


文章目录
- 1. 演示项目版本
- 2. Maven 依赖
- 3. RESTful 网络服务 URL 和 CRUD 操作的响应状态代码
- 4. RESTful 网络服务访问地址
- 5. 使用 RestTemplate 的 RESTful Web 服务客户端
- 6. @GetMapping
- 7. @PostMapping
- 8. @PutMapping
- 9. @DeleteMapping
- 10. 配置接收内容和返回内容的介质类型
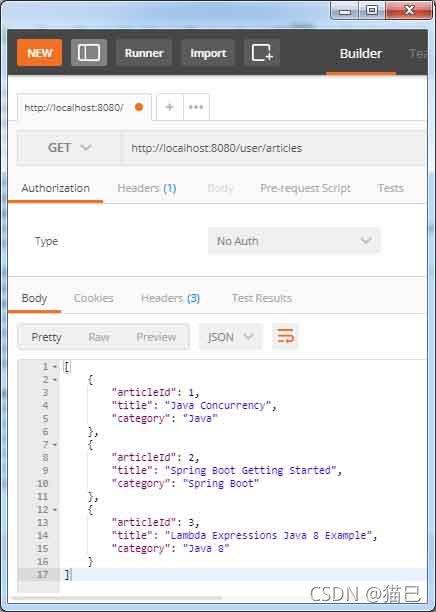
- 11. RESTful 网络服务的 JSON 响应
- 12. RESTful 网络服务 XML 响应
- 13. CORS支持
- 14. 完整实例
- 15. 使用 RestTemplate 的客户端代码
- 16. 测试应用
- 参考文献
- 源码下载
本页将介绍Spring Boot RESTful网络服务CRUD的例子。REST是指REpresentational State Transfer。REST或RESTful网络服务在互联网上的软件应用程序之间提供通信媒介。REST使用统一和预定义的无状态操作集。RESTful网络服务可以返回和接收JSON、XML和其他媒体类型。为了创建一个Spring RESTful Web服务端点,我们需要创建一个带有@RestController注释的Spring控制器。Spring提供了@RequestMapping、@GetMapping、@PostMapping、@PutMapping、@DeleteMapping和@PatchMapping注解,将请求路径与Spring控制器方法绑定。为了支持CORS,Spring提供了@CrossOrigin注解,可以在类和方法层面进行注解。在Spring Boot应用程序中,为了启用RESTful Web服务,我们需要在构建文件中包含spring-boot-starter-web。它默认配置了Jackson JSON库,即jackson-databind。当Spring Boot RESTful Web服务在类路径中检测到Jackson JSON库时,会产生JSON响应;如果检测到Jackson XML库,则会产生XML响应。对于Jackson XML库,我们需要在构建文件中包含jackson-dataformat-xml。Spring提供了RestTemplate类来创建RESTful Web服务客户端应用程序。在这个页面上,我们将使用CrudRepository和MySQL创建Spring RESTful Web服务CRUD的例子,并一步步详细说明。
1. 演示项目版本
- Java 9
- Spring 5.0.5.RELEASE
- Spring Boot 2.0.1.RELEASE
- Maven 3.5.2
- MySQL 5.5
- Eclipse Oxygen
2. Maven 依赖
为了使用Spring Boot RESTful网络服务,我们需要提供spring-boot-starter-web的Maven依赖项,如下所示。
<dependency>
  <groupId>org.springframework.boot</groupId>
  <artifactId>spring-boot-starter-web</artifactId>
</dependency>
上述Maven依赖项默认引用了Jackson JSON库,即jackson-databind。Spring Boot REST默认给出JSON响应,因为它在类路径中检测到了jackson-databind。
为了在Spring Boot REST中支持XML响应,我们需要在Spring-boot-starter-web中提供jackson-dataformat-xml库。找到Maven的依赖关系。
<dependency>
  <groupId>org.springframework.boot</groupId>
  <artifactId>spring-boot-starter-web</artifactId>
</dependency>
<dependency>
  <groupId>com.fasterxml.jackson.dataformat</groupId>
  <artifactId>jackson-dataformat-xml</artifactId>
  <version>2.9.4</version>
</dependency>
在pom.xml中包括上述依赖关系,我们就可以获得XML响应了。
3. RESTful 网络服务 URL 和 CRUD 操作的响应状态代码
在我们的RESTful网络服务CRUD例子中,我们将使用以下HTTP网址、HTTP方法和响应状态代码。
1. Create :
HTTP方法: POST, 网址: /user/article
HTTP响应状态代码: 201 CREATED和409 CONFLICT
2. Read :
HTTP方法: GET, 网址: /user/article/{id}(根据ID获取文章)
HTTP方法: GET, 网址: /user/articles(获取所有文章)
HTTP响应状态代码: 200 OK
3. Update :
HTTP方法: PUT, 网址: /user/article
HTTP响应状态代码: 200 OK
4. Delete :
HTTP方法: DELETE, 网址: /user/article/{id}
HTTP响应状态代码: 204 NO CONTENT
4. RESTful 网络服务访问地址
为了创建一个RESTful Web服务访问地址,我们需要创建一个带有@RestController注释的Spring控制器。在这里,我们已经为CRUD操作创建了访问地址。我们已经创建了不同的Web服务方法来处理创建、读取、更新和删除操作,如下所示。
ArticleController.java
@RestController
@RequestMapping("user")
@CrossOrigin(origins = {"http://localhost:4200"})
public class ArticleController {
	@Autowired
	private IArticleService articleService;

	//Fetches article by id
	@GetMapping("article/{id}")
	public ResponseEntity<ArticleInfo> getArticleById(@PathVariable("id") Integer id) {
		ArticleInfo ob = new ArticleInfo();
		BeanUtils.copyProperties(articleService.getArticleById(id), ob);
		return new ResponseEntity<ArticleInfo>(ob, HttpStatus.OK);
	}

	//Fetches all articles
	@GetMapping(value="articles")
	public ResponseEntity<List<ArticleInfo>> getAllArticles() {
		List<ArticleInfo> responseArticleList = new ArrayList<>();
		List<Article> articleList = articleService.getAllArticles();
		for (int i = 0; i < articleList.size(); i++) {
			ArticleInfo ob = new ArticleInfo();
		    BeanUtils.copyProperties(articleList.get(i), ob);
		    responseArticleList.add(ob);
		}
		return new ResponseEntity<List<ArticleInfo>>(responseArticleList, HttpStatus.OK);
	}

	//Creates a new article
	@PostMapping("article")
	public ResponseEntity<Void> addArticle(@RequestBody ArticleInfo articleInfo, UriComponentsBuilder builder) {
		Article article = new Article();
		BeanUtils.copyProperties(articleInfo, article);
                boolean flag = articleService.addArticle(article);
                if (flag == false) {
        	   return new ResponseEntity<Void>(HttpStatus.CONFLICT);
                }
                HttpHeaders headers = new HttpHeaders();
                headers.setLocation(builder.path("/article/{id}").buildAndExpand(article.getArticleId()).toUri());
                return new ResponseEntity<Void>(headers, HttpStatus.CREATED);
	}

	//Updates article
	@PutMapping("article")
	public ResponseEntity<ArticleInfo> updateArticle(@RequestBody ArticleInfo articleInfo) {
		Article article = new Article();
		BeanUtils.copyProperties(articleInfo, article);
		articleService.updateArticle(article);

		ArticleInfo ob = new ArticleInfo();
		BeanUtils.copyProperties(article, ob);
		return new ResponseEntity<ArticleInfo>(ob, HttpStatus.OK);
	}

	//Deletes article by id
	@DeleteMapping("article/{id}")
	public ResponseEntity<Void> deleteArticle(@PathVariable("id") Integer id) {
		articleService.deleteArticle(id);
		return new ResponseEntity<Void>(HttpStatus.NO_CONTENT);
	}
}
@RestController: 它在类的层面上被用来制作RESTful网络服务访问地址。@RestController是@Controller和@ResponseBody的组合。
@CrossOrigin: 它用于支持CORS,允许在类和方法层面的跨源请求。
@RequestMapping: 它将网络请求映射到REST网络服务访问地址的方法上,提供灵活的方法签名。
@GetMapping: 它是带有HTTP GET方法的@RequestMapping。
@PostMapping: 它是带有HTTP POST方法的@RequestMapping。
@PutMapping: 它是带有HTTP PUT方法的@RequestMapping。
@DeleteMapping:它是带有HTTP DELETE方法的@RequestMapping。
@PatchMapping: 它是带有HTTP PATCH方法的@RequestMapping。
@PathVariable: 它表示一个方法参数被绑定到一个URI模板变量。
@RequestBody: 它与方法参数一起被用来绑定网络请求的主体。
@RequestParam: 它与方法参数一起使用,用于绑定网络请求参数。
ResponseEntity: 它是HttpEntity的扩展,表示HTTP请求或响应实体,由headers和body组成。
UriComponentsBuilder: 它是UriComponents的构建器,表示一个不可变的URI组件的集合。
注解@RequestMapping、@GetMapping、@PostMapping、@PutMapping、@DeleteMapping和@PatchMapping都有以下可选元素。
consumes: 它定义了映射请求的接收值媒体类型数组。
produces: 它定义了映射请求的返回值媒体类型的数组。
headers: 它定义了可接受的映射请求头。
params: 它定义了映射请求的参数,缩小了主映射的范围。
path: 它在servlet环境中定义了路径映射URI。
name: 它为该映射指定一个名称。
value: 它定义了该注释所表达的主要映射。
5. 使用 RestTemplate 的 RESTful Web 服务客户端
RestTemplate是同步客户端HTTP访问的核心类。RestTemplate使用HTTP方法与RESTful web服务进行通信。找到一些RestTemplate的方法。
getForObject: 通过在指定的URL上使用HTTP GET来检索数据。
postForLocation: 使用给定的对象以HTTP POST的方式在URI模板上创建一个新资源。
put: 使用HTTP PUT方法将给定对象创建或更新资源到URI模板。
delete: 删除指定URI上的资源。
exchange: 它可以对给定的URI模板执行任何HTTP方法。它返回ResponseEntity。
找到执行RestTemplate.exchange方法的例子。
HttpHeaders headers = new HttpHeaders();
headers.setContentType(MediaType.APPLICATION_JSON);

String url = "http://localhost:8080/user/articles";

RestTemplate restTemplate = new RestTemplate();
HttpEntity<String> requestEntity = new HttpEntity<String>(headers);
ResponseEntity<Article[]> responseEntity = restTemplate.exchange(url, HttpMethod.GET, requestEntity, Article[].class);
在上面的代码中,我们正在使用HTTP GET方法的交换来获取所有文章类型的数据。在我们的演示程序中,RestClientUtil.java包含客户端代码。
6. @GetMapping
在RESTful Web服务中,@GetMapping被用来创建获取资源的访问地址。@GetMapping是带有HTTP GET方法的@RequestMapping。我们创建了一个Web服务方法,使用@GetMapping按id获取数据。
@GetMapping("article/{id}")
public ResponseEntity<ArticleInfo> getArticleById(@PathVariable("id") Integer id) {
   ArticleInfo ob = new ArticleInfo();
   BeanUtils.copyProperties(articleService.getArticleById(id), ob);
   return new ResponseEntity<ArticleInfo>(ob, HttpStatus.OK);
}
假设我们想获取id为101的数据。RESTful网络服务的URL将是/user/article/101,它将监听HTTP GET方法。上述网络服务方法将以HTTP状态200 (Ok)返回该ID的数据。
客户端代码:为了创建上述RESTful网络服务的客户端代码,我们将使用RestTemplate的exchange方法来接收HTTP GET方法。
public void getArticleByIdDemo() {
  HttpHeaders headers = new HttpHeaders();
  headers.setContentType(MediaType.APPLICATION_JSON);
  RestTemplate restTemplate = new RestTemplate();
  String url = "http://localhost:8080/user/article/{id}";
  HttpEntity<String> requestEntity = new HttpEntity<String>(headers);
  ResponseEntity<Article> responseEntity = restTemplate.exchange(url, HttpMethod.GET, requestEntity, Article.class, 101);
  Article article = responseEntity.getBody();
  System.out.println("Id:"+article.getArticleId()+", Title:"+article.getTitle()
                 +", Category:"+article.getCategory());
}
7. @PostMapping
在RESTful Web服务中,@PostMapping被用来创建一个创建资源的Web服务端点。@PostMapping是带有HTTP POST方法的@RequestMapping。我们使用@PostMapping创建了一个Web服务方法来创建资源,如下所示。
@PostMapping("article")
public ResponseEntity<Void> addArticle(@RequestBody ArticleInfo articleInfo, UriComponentsBuilder builder) {
  Article article = new Article();
  BeanUtils.copyProperties(articleInfo, article);
  boolean flag = articleService.addArticle(article);
  if (flag == false) {
     return new ResponseEntity<Void>(HttpStatus.CONFLICT);
  }
  HttpHeaders headers = new HttpHeaders();
  headers.setLocation(builder.path("/article/{id}").buildAndExpand(article.getArticleId()).toUri());
  return new ResponseEntity<Void>(headers, HttpStatus.CREATED);
}
为了保存一个资源,RESTful网络服务的URL将是/user/article,它将侦听HTTP POST方法。在上面的代码中,我们正在创建资源,并以HTTP状态201 (Created)返回创建数据的location。如果该资源已经存在,我们将返回HTTP状态409 (Conflict)。
客户端代码:为了创建客户端代码,对于上述RESTful网络服务,我们使用RestTemplate的postForLocation方法。
public void addArticleDemo() {
   HttpHeaders headers = new HttpHeaders();
   headers.setContentType(MediaType.APPLICATION_JSON);
   RestTemplate restTemplate = new RestTemplate();
   String url = "http://localhost:8080/user/article";
   Article objArticle = new Article();
   objArticle.setTitle("Spring REST Security using Hibernate");
   objArticle.setCategory("Spring");
   HttpEntity<Article> requestEntity = new HttpEntity<Article>(objArticle, headers);
   URI uri = restTemplate.postForLocation(url, requestEntity);
   System.out.println(uri.getPath());
}
8. @PutMapping
在RESTful网络服务中,@PutMapping被用来创建一个可以创建或更新资源的网络服务访问地址。@PutMapping是带有HTTP PUT方法的@RequestMapping。我们使用@PutMapping创建了一个Web服务方法来更新资源,如下所示。
@PutMapping("article")
  public ResponseEntity<ArticleInfo> updateArticle(@RequestBody ArticleInfo articleInfo) {
  Article article = new Article();
  BeanUtils.copyProperties(articleInfo, article);
  articleService.updateArticle(article);

  ArticleInfo ob = new ArticleInfo();
  BeanUtils.copyProperties(article, ob);
  return new ResponseEntity<ArticleInfo>(ob, HttpStatus.OK);
}
要更新一个资源,网络服务的URL是/user/article,它将监听HTTP PUT方法。在上面的代码中,我们正在更新一个资源,并以HTTP状态200 (OK)返回更新的资源。
客户端代码:为了创建客户端代码,对于上述RESTful web服务,我们使用RestTemplate的put方法。
public void updateArticleDemo() {
  HttpHeaders headers = new HttpHeaders();
  headers.setContentType(MediaType.APPLICATION_JSON);
  RestTemplate restTemplate = new RestTemplate();
  String url = "http://localhost:8080/user/article";
  Article objArticle = new Article();
  objArticle.setArticleId(1);
  objArticle.setTitle("Update:Java Concurrency");
  objArticle.setCategory("Java");
  HttpEntity<Article> requestEntity = new HttpEntity<Article>(objArticle, headers);
  restTemplate.put(url, requestEntity);
}
9. @DeleteMapping
在RESTful Web服务中,@DeleteMapping被用来创建一个删除资源的Web服务访问地址。@DeleteMapping是带有HTTP DELETE方法的@RequestMapping。我们使用@DeleteMapping创建了一个web服务方法来删除一个资源,如下所示。
@DeleteMapping("article/{id}")
public ResponseEntity<Void> deleteArticle(@PathVariable("id") Integer id) {
   articleService.deleteArticle(id);
   return new ResponseEntity<Void>(HttpStatus.NO_CONTENT);
}
假设我们想删除一个ID为101的资源。网络服务的URL将是/user/article/101,它将监听HTTP DELETE方法。在上面的代码中,我们正在删除一个给定id的资源并返回HTTP状态204 (No Content)。
客户端代码:为了创建客户端代码,对于上述RESTful网络服务,我们使用RestTemplate的exchange方法和HTTP DELETE方法。
public void deleteArticleDemo() {
  HttpHeaders headers = new HttpHeaders();
  headers.setContentType(MediaType.APPLICATION_JSON);
  RestTemplate restTemplate = new RestTemplate();
  String url = "http://localhost:8080/user/article/{id}";
  HttpEntity<Article> requestEntity = new HttpEntity<Article>(headers);
  restTemplate.exchange(url, HttpMethod.DELETE, requestEntity, Void.class, 101);
}
10. 配置接收内容和返回内容的介质类型
一个Web服务方法默认返回值和接收值主要的媒体类型。我们可以限制只接收值和返回值配置的媒体类型。注解@RequestMapping、@GetMapping、@PostMapping、@PutMapping、@DeleteMapping和@PatchMapping都有可选的元素作为produces和consumes,并配置了所需的媒体类型。查找示例代码。
@GetMapping(value= "article/{id}", produces= { MediaType.APPLICATION_XML_VALUE },
	consumes= { MediaType.APPLICATION_JSON_VALUE })
public ResponseEntity<ArticleInfo> getArticleById(@PathVariable("id") Integer id) {
  ArticleInfo ob = new ArticleInfo();
  BeanUtils.copyProperties(articleService.getArticleById(id), ob);
  return new ResponseEntity<ArticleInfo>(ob, HttpStatus.OK);
}
现在,上述Web服务方法的返回值类型只能是application/xml和在接收内容类型只能是application/json媒体类型。
如果我们想在类的层面上配置媒体类型,这将适用于它的所有网络服务方法,我们可以使用@RequestMapping来实现,如下所示。
@RestController
@RequestMapping(value= "user", produces= { MediaType.APPLICATION_XML_VALUE },
    consumes= { MediaType.APPLICATION_JSON_VALUE })
public class ArticleController {
------
}
11. RESTful 网络服务的 JSON 响应
Spring使用Jackson JSON库来自动将资源类型的实例编入JSON。如果类路径中存在Jackson JSON库,即jackson-databind,我们的Spring RESTful Web服务应用程序将默认产生JSON响应。在Spring Boot应用程序中,spring-boot-starter-web库默认包括jackson-databind库。要使用Jackson JSON忽略JSON响应中的空值,我们需要在我们的资源类中使用@JsonInclude。
ArticleInfo.java
public class ArticleInfo {
    @JsonInclude(Include.NON_NULL)
    private long articleId;

    @JsonInclude(Include.NON_NULL)
    private String title;

    @JsonInclude(Include.NON_NULL)
    private String category;

    //Getters and Setters
}
我们的Web服务方法可以被限制为只在返回时进行JSON响应,使用诸如@GetMapping等映射注释的produces元素。
@GetMapping(value= "article/{id}", produces= { MediaType.APPLICATION_JSON_VALUE })
public ResponseEntity<ArticleInfo> getArticleById(@PathVariable("id") Integer id) {
  ArticleInfo ob = new ArticleInfo();
  BeanUtils.copyProperties(articleService.getArticleById(id), ob);
  return new ResponseEntity<ArticleInfo>(ob, HttpStatus.OK);
}
要为JSON配置HttpMessageConverter,我们可以按以下方式创建JavaConfig。
AppConfig.java
@Configuration
@ComponentScan("com.concretepage")
@EnableWebMvc
public class AppConfig implements WebMvcConfigurer {
    @Override
    public void configureMessageConverters(List<HttpMessageConverter<?>> converters) {
        Jackson2ObjectMapperBuilder builder = new Jackson2ObjectMapperBuilder();
        builder.indentOutput(true);
        converters.add(new MappingJackson2HttpMessageConverter(builder.build()));
    }
}
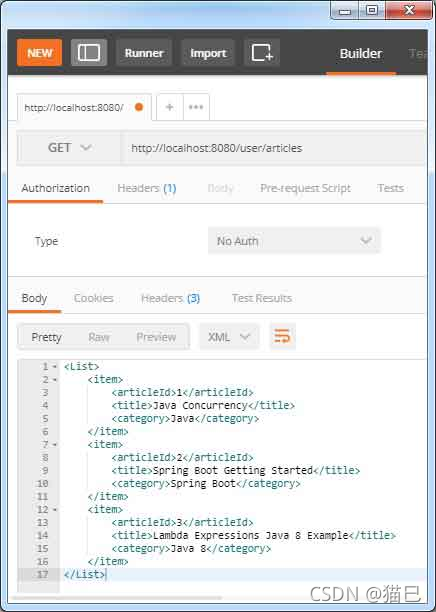
12. RESTful 网络服务 XML 响应
为了通过Spring RESTful Web服务获得XML响应,我们需要在应用程序的类路径中包含Jackson XML库,即jackson-dataformat-xml库。找到jackson-dataformat-xml库的maven依赖项。
<dependency>
  <groupId>com.fasterxml.jackson.dataformat</groupId>
  <artifactId>jackson-dataformat-xml</artifactId>
  <version>2.9.4</version>
</dependency>
我们只需在pom.xml中加入上述Maven依赖项,就可以获得XML响应了。我们可以在资源类中使用@JacksonXmlProperty注解来改变本地名称等。
ArticleInfo.java
@JacksonXmlRootElement(localName="article", namespace="com.concretepage")
public class ArticleInfo {
    @JacksonXmlProperty(localName="articleId")
    private long articleId;

    @JacksonXmlProperty(localName="title")
    private String title;

    @JacksonXmlProperty(localName="category")
    private String category;

    //Getters and Setters
}
我们的Web服务方法可以被限制为只产生XML响应,使用诸如@GetMapping的映射注解的produces元素。
@GetMapping(value= "article/{id}", produces= { MediaType.APPLICATION_XML_VALUE })
public ResponseEntity<ArticleInfo> getArticleById(@PathVariable("id") Integer id) {
  ArticleInfo ob = new ArticleInfo();
  BeanUtils.copyProperties(articleService.getArticleById(id), ob);
  return new ResponseEntity<ArticleInfo>(ob, HttpStatus.OK);
}
要为XML配置HttpMessageConverter,我们可以按以下方式创建JavaConfig。
AppConfig.java
@Configuration
@ComponentScan("com.concretepage")
@EnableWebMvc
public class AppConfig extends WebMvcConfigurerAdapter {
    @Override
    public void configureMessageConverters(List<HttpMessageConverter<?>> converters) {
        Jackson2ObjectMapperBuilder builder = Jackson2ObjectMapperBuilder.xml();
        builder.indentOutput(true);
        converters.add(new MappingJackson2XmlHttpMessageConverter(builder.build()));
    }
}
13. CORS支持
为了支持CORS,Spring提供了@CrossOrigin注解。这个注解可以在RESTful Web服务控制器的类级和方法级使用。查找示例代码以在类级别使用它。
@RestController
@RequestMapping("user")
@CrossOrigin(origins = {"http://localhost:4200"})
public class ArticleController {
------
}
在上面的代码中,我们已经将支持CORS的origin配置为http://localhost:4200 。这意味着只能运行在网址http://localhost:4200的网络应用程序访问我们的RESTful网络服务程序。
14. 完整实例
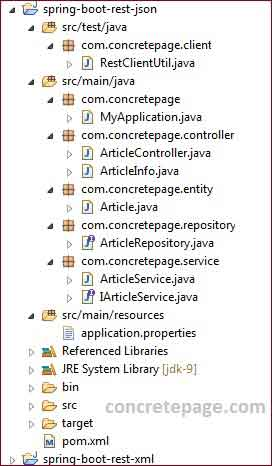
现在我们将在这里提供我们的演示应用程序的完整代码。我们将在这里执行Spring REST操作。我们使用MySQL数据库,对于数据库查询,我们使用CrudRepository。我们已经创建了两个演示应用程序,一个是JSON响应,另一个是XML响应。在这里,我们提供了JSON响应应用程序的代码,并给出了XML响应所需的修改。在文章的最后,我们提供了两个应用程序的源代码下载链接。
14.1 项目结构
14.2 Maven 依赖
pom.xml
<?xml version="1.0" encoding="UTF-8"?>
<project xmlns="http://maven.apache.org/POM/4.0.0" xmlns:xsi="http://www.w3.org/2001/XMLSchema-instance"
	xsi:schemaLocation="http://maven.apache.org/POM/4.0.0 http://maven.apache.org/xsd/maven-4.0.0.xsd">
	<modelVersion>4.0.0</modelVersion>
	<groupId>com.concretepage</groupId>
	<artifactId>spring-boot-demo</artifactId>
	<version>0.0.1-SNAPSHOT</version>
	<packaging>jar</packaging>
	<name>spring-boot-demo</name>
	<description>Spring Boot Application</description>
	<parent>
	    <groupId>org.springframework.boot</groupId>
  	    <artifactId>spring-boot-starter-parent</artifactId>
	    <version>2.0.1.RELEASE</version>
 	    <relativePath/>
	</parent>
	<properties>
	    <java.version>9</java.version>
	</properties>
	<dependencies>
	  <dependency>
		 <groupId>org.springframework.boot</groupId>
		 <artifactId>spring-boot-starter-web</artifactId>
	  </dependency>
	  <dependency>
		 <groupId>org.springframework.boot</groupId>
		 <artifactId>spring-boot-starter-data-jpa</artifactId>
	  </dependency>
	  <dependency>
		 <groupId>mysql</groupId>
		 <artifactId>mysql-connector-java</artifactId>
		 <version>6.0.5</version>
	  </dependency>
	  <dependency>
		 <groupId>javax.xml.bind</groupId>
		 <artifactId>jaxb-api</artifactId>
		 <version>2.3.0</version>
	  </dependency>
          <dependency>
                 <groupId>org.springframework.boot</groupId>
                 <artifactId>spring-boot-devtools</artifactId>
                 <optional>true</optional>
          </dependency>
	</dependencies>
	<build>
	  <plugins>
		 <plugin>
			<groupId>org.springframework.boot</groupId>
			<artifactId>spring-boot-maven-plugin</artifactId>
		 </plugin>
	  </plugins>
	</build>
</project>
找到maven文件中配置的spring boot启动器的描述。
spring-boot-starter-parent: 用于依赖关系管理的父POM。
spring-boot-starter-web: 构建Web、REST应用程序的启动器。它使用Tomcat服务器作为默认的嵌入式服务器。
spring-boot-starter-data-jpa: 具备hibernate的spring data JPA的启动程序。
spring-boot-devtools: 它提供了开发者工具。这些工具在应用开发模式中很有帮助。开发者工具的一个特点是在代码发生任何变化时自动重新启动服务器。
spring-boot-maven-plugin: 它用于创建应用程序的可执行JAR。
上述Maven文件将给出JSON响应。要获得XML响应,我们需要添加以下依赖。
<dependency>
  <groupId>com.fasterxml.jackson.dataformat</groupId>
  <artifactId>jackson-dataformat-xml</artifactId>
  <version>2.9.4</version>
</dependency>
jackson-dataformat-xml: 提供Jackson XML库。
14.3 MySQL 数据库
CREATE DATABASE IF NOT EXISTS `concretepage`;
USE `concretepage`;

CREATE TABLE IF NOT EXISTS `articles` (
  `article_id` bigint(5) NOT NULL AUTO_INCREMENT,
  `title` varchar(200) NOT NULL,
  `category` varchar(100) NOT NULL,
  PRIMARY KEY (`article_id`)
) ENGINE=InnoDB;

INSERT INTO `articles` (`article_id`, `title`, `category`) VALUES
	(1, 'Java Concurrency', 'Java'),
	(2, 'Spring Boot Getting Started', 'Spring Boot'),
	(3, 'Lambda Expressions Java 8 Example', 'Java 8');
14.4 Repository 和 Service
ArticleRepository.java
package com.concretepage.repository;
import java.util.List;
import org.springframework.data.repository.CrudRepository;
import com.concretepage.entity.Article;
public interface ArticleRepository extends CrudRepository<Article, Long>  {
    List<Article> findByTitle(String title);
    List<Article> findDistinctByCategory(String category);
    List<Article> findByTitleAndCategory(String title, String category);
}
Article.java
package com.concretepage.entity;
import java.io.Serializable;
import javax.persistence.Column;
import javax.persistence.Entity;
import javax.persistence.GeneratedValue;
import javax.persistence.GenerationType;
import javax.persistence.Id;
import javax.persistence.Table;
@Entity
@Table(name="articles")
public class Article implements Serializable {
	private static final long serialVersionUID = 1L;
	@Id
	@GeneratedValue(strategy=GenerationType.AUTO)
	@Column(name="article_id")
        private long articleId;
	@Column(name="title")
        private String title;
	@Column(name="category")
	private String category;
	public long getArticleId() {
		return articleId;
	}
	public void setArticleId(long articleId) {
		this.articleId = articleId;
	}
	public String getTitle() {
		return title;
	}
	public void setTitle(String title) {
		this.title = title;
	}
	public String getCategory() {
		return category;
	}
	public void setCategory(String category) {
		this.category = category;
	}
}
IArticleService.java
package com.concretepage.service;
import java.util.List;
import com.concretepage.entity.Article;
public interface IArticleService {
     List<Article> getAllArticles();
     Article getArticleById(long articleId);
     boolean addArticle(Article article);
     void updateArticle(Article article);
     void deleteArticle(int articleId);
}
ArticleService.java
package com.concretepage.service;
import java.util.ArrayList;
import java.util.List;
import org.springframework.beans.factory.annotation.Autowired;
import org.springframework.stereotype.Service;
import com.concretepage.entity.Article;
import com.concretepage.repository.ArticleRepository;
@Service
public class ArticleService implements IArticleService {
	@Autowired
	private ArticleRepository articleRepository;
	@Override
	public Article getArticleById(long articleId) {
		Article obj = articleRepository.findById(articleId).get();
		return obj;
	}
	@Override
	public List<Article> getAllArticles(){
		List<Article> list = new ArrayList<>();
		articleRepository.findAll().forEach(e -> list.add(e));
		return list;
	}
	@Override
	public synchronized boolean addArticle(Article article){
	        List<Article> list = articleRepository.findByTitleAndCategory(article.getTitle(), article.getCategory());
                  if (list.size() > 0) {
    	          return false;
                } else {
    	          articleRepository.save(article);
    	          return true;
                }
	}
	@Override
	public void updateArticle(Article article) {
		articleRepository.save(article);
	}
	@Override
	public void deleteArticle(int articleId) {
		articleRepository.delete(getArticleById(articleId));
	}
}
14.5 application.properties
数据源、JPA属性和日志等需要在位于Spring boot应用程序类路径中的application.properties文件中进行配置。这些属性将被Spring boot自动读取。
application.properties
spring.datasource.url=jdbc:mysql://localhost:3306/concretepage
spring.datasource.username=root
spring.datasource.password=cp

spring.datasource.hikari.connection-timeout=20000
spring.datasource.hikari.minimum-idle=5
spring.datasource.hikari.maximum-pool-size=12
spring.datasource.hikari.idle-timeout=300000
spring.datasource.hikari.max-lifetime=1200000

spring.jpa.properties.hibernate.dialect=org.hibernate.dialect.MySQLDialect
spring.jpa.properties.hibernate.id.new_generator_mappings=false
spring.jpa.properties.hibernate.format_sql=true

logging.level.org.hibernate.SQL=DEBUG
logging.level.org.hibernate.type.descriptor.sql.BasicBinder=TRACE
spring-boot-starter-jdbc和spring-boot-starter-data-jpa默认引入HikariCP依赖,spring.datasource.type属性默认值为HikariDataSource。以spring.datasource.*开头的数据源属性将被Spring boot JPA自动读取。要改变Hibernate属性,我们将使用前缀spring.jpa.properties.*与Hibernate属性名称。在给定的数据源URL的基础上,Spring Boot可以自动识别数据源驱动类。所以我们不需要配置驱动类。
14.6 创建 Controller
ArticleController.java
package com.concretepage.controller;
import java.util.ArrayList;
import java.util.List;
import org.springframework.beans.BeanUtils;
import org.springframework.beans.factory.annotation.Autowired;
import org.springframework.http.HttpHeaders;
import org.springframework.http.HttpStatus;
import org.springframework.http.MediaType;
import org.springframework.http.ResponseEntity;
import org.springframework.web.bind.annotation.CrossOrigin;
import org.springframework.web.bind.annotation.DeleteMapping;
import org.springframework.web.bind.annotation.GetMapping;
import org.springframework.web.bind.annotation.PathVariable;
import org.springframework.web.bind.annotation.PostMapping;
import org.springframework.web.bind.annotation.PutMapping;
import org.springframework.web.bind.annotation.RequestBody;
import org.springframework.web.bind.annotation.RequestMapping;
import org.springframework.web.bind.annotation.RestController;
import org.springframework.web.util.UriComponentsBuilder;
import com.concretepage.entity.Article;
import com.concretepage.service.IArticleService;
@RestController
@RequestMapping("user")
@CrossOrigin(origins = {"http://localhost:4200"})
public class ArticleController {
	@Autowired
	private IArticleService articleService;

	//Fetches article by id
	@GetMapping(value= "article/{id}", produces= { MediaType.APPLICATION_JSON_VALUE })
	public ResponseEntity<ArticleInfo> getArticleById(@PathVariable("id") Integer id) {
		ArticleInfo ob = new ArticleInfo();
		BeanUtils.copyProperties(articleService.getArticleById(id), ob);
		return new ResponseEntity<ArticleInfo>(ob, HttpStatus.OK);
	}

	//Fetches all articles
	@GetMapping(value= "articles", produces= { MediaType.APPLICATION_JSON_VALUE })
	public ResponseEntity<List<ArticleInfo>> getAllArticles() {
		List<ArticleInfo> responseArticleList = new ArrayList<>();
		List<Article> articleList = articleService.getAllArticles();
		for (int i = 0; i < articleList.size(); i++) {
			ArticleInfo ob = new ArticleInfo();
		    BeanUtils.copyProperties(articleList.get(i), ob);
		    responseArticleList.add(ob);
		}
		return new ResponseEntity<List<ArticleInfo>>(responseArticleList, HttpStatus.OK);
	}

	//Creates a new article
	@PostMapping(value= "article", produces= { MediaType.APPLICATION_JSON_VALUE })
	public ResponseEntity<Void> addArticle(@RequestBody ArticleInfo articleInfo, UriComponentsBuilder builder) {
		Article article = new Article();
		BeanUtils.copyProperties(articleInfo, article);
                boolean flag = articleService.addArticle(article);
                if (flag == false) {
        	   return new ResponseEntity<Void>(HttpStatus.CONFLICT);
                }
                HttpHeaders headers = new HttpHeaders();
                headers.setLocation(builder.path("/article/{id}").buildAndExpand(article.getArticleId()).toUri());
                return new ResponseEntity<Void>(headers, HttpStatus.CREATED);
	}

	//Updates article
	@PutMapping(value= "article", produces= { MediaType.APPLICATION_JSON_VALUE })
	public ResponseEntity<ArticleInfo> updateArticle(@RequestBody ArticleInfo articleInfo) {
		Article article = new Article();
		BeanUtils.copyProperties(articleInfo, article);
		articleService.updateArticle(article);

		ArticleInfo ob = new ArticleInfo();
		BeanUtils.copyProperties(article, ob);
		return new ResponseEntity<ArticleInfo>(ob, HttpStatus.OK);
	}

	//Deletes article by id
	@DeleteMapping(value= "article/{id}", produces= { MediaType.APPLICATION_JSON_VALUE })
	public ResponseEntity<Void> deleteArticle(@PathVariable("id") Integer id) {
		articleService.deleteArticle(id);
		return new ResponseEntity<Void>(HttpStatus.NO_CONTENT);
	}
}
在上面的控制器中,我们将返回值的媒体类型限制为MediaType.APPLICATION_JSON_VALUE,在我们的JSON响应演示应用程序中。在我们的XML响应演示应用程序中,我们正在使用返回值媒体类型为MediaType.APPLICATION_XML_VALUE。
找到JSON的ArticleInfo.java。
ArticleInfo.java
package com.concretepage.controller;
import com.fasterxml.jackson.annotation.JsonInclude;
import com.fasterxml.jackson.annotation.JsonInclude.Include;
public class ArticleInfo {
	@JsonInclude(Include.NON_NULL)
        private long articleId;
	@JsonInclude(Include.NON_NULL)
        private String title;
	@JsonInclude(Include.NON_NULL)
        private String category;
	public long getArticleId() {
		return articleId;
	}
	public void setArticleId(long articleId) {
		this.articleId = articleId;
	}
	public String getTitle() {
		return title;
	}
	public void setTitle(String title) {
		this.title = title;
	}
	public String getCategory() {
		return category;
	}
	public void setCategory(String category) {
		this.category = category;
	}
}
找到XML的ArticleInfo.java。
ArticleInfo.java
package com.concretepage.controller;
import com.fasterxml.jackson.dataformat.xml.annotation.JacksonXmlProperty;
import com.fasterxml.jackson.dataformat.xml.annotation.JacksonXmlRootElement;
@JacksonXmlRootElement(localName="article", namespace="com.concretepage")
public class ArticleInfo {
	@JacksonXmlProperty(localName="articleId")
        private long articleId;
	@JacksonXmlProperty(localName="title")
        private String title;
	@JacksonXmlProperty(localName="category")
        private String category;
	public long getArticleId() {
		return articleId;
	}
	public void setArticleId(long articleId) {
		this.articleId = articleId;
	}
	public String getTitle() {
		return title;
	}
	public void setTitle(String title) {
		this.title = title;
	}
	public String getCategory() {
		return category;
	}
	public void setCategory(String category) {
		this.category = category;
	}
}
14.7 使用 SpringApplication 的 Main 类
为了运行Spring Boot应用程序,我们需要使用SpringApplication创建一个带有Main方法的类,并以@SpringBootApplication作为注释,如下所示。
MyApplication.java
package com.concretepage;
import org.springframework.boot.SpringApplication;
import org.springframework.boot.autoconfigure.SpringBootApplication;
@SpringBootApplication
public class MyApplication {
	public static void main(String[] args) {
		SpringApplication.run(MyApplication.class, args);
        }
}
@SpringBootApplication注解是@Configuration、@EnableAutoConfiguration和@ComponentScan注解的组合。
15. 使用 RestTemplate 的客户端代码
RestClientUtil.java
package com.concretepage.client;
import java.net.URI;
import org.springframework.http.HttpEntity;
import org.springframework.http.HttpHeaders;
import org.springframework.http.HttpMethod;
import org.springframework.http.MediaType;
import org.springframework.http.ResponseEntity;
import org.springframework.web.client.RestTemplate;
import com.concretepage.entity.Article;

public class RestClientUtil {
    public void getArticleByIdDemo() {
    	HttpHeaders headers = new HttpHeaders();
    	headers.setContentType(MediaType.APPLICATION_JSON);
        RestTemplate restTemplate = new RestTemplate();
	String url = "http://localhost:8080/user/article/{id}";
        HttpEntity<String> requestEntity = new HttpEntity<String>(headers);
        ResponseEntity<Article> responseEntity = restTemplate.exchange(url, HttpMethod.GET, requestEntity, Article.class, 1);
        Article article = responseEntity.getBody();
        System.out.println("Id:"+article.getArticleId()+", Title:"+article.getTitle()
                 +", Category:"+article.getCategory());
    }
    public void getAllArticlesDemo() {
	HttpHeaders headers = new HttpHeaders();
	headers.setContentType(MediaType.APPLICATION_JSON);
        RestTemplate restTemplate = new RestTemplate();
	String url = "http://localhost:8080/user/articles";
        HttpEntity<String> requestEntity = new HttpEntity<String>(headers);
        ResponseEntity<Article[]> responseEntity = restTemplate.exchange(url, HttpMethod.GET, requestEntity, Article[].class);
        Article[] articles = responseEntity.getBody();
        for(Article article : articles) {
              System.out.println("Id:"+article.getArticleId()+", Title:"+article.getTitle()
                      +", Category: "+article.getCategory());
        }
    }
    public void addArticleDemo() {
    	HttpHeaders headers = new HttpHeaders();
    	headers.setContentType(MediaType.APPLICATION_JSON);
        RestTemplate restTemplate = new RestTemplate();
	String url = "http://localhost:8080/user/article";
	Article objArticle = new Article();
	objArticle.setTitle("Spring REST Security using Hibernate");
	objArticle.setCategory("Spring");
        HttpEntity<Article> requestEntity = new HttpEntity<Article>(objArticle, headers);
        URI uri = restTemplate.postForLocation(url, requestEntity);
        System.out.println(uri.getPath());
    }
    public void updateArticleDemo() {
    	HttpHeaders headers = new HttpHeaders();
    	headers.setContentType(MediaType.APPLICATION_JSON);
        RestTemplate restTemplate = new RestTemplate();
	String url = "http://localhost:8080/user/article";
	Article objArticle = new Article();
	objArticle.setArticleId(1);
	objArticle.setTitle("Update:Java Concurrency");
	objArticle.setCategory("Java");
        HttpEntity<Article> requestEntity = new HttpEntity<Article>(objArticle, headers);
        restTemplate.put(url, requestEntity);
    }
    public void deleteArticleDemo() {
    	HttpHeaders headers = new HttpHeaders();
    	headers.setContentType(MediaType.APPLICATION_JSON);
        RestTemplate restTemplate = new RestTemplate();
	String url = "http://localhost:8080/user/article/{id}";
        HttpEntity<Article> requestEntity = new HttpEntity<Article>(headers);
        restTemplate.exchange(url, HttpMethod.DELETE, requestEntity, Void.class, 4);
    }
    public static void main(String args[]) {
    	RestClientUtil util = new RestClientUtil();
        //util.getArticleByIdDemo();
    	//util.addArticleDemo();
    	//util.updateArticleDemo();
    	//util.deleteArticleDemo();
    	util.getAllArticlesDemo();
    }
}
16. 测试应用
为了测试该应用程序,首先在MySQL中创建表,如例子中给出的。然后,我们可以通过以下方式运行REST网络服务。
1. 使用Maven命令:使用文末给出的下载链接下载项目源代码。使用命令提示符进入项目的根文件夹,运行命令。
mvn spring-boot:run
Tomcat服务器将被启动。
2. 使用Eclipse:下载项目的源代码。将该项目导入eclipse。使用命令提示符,进入项目的根目录并运行。
mvn clean eclipse:eclipse
然后在eclipse中刷新该项目。通过点击Run as -> Java Application来运行主类MyApplication。Tomcat服务器将被启动。
3. 使用可执行的JAR:使用命令提示符,进入项目的根文件夹并运行命令。
mvn clean package
我们将在目标文件夹中得到可执行的JAR spring-boot-demo-0.0.1-SNAPSHOT.jar。以下列方式运行这个JAR
java -jar target/spring-boot-demo-0.0.1-SNAPSHOT.jar
Tomcat服务器将被启动。
现在我们已经准备好测试这个应用程序。要运行Web服务客户端,在eclipse中进入RestClientUtil类,点击Run as -> Java Application。我们也可以使用Postman来测试该应用程序。找到XML响应的截图。
参考文献
【1】Spring Boot Reference Guide
【2】Spring Boot CrudRepository Example
【3】Spring Boot REST Example
源码下载
提取码:mao4
【1】Source Code for JSON Response
【2】Source Code for XML Response


 169
169

 被折叠的 条评论
为什么被折叠?
被折叠的 条评论
为什么被折叠?
 到【灌水乐园】发言


