


前言:
今天的重点就是来介绍一下Retyofit2.0的使用方式, retrofit是由square公司开发的。square在github上发布了很多优秀的Android开源项目。例如:otto(事件总线),leakcanary(排查内存泄露),android-times-square(日历控件),dagger(依赖注入),picasso(异步加载图片),okhttp(网络请求),retrofit(网络请求)等等。更多square上的开源项目我们可以去square的GitHub进行查看。这次就来介绍一下retrofit的一些基本用法。retrofit是REST安卓客户端请求库。使用retrofit可以进行GET,POST,PUT,DELETE等请求方式。下面就来看一下retrofit的基本用法。
Retrofit的使用方式
一 添加Gradle依赖项
compile 'com.squareup.retrofit2:retrofit:2.3.0'二Retrofit
简单三步就可以实现Retrofit2.0异步的操作,如图所示
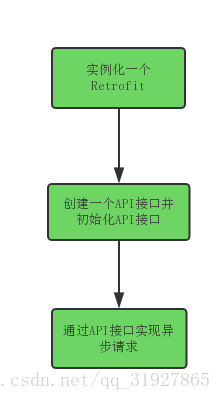
2.1:创建API接口
在retrofit中通过一个Java接口作为http请求的api接口。关于注解这一块后期会分析,今天就先简单的介绍一下get post和上传文件的时候所使用到的注解,如何定义API接口。
- get的请求方式
public interface GitHubApi {

    @GET("repos/{owner}/{repo}/contributors")
 //使用注解path来定义两个String类型参数     Call<ResponseBody>contributorsBySimpleGetCall(@Path("owner") String owner, @Path("repo") String repo);
}
关于get请求方式的API接口中使用的注解还可以用@Query,@QueryMap来表示
@GET("search/repositories")
Call<RetrofitBean> queryRetrofitByGetCall(@Query("q")String owner,
                                      @Query("since")String time,
                                      @Query("page")int page,
                                      @Query("per_page")int per_Page);
当我们的参数过多的时候我们可以通过@QueryMap注解和map对象参数来指定每个表单项的Key,value的值。
@GET("search/repositories")
Call<RetrofitBean> queryRetrofitByGetCallMap(@QueryMap Map<String,String> map);
在Retrofit 2.0添加了一个新的注解:@Url,它允许我们直接传入一个请求的URL。这样以来我们可以将上一个请求的获得的url直接传入进来。方便了我们的操作。
@GET
Call<List<Contributor>> repoContributorsPaginate(@Url String url);
post的请求方式
我们可以使用@FormUrlEncoded注解来发送表单数据。使用 @Field注解和参数来指定每个表单项的Key,value为参数的值。
@FormUrlEncoded
@POST("user/edit")
Call<User> updateUser(@Field("first_name") String first, @Field("last_name") String last);
当我们有很多个表单参数时可以通过@FieldMap注解和Map对象参数来指定每个表单项的Key,value的值。
@FormUrlEncoded
@POST("user/edit")
Call<User> updateUser(@FieldMap Map<String,String> fieldMap);- 发送文件
通过@Multipart注解来发送Multipart数据。通过@Part注解来定义需要发送的文件。
@Multipart
@PUT("/user/photo")
User updateUser(@Part("photo") TypedFile photo, @Part("description") TypedString description);- 请求头部的定义
//请求头
    @Headers({
            "Accept: application/vnd.github.v3.full+json",
            "User-Agent: RetrofitBean-Sample-App",
            "name:liangguliang"
    })
2.2:创建Retrofit
最基本的初始化
Retrofit retrofit=new Retrofit.Builder().baseUrl("https://api.github.com/").build();创建retrofit实例,我们通也过addConverterFactory指定一个factory来对响应反序列化,在这里converters被添加的顺序将是它们被Retrofit尝试的顺序。
Retrofit retrofit = new Retrofit.Builder()
        .baseUrl("https://api.github.com/")
        .addConverterFactory(GsonConverterFactory.create())
        .build();
2.3:实例化API接口
GitHubApi repo = retrofit.create(GitHubApi.class);
Call<List<Contributor>> call = repo.contributorsByAddConverterGetCall(mUserName, mRepo);
2.4:通过接口实现异步请求
call.enqueue(new Callback<List<Contributor>>() {
    @Override
    public void onResponse(Call<List<Contributor>> call, Response<List<Contributor>> response) {
        List<Contributor> contributorList = response.body();
        for (Contributor contributor : contributorList){
            Log.d("login", contributor.getLogin());
            Log.d("contributions", contributor.getContributions() + "");
        }
    }

    @Override
    public void onFailure(Call<List<Contributor>> call, Throwable t) {

    }
});
Retroft的使用是不是挺简单的~
三 Okhttp+Retrofit2.0
okHttp+Retrofit2.0实现异步操作的方式单独使用Retrofit多了一个设置client()的方法
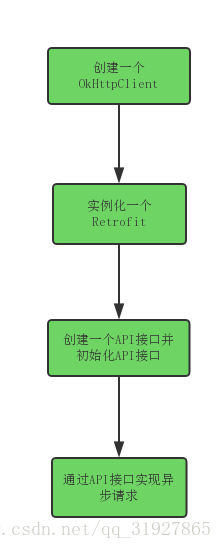
创建OkhttpClient来设置时间间隔,增加日志信息,设置缓存等
设置超时时间如图所示
  //手动创建一个OkHttpClient并设置超时时间
        okhttp3.OkHttpClient.Builder builder = new OkHttpClient.Builder();
        builder.connectTimeout(5, TimeUnit.SECONDS);

        Retrofit retrofit = new Retrofit.Builder()
                .client(builder.build())              .addConverterFactory(GsonConverterFactory.create())               .addCallAdapterFactory(RxJavaCallAdapterFactory.create())
.baseUrl("http://www.izaodao.com/Api/")
.build();
在retrofit2.0中是没有日志功能的。但是retrofit2.0中依赖OkHttp,所以也就能够通过OkHttp中的interceptor来实现实际的底层的请求和响应日志。在这里我们需要修改上一个retrofit实例,为其自定自定义的OkHttpClient。代码如下:
HttpLoggingInterceptor httpLoggingInterceptor = new HttpLoggingInterceptor();
httpLoggingInterceptor.setLevel(HttpLoggingInterceptor.Level.BODY);
OkHttpClient okHttpClient = new OkHttpClient.Builder()
        .addInterceptor(httpLoggingInterceptor)
        .build();

Retrofit retrofit = new Retrofit.Builder().addCallAdapterFactory(RxJavaCallAdapterFactory.create())
        .client(okHttpClient)
        .baseUrl("https://api.github.com/")
        .addConverterFactory(GsonConverterFactory.create())
.build();好了,Retrofit2.0的使用是不是简化了很多~就单独的来说,OkHttp的网络请求也是很好用的,之前写过一篇介绍Okhttp的简单用法,http://blog.csdn.net/qq_31927865/article/details/77506972推荐文章鸿神的http://blog.csdn.net/lmj623565791/article/details/47911083


 2772
2772


 被折叠的 条评论
为什么被折叠?
被折叠的 条评论
为什么被折叠?
 到【灌水乐园】发言


