浅析Window与WindowManager相关关系及源码
通过上面那幅图可以很直观的看见,Android屏幕显示的就是Window和各种View,Activity在其中的作用主要是管理生命周期、建立窗口等。也就是说Window相关的东西对于Android屏幕来说是至关重要的(虽然前面分析Activity的setContentView等原理时说过一点Window,但那只是皮毛。),所以有必要在分析Android应用Activity、Dialog、PopWindow加载显示机制前再看看Window相关的一些东西。
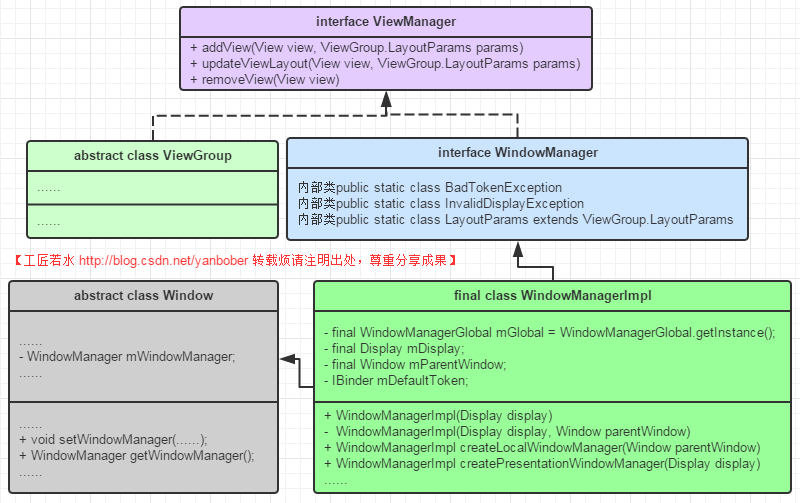
2-1 Window与WindowManager基础关系
在分析Window与WindowManager之前我们先看一张图:
接下来看一点代码,如下:
/** Interface to let you add and remove child views to an Activity. To get an instance
  * of this class, call {@link android.content.Context#getSystemService(java.lang.String) Context.getSystemService()}.
  */
public interface ViewManager
{
    public void addView(View view, ViewGroup.LayoutParams params);
    public void updateViewLayout(View view, ViewGroup.LayoutParams params);
    public void removeView(View view);
}
可以看见,ViewManager接口定义了一组规则,也就是add、update、remove的操作View接口。也就是说ViewManager是用来添加和移除activity中View的接口。继续往下看:
public interface WindowManager extends ViewManager {
    ......
    public Display getDefaultDisplay();
    public void removeViewImmediate(View view);
    ......
    public static class LayoutParams extends ViewGroup.LayoutParams
            implements Parcelable {
        ......
    }
}
看见没有,WindowManager继承自ViewManager,然后自己还是一个接口,同时又定义了一个静态内部类LayoutParams(这个类比较重要,后面会分析。提前透漏下,如果你在APP做过类似360助手屏幕的那个悬浮窗或者做过那种类似iOS的小白圆点,点击展开菜单功能,你或多或少就能猜到这个类的重要性。)。WindowManager用来在应用与Window之间的接口、窗口顺序、消息等的管理。继续看下ViewManager的另一个实现子类ViewGroup,如下:
public abstract class ViewGroup extends View implements ViewParent, ViewManager {
......
public void addView(View child, LayoutParams params) {
addView(child, -1, params);
}
......
public void addView(View child, int index, LayoutParams params) {
......
requestLayout();
invalidate(true);
addViewInner(child, index, params, false);
}
......
}
- 1
- 2
- 3
- 4
- 5
- 6
- 7
- 8
- 9
- 10
- 11
- 12
- 13
- 14
- 15
- 16
- 17
- 18
- 19
- 20
- 21
- 22
- 23
- 1
- 2
- 3
- 4
- 5
- 6
- 7
- 8
- 9
- 10
- 11
- 12
- 13
- 14
- 15
- 16
- 17
- 18
- 19
- 20
- 21
- 22
- 23
这下理解上面那幅图了吧,所以说View通过ViewGroup的addView方法添加到ViewGroup中,而ViewGroup层层嵌套到最顶级都会显示在在一个窗口Window中(正如上面背景介绍中《Android应用setContentView与LayoutInflater加载解析机制源码分析》的示意图一样),其中每个View都有一个ViewParent类型的父节点mParent,最顶上的节点也是一个viewGroup,也即前面文章分析的Window的内部类DecorView(从《Android应用setContentView与LayoutInflater加载解析机制源码分析》的总结部分或者《Android应用层View绘制流程与源码分析》的5-1小节都可以验证这个结论)对象。同时通过上面背景中那幅图可以看出来,对于一个Activity只有一个DecorView(ViewRoot),也只有一个Window。
2-2 Activity窗口添加流程拓展
前面文章说过,ActivityThread类的performLaunchActivity方法中调运了activity.attach(…)方法进行初始化。如下是Activity的attach方法源码:
final void attach(Context context, ActivityThread aThread,
Instrumentation instr, IBinder token, int ident,
Application application, Intent intent, ActivityInfo info,
CharSequence title, Activity parent, String id,
NonConfigurationInstances lastNonConfigurationInstances,
Configuration config, String referrer, IVoiceInteractor voiceInteractor) {
......
mWindow = PolicyManager.makeNewWindow(this);
......
mWindow.setWindowManager(
(WindowManager)context.getSystemService(Context.WINDOW_SERVICE),
mToken, mComponent.flattenToString(),
(info.flags & ActivityInfo.FLAG_HARDWARE_ACCELERATED) != 0);
......
mWindowManager = mWindow.getWindowManager();
......
}
- 1
- 2
- 3
- 4
- 5
- 6
- 7
- 8
- 9
- 10
- 11
- 12
- 13
- 14
- 15
- 16
- 17
- 18
- 19
- 20
- 1
- 2
- 3
- 4
- 5
- 6
- 7
- 8
- 9
- 10
- 11
- 12
- 13
- 14
- 15
- 16
- 17
- 18
- 19
- 20
看见没有,Activity类中的attach方法又创建了Window类型的新成员变量mWindow(PhoneWindow实现类)与Activity相关联,接着在Activity类的attach方法最后又通过mWindow.setWindowManager(…)方法创建了与Window相关联的WindowManager对象,最后又通过mWindow.getWindowManager()将Window的WindowManager成员变量赋值给Activity的WindowManager成员变量mWindowManager。
接下来我们看下上面代码中的mWindow.setWindowManager(…)方法源码(PhoneWindow没有重写抽象Window的setWindowManager方法,所以直接看Window类的该方法源码),如下:
public void setWindowManager(WindowManager wm, IBinder appToken, String appName,
boolean hardwareAccelerated) {
......
if (wm == null) {
wm = (WindowManager)mContext.getSystemService(Context.WINDOW_SERVICE);
}
mWindowManager = ((WindowManagerImpl)wm).createLocalWindowManager(this);
}
可以看见,Window的setWindowManager方法中通过WindowManagerImpl实例的createLocalWindowManager方法获取了WindowManager实例,如下:
public final class WindowManagerImpl implements WindowManager {
    ......
    private WindowManagerImpl(Display display, Window parentWindow) {
        mDisplay = display;
        mParentWindow = parentWindow;
    }
    ......
    public WindowManagerImpl createLocalWindowManager(Window parentWindow) {
        return new WindowManagerImpl(mDisplay, parentWindow);
    }
    ......
}
看见没有?这样就把Activity的Window与WindowManager关联起来了。Activity类的Window类型成员变量mWindow及WindowManager类型成员变量mWindowManager就是这么来的。
回过头继续看上面刚刚贴的Activity的attach方法代码,看见mWindow.setWindowManager方法传递的第一个参数没?有人会想(WindowManager)context.getSystemService(Context.WINDOW_SERVICE)这行代码是什么意思,现在告诉你。
《Android应用Context详解及源码解析》一文中第三部分曾经说过ActivityThread中创建了Acitivty(执行attach等方法)等东东,在创建这个Activity之前得到了Context的实例。记不记得当时说Context的实现类就是ContextImpl吗?下面我们看下ContextImpl类的静态方法块,如下:
class ContextImpl extends Context {
......
static {
......
......
registerService(WINDOW_SERVICE, new ServiceFetcher() {
Display mDefaultDisplay;
public Object getService(ContextImpl ctx) {
Display display = ctx.mDisplay;
if (display == null) {
if (mDefaultDisplay == null) {
DisplayManager dm = (DisplayManager)ctx.getOuterContext().
getSystemService(Context.DISPLAY_SERVICE);
mDefaultDisplay = dm.getDisplay(Display.DEFAULT_DISPLAY);
}
display = mDefaultDisplay;
}
return new WindowManagerImpl(display);
}});
......
}
@Override
public Object getSystemService(String name) {
ServiceFetcher fetcher = SYSTEM_SERVICE_MAP.get(name);
return fetcher == null ? null : fetcher.getService(this);
}
private static void registerService(String serviceName, ServiceFetcher fetcher) {
if (!(fetcher instanceof StaticServiceFetcher)) {
fetcher.mContextCacheIndex = sNextPerContextServiceCacheIndex++;
}
SYSTEM_SERVICE_MAP.put(serviceName, fetcher);
}
}
- 1
- 2
- 3
- 4
- 5
- 6
- 7
- 8
- 9
- 10
- 11
- 12
- 13
- 14
- 15
- 16
- 17
- 18
- 19
- 20
- 21
- 22
- 23
- 24
- 25
- 26
- 27
- 28
- 29
- 30
- 31
- 32
- 33
- 34
- 35
- 36
- 37
- 38
- 39
- 1
- 2
- 3
- 4
- 5
- 6
- 7
- 8
- 9
- 10
- 11
- 12
- 13
- 14
- 15
- 16
- 17
- 18
- 19
- 20
- 21
- 22
- 23
- 24
- 25
- 26
- 27
- 28
- 29
- 30
- 31
- 32
- 33
- 34
- 35
- 36
- 37
- 38
- 39
看见没有,我们都知道Java的静态代码块是类加载是执行一次的,也就相当于一个全局的,这样就相当于每个Application只有一个WindowManagerImpl(display)实例。
还记不记得《Android应用setContentView与LayoutInflater加载解析机制源码分析》一文2-6小节中说的,setContentView的实质显示是触发了Activity的resume状态,也就是触发了makeVisible方法,那我们再来看下这个方法,如下:
void makeVisible() {
if (!mWindowAdded) {
ViewManager wm = getWindowManager();
wm.addView(mDecor, getWindow().getAttributes());
mWindowAdded = true;
}
mDecor.setVisibility(View.VISIBLE);
}
特别注意,看见makeVisible方法的wm变量没,这个变量就是Window类中通过调运WindowManagerImpl的createLocalWindowManager创建的实例,也就是说每一个Activity都会新创建这么一个WindowManager实例来显示Activity的界面的,有点和上面分析的ContextImpl中static块创建的WindowManager不太一样的地方就在于Context的WindowManager对每个APP来说是一个全局单例的,而Activity的WindowManager是每个Activity都会新创建一个的(其实你从上面分析的两个实例化WindowManagerImpl的构造函数参数传递就可以看出来,Activity中Window的WindowManager成员在构造实例化时传入给WindowManagerImpl中mParentWindow成员的是当前Window对象,而ContextImpl的static块中单例实例化WindowManagerImpl时传入给WindowManagerImpl中mParentWindow成员的是null值)。
继续看makeVisible中调运的WindowManagerImpl的addView方法如下:
public final class WindowManagerImpl implements WindowManager {
private final WindowManagerGlobal mGlobal = WindowManagerGlobal.getInstance();
......
public void addView(@NonNull View view, @NonNull ViewGroup.LayoutParams params) {
applyDefaultToken(params);
mGlobal.addView(view, params, mDisplay, mParentWindow);
}
......
}
这里当前传入的view是mDecor,LayoutParams呢?可以看见是getWindow().getAttributes(),那我们进去看看Window类的这个属性,如下:
private final WindowManager.LayoutParams mWindowAttributes = new WindowManager.LayoutParams();
原来是WindowManager的静态内部类LayoutParams的默认构造函数:
public LayoutParams() {
    super(LayoutParams.MATCH_PARENT, LayoutParams.MATCH_PARENT);
    type = TYPE_APPLICATION;
    format = PixelFormat.OPAQUE;
}
看见没有,Activity窗体的WindowManager.LayoutParams类型是TYPE_APPLICATION的。
继续回到WindowManagerImpl的addView方法,分析可以看见WindowManagerImpl中有一个单例模式的WindowManagerGlobal成员mGlobal,addView最终调运了WindowManagerGlobal的addView,源码如下:
public final class WindowManagerGlobal {
......
private final ArrayList<View> mViews = new ArrayList<View>();
private final ArrayList<ViewRootImpl> mRoots = new ArrayList<ViewRootImpl>();
private final ArrayList<WindowManager.LayoutParams> mParams =
new ArrayList<WindowManager.LayoutParams>();
private final ArraySet<View> mDyingViews = new ArraySet<View>();
......
public void addView(View view, ViewGroup.LayoutParams params,
Display display, Window parentWindow) {
......
final WindowManager.LayoutParams wparams = (WindowManager.LayoutParams)params;
if (parentWindow != null) {
parentWindow.adjustLayoutParamsForSubWindow(wparams);
} else {
......
}
ViewRootImpl root;
......
synchronized (mLock) {
......
root = new ViewRootImpl(view.getContext(), display);
view.setLayoutParams(wparams);
mViews.add(view);
mRoots.add(root);
mParams.add(wparams);
}
try {
root.setView(view, wparams, panelParentView);
} catch (RuntimeException e) {
......
}
}
......
}
- 1
- 2
- 3
- 4
- 5
- 6
- 7
- 8
- 9
- 10
- 11
- 12
- 13
- 14
- 15
- 16
- 17
- 18
- 19
- 20
- 21
- 22
- 23
- 24
- 25
- 26
- 27
- 28
- 29
- 30
- 31
- 32
- 33
- 34
- 35
- 36
- 37
- 38
- 39
- 40
- 41
- 42
- 43
- 44
- 45
- 1
- 2
- 3
- 4
- 5
- 6
- 7
- 8
- 9
- 10
- 11
- 12
- 13
- 14
- 15
- 16
- 17
- 18
- 19
- 20
- 21
- 22
- 23
- 24
- 25
- 26
- 27
- 28
- 29
- 30
- 31
- 32
- 33
- 34
- 35
- 36
- 37
- 38
- 39
- 40
- 41
- 42
- 43
- 44
- 45
可以看见,在addView方法中会利用LayoutParams获得Window的属性,然后为每个Window创建ViewRootImpl,最后通过ViewRootImpl的setView方法通过mSession向WindowManagerService发送添加窗口请求把窗口添加到WindowManager中,并且由WindowManager来管理窗口的view、事件、消息收集处理等(ViewRootImpl的这一添加过程后面会写文章分析,这里先记住这个概念即可)。
至此我们对上面背景中那幅图,也就是《Android应用setContentView与LayoutInflater加载解析机制源码分析》这篇文章总结部分的那幅图又进行了更深入的一点分析,其目的也就是为了下面分析Android应用Dialog、PopWindow、Toast加载显示机制做铺垫准备。
2-3 继续顺藤摸瓜WindowManager.LayoutParams类的源码
上面2-1分析Window与WindowManager基础关系时提到了WindowManager有一个静态内部类LayoutParams,它继承于ViewGroup.LayoutParams,用于向WindowManager描述Window的管理策略。现在我们来看下这个类(PS:在AD上也可以看见,自备梯子点我看AD的),如下:
public static class LayoutParams extends ViewGroup.LayoutParams
implements Parcelable {
public int x;
public int y;
public float horizontalWeight;
public float verticalWeight;
public int type;
public static final int FIRST_APPLICATION_WINDOW = 1;
public static final int TYPE_BASE_APPLICATION = 1;
public static final int TYPE_APPLICATION = 2;
public static final int TYPE_APPLICATION_STARTING = 3;
public static final int LAST_APPLICATION_WINDOW = 99;
public static final int FIRST_SUB_WINDOW = 1000;
public static final int TYPE_APPLICATION_PANEL = FIRST_SUB_WINDOW;
public static final int TYPE_APPLICATION_MEDIA = FIRST_SUB_WINDOW+1;
public static final int TYPE_APPLICATION_SUB_PANEL = FIRST_SUB_WINDOW+2;
public static final int TYPE_APPLICATION_ATTACHED_DIALOG = FIRST_SUB_WINDOW+3;
public static final int TYPE_APPLICATION_MEDIA_OVERLAY = FIRST_SUB_WINDOW+4;
public static final int LAST_SUB_WINDOW = 1999;
public static final int FIRST_SYSTEM_WINDOW = 2000;
public static final int TYPE_STATUS_BAR = FIRST_SYSTEM_WINDOW;
public static final int TYPE_SEARCH_BAR = FIRST_SYSTEM_WINDOW+1;
public static final int TYPE_PHONE = FIRST_SYSTEM_WINDOW+2;
public static final int TYPE_SYSTEM_ALERT = FIRST_SYSTEM_WINDOW+3;
public static final int TYPE_KEYGUARD = FIRST_SYSTEM_WINDOW+4;
public static final int TYPE_TOAST = FIRST_SYSTEM_WINDOW+5;
public static final int TYPE_SYSTEM_OVERLAY = FIRST_SYSTEM_WINDOW+6;
public static final int TYPE_PRIORITY_PHONE = FIRST_SYSTEM_WINDOW+7;
public static final int TYPE_SYSTEM_DIALOG = FIRST_SYSTEM_WINDOW+8;
public static final int TYPE_KEYGUARD_DIALOG = FIRST_SYSTEM_WINDOW+9;
public static final int TYPE_SYSTEM_ERROR = FIRST_SYSTEM_WINDOW+10;
public static final int TYPE_INPUT_METHOD = FIRST_SYSTEM_WINDOW+11;
public static final int TYPE_INPUT_METHOD_DIALOG= FIRST_SYSTEM_WINDOW+12;
public static final int TYPE_WALLPAPER = FIRST_SYSTEM_WINDOW+13;
public static final int TYPE_STATUS_BAR_PANEL = FIRST_SYSTEM_WINDOW+14;
public static final int TYPE_SECURE_SYSTEM_OVERLAY = FIRST_SYSTEM_WINDOW+15;
public static final int TYPE_DRAG = FIRST_SYSTEM_WINDOW+16;
public static final int TYPE_STATUS_BAR_SUB_PANEL = FIRST_SYSTEM_WINDOW+17;
public static final int TYPE_POINTER = FIRST_SYSTEM_WINDOW+18;
public static final int TYPE_NAVIGATION_BAR = FIRST_SYSTEM_WINDOW+19;
public static final int TYPE_VOLUME_OVERLAY = FIRST_SYSTEM_WINDOW+20;
public static final int TYPE_BOOT_PROGRESS = FIRST_SYSTEM_WINDOW+21;
public static final int TYPE_HIDDEN_NAV_CONSUMER = FIRST_SYSTEM_WINDOW+22;
public static final int TYPE_DREAM = FIRST_SYSTEM_WINDOW+23;
public static final int TYPE_NAVIGATION_BAR_PANEL = FIRST_SYSTEM_WINDOW+24;
public static final int TYPE_UNIVERSE_BACKGROUND = FIRST_SYSTEM_WINDOW+25;
public static final int TYPE_DISPLAY_OVERLAY = FIRST_SYSTEM_WINDOW+26;
public static final int TYPE_MAGNIFICATION_OVERLAY = FIRST_SYSTEM_WINDOW+27;
public static final int TYPE_KEYGUARD_SCRIM = FIRST_SYSTEM_WINDOW+29;
public static final int TYPE_PRIVATE_PRESENTATION = FIRST_SYSTEM_WINDOW+30;
public static final int TYPE_VOICE_INTERACTION = FIRST_SYSTEM_WINDOW+31;
public static final int TYPE_ACCESSIBILITY_OVERLAY = FIRST_SYSTEM_WINDOW+32;
public static final int LAST_SYSTEM_WINDOW = 2999;
public static final int MEMORY_TYPE_NORMAL = 0;
public static final int MEMORY_TYPE_HARDWARE = 1;
public static final int MEMORY_TYPE_GPU = 2;
public static final int MEMORY_TYPE_PUSH_BUFFERS = 3;
public int memoryType;
public static final int FLAG_ALLOW_LOCK_WHILE_SCREEN_ON = 0x00000001;
public static final int FLAG_DIM_BEHIND = 0x00000002;
public static final int FLAG_BLUR_BEHIND = 0x00000004;
public static final int FLAG_NOT_FOCUSABLE = 0x00000008;
public static final int FLAG_NOT_TOUCHABLE = 0x00000010;
public static final int FLAG_NOT_TOUCH_MODAL = 0x00000020;
public static final int FLAG_TOUCHABLE_WHEN_WAKING = 0x00000040;
public static final int FLAG_KEEP_SCREEN_ON = 0x00000080;
public static final int FLAG_LAYOUT_IN_SCREEN = 0x00000100;
public static final int FLAG_LAYOUT_NO_LIMITS = 0x00000200;
public static final int FLAG_FULLSCREEN = 0x00000400;
public static final int FLAG_FORCE_NOT_FULLSCREEN = 0x00000800;
public static final int FLAG_DITHER = 0x00001000;
public static final int FLAG_SECURE = 0x00002000;
public static final int FLAG_SCALED = 0x00004000;
public static final int FLAG_IGNORE_CHEEK_PRESSES = 0x00008000;
public static final int FLAG_LAYOUT_INSET_DECOR = 0x00010000;
public static final int FLAG_ALT_FOCUSABLE_IM = 0x00020000;
public static final int FLAG_WATCH_OUTSIDE_TOUCH = 0x00040000;
public static final int FLAG_SHOW_WHEN_LOCKED = 0x00080000;
public static final int FLAG_SHOW_WALLPAPER = 0x00100000;
public static final int FLAG_TURN_SCREEN_ON = 0x00200000;
public static final int FLAG_DISMISS_KEYGUARD = 0x00400000;
public static final int FLAG_SPLIT_TOUCH = 0x00800000;
public static final int FLAG_HARDWARE_ACCELERATED = 0x01000000;
public static final int FLAG_LAYOUT_IN_OVERSCAN = 0x02000000;
public static final int FLAG_TRANSLUCENT_STATUS = 0x04000000;
public static final int FLAG_TRANSLUCENT_NAVIGATION = 0x08000000;
public static final int FLAG_LOCAL_FOCUS_MODE = 0x10000000;
public static final int FLAG_SLIPPERY = 0x20000000;
public static final int FLAG_LAYOUT_ATTACHED_IN_DECOR = 0x40000000;
public static final int FLAG_DRAWS_SYSTEM_BAR_BACKGROUNDS = 0x80000000;
public int flags;
public static final int PRIVATE_FLAG_FAKE_HARDWARE_ACCELERATED = 0x00000001;
public static final int PRIVATE_FLAG_FORCE_HARDWARE_ACCELERATED = 0x00000002;
public static final int PRIVATE_FLAG_WANTS_OFFSET_NOTIFICATIONS = 0x00000004;
public static final int PRIVATE_FLAG_SHOW_FOR_ALL_USERS = 0x00000010;
public static final int PRIVATE_FLAG_NO_MOVE_ANIMATION = 0x00000040;
public static final int PRIVATE_FLAG_COMPATIBLE_WINDOW = 0x00000080;
public static final int PRIVATE_FLAG_SYSTEM_ERROR = 0x00000100;
public static final int PRIVATE_FLAG_INHERIT_TRANSLUCENT_DECOR = 0x00000200;
public static final int PRIVATE_FLAG_KEYGUARD = 0x00000400;
public static final int PRIVATE_FLAG_DISABLE_WALLPAPER_TOUCH_EVENTS = 0x00000800;
public int privateFlags;
public static final int NEEDS_MENU_UNSET = 0;
public static final int NEEDS_MENU_SET_TRUE = 1;
public static final int NEEDS_MENU_SET_FALSE = 2;
public int needsMenuKey = NEEDS_MENU_UNSET;
public static boolean mayUseInputMethod(int flags) {
......
}
public static final int SOFT_INPUT_MASK_STATE = 0x0f;
public static final int SOFT_INPUT_STATE_UNSPECIFIED = 0;
public static final int SOFT_INPUT_STATE_UNCHANGED = 1;
public static final int SOFT_INPUT_STATE_HIDDEN = 2;
public static final int SOFT_INPUT_STATE_ALWAYS_HIDDEN = 3;
public static final int SOFT_INPUT_STATE_VISIBLE = 4;
public static final int SOFT_INPUT_STATE_ALWAYS_VISIBLE = 5;
public static final int SOFT_INPUT_MASK_ADJUST = 0xf0;
public static final int SOFT_INPUT_ADJUST_UNSPECIFIED = 0x00;
public static final int SOFT_INPUT_ADJUST_RESIZE = 0x10;
public static final int SOFT_INPUT_ADJUST_PAN = 0x20;
public static final int SOFT_INPUT_ADJUST_NOTHING = 0x30;
public static final int SOFT_INPUT_IS_FORWARD_NAVIGATION = 0x100;
public int softInputMode;
public int gravity;
public float horizontalMargin;
public float verticalMargin;
public final Rect surfaceInsets = new Rect();
public int format;
public int windowAnimations;
public float alpha = 1.0f;
public float dimAmount = 1.0f;
public static final float BRIGHTNESS_OVERRIDE_NONE = -1.0f;
public static final float BRIGHTNESS_OVERRIDE_OFF = 0.0f;
public static final float BRIGHTNESS_OVERRIDE_FULL = 1.0f;
public float screenBrightness = BRIGHTNESS_OVERRIDE_NONE;
public float buttonBrightness = BRIGHTNESS_OVERRIDE_NONE;
public static final int ROTATION_ANIMATION_ROTATE = 0;
public static final int ROTATION_ANIMATION_CROSSFADE = 1;
public static final int ROTATION_ANIMATION_JUMPCUT = 2;
public int rotationAnimation = ROTATION_ANIMATION_ROTATE;
public IBinder token = null;
public String packageName = null;
public int screenOrientation = ActivityInfo.SCREEN_ORIENTATION_UNSPECIFIED;
public float preferredRefreshRate;
public int systemUiVisibility;
public int subtreeSystemUiVisibility;
public boolean hasSystemUiListeners;
public static final int INPUT_FEATURE_DISABLE_POINTER_GESTURES = 0x00000001;
public static final int INPUT_FEATURE_NO_INPUT_CHANNEL = 0x00000002;
public static final int INPUT_FEATURE_DISABLE_USER_ACTIVITY = 0x00000004;
public int inputFeatures;
public long userActivityTimeout = -1;
......
public final int copyFrom(LayoutParams o) {
......
}
......
public void scale(float scale) {
......
}
......
}
- 1
- 2
- 3
- 4
- 5
- 6
- 7
- 8
- 9
- 10
- 11
- 12
- 13
- 14
- 15
- 16
- 17
- 18
- 19
- 20
- 21
- 22
- 23
- 24
- 25
- 26
- 27
- 28
- 29
- 30
- 31
- 32
- 33
- 34
- 35
- 36
- 37
- 38
- 39
- 40
- 41
- 42
- 43
- 44
- 45
- 46
- 47
- 48
- 49
- 50
- 51
- 52
- 53
- 54
- 55
- 56
- 57
- 58
- 59
- 60
- 61
- 62
- 63
- 64
- 65
- 66
- 67
- 68
- 69
- 70
- 71
- 72
- 73
- 74
- 75
- 76
- 77
- 78
- 79
- 80
- 81
- 82
- 83
- 84
- 85
- 86
- 87
- 88
- 89
- 90
- 91
- 92
- 93
- 94
- 95
- 96
- 97
- 98
- 99
- 100
- 101
- 102
- 103
- 104
- 105
- 106
- 107
- 108
- 109
- 110
- 111
- 112
- 113
- 114
- 115
- 116
- 117
- 118
- 119
- 120
- 121
- 122
- 123
- 124
- 125
- 126
- 127
- 128
- 129
- 130
- 131
- 132
- 133
- 134
- 135
- 136
- 137
- 138
- 139
- 140
- 141
- 142
- 143
- 144
- 145
- 146
- 147
- 148
- 149
- 150
- 151
- 152
- 153
- 154
- 155
- 156
- 157
- 158
- 159
- 160
- 161
- 162
- 163
- 164
- 165
- 166
- 167
- 168
- 169
- 170
- 171
- 172
- 173
- 174
- 175
- 176
- 177
- 178
- 179
- 180
- 181
- 182
- 183
- 184
- 185
- 186
- 187
- 188
- 189
- 190
- 191
- 192
- 193
- 194
- 195
- 196
- 197
- 198
- 199
- 200
- 201
- 202
- 203
- 204
- 205
- 206
- 207
- 208
- 209
- 210
- 211
- 212
- 213
- 214
- 215
- 216
- 217
- 218
- 219
- 220
- 221
- 222
- 223
- 224
- 225
- 226
- 227
- 228
- 229
- 230
- 231
- 232
- 233
- 234
- 235
- 236
- 237
- 238
- 239
- 240
- 241
- 242
- 243
- 244
- 245
- 246
- 247
- 248
- 249
- 250
- 251
- 252
- 253
- 254
- 255
- 256
- 257
- 258
- 259
- 260
- 261
- 262
- 263
- 264
- 265
- 266
- 267
- 268
- 269
- 270
- 271
- 272
- 273
- 274
- 275
- 276
- 277
- 278
- 279
- 280
- 281
- 282
- 283
- 284
- 285
- 286
- 287
- 288
- 289
- 290
- 291
- 292
- 293
- 294
- 295
- 296
- 297
- 298
- 299
- 300
- 301
看见没有,从上面类可以看出,Android窗口类型主要分成了三大类:
- 应用程序窗口。一般应用程序的窗口,比如我们应用程序的Activity的窗口。
- 子窗口。一般在Activity里面的窗口,比如对话框等。
- 系统窗口。系统的窗口,比如输入法,Toast,墙纸等。
同时还可以看见,WindowManager.LayoutParams里面窗口的type类型值定义是一个递增保留的连续增大数值,从注释可以看出来其实就是窗口的Z-ORDER序列(值越大显示的位置越在上面,你需要将屏幕想成三维坐标模式)。创建不同类型的窗口需要设置不同的type值,譬如上面拓展Activity窗口加载时分析的makeVisible方法中的Window默认属性的type=TYPE_APPLICATION。
既然说这个类很重要,那总得感性的体验一下重要性吧,所以我们先来看几个实例。
2-4 通过上面WindowManager.LayoutParams分析引出的应用层开发常用经典实例
有了上面分析相信你一定觉得WindowManager.LayoutParams还是蛮熟悉的,不信我们来看下。
Part1:开发APP时设置Activity全屏常亮的一种办法(设置Activity也就是Activity的Window):
public class MainActivity extends ActionBarActivity {
@Override
protected void onCreate(Bundle savedInstanceState) {
super.onCreate(savedInstanceState);
Window window = getWindow();
WindowManager.LayoutParams windowAttributes = window.getAttributes();
windowAttributes.flags = WindowManager.LayoutParams.FLAG_FULLSCREEN | windowAttributes.flags;
window.setAttributes(windowAttributes);
window.addFlags(WindowManager.LayoutParams.FLAG_KEEP_SCREEN_ON);
setContentView(R.layout.activity_main);
}
}
这是运行结果:
Part2:App开发中弹出软键盘时下面的输入框被软件盘挡住问题的解决办法:
在Activity中的onCreate中setContentView之前写如下代码:
getWindow().setSoftInputMode(WindowManager.LayoutParams.SOFT_INPUT_ADJUST_RESIZE|WindowManager.LayoutParams.SOFT_INPUT_STATE_HIDDEN);
Part3:创建悬浮窗口(仿IPhone的小圆点或者魅族的小白点或者360手机卫士的小浮标),退出当前Activity依旧可见的一种实现方法:
省略了Activity的start与stop Service的按钮代码,直接给出了核心代码如下:
/**
* Author : yanbo
* Time : 14:47
* Description : 手机屏幕悬浮窗,仿IPhone小圆点
* (未完全实现,只提供思路,如需请自行实现)
* Notice : <uses-permission android:name="android.permission.SYSTEM_ALERT_WINDOW" />
*/
public class WindowService extends Service {
private WindowManager mWindowManager;
private ImageView mImageView;
@Override
public IBinder onBind(Intent intent) {
return null;
}
@Override
public void onCreate() {
super.onCreate();
createFloatWindow();
}
private void createFloatWindow() {
WindowManager.LayoutParams layoutParams = new WindowManager.LayoutParams();
mWindowManager = (WindowManager) getApplication().getSystemService(Context.WINDOW_SERVICE);
layoutParams.type = WindowManager.LayoutParams.TYPE_PHONE;
layoutParams.format = PixelFormat.RGBA_8888;
layoutParams.flags = WindowManager.LayoutParams.FLAG_NOT_FOCUSABLE;
layoutParams.gravity = Gravity.BOTTOM | Gravity.RIGHT;
layoutParams.width = WindowManager.LayoutParams.WRAP_CONTENT;
layoutParams.height = WindowManager.LayoutParams.WRAP_CONTENT;
layoutParams.x = -50;
layoutParams.y = -50;
mImageView = new ImageView(this);
mImageView.setImageResource(android.R.drawable.ic_menu_add);
mWindowManager.addView(mImageView, layoutParams);
mImageView.setOnTouchListener(touchListener);
}
@Override
public void onDestroy() {
super.onDestroy();
if (mImageView != null) {
mWindowManager.removeView(mImageView);
}
}
private View.OnTouchListener touchListener = new View.OnTouchListener() {
@Override
public boolean onTouch(View v, MotionEvent event) {
Intent intent = new Intent(Intent.ACTION_VIEW);
intent.addFlags(Intent.FLAG_ACTIVITY_NEW_TASK);
startActivity(intent);
return false;
}
};
}
- 1
- 2
- 3
- 4
- 5
- 6
- 7
- 8
- 9
- 10
- 11
- 12
- 13
- 14
- 15
- 16
- 17
- 18
- 19
- 20
- 21
- 22
- 23
- 24
- 25
- 26
- 27
- 28
- 29
- 30
- 31
- 32
- 33
- 34
- 35
- 36
- 37
- 38
- 39
- 40
- 41
- 42
- 43
- 44
- 45
- 46
- 47
- 48
- 49
- 50
- 51
- 52
- 53
- 54
- 55
- 56
- 57
- 58
- 59
- 60
- 61
- 62
- 63
- 64
- 65
- 66
- 67
如下是运行过程模拟,特别留意屏幕右下角的变化:
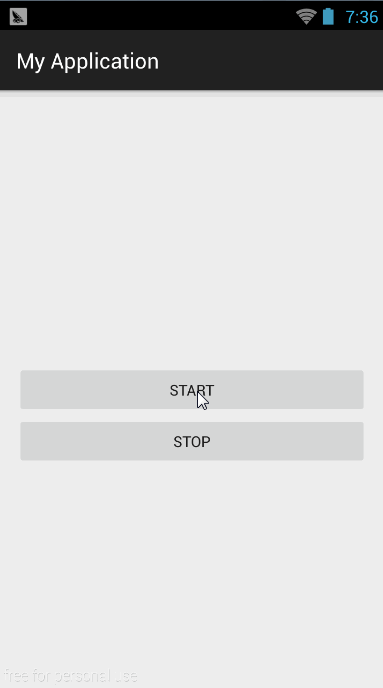
怎么样,通过最后这个例子你是不是就能体会到WindowManager.LayoutParams的Z-ORDER序列类型,值越大显示的位置越在上面。
2-5 总结Activity的窗口添加机制
有了上面这么多分析和前几篇的分析,我们对Activity的窗口加载再次深入分析总结如下:
可以看见Context的WindowManager对每个APP来说是一个全局单例的,而Activity的WindowManager是每个Activity都会新创建一个的(其实你从上面分析的两个实例化WindowManagerImpl的构造函数参数传递就可以看出来,Activity中Window的WindowManager成员在构造实例化时传入给WindowManagerImpl中mParentWindow成员的是当前Window对象,而ContextImpl的static块中单例实例化WindowManagerImpl时传入给WindowManagerImpl中mParentWindow成员的是null值),所以上面模拟苹果浮动小图标使用了Application的WindowManager而不是Activity的,原因就在于这里;使用Activity的WindowManager时当Activity结束时WindowManager就无效了,所以使用Activity的getSysytemService(WINDOW_SERVICE)获取的是Local的WindowManager。同时可以看出来Activity中的WindowManager.LayoutParams的type为TYPE_APPLICATION。
好了,上面也说了不少了,有了上面这些知识点以后我们就来开始分析Android应用Activity、Dialog、PopWindow窗口显示机制。
【工匠若水 http://blog.csdn.net/yanbober 转载烦请注明出处,尊重劳动成果】
3 Android应用Dialog窗口添加显示机制源码
3-1 Dialog窗口源码分析
写过APP都知道,Dialog是一系列XXXDialog的基类,我们可以new任意Dialog或者通过Activity提供的onCreateDialog(……)、onPrepareDialog(……)和showDialog(……)等方法来管理我们的Dialog,但是究其实质都是来源于Dialog基类,所以我们对于各种XXXDialog来说只用分析Dialog的窗口加载就可以了。
如下从Dialog的构造函数开始分析:
public class Dialog implements DialogInterface, Window.Callback,
KeyEvent.Callback, OnCreateContextMenuListener, Window.OnWindowDismissedCallback {
......
public Dialog(Context context) {
this(context, 0, true);
}
Dialog(Context context, int theme, boolean createContextThemeWrapper) {
if (createContextThemeWrapper) {
if (theme == 0) {
TypedValue outValue = new TypedValue();
context.getTheme().resolveAttribute(com.android.internal.R.attr.dialogTheme,
outValue, true);
theme = outValue.resourceId;
}
mContext = new ContextThemeWrapper(context, theme);
} else {
mContext = context;
}
mWindowManager = (WindowManager)context.getSystemService(Context.WINDOW_SERVICE);
Window w = PolicyManager.makeNewWindow(mContext);
mWindow = w;
w.setCallback(this);
w.setOnWindowDismissedCallback(this);
w.setWindowManager(mWindowManager, null, null);
w.setGravity(Gravity.CENTER);
mListenersHandler = new ListenersHandler(this);
}
......
}
- 1
- 2
- 3
- 4
- 5
- 6
- 7
- 8
- 9
- 10
- 11
- 12
- 13
- 14
- 15
- 16
- 17
- 18
- 19
- 20
- 21
- 22
- 23
- 24
- 25
- 26
- 27
- 28
- 29
- 30
- 31
- 32
- 33
- 34
- 35
- 36
- 37
- 38
- 39
- 1
- 2
- 3
- 4
- 5
- 6
- 7
- 8
- 9
- 10
- 11
- 12
- 13
- 14
- 15
- 16
- 17
- 18
- 19
- 20
- 21
- 22
- 23
- 24
- 25
- 26
- 27
- 28
- 29
- 30
- 31
- 32
- 33
- 34
- 35
- 36
- 37
- 38
- 39
可以看到,Dialog构造函数首先把外部传入的参数context对象赋值给了当前类的成员(我们的Dialog一般都是在Activity中启动的,所以这个context一般是个Activity),然后调用context.getSystemService(Context.WINDOW_SERVICE)获取WindowManager,这个WindowManager是哪来的呢?先按照上面说的context一般是个Activity来看待,可以发现这句实质就是Activity的getSystemService方法,我们看下源码,如下:
@Override
public Object getSystemService(@ServiceName @NonNull String name) {
if (getBaseContext() == null) {
throw new IllegalStateException(
"System services not available to Activities before onCreate()");
}
if (WINDOW_SERVICE.equals(name)) {
return mWindowManager;
} else if (SEARCH_SERVICE.equals(name)) {
ensureSearchManager();
return mSearchManager;
}
return super.getSystemService(name);
}
看见没有,Dialog中的WindowManager成员实质和Activity里面是一样的,也就是共用了一个WindowManager。
回到Dialog的构造函数继续分析,在得到了WindowManager之后,程序又新建了一个Window对象(类型是PhoneWindow类型,和Activity的Window新建过程类似);接着通过w.setCallback(this)设置Dialog为当前window的回调接口,这样Dialog就能够接收事件处理了;接着把从Activity拿到的WindowManager对象关联到新创建的Window中。
至此Dialog的创建过程Window处理已经完毕,很简单,所以接下来我们继续看看Dialog的show与cancel方法,如下:
public void show() {
......
if (!mCreated) {
dispatchOnCreate(null);
}
onStart();
mDecor = mWindow.getDecorView();
......
WindowManager.LayoutParams l = mWindow.getAttributes();
......
try {
mWindowManager.addView(mDecor, l);
......
} finally {
}
}
- 1
- 2
- 3
- 4
- 5
- 6
- 7
- 8
- 9
- 10
- 11
- 12
- 13
- 14
- 15
- 16
- 17
- 18
- 19
- 20
- 21
- 1
- 2
- 3
- 4
- 5
- 6
- 7
- 8
- 9
- 10
- 11
- 12
- 13
- 14
- 15
- 16
- 17
- 18
- 19
- 20
- 21
可以看见Dialog的新Window与Activity的Window的type同样都为TYPE_APPLICATION,上面介绍WindowManager.LayoutParams时TYPE_APPLICATION的注释明确说过,普通应用程序窗口TYPE_APPLICATION的token必须设置为Activity的token来指定窗口属于谁。所以可以看见,既然Dialog和Activity共享同一个WindowManager(也就是上面分析的WindowManagerImpl),而WindowManagerImpl里面有个Window类型的mParentWindow变量,这个变量在Activity的attach中创建WindowManagerImpl时传入的为当前Activity的Window,而当前Activity的Window里面的mAppToken值又为当前Activity的token,所以Activity与Dialog共享了同一个mAppToken值,只是Dialog和Activity的Window对象不同。
3-2 Dialog窗口加载总结
通过上面分析Dialog的窗口加载原理,我们总结如下图:
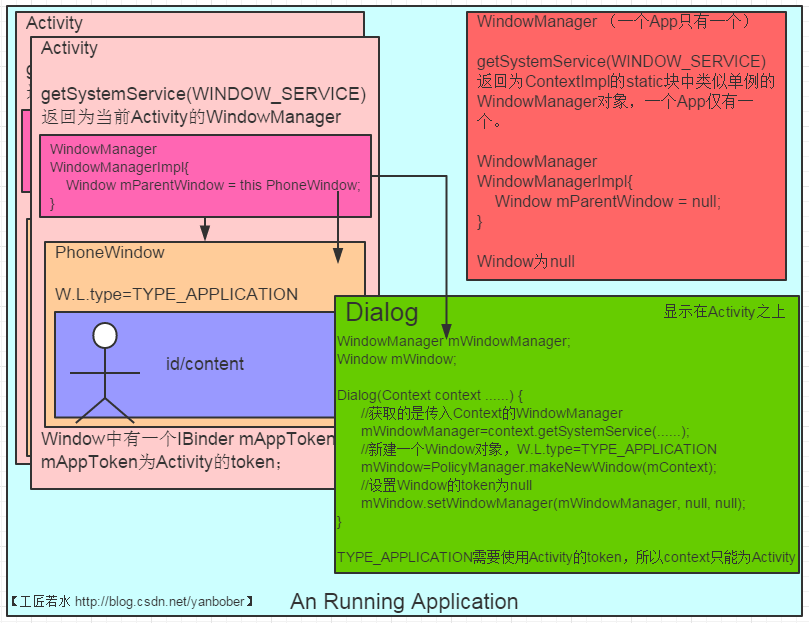
从图中可以看出,Activity和Dialog共用了一个Token对象,Dialog必须依赖于Activity而显示(通过别的context搞完之后token都为null,最终会在ViewRootImpl的setView方法中加载时因为token为null抛出异常),所以Dialog的Context传入参数一般是一个存在的Activity,如果Dialog弹出来之前Activity已经被销毁了,则这个Dialog在弹出的时候就会抛出异常,因为token不可用了。在Dialog的构造函数中我们关联了新Window的callback事件监听处理,所以当Dialog显示时Activity无法消费当前的事件。
到此Dialog的窗口加载机制就分析完毕了,接下来我们说说应用开发中常见的一个诡异问题。
3-3 从Dialog窗口加载分析引出的应用开发问题
有了上面的分析我们接下来看下平时开发App初学者容易犯的几个错误。
实现在一个Activity中显示一个Dialog,如下代码:
public class MainActivity extends AppCompatActivity {
@Override
protected void onCreate(Bundle savedInstanceState) {
setContentView(R.layout.activity_main);
Dialog dialog = new ProgressDialog(this);
dialog.setTitle("TestDialogContext");
dialog.show();
}
}
分析:使用了Activity为context,也即和Activity共用token,符合上面的分析,所以不会报错,正常执行。
实现在一个Activity中显示一个Dialog,如下代码:
public class MainActivity extends AppCompatActivity {
@Override
protected void onCreate(Bundle savedInstanceState) {
setContentView(R.layout.activity_main);
Dialog dialog = new ProgressDialog(getApplicationContext());
dialog.setTitle("TestDialogContext");
dialog.show();
}
}
分析:传入的是Application的Context,导致TYPE_APPLICATION类型Dialog的token为null,所以抛出如下异常,无法显示对话框。
Caused by: android.view.WindowManager$BadTokenException: Unable to add window -- token null is not for an application
            at android.view.ViewRootImpl.setView(ViewRootImpl.java:566)
            at android.view.WindowManagerGlobal.addView(WindowManagerGlobal.java:272)
            at android.view.WindowManagerImpl.addView(WindowManagerImpl.java:69)
            at android.app.Dialog.show(Dialog.java:298)
实现在一个Service中显示一个Dialog,如下代码:
public class WindowService extends Service {
@Override
public IBinder onBind(Intent intent) {
return null;
}
@Override
public void onCreate() {
super.onCreate();
Dialog dialog = new ProgressDialog(this);
dialog.setTitle("TestDialogContext");
dialog.show();
}
}
分析:传入的Context是一个Service,类似上面传入ApplicationContext一样的后果,一样的原因,抛出如下异常:
Caused by: android.view.WindowManager$BadTokenException: Unable to add window -- token null is not for an application
            at android.view.ViewRootImpl.setView(ViewRootImpl.java:566)
            at android.view.WindowManagerGlobal.addView(WindowManagerGlobal.java:272)
            at android.view.WindowManagerImpl.addView(WindowManagerImpl.java:69)
            at android.app.Dialog.show(Dialog.java:298)
至此通过我们平时使用最多的Dialog也验证了Dialog成功显示的必要条件,同时也让大家避免了再次使用Dialog不当出现异常的情况,或者出现类似异常后知道真实的背后原因是什么的问题。
可以看见,Dialog的实质无非也是使用WindowManager的addView、updateViewLayout、removeView进行一些操作展示。
【工匠若水 http://blog.csdn.net/yanbober 转载烦请注明出处,尊重劳动成果】
4 Android应用PopWindow窗口添加显示机制源码
PopWindow实质就是弹出式菜单,它与Dialag不同的地方是不会使依赖的Activity组件失去焦点(PopupWindow弹出后可以继续与依赖的Activity进行交互),Dialog却不能这样。同时PopupWindow与Dialog另一个不同点是PopupWindow是一个阻塞的对话框,如果你直接在Activity的onCreate等方法中显示它则会报错,所以PopupWindow必须在某个事件中显示地或者是开启一个新线程去调用。
说这么多还是直接看代码吧。
4-1 PopWindow窗口源码分析
依据PopWindow的使用,我们选择最常用的方式来分析,如下先看其中常用的一种构造函数:
public class PopupWindow {
......
public PopupWindow(View contentView, int width, int height, boolean focusable) {
if (contentView != null) {
mContext = contentView.getContext();
mWindowManager = (WindowManager) mContext.getSystemService(Context.WINDOW_SERVICE);
}
setContentView(contentView);
setWidth(width);
setHeight(height);
setFocusable(focusable);
}
......
}
- 1
- 2
- 3
- 4
- 5
- 6
- 7
- 8
- 9
- 10
- 11
- 12
- 13
- 14
- 15
- 16
- 17
- 18
- 1
- 2
- 3
- 4
- 5
- 6
- 7
- 8
- 9
- 10
- 11
- 12
- 13
- 14
- 15
- 16
- 17
- 18
可以看见,构造函数只是初始化了一些变量,看完构造函数继续看下PopWindow的展示函数,如下:
public void showAsDropDown(View anchor, int xoff, int yoff, int gravity) {
......
WindowManager.LayoutParams p = createPopupLayout(anchor.getWindowToken());
preparePopup(p);
......
invokePopup(p);
}
可以看见,当我们想将PopWindow展示在anchor的下方向(Z轴是在anchor的上面)旁边时经理了上面三步,我们一步一步来分析,先看第一步,源码如下:
private WindowManager.LayoutParams createPopupLayout(IBinder token) {
WindowManager.LayoutParams p = new WindowManager.LayoutParams();
p.gravity = Gravity.START | Gravity.TOP;
p.width = mLastWidth = mWidth;
p.height = mLastHeight = mHeight;
if (mBackground != null) {
p.format = mBackground.getOpacity();
} else {
p.format = PixelFormat.TRANSLUCENT;
}
p.flags = computeFlags(p.flags);
p.type = mWindowLayoutType;
p.token = token;
......
return p;
}
- 1
- 2
- 3
- 4
- 5
- 6
- 7
- 8
- 9
- 10
- 11
- 12
- 13
- 14
- 15
- 16
- 17
- 18
- 19
- 20
- 21
- 22
- 23
- 1
- 2
- 3
- 4
- 5
- 6
- 7
- 8
- 9
- 10
- 11
- 12
- 13
- 14
- 15
- 16
- 17
- 18
- 19
- 20
- 21
- 22
- 23
接着回到showAsDropDown方法看看第二步,如下源码:
private void preparePopup(WindowManager.LayoutParams p) {
......
if (mBackground != null) {
......
PopupViewContainer popupViewContainer = new PopupViewContainer(mContext);
PopupViewContainer.LayoutParams listParams = new PopupViewContainer.LayoutParams(
ViewGroup.LayoutParams.MATCH_PARENT, height
);
popupViewContainer.setBackground(mBackground);
popupViewContainer.addView(mContentView, listParams);
mPopupView = popupViewContainer;
} else {
mPopupView = mContentView;
}
......
}
- 1
- 2
- 3
- 4
- 5
- 6
- 7
- 8
- 9
- 10
- 11
- 12
- 13
- 14
- 15
- 16
- 17
- 18
- 19
- 20
- 21
- 22
- 1
- 2
- 3
- 4
- 5
- 6
- 7
- 8
- 9
- 10
- 11
- 12
- 13
- 14
- 15
- 16
- 17
- 18
- 19
- 20
- 21
- 22
可以看见preparePopup方法的作用就是判断设置View,如果有背景则会在传入的contentView外面包一层PopupViewContainer(实质是一个重写了事件处理的FrameLayout)之后作为mPopupView,如果没有背景则直接用contentView作为mPopupView。我们再来看下这里的PopupViewContainer类,如下源码:
    private class PopupViewContainer extends FrameLayout {
        ......
        @Override
        protected int[] onCreateDrawableState(int extraSpace) {
            ......
        }

        @Override
        public boolean dispatchKeyEvent(KeyEvent event) {
            ......
        }

        @Override
        public boolean dispatchTouchEvent(MotionEvent ev) {
            if (mTouchInterceptor != null && mTouchInterceptor.onTouch(this, ev)) {
                return true;
            }
            return super.dispatchTouchEvent(ev);
        }

        @Override
        public boolean onTouchEvent(MotionEvent event) {
            ......
            if(xxx) {
                dismiss();
            }
            ......
        }

        @Override
        public void sendAccessibilityEvent(int eventType) {
            ......
        }
    }
- 1
- 2
- 3
- 4
- 5
- 6
- 7
- 8
- 9
- 10
- 11
- 12
- 13
- 14
- 15
- 16
- 17
- 18
- 19
- 20
- 21
- 22
- 23
- 24
- 25
- 26
- 27
- 28
- 29
- 30
- 31
- 32
- 33
- 34
- 1
- 2
- 3
- 4
- 5
- 6
- 7
- 8
- 9
- 10
- 11
- 12
- 13
- 14
- 15
- 16
- 17
- 18
- 19
- 20
- 21
- 22
- 23
- 24
- 25
- 26
- 27
- 28
- 29
- 30
- 31
- 32
- 33
- 34
可以看见,这个PopupViewContainer是一个PopWindow的内部私有类,它继承了FrameLayout,在其中重写了Key和Touch事件的分发处理逻辑。同时查阅PopupView可以发现,PopupView类自身没有重写Key和Touch事件的处理,所以如果没有将传入的View对象放入封装的ViewGroup中,则点击Back键或者PopWindow以外的区域PopWindow是不会消失的(其实PopWindow中没有向Activity及Dialog一样new新的Window,所以不会有新的callback设置,也就没法处理事件消费了)。
接着继续回到showAsDropDown方法看看第三步,如下源码:
    private void invokePopup(WindowManager.LayoutParams p) {
        if (mContext != null) {
            p.packageName = mContext.getPackageName();
        }
        mPopupView.setFitsSystemWindows(mLayoutInsetDecor);
        setLayoutDirectionFromAnchor();
        mWindowManager.addView(mPopupView, p);
    }
可以看见,这里使用了Activity的WindowManager将我们的PopWindow进行了显示。
到此可以发现,PopWindow的实质无非也是使用WindowManager的addView、updateViewLayout、removeView进行一些操作展示。与Dialog不同的地方是没有新new Window而已(也就没法设置callback,无法消费事件,也就是前面说的PopupWindow弹出后可以继续与依赖的Activity进行交互的原因)。
到此PopWindw的窗口加载显示机制就分析完毕了,接下来进行总结与应用开发技巧提示。
4-2 PopWindow窗口源码分析总结及应用开发技巧提示
通过上面分析可以发现总结如下图:
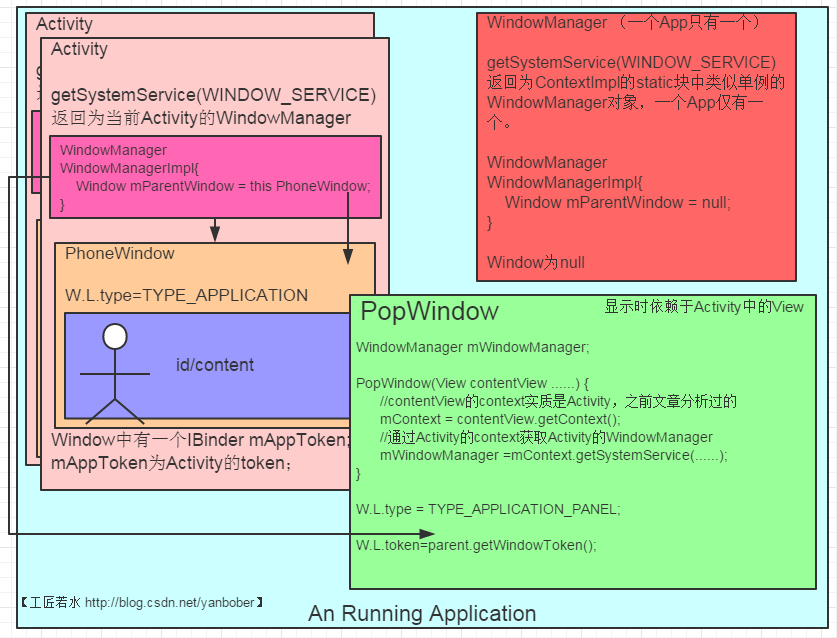
可以看见,PopWindow完全使用了Activity的Window与WindowManager,相对来说比较简单容易记理解。
再来看一个开发技巧:
如果设置了PopupWindow的background,则点击Back键或者点击PopupWindow以外的区域时PopupWindow就会dismiss;如果不设置PopupWindow的background,则点击Back键或者点击PopupWindow以外的区域PopupWindow不会消失。
【工匠若水 http://blog.csdn.net/yanbober 转载烦请注明出处,尊重劳动成果】
5 Android应用Toast窗口添加显示机制源码
5-1 基础知识准备
在开始分析这几个窗口之前需要脑补一点东东,我们从应用层开发来直观脑补,这样下面分析源码时就不蛋疼了。如下是一个我们写的两个应用实现Service跨进程调用服务ADIL的例子,客户端调运远程Service的start与stop方法控制远程Service的操作。
Android系统中的应用程序都运行在各自的进程中,进程之间是无法直接交换数据的,但是Android为开发者提供了AIDL跨进程调用Service的功能。其实AIDL就相当于双方约定的一个规则而已。
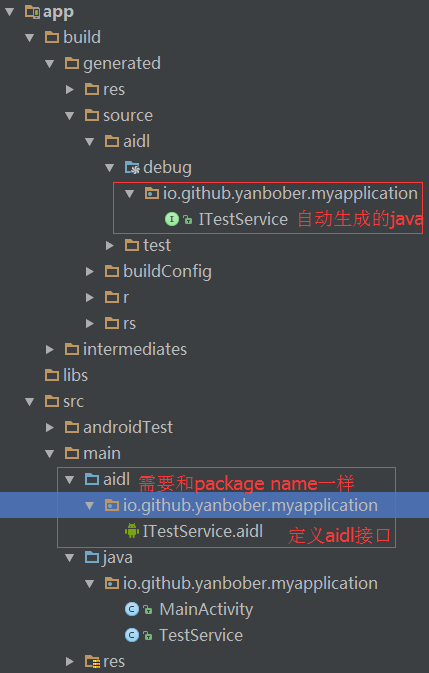
先看下在Android Studio中AIDL开发的工程目录结构,如下:
由于AIDL文件中不能出现访问修饰符(如public),同时AIDL文件在两个项目中要完全一致而且只支持基本类型,所以我们定义的AIDL文件如下:
ITestService.aidl
package io.github.yanbober.myapplication;

interface ITestService {
    void start(int id);
    void stop(int id);
}
再来看下依据aidl文件自动生成的ITestService.java文件吧,如下:
package io.github.yanbober.myapplication;
public interface ITestService extends android.os.IInterface
{
public static abstract class Stub extends android.os.Binder implements io.github.yanbober.myapplication.ITestService
{
......
public static io.github.yanbober.myapplication.ITestService asInterface(android.os.IBinder obj)
{
......
}
......
private static class Proxy implements io.github.yanbober.myapplication.ITestService
{
......
@Override
public void start(int id) throws android.os.RemoteException
{
......
}
@Override
public void stop(int id) throws android.os.RemoteException
{
......
}
}
......
}
public void start(int id) throws android.os.RemoteException;
public void stop(int id) throws android.os.RemoteException;
}
- 1
- 2
- 3
- 4
- 5
- 6
- 7
- 8
- 9
- 10
- 11
- 12
- 13
- 14
- 15
- 16
- 17
- 18
- 19
- 20
- 21
- 22
- 23
- 24
- 25
- 26
- 27
- 28
- 29
- 30
- 31
- 32
- 33
- 34
- 35
- 36
- 37
- 38
- 39
- 1
- 2
- 3
- 4
- 5
- 6
- 7
- 8
- 9
- 10
- 11
- 12
- 13
- 14
- 15
- 16
- 17
- 18
- 19
- 20
- 21
- 22
- 23
- 24
- 25
- 26
- 27
- 28
- 29
- 30
- 31
- 32
- 33
- 34
- 35
- 36
- 37
- 38
- 39
这就是自动生成的java文件,接下来我们看看服务端的Service源码,如下:
public class TestService extends Service {
private TestBinder mTestBinder;
public class TestBinder extends ITestService.Stub {
@Override
public void start(int id) throws RemoteException {
Log.i(null, "Server Service is start!");
}
@Override
public void stop(int id) throws RemoteException {
Log.i(null, "Server Service is stop!");
}
}
@Override
public IBinder onBind(Intent intent) {
return mTestBinder;
}
@Override
public void onCreate() {
super.onCreate();
mTestBinder = new TestBinder();
}
}
- 1
- 2
- 3
- 4
- 5
- 6
- 7
- 8
- 9
- 10
- 11
- 12
- 13
- 14
- 15
- 16
- 17
- 18
- 19
- 20
- 21
- 22
- 23
- 24
- 25
- 26
- 27
- 28
- 29
- 30
- 31
- 32
- 33
- 1
- 2
- 3
- 4
- 5
- 6
- 7
- 8
- 9
- 10
- 11
- 12
- 13
- 14
- 15
- 16
- 17
- 18
- 19
- 20
- 21
- 22
- 23
- 24
- 25
- 26
- 27
- 28
- 29
- 30
- 31
- 32
- 33
现在服务端App的代码已经OK,我们来看下客户端的代码。客户端首先也要像上面的工程结构一样,把AIDL文件放好,接着在客户端使用远程服务端的Service代码如下:
public class MainActivity extends Activity {
private static final String REMOT_SERVICE_ACTION = "io.github.yanbober.myapplication.aidl";
private Button mStart, mStop;
private ITestService mBinder;
private ServiceConnection connection = new ServiceConnection() {
@Override
public void onServiceConnected(ComponentName name, IBinder service) {
mBinder = ITestService.Stub.asInterface(service);
}
@Override
public void onServiceDisconnected(ComponentName name) {
}
};
@Override
protected void onCreate(Bundle savedInstanceState) {
super.onCreate(savedInstanceState);
setContentView(R.layout.activity_main);
mStart = (Button) this.findViewById(R.id.start);
mStop = (Button) this.findViewById(R.id.stop);
mStart.setOnClickListener(clickListener);
mStop.setOnClickListener(clickListener);
bindService(new Intent(REMOT_SERVICE_ACTION), connection, BIND_AUTO_CREATE);
}
@Override
protected void onDestroy() {
super.onDestroy();
unbindService(connection);
}
private View.OnClickListener clickListener = new View.OnClickListener() {
@Override
public void onClick(View v) {
switch (v.getId()) {
case R.id.start:
try {
mBinder.start(0x110);
} catch (RemoteException e) {
e.printStackTrace();
}
break;
case R.id.stop:
try {
mBinder.stop(0x120);
} catch (RemoteException e) {
e.printStackTrace();
}
break;
}
}
};
}
- 1
- 2
- 3
- 4
- 5
- 6
- 7
- 8
- 9
- 10
- 11
- 12
- 13
- 14
- 15
- 16
- 17
- 18
- 19
- 20
- 21
- 22
- 23
- 24
- 25
- 26
- 27
- 28
- 29
- 30
- 31
- 32
- 33
- 34
- 35
- 36
- 37
- 38
- 39
- 40
- 41
- 42
- 43
- 44
- 45
- 46
- 47
- 48
- 49
- 50
- 51
- 52
- 53
- 54
- 55
- 56
- 57
- 58
- 59
- 60
- 61
- 62
- 63
- 64
到此你对应用层通过AIDL使用远程Service的形式已经很熟悉了,至于实质的通信使用Binder的机制我们后面会写文章一步一步往下分析。到此的准备知识已经足够用来理解下面我们的源码分析了。
5-2 Toast窗口源码分析
我们常用的Toast窗口其实和前面分析的Activity、Dialog、PopWindow都是不同的,因为它和输入法、墙纸类似,都是系统窗口。
我们还是按照最常用的方式来分析源码吧。
我们先看下Toast的静态makeText方法吧,如下:
public static Toast makeText(Context context, CharSequence text, @Duration int duration) {
Toast result = new Toast(context);
LayoutInflater inflate = (LayoutInflater)
context.getSystemService(Context.LAYOUT_INFLATER_SERVICE);
View v = inflate.inflate(com.android.internal.R.layout.transient_notification, null);
TextView tv = (TextView)v.findViewById(com.android.internal.R.id.message);
tv.setText(text);
result.mNextView = v;
result.mDuration = duration;
return result;
}
- 1
- 2
- 3
- 4
- 5
- 6
- 7
- 8
- 9
- 10
- 11
- 12
- 13
- 14
- 15
- 16
- 17
- 18
- 1
- 2
- 3
- 4
- 5
- 6
- 7
- 8
- 9
- 10
- 11
- 12
- 13
- 14
- 15
- 16
- 17
- 18
可以看见,这个方法构造了一个Toast,然后把要显示的文本放到这个View的TextView中,然后初始化相关属性后返回这个新的Toast对象。
当我们有了这个Toast对象之后,可以通过show方法来显示出来,如下看下show方法源码:
public void show() {
......
INotificationManager service = getService();
String pkg = mContext.getOpPackageName();
TN tn = mTN;
tn.mNextView = mNextView;
try {
service.enqueueToast(pkg, tn, mDuration);
} catch (RemoteException e) {
}
}
我们看看show方法中调运的getService方法,如下:
private static INotificationManager sService;
static private INotificationManager getService() {
if (sService != null) {
return sService;
}
sService = INotificationManager.Stub.asInterface(ServiceManager.getService("notification"));
return sService;
}
通过上面我们的基础脑补实例你也能看懂这个getService方法了吧。那接着我们来看mTN吧,好像mTN在Toast的构造函数里见过一眼,我们来看看,如下:
    public Toast(Context context) {
        mContext = context;
        mTN = new TN();
        mTN.mY = context.getResources().getDimensionPixelSize(
                com.android.internal.R.dimen.toast_y_offset);
        mTN.mGravity = context.getResources().getInteger(
                com.android.internal.R.integer.config_toastDefaultGravity);
    }
可以看见mTN确实是在构造函数中实例化的,那我们就来看看这个TN类,如下:
private static class TN extends ITransientNotification.Stub {
......
@Override
public void show() {
if (localLOGV) Log.v(TAG, "SHOW: " + this);
mHandler.post(mShow);
}
@Override
public void hide() {
if (localLOGV) Log.v(TAG, "HIDE: " + this);
mHandler.post(mHide);
}
......
}
- 1
- 2
- 3
- 4
- 5
- 6
- 7
- 8
- 9
- 10
- 11
- 12
- 13
- 14
- 15
- 16
- 17
- 1
- 2
- 3
- 4
- 5
- 6
- 7
- 8
- 9
- 10
- 11
- 12
- 13
- 14
- 15
- 16
- 17
看见没有,TN是Toast内部的一个私有静态类,继承自ITransientNotification.Stub。你这时指定好奇ITransientNotification.Stub是个啥玩意,对吧?其实你在上面的脑补实例中见过它的,他出现在服务端实现的Service中,就是一个Binder对象,也就是对一个aidl文件的实现而已,我们看下这个ITransientNotification.aidl文件,如下:
package android.app;

/** @hide */
oneway interface ITransientNotification {
    void show();
    void hide();
}
看见没有,和我们上面的例子很类似吧。
再回到上面分析的show()方法中可以看到,我们的Toast是传给远程的NotificationManagerService管理的,为了NotificationManagerService回到我们的应用程序(回调),我们需要告诉NotificationManagerService我们当前程序的Binder引用是什么(也就是TN)。是不是觉得和上面例子有些不同,这里感觉Toast又充当客户端,又充当服务端的样子,实质就是一个回调过程而已。
继续来看Toast中的show方法的service.enqueueToast(pkg, tn, mDuration);语句,service实质是远程的NotificationManagerService,所以enqueueToast方法就是NotificationManagerService类的,如下:
private final IBinder mService = new INotificationManager.Stub() {
@Override
public void enqueueToast(String pkg, ITransientNotification callback, int duration)
{
......
synchronized (mToastQueue) {
int callingPid = Binder.getCallingPid();
long callingId = Binder.clearCallingIdentity();
try {
ToastRecord record;
int index = indexOfToastLocked(pkg, callback);
if (index >= 0) {
record = mToastQueue.get(index);
record.update(duration);
} else {
......
record = new ToastRecord(callingPid, pkg, callback, duration);
mToastQueue.add(record);
index = mToastQueue.size() - 1;
keepProcessAliveLocked(callingPid);
}
if (index == 0) {
showNextToastLocked();
}
} finally {
Binder.restoreCallingIdentity(callingId);
}
}
}
}
- 1
- 2
- 3
- 4
- 5
- 6
- 7
- 8
- 9
- 10
- 11
- 12
- 13
- 14
- 15
- 16
- 17
- 18
- 19
- 20
- 21
- 22
- 23
- 24
- 25
- 26
- 27
- 28
- 29
- 30
- 31
- 32
- 33
- 34
- 35
- 36
- 37
- 38
- 39
- 40
- 41
- 42
- 43
- 1
- 2
- 3
- 4
- 5
- 6
- 7
- 8
- 9
- 10
- 11
- 12
- 13
- 14
- 15
- 16
- 17
- 18
- 19
- 20
- 21
- 22
- 23
- 24
- 25
- 26
- 27
- 28
- 29
- 30
- 31
- 32
- 33
- 34
- 35
- 36
- 37
- 38
- 39
- 40
- 41
- 42
- 43
继续看下该方法中调运的showNextToastLocked方法,如下:
void showNextToastLocked() {
ToastRecord record = mToastQueue.get(0);
while (record != null) {
try {
record.callback.show();
scheduleTimeoutLocked(record);
return;
} catch (RemoteException e) {
......
}
}
}
继续先看下该方法中调运的scheduleTimeoutLocked方法,如下:
private void scheduleTimeoutLocked(ToastRecord r)
{
mHandler.removeCallbacksAndMessages(r);
Message m = Message.obtain(mHandler, MESSAGE_TIMEOUT, r);
long delay = r.duration == Toast.LENGTH_LONG ? LONG_DELAY : SHORT_DELAY;
mHandler.sendMessageDelayed(m, delay);
}
可以看见这里先回调了Toast的TN的show,下面timeout可能就是hide了。接着还在该类的mHandler处理了这条消息,然后调运了如下处理方法:
    private void handleTimeout(ToastRecord record)
    {
        ......
        synchronized (mToastQueue) {
            int index = indexOfToastLocked(record.pkg, record.callback);
            if (index >= 0) {
                cancelToastLocked(index);
            }
        }
    }
我们继续看cancelToastLocked方法,如下:
void cancelToastLocked(int index) {
ToastRecord record = mToastQueue.get(index);
try {
record.callback.hide();
} catch (RemoteException e) {
......
}
mToastQueue.remove(index);
keepProcessAliveLocked(record.pid);
if (mToastQueue.size() > 0) {
showNextToastLocked();
}
}
到此可以发现,Toast的远程管理NotificationManagerService类的处理实质是通过Handler发送延时消息显示取消Toast的,而且在远程NotificationManagerService类中又远程回调了Toast的TN类实现的show与hide方法。
现在我们就回到Toast的TN类再看看这个show与hide方法,如下:
```java
private static class TN extends ITransientNotification.Stub {
......
final Handler mHandler = new Handler();
......
final Runnable mShow = new Runnable() {
@Override
public void run() {
handleShow();
}
};
final Runnable mHide = new Runnable() {
@Override
public void run() {
handleHide();
mNextView = null;
}
};
......
@Override
public void show() {
if (localLOGV) Log.v(TAG, "SHOW: " + this);
mHandler.post(mShow);
}
@Override
public void hide() {
if (localLOGV) Log.v(TAG, "HIDE: " + this);
mHandler.post(mHide);
}
......
}
- 1
- 2
- 3
- 4
- 5
- 6
- 7
- 8
- 9
- 10
- 11
- 12
- 13
- 14
- 15
- 16
- 17
- 18
- 19
- 20
- 21
- 22
- 23
- 24
- 25
- 26
- 27
- 28
- 29
- 30
- 31
- 32
- 33
- 34
- 35
- 36
- 1
- 2
- 3
- 4
- 5
- 6
- 7
- 8
- 9
- 10
- 11
- 12
- 13
- 14
- 15
- 16
- 17
- 18
- 19
- 20
- 21
- 22
- 23
- 24
- 25
- 26
- 27
- 28
- 29
- 30
- 31
- 32
- 33
- 34
- 35
- 36
可以看见,这里实现aidl接口的方法实质是通过handler的post来执行的一个方法,而这个Handler仅仅只是new了一下,也就是说,如果我们写APP时使用Toast在子线程中则需要自行准备Looper对象,只有主线程Activity创建时帮忙准备了Looper(关于Handler与Looper如果整不明白请阅读《Android异步消息处理机制详解及源码分析》)。
那我们重点关注一下handleShow与handleHide方法,如下:
public void handleShow() {
if (localLOGV) Log.v(TAG, "HANDLE SHOW: " + this + " mView=" + mView
+ " mNextView=" + mNextView);
if (mView != mNextView) {
handleHide();
mView = mNextView;
Context context = mView.getContext().getApplicationContext();
String packageName = mView.getContext().getOpPackageName();
if (context == null) {
context = mView.getContext();
}
mWM = (WindowManager)context.getSystemService(Context.WINDOW_SERVICE);
......
if (mView.getParent() != null) {
......
mWM.removeView(mView);
}
......
mWM.addView(mView, mParams);
......
}
}
- 1
- 2
- 3
- 4
- 5
- 6
- 7
- 8
- 9
- 10
- 11
- 12
- 13
- 14
- 15
- 16
- 17
- 18
- 19
- 20
- 21
- 22
- 23
- 24
- 25
- 26
- 27
- 1
- 2
- 3
- 4
- 5
- 6
- 7
- 8
- 9
- 10
- 11
- 12
- 13
- 14
- 15
- 16
- 17
- 18
- 19
- 20
- 21
- 22
- 23
- 24
- 25
- 26
- 27
public void handleHide() {
if (mView != null) {
if (mView.getParent() != null) {
mWM.removeView(mView);
}
mView = null;
}
}
到此Toast的窗口添加原理就分析完毕了,接下来我们进行总结。
5-3 Toast窗口源码分析总结及应用开发技巧
经过上面的分析我们总结如下:
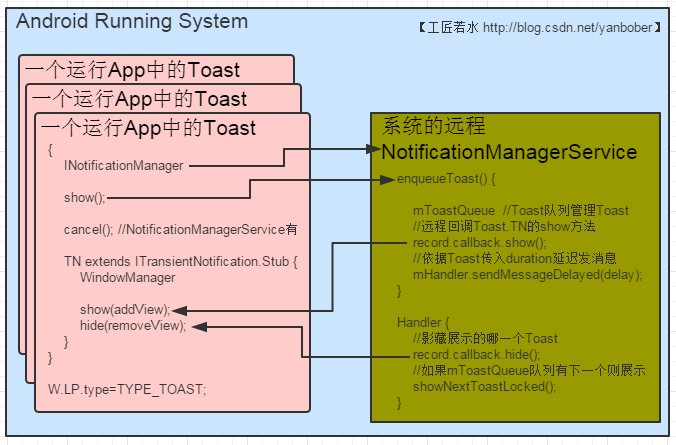
通过上面分析及上图直观描述可以发现,之所以Toast的显示交由远程的NotificationManagerService管理是因为Toast是每个应用程序都会弹出的,而且位置和UI风格都差不多,所以如果我们不统一管理就会出现覆盖叠加现象,同时导致不好控制,所以Google把Toast设计成为了系统级的窗口类型,由NotificationManagerService统一队列管理。
在我们开发应用程序时使用Toast注意事项:
-
通过分析TN类的handler可以发现,如果想在非UI线程使用Toast需要自行声明Looper,否则运行会抛出Looper相关的异常;UI线程不需要,因为系统已经帮忙声明。
-
在使用Toast时context参数尽量使用getApplicationContext(),可以有效的防止静态引用导致的内存泄漏。
-
有时候我们会发现Toast弹出过多就会延迟显示,因为上面源码分析可以看见Toast.makeText是一个静态工厂方法,每次调用这个方法都会产生一个新的Toast对象,当我们在这个新new的对象上调用show方法就会使这个对象加入到NotificationManagerService管理的mToastQueue消息显示队列里排队等候显示;所以如果我们不每次都产生一个新的Toast对象(使用单例来处理)就不需要排队,也就能及时更新了。
6 Android应用Activity、Dialog、PopWindow、Toast窗口显示机制总结
可以看见上面无论Acitivty、Dialog、PopWindow、Toast的实质其实都是如下接口提供的方法操作:
public interface ViewManager
{
    public void addView(View view, ViewGroup.LayoutParams params);
    public void updateViewLayout(View view, ViewGroup.LayoutParams params);
    public void removeView(View view);
}
整个应用各种窗口的显示都离不开这三个方法而已,只是token及type与Window是否共用的问题。


 1198
1198

 被折叠的 条评论
为什么被折叠?
被折叠的 条评论
为什么被折叠?
 到【灌水乐园】发言


