


前言
spring同样提供了一套对jdbc的封装代码,并且可以配置数据源(DataSource,数据库连接池)。这样一来,写程序的时候就可以专注于业务逻辑(增删改查等),而不用去管数据库的连接和关闭等琐事。
这套代码封装就是JdbcTemplate模板,该模板已经封装进了Spring框架,为了使用它,我们要在配置文件中配置bean。
正文
一,生成jdbcTemplate并测试
1,首先编写数据库连接的db.properties文件
jdbc.DriverClass=com.mysql.jdbc.Driver
jdbc.URL=jdbc:mysql:///user
jdbc.username=root
jdbc.password=123456
2,然后编写spring的配置文件
<?xml version="1.0" encoding="UTF-8"?>
<beans xmlns="http://www.springframework.org/schema/beans"
       xmlns:xsi="http://www.w3.org/2001/XMLSchema-instance"
       xmlns:jdbc="http://www.springframework.org/schema/jdbc"
       xmlns:context="http://www.springframework.org/schema/context"
       xsi:schemaLocation="
                http://www.springframework.org/schema/beans
                http://www.springframework.org/schema/beans/spring-beans.xsd
                http://www.springframework.org/schema/jdbc
                http://www.springframework.org/schema/jdbc/spring-jdbc.xsd
                http://www.springframework.org/schema/context
                http://www.springframework.org/schema/context/spring-context.xsd">

    <!-- 读取property文件 -->
    <context:property-placeholder location="classpath:com/jimmy/jdbcTemplateTest/db.properties"/>

    <!-- 生成c3p0连接池 -->
    <bean id="dataSourceId" class="com.mchange.v2.c3p0.ComboPooledDataSource">
        <property name="driverClass" value="${jdbc.DriverClass}"></property>
        <property name="jdbcUrl" value="${jdbc.URL}"></property>
        <property name="user" value="${jdbc.username}"></property>
        <property name="password" value="${jdbc.password}"></property>
    </bean>

    <!-- 生成jdbcTemplate,并注入连接池 -->
    <bean id="jdbcTemplateId" class="org.springframework.jdbc.core.JdbcTemplate">
        <property name="dataSource" ref="dataSourceId"></property>
    </bean>

</beans>
3,已经生成了bean对象,现在获取并测试它
package com.jimmy.jdbcTemplateTest;

import org.junit.Test;
import org.springframework.context.ApplicationContext;
import org.springframework.context.support.ClassPathXmlApplicationContext;
import org.springframework.jdbc.core.JdbcTemplate;
import org.springframework.jdbc.core.support.JdbcDaoSupport;

public class Test1 {
    @Test
    public void test1() {
        String xmlPath = "com/jimmy/jdbcTemplateTest/applicationContext.xml";
        ApplicationContext applicationContext = new ClassPathXmlApplicationContext(xmlPath);

        JdbcTemplate jdbcTemplate = (JdbcTemplate) applicationContext.getBean("jdbcTemplateId");
        jdbcTemplate.update("insert into user4(username, password,age) values(?,?,?)", "jimmy","sss",26);
    }
}
二,JdbcDaoSupport的使用
一般地,我们把直接操作数据库的代码放在“dao”层。为了简化操作,我们把“dao”层的类继承自JdbcDaoSupport类,然后JdbcDaoSupport类会替我们生成数据源,生成jdbcTemplate。我们只需要在我们的dao类中调用父类(JdbcDaoSupport)生成好的jdbcTemplate即可。
首先我们来看一下JdbcDaoSupport的部分源码:
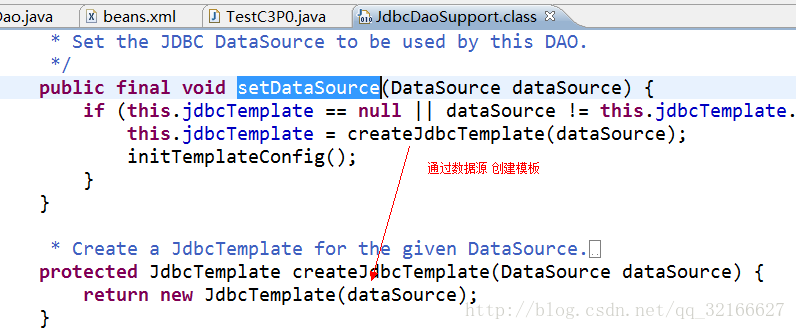
既然父类有“生成数据源“和“生成jdbcTemplate”的方法,那么,子类当然也有这些方法。这样我们就可以配置我们自己的dao类并注入数据源,生成jdbcTemplate啦。下面来写代码测试JdbcDaoSupport的使用。
1,首先编写数据库连接的db.properties文件
jdbc.DriverClass=com.mysql.jdbc.Driver
jdbc.URL=jdbc:mysql:///user
jdbc.username=root
jdbc.password=123456
2,编写dao类,继承自JdbcDaoSupport
package com.jimmy.jdbcDaoSupportTest;

import org.springframework.jdbc.core.support.JdbcDaoSupport;

public class Dao extends JdbcDaoSupport{

    public void addUser() {
        this.getJdbcTemplate().update("insert into user4(username, password,age) values(?,?,?)", "jimmy","sss",25);
    }
}
3,编写Spring配置文件
<?xml version="1.0" encoding="UTF-8"?>
<beans xmlns="http://www.springframework.org/schema/beans"
       xmlns:xsi="http://www.w3.org/2001/XMLSchema-instance"
       xmlns:jdbc="http://www.springframework.org/schema/jdbc"
       xmlns:context="http://www.springframework.org/schema/context"
       xsi:schemaLocation="
                http://www.springframework.org/schema/beans
                http://www.springframework.org/schema/beans/spring-beans.xsd
                http://www.springframework.org/schema/jdbc
                http://www.springframework.org/schema/jdbc/spring-jdbc.xsd
                http://www.springframework.org/schema/context
                http://www.springframework.org/schema/context/spring-context.xsd">

    <!-- 读取property文件 -->
    <context:property-placeholder location="classpath:com/jimmy/jdbcDaoSupportTest/db.properties"/>

    <!-- 生成c3p0连接池 -->
    <bean id="dataSourceId" class="com.mchange.v2.c3p0.ComboPooledDataSource">
        <property name="driverClass" value="${jdbc.DriverClass}"></property>
        <property name="jdbcUrl" value="${jdbc.URL}"></property>
        <property name="user" value="${jdbc.username}"></property>
        <property name="password" value="${jdbc.password}"></property>
    </bean>

    <!-- 生成我们自己的jdbcTemplate,并注入连接池 -->
    <bean id="jdbcTemplateId" class="com.jimmy.jdbcDaoSupportTest.Dao">
        <property name="dataSource" ref="dataSourceId"></property>
    </bean>
</beans>
4,测试
package com.jimmy.jdbcDaoSupportTest;

import org.junit.Test;
import org.springframework.context.ApplicationContext;
import org.springframework.context.support.ClassPathXmlApplicationContext;

public class Test1 {
    @Test
    public void test1() {
        String xmlPath = "com/jimmy/jdbcDaoSupportTest/applicationContext.xml";
        ApplicationContext applicationContext = new ClassPathXmlApplicationContext(xmlPath);

        Dao dao = (Dao) applicationContext.getBean("jdbcTemplateId");
        dao.addUser();
    }
}
总结
jdbcTemplate就是一套对jdbc的封装,可以简化程序员的代码。Spring同样也对ORM数据库封装框架(如hibernate,mybatis等)有很好地支持,以后介绍Spring集成这些框架。


 3353
3353

 被折叠的 条评论
为什么被折叠?
被折叠的 条评论
为什么被折叠?
 到【灌水乐园】发言


