


Nacos使用实践
背景
本文主要整理了如何使用nacos作为微服务的注册中心、配置中心以及开启鉴权。
软件版本
Spring Boot 2.6.7
Spring Cloud 2021.0.2
Spring Cloud Alibaba 2021.0.1.0
Nacos 2.1.0
Nacos Server部署
本次部署采用的是源码构建的方式。
通过官方github,下载Nacos最新源码,执行如下命令编译项目:
git clone https://github.com/alibaba/nacos.git
cd nacos/
mvn -Prelease-nacos -Dmaven.test.skip=true clean install -U
进入编译后的目录,启动nacos服务,本次使用的单机模式运行:
cd distribution/target/nacos-server-$version/nacos/bin
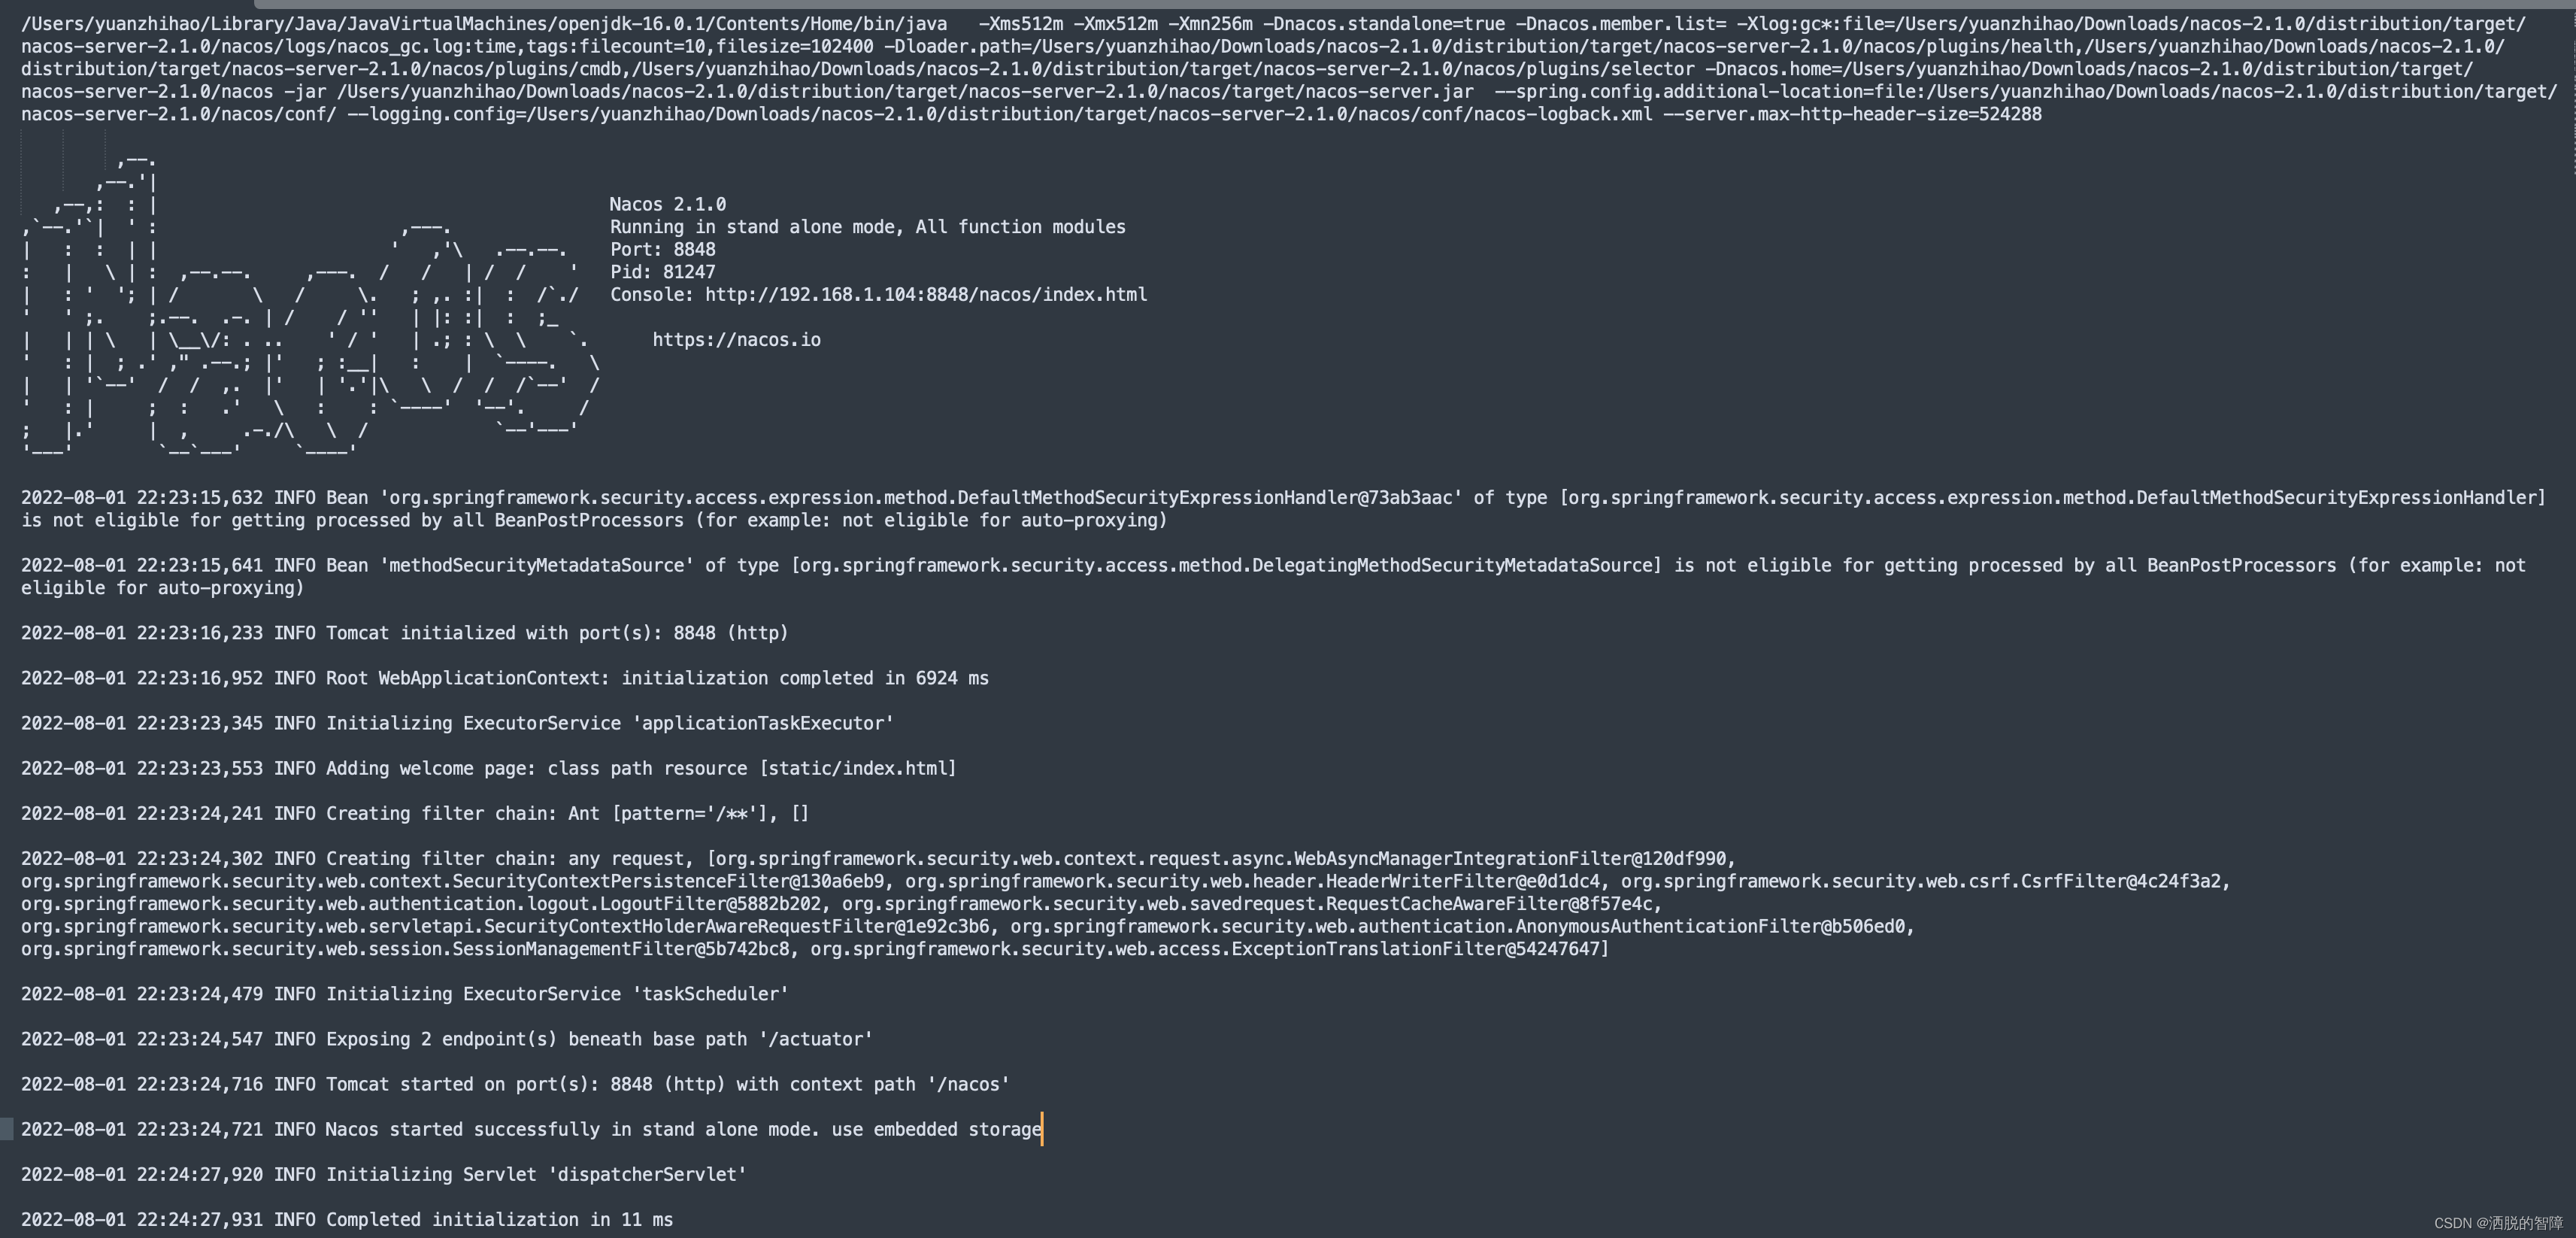
sh startup.sh -m standalone
启动ok:
通过url http://localhost:8848/nacos/index.html 访问nacos控制台,账号密码默认为nacos/nacos:
服务注册发现
Eureka可以很平滑的切换到Nacos,只需要修改部分依赖和配置信息,就可以实现之前Eureka提供的服务注册发现和客户端负载均衡的功能。
本次验证的工程图示如下:
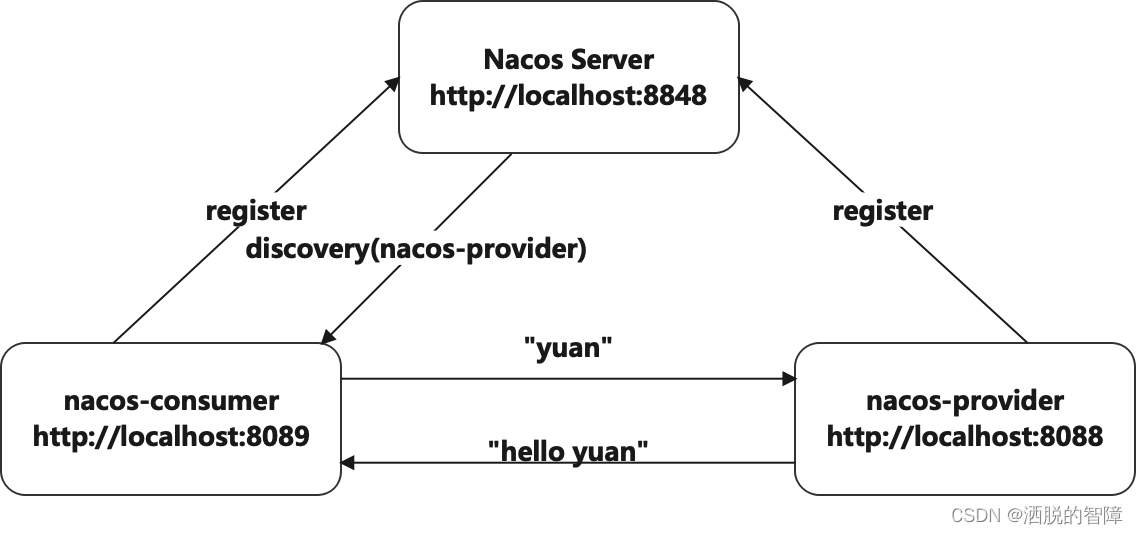
提供一个生产者和消费者,注册到Nacos Server上面。并且由消费者consumer去请求生产者provider提供的接口。
服务注册发现
首先添加依赖:
<dependency>
  <groupId>org.springframework.boot</groupId>
  <artifactId>spring-boot-starter-web</artifactId>
</dependency>
<dependency>
  <groupId>com.alibaba.cloud</groupId>
  <artifactId>spring-cloud-starter-alibaba-nacos-discovery</artifactId>
</dependency>
在application.properties配置文件中添加Nacos Server地址:
spring.application.name=nacos-provider
server.port=8088
spring.cloud.nacos.discovery.server-addr=http://localhost:8848
启动类配置@EnableDiscoveryClient注解开启服务注册发现功能,和之前eureka一样:
/**
 * 生产者
 *
 * @author yuanzhihao
 * @since 2022/8/1
 */
@SpringBootApplication
@EnableDiscoveryClient
public class NacosProviderApplication {
    public static void main(String[] args) {
        SpringApplication.run(NacosProviderApplication.class, args);
    }
}
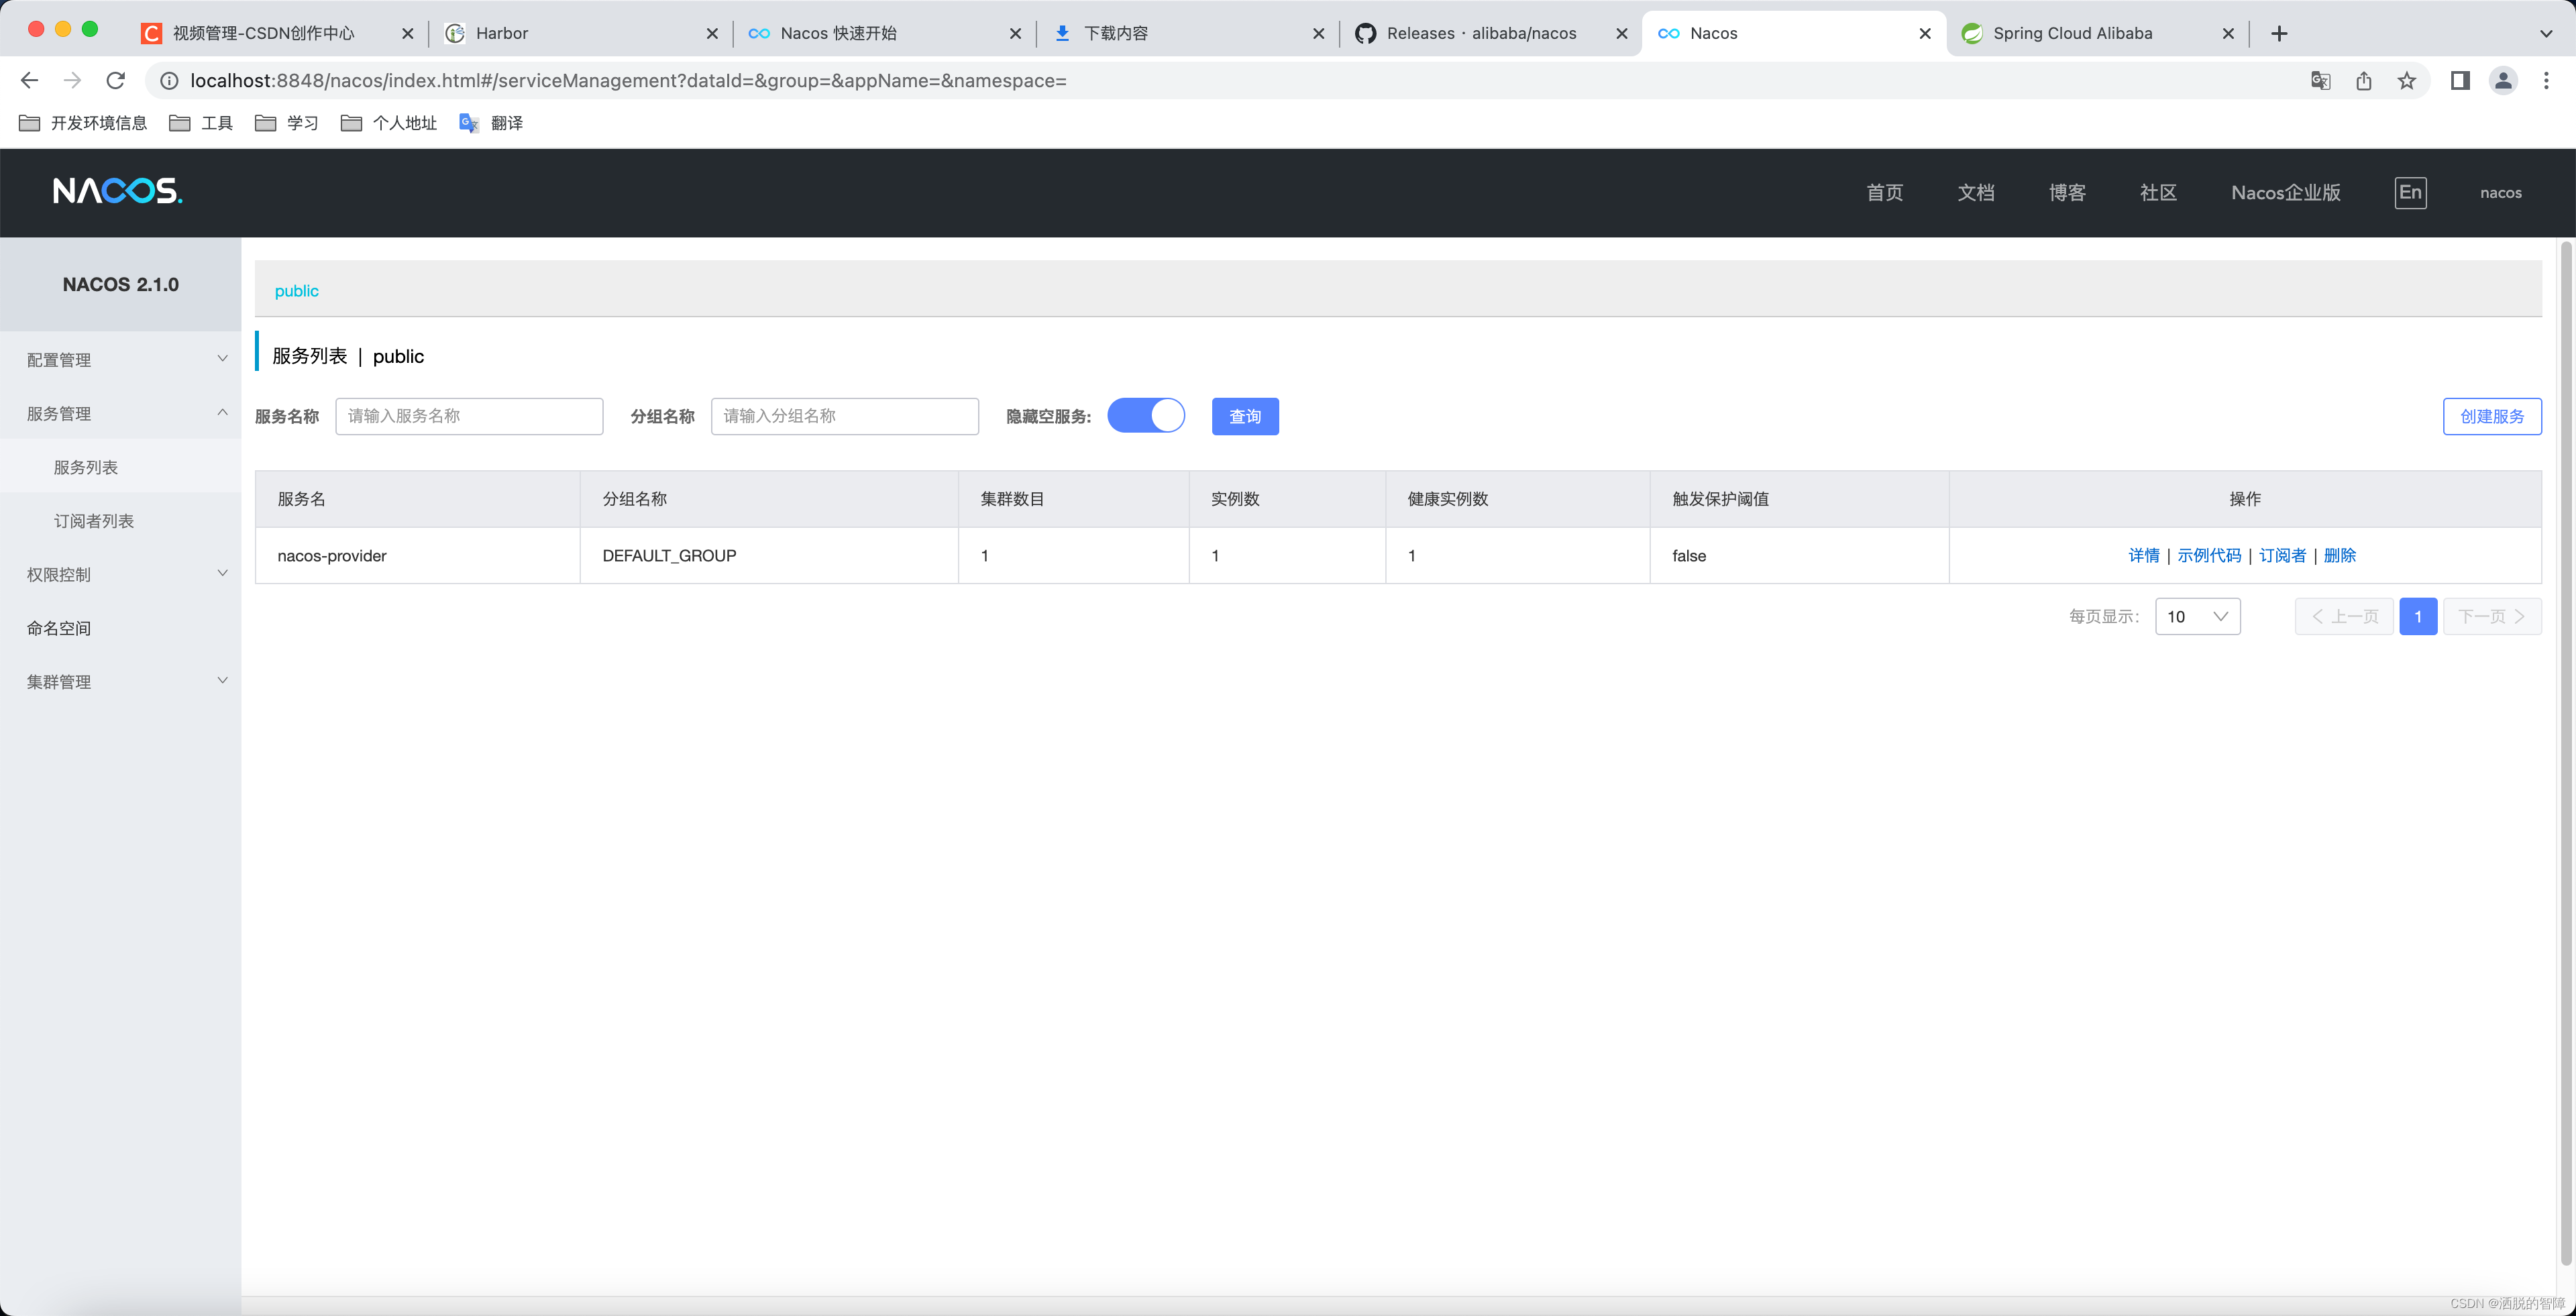
启动服务,可以看到服务nacos-provider已经注册到nacos上,这样就完成了服务注册:
客户端负载均衡
对于消费端nacos-consumer,还是和生产端nacos-provider一样,需要注册到nacos上,不过要实现负载均衡的话,还需要添加loadbalancer依赖。
具体配置如下:
添加依赖,需要额外添加一个loadbalancer依赖:
<dependency>
  <groupId>org.springframework.boot</groupId>
  <artifactId>spring-boot-starter-web</artifactId>
</dependency>
<dependency>
  <groupId>com.alibaba.cloud</groupId>
  <artifactId>spring-cloud-starter-alibaba-nacos-discovery</artifactId>
</dependency>
<!--负载均衡 -->
<dependency>
  <groupId>org.springframework.cloud</groupId>
  <artifactId>spring-cloud-starter-loadbalancer</artifactId>
</dependency>
application.properties配置文件中添加Nacos Server地址:
spring.application.name=nacos-consumer
server.port=8089
spring.cloud.nacos.discovery.server-addr=http://localhost:8848
启动类配置@EnableDiscoveryClient注解开启服务注册发现功能:
/**
 * 消费者
 *
 * @author yuanzhihao
 * @since 2022/8/1
 */
@SpringBootApplication
@EnableDiscoveryClient
public class NacosConsumerApplication {

    public static void main(String[] args) {
        SpringApplication.run(NacosConsumerApplication.class, args);
    }
}
之后可以通过http客户端来请求生产者提供的接口,下面分别整理了RestTemplate和OpenFeign两种方式的实现。
RestTemplate
RestTemplate和之前使用一样,通过和@LoadBalanced注解配置使用,就可以通过服务名的方式,请求对应生产者provider提供的接口,在nacos-consumer中注入一个RestTemplate类型的bean:
@LoadBalanced
@Bean
RestTemplate restTemplate() {
  return new RestTemplate();
}
生产者nacos-provider中提供接口:
@RestController
public static class HelloController {
  @GetMapping("/hello/{name}")
  public String hello(@PathVariable("name") String name) {
    return "hello " + name;
  }
}
在消费者nacos-consumer中使用RestTemplate去请求生产者提供的接口:
@RestController
public static class HelloController {
  @Autowired
  private RestTemplate restTemplate;

  @GetMapping("/hello/{name}")
  public String hello(@PathVariable("name") String name) {
    return restTemplate.getForObject(String.format(Locale.ROOT, "http://nacos-provider/hello/%s", name), String.class);
  }
}
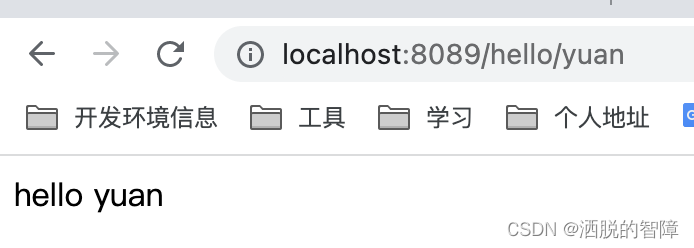
其实代码不需要做任何适配就可以完成nacos的切换,验证ok:
Spring Cloud OpenFeign
OpenFeign使用和RestTemplate一样,不用做任何代码适配,也简单整理下:
首先添加openfeign依赖:
<dependency>
  <groupId>org.springframework.cloud</groupId>
  <artifactId>spring-cloud-starter-openfeign</artifactId>
</dependency>
添加feignclient接口,配置生产者provider信息:
/**
 * 配置生产者provider
 *
 * @author yuanzhihao
 * @since 2022/8/1
 */
@FeignClient(value = "nacos-provider")
public interface ProviderFeign {

    @GetMapping("/hello/{name}")
    String hello(@PathVariable("name") String name);
}
添加@EnableFeignClients注解扫描指定的feign客户端:
@SpringBootApplication
@EnableDiscoveryClient
@EnableFeignClients("com.yzh.feign")
public class NacosConsumerApplication {
}
请求接口:
@Autowired
private ProviderFeign providerFeign;

@GetMapping("/hello2/{name}")
public String hello2(@PathVariable("name") String name) {
  return providerFeign.hello(name);
}
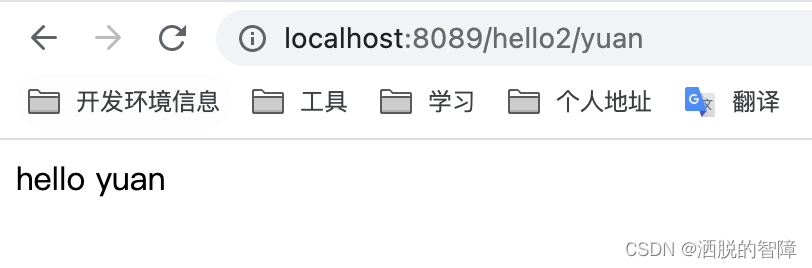
验证ok:
Nacos作为配置中心
nacos除了可以作为注册中心以外,还可以用作配置中心,nacos可以用来替换eureka和Spring Cloud Config两个组件的功能,下面整理了如何使用nacos作为配置中心。
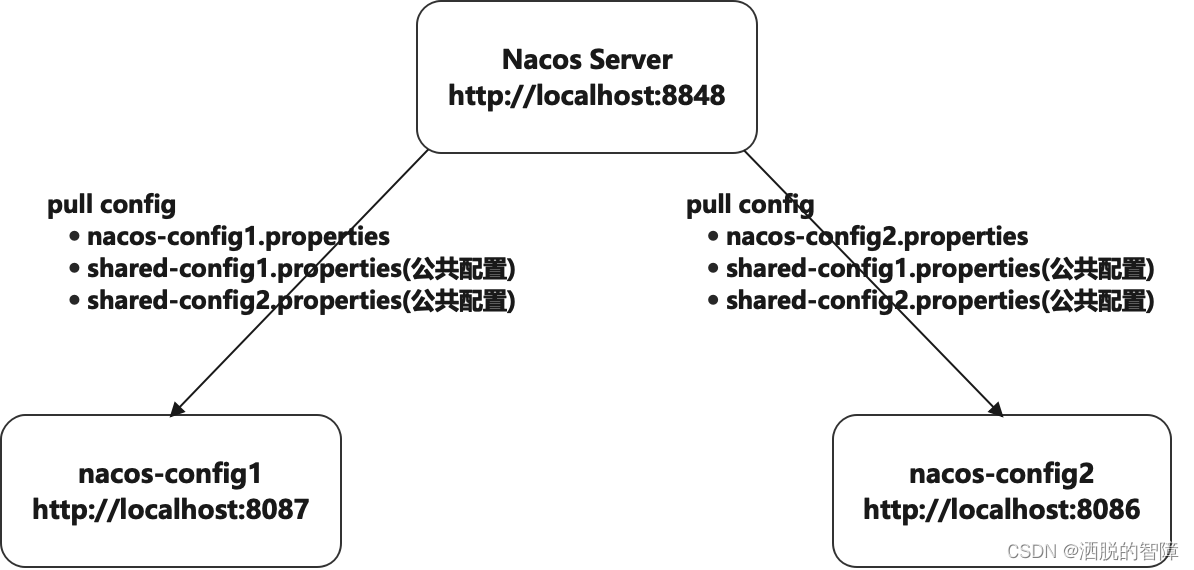
验证工程图示如下:
微服务配置拉取
首先添加依赖,这边需要添加一个spring-cloud-starter-bootstrap依赖,这样就可以读取bootstrap.properties中的配置文件:
<dependency>
  <groupId>org.springframework.boot</groupId>
  <artifactId>spring-boot-starter-web</artifactId>
</dependency>
<dependency>
  <groupId>com.alibaba.cloud</groupId>
  <artifactId>spring-cloud-starter-alibaba-nacos-discovery</artifactId>
</dependency>
<!--配置中心 -->
<dependency>
  <groupId>com.alibaba.cloud</groupId>
  <artifactId>spring-cloud-starter-alibaba-nacos-config</artifactId>
</dependency>
<dependency>
  <groupId>org.springframework.cloud</groupId>
  <artifactId>spring-cloud-starter-bootstrap</artifactId>
</dependency>
在bootstrap.properties配置文件中添加Nacos Server的地址:
spring.application.name=nacos-config1
server.port=8087
spring.cloud.nacos.config.server-addr=http://localhost:8848
spring.cloud.nacos.discovery.server-addr=http://localhost:8848
# 指定拉取配置文件的名称
spring.cloud.nacos.config.prefix=nacos-config1
这边参考官网,客户端拉取配置文件的格式如下:
${prefix}-${spring.profiles.active}.${file-extension}
prefix默认为spring.application.name的值,也可以通过配置项spring.cloud.nacos.config.prefix来配置。spring.profiles.active即为当前环境对应的 profile,详情可以参考 Spring Boot文档。 注意:当spring.profiles.active为空时,对应的连接符-也将不存在,dataId 的拼接格式变成${prefix}.${file-extension}file-exetension为配置内容的数据格式,可以通过配置项spring.cloud.nacos.config.file-extension来配置,默认参数为properties。目前只支持properties和yaml类型。
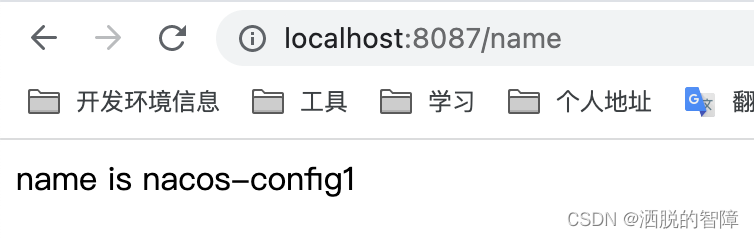
所以,我上面bootstrap.properties配置中,因为手动指定了spring.cloud.nacos.config.prefix配置,并且spring.profiles.active参数为空,然后没有显示指定file-exetension配置数据格式,所以默认会拉取nacos-config1.properties配置文件。
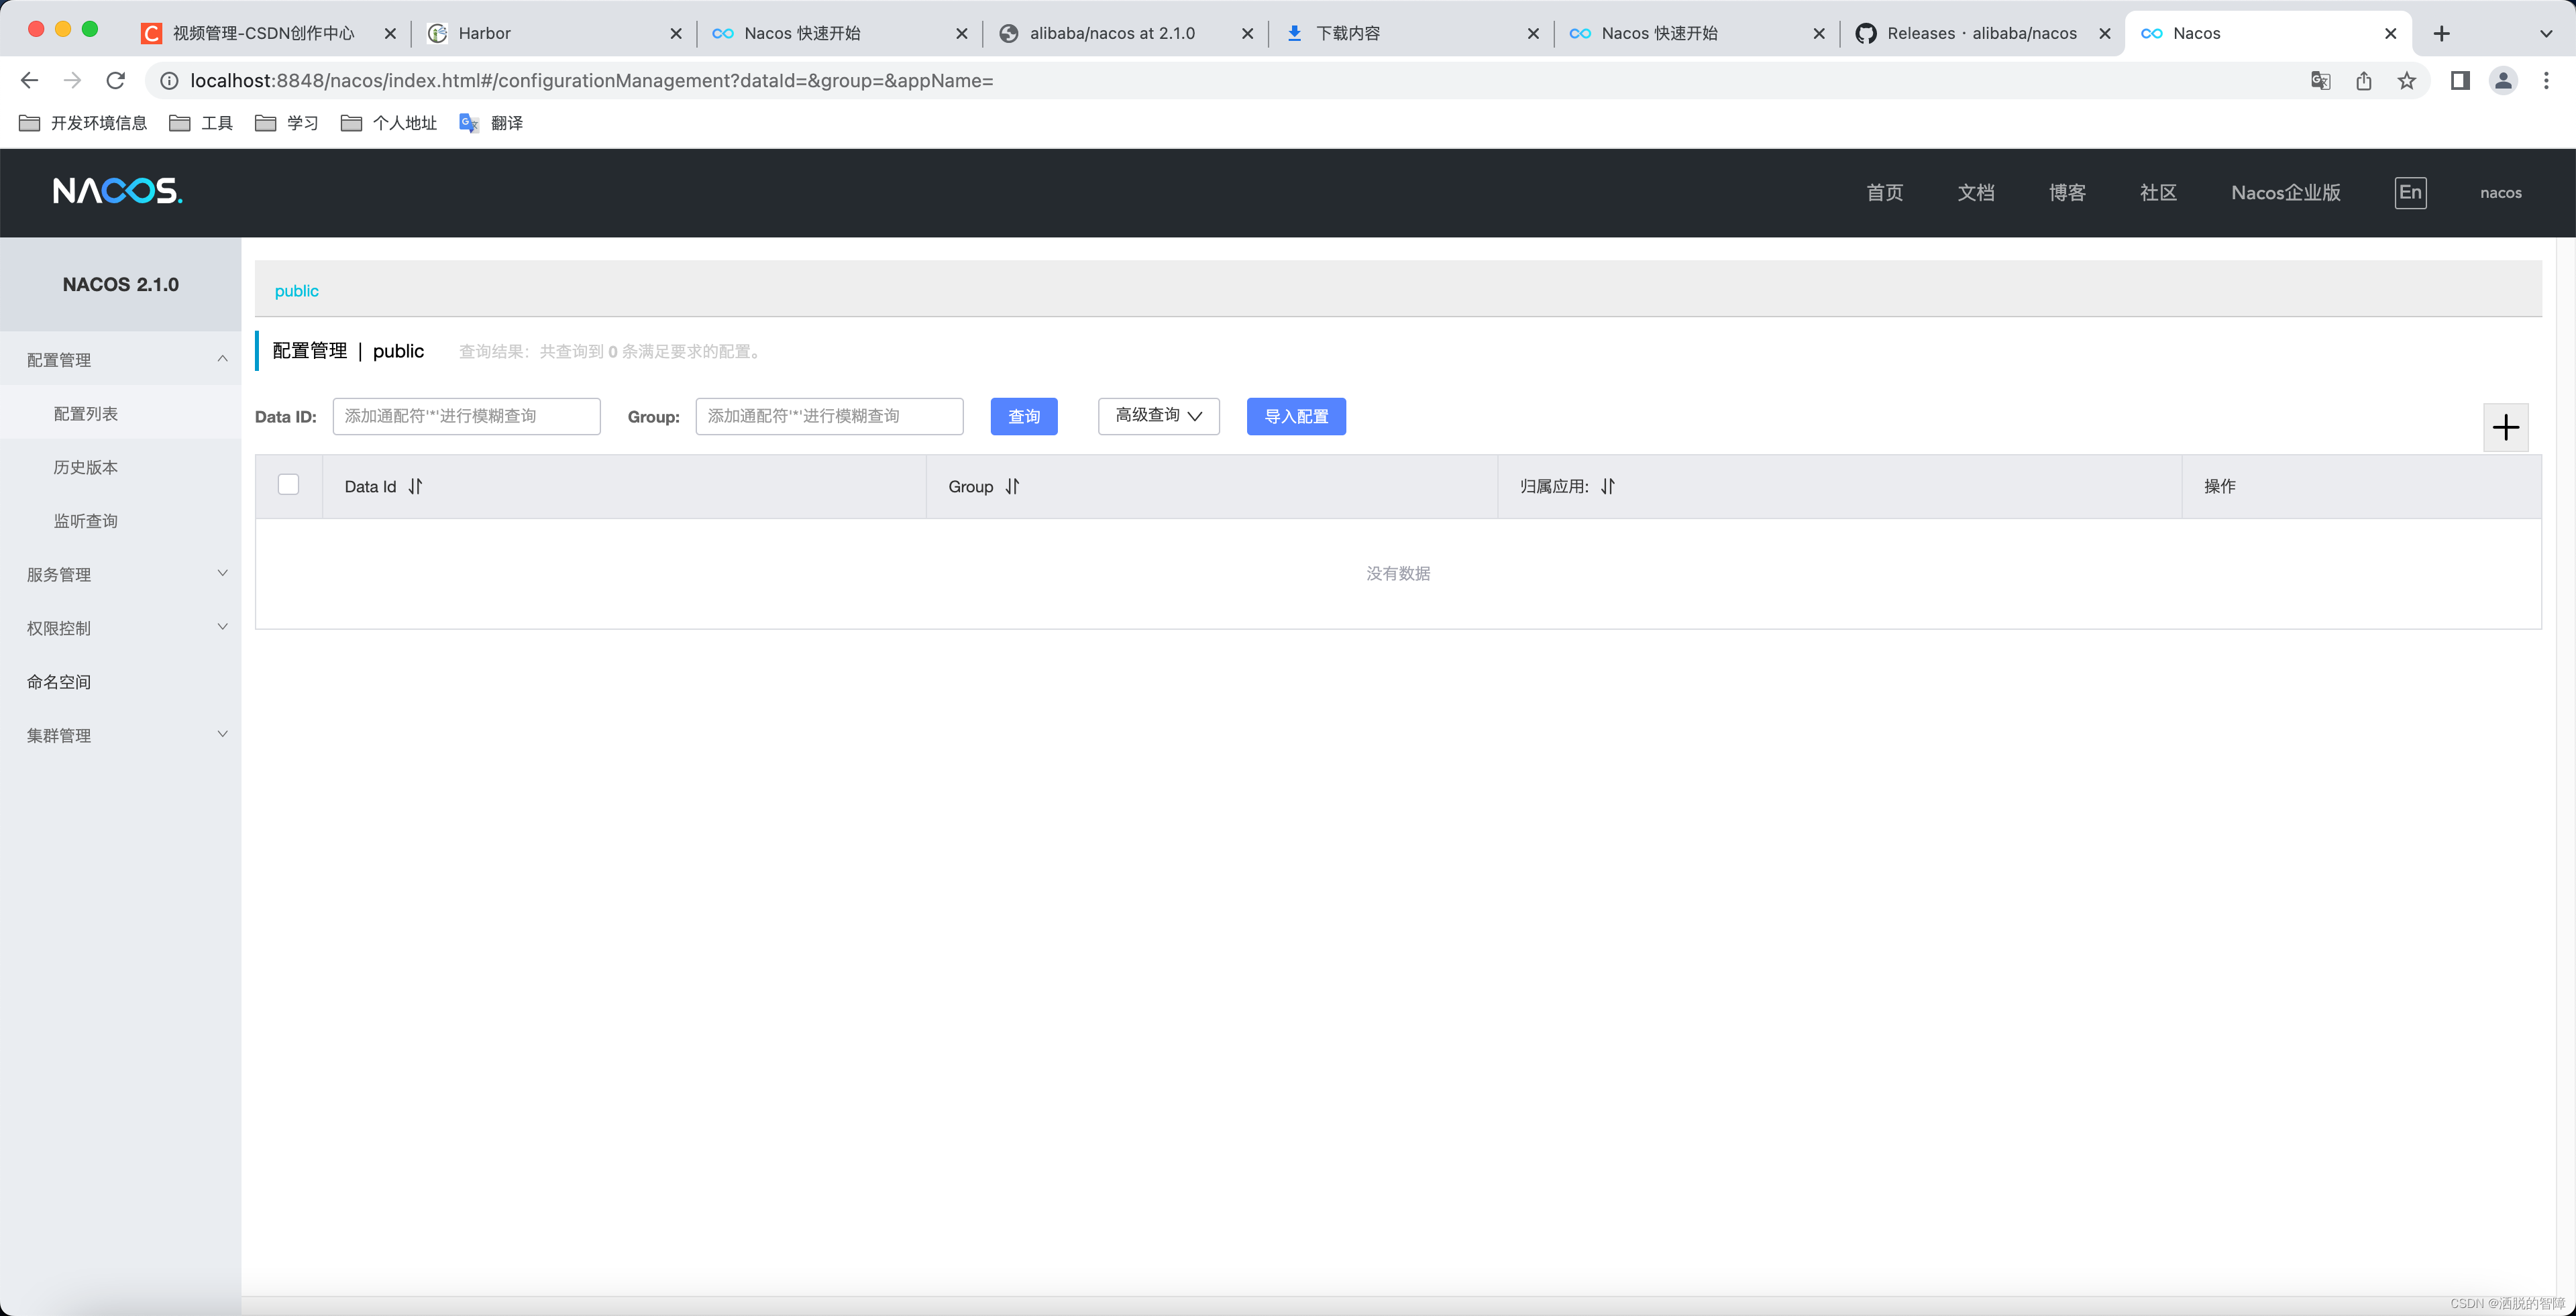
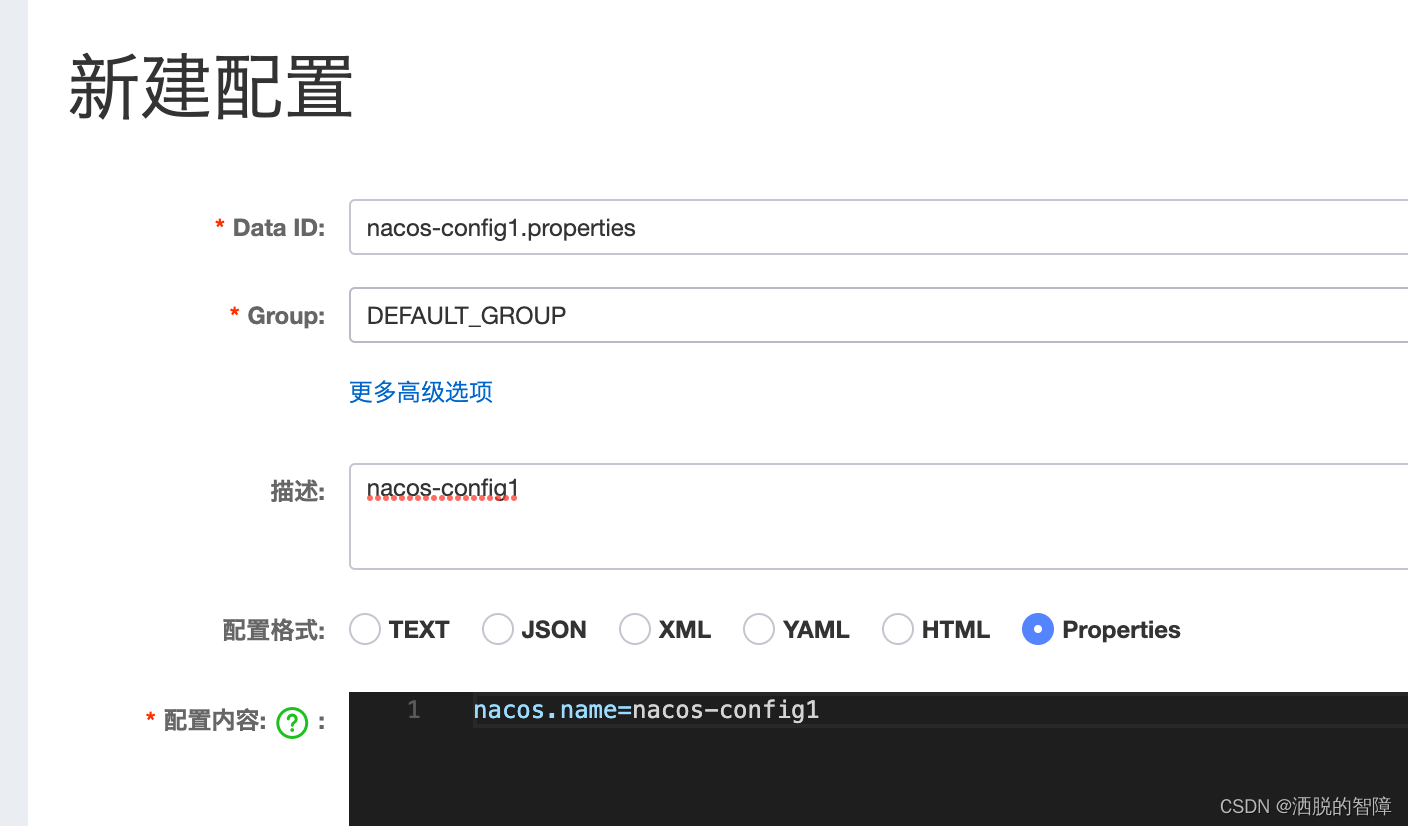
之后需要在nacos页面上添加对应的配置文件,在配置管理->配置列表->新建配置添加nacos-config1.properties配置。
客户端中读取配置文件:
/**
 * nacos config
 *
 * @author yuanzhihao
 * @since 2022/8/1
 */
@SpringBootApplication
@EnableDiscoveryClient
@RestController
public class NacosConfig1Application {
    @Value("${nacos.name}")
    private String name;

    @GetMapping("/name")
    public String name() {
        return "name is " + name;
    }

    public static void main(String[] args) {
        SpringApplication.run(NacosConfig1Application.class, args);
    }
}
启动验证ok:
共享配置拉取
在开发中,微服务非常多的情况下,会有很多的重复的配置,比如服务注册中心,服务证书信息这些,我们可以把这些配置信息都提取出来放到一个公共的配置文件中,之前在Spring Cloud Config中有类似的能力,在Nacos中也提供了这种共享配置的能力。
首先添加spring.cloud.nacos.config.shared-configs[x]配置,该配置是一个数组,表示公共配置的一个集合:
spring.application.name=nacos-config2
server.port=8086
spring.cloud.nacos.config.server-addr=http://localhost:8848
spring.cloud.nacos.discovery.server-addr=http://localhost:8848
# 指定拉取配置文件的名称
spring.cloud.nacos.config.prefix=nacos-config2
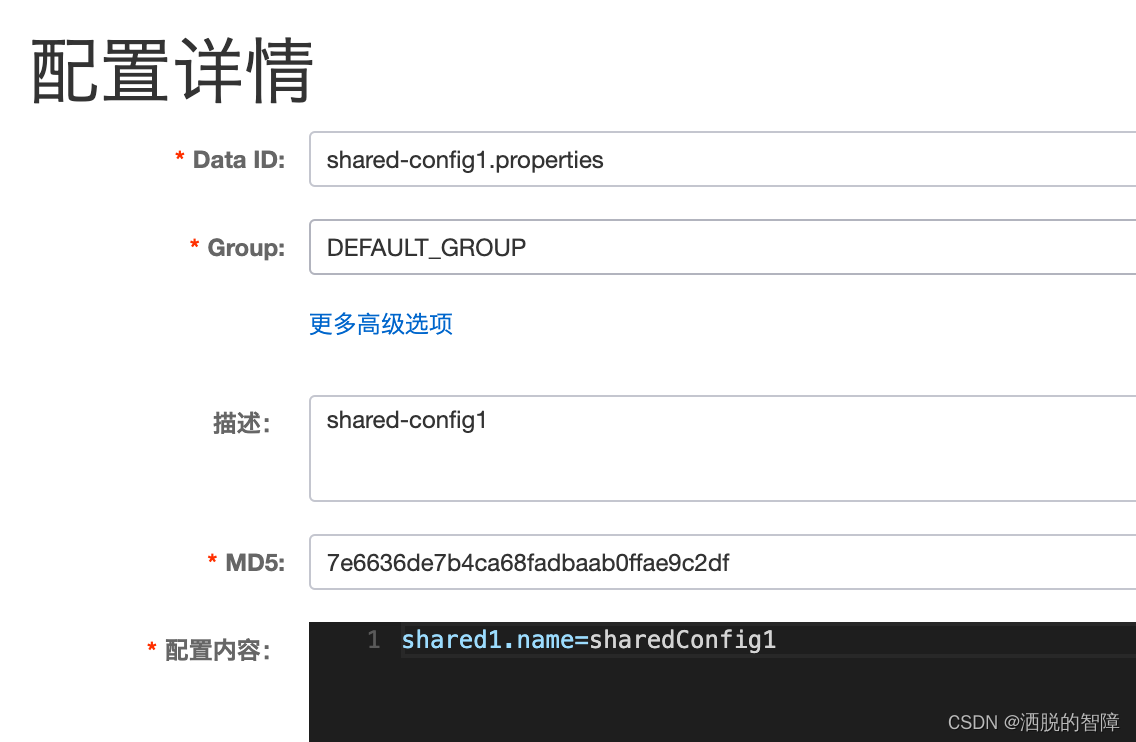
spring.cloud.nacos.config.shared-configs[0]=shared-config1.properties
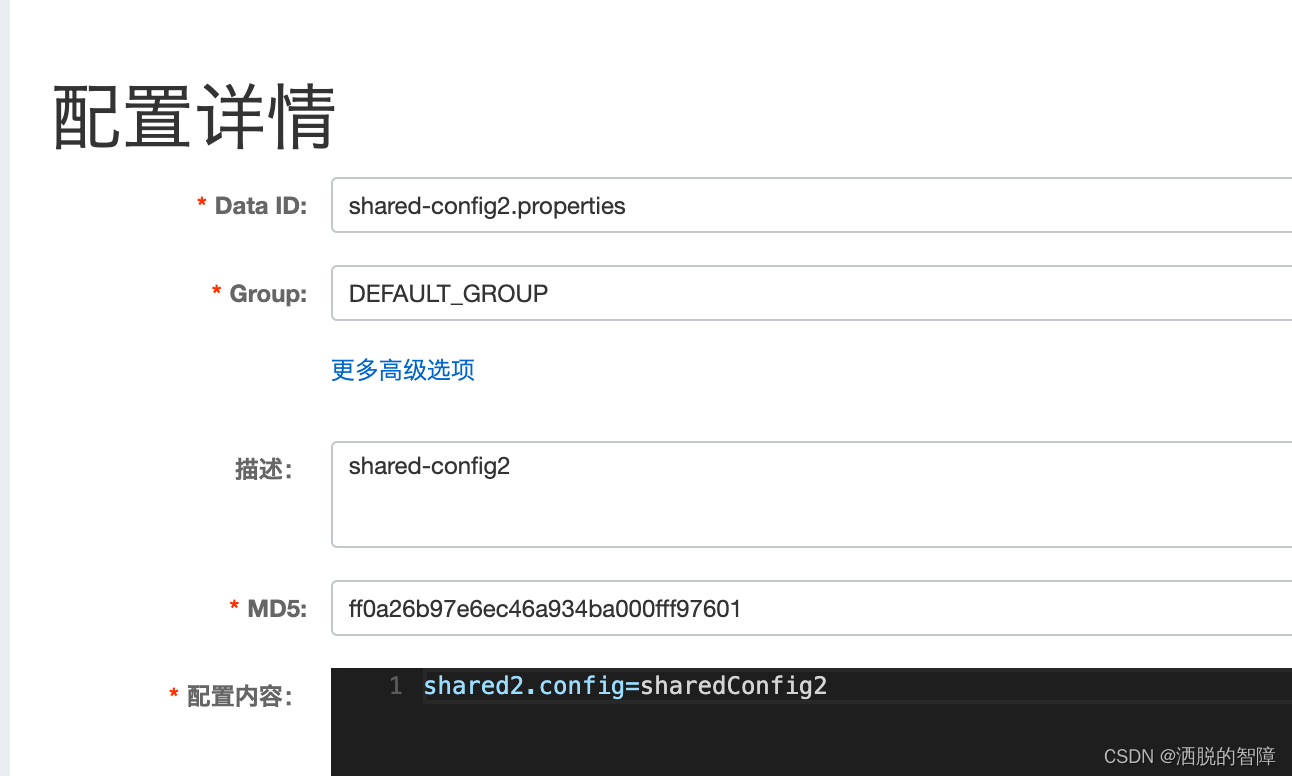
spring.cloud.nacos.config.shared-configs[1]=shared-config2.properties
在nacos中添加对应配置,配置如下:
shared-config1.properties
shared-config2.properties
在客户端中读取对应配置:
/**
 * nacos config
 *
 * @author yuanzhihao
 * @since 2022/8/1
 */
@SpringBootApplication
@EnableDiscoveryClient
@RestController
public class NacosConfig2Application {
    @Value("${nacos.name}")
    private String name;

    @Value("${shared1.name}")
    private String shared1Name;

    @Value("${shared2.name}")
    private String shared2Name;

    @GetMapping("/name")
    public String name() {
        return "name is " + name + ";  shared1Name is " + shared1Name + ";  shared2Name is " + shared2Name;
    }

    public static void main(String[] args) {
        SpringApplication.run(NacosConfig2Application.class, args);
    }
}
验证ok:

其他
如何开启鉴权
nacos提供了一个简单的鉴权插件,只需要开启一个开关和在配置中添加用户名和密码就ok。
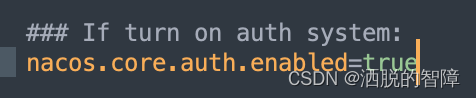
首先在Nacos Server的配置文件application.properties中,配置文件在**/distribution/target/nacos-server-$version/nacos/conf/application.properties**中,需要修改nacos.core.auth.enabled配置为true,官方说不需要重启服务端,但是我还是重启了下、、、
在客户端配置文件中,添加用户的账号和密码信息,默认就是nacos/nacos:
spring.cloud.nacos.username=nacos
spring.cloud.nacos.password=nacos
开启ok,之后如果不配置账号和密码的话,或者账号密码错误,启动会报错导致注册失败。
结语
关于nacos最基础的用法就整理到这里,这里除了没有支持https以外,基本上都能满足我们项目的需求了,之后文章还会整理下Nacos Server如何开启https以及客户端如何注册到https的Nacos Server上。
参考:
https://nacos.io/zh-cn/docs/quick-start-spring-cloud.html
https://nacos.io/zh-cn/docs/auth.html
代码地址:https://github.com/yzh19961031/blogDemo/tree/master/nacosDemo


 455
455

 被折叠的 条评论
为什么被折叠?
被折叠的 条评论
为什么被折叠?
 到【灌水乐园】发言


