


本方案采用NDK+Cmake在flutter实现,建议各位先看图片,我是先截图后面才补充的代码内容,按照顺序看图就好,然后具体代码只是一个参考,主要是为了防止图片看不清被压缩啥的,图片里面的描述已经很清晰了,我的项目文件目录结构在最后也都加上了注释,希望可以帮助到你们
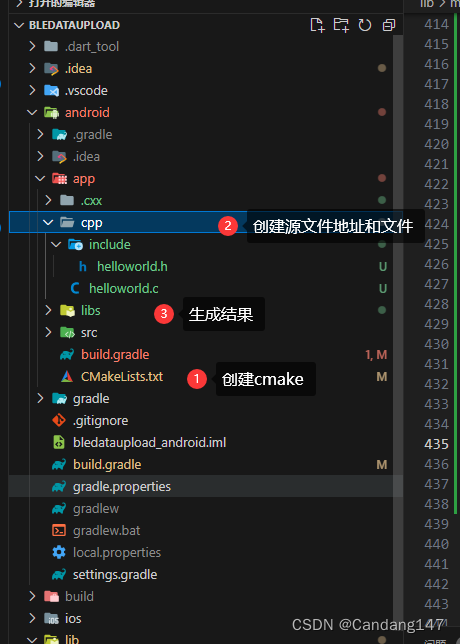
1.首先创建C/C++文件
放置到项目任意地址,当然了谷歌官方建议我们丢到以下这个目录
源码
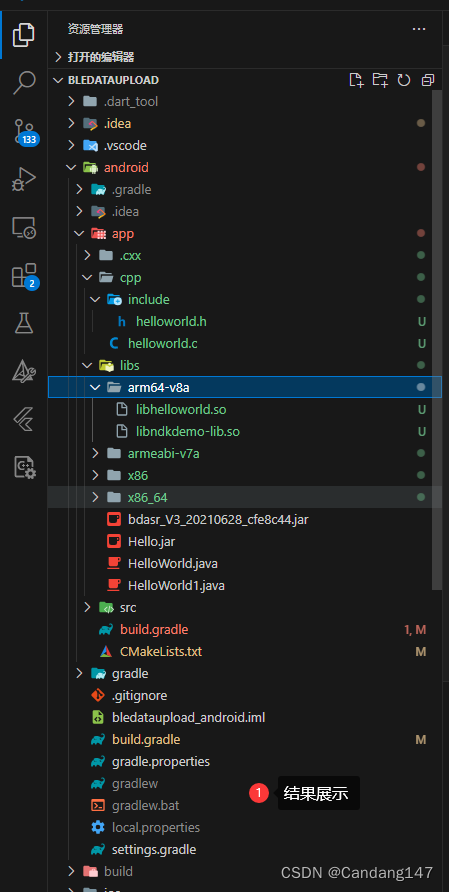
android\app\src\main\cpp
头文件
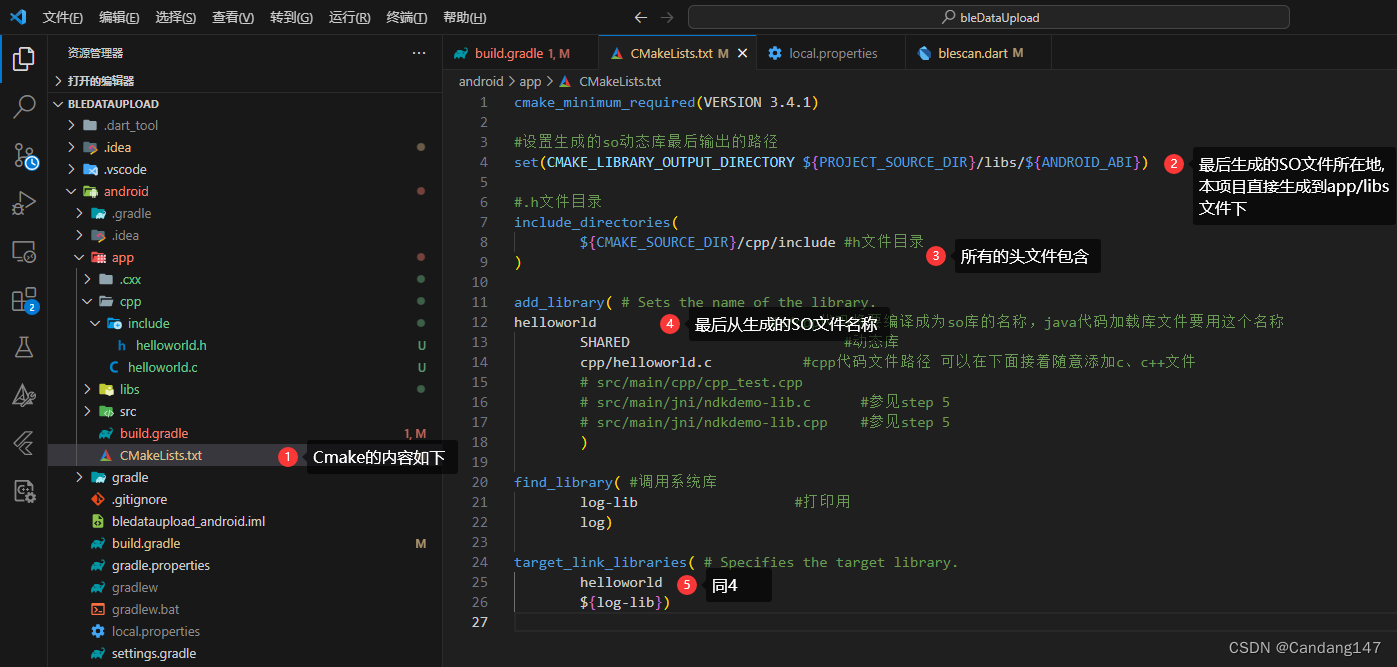
android\app\src\main\cpp\include2.实现CMake
cmake_minimum_required(VERSION 3.4.1)

#设置生成的so动态库最后输出的路径
set(CMAKE_LIBRARY_OUTPUT_DIRECTORY ${PROJECT_SOURCE_DIR}/libs/${ANDROID_ABI})

#.h文件目录
include_directories(
        ${CMAKE_SOURCE_DIR}/cpp/include #h文件目录
)

add_library( # Sets the name of the library.
helloworld                     #c/cpp代码将要编译成为so库的名称,java代码加载库文件要用这个名称
        SHARED                          #动态库
        cpp/helloworld.c           #cpp代码文件路径 可以在下面接着随意添加c、c++文件
        # src/main/cpp/cpp_test.cpp
        # src/main/jni/ndkdemo-lib.c      #参见step 5
        # src/main/jni/ndkdemo-lib.cpp    #参见step 5
        )

find_library( #调用系统库
        log-lib                   #打印用
        log)

target_link_libraries( # Specifies the target library.
        helloworld
        ${log-lib})
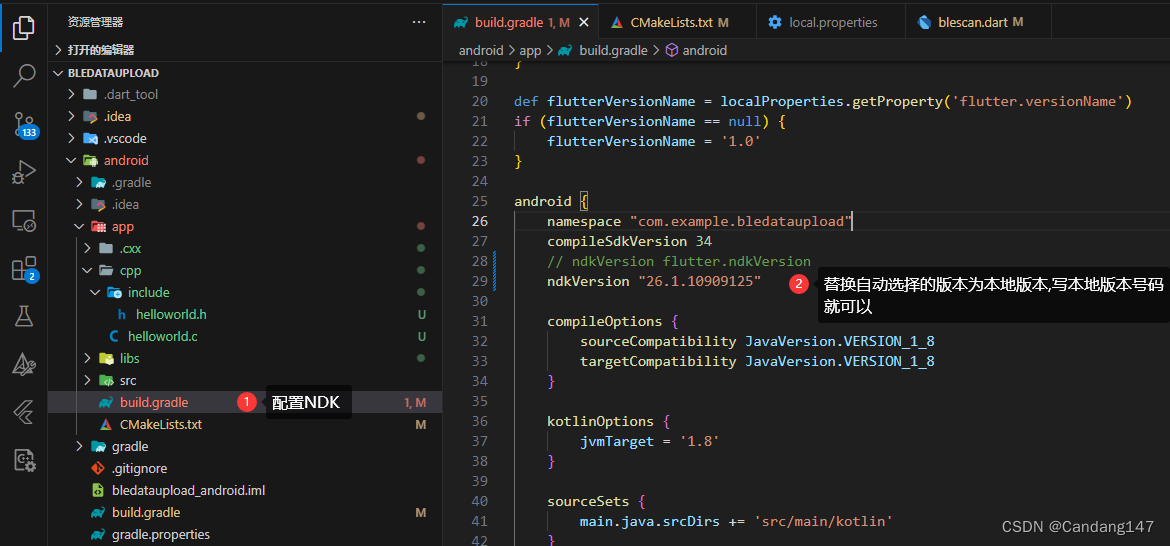
3.配置Gradle
主要是修改指向NDK的目录和版本号,调用Cmake,NDK要预先在Android studio 下载配置好
plugins {
id "com.android.application"
id "kotlin-android"
id "dev.flutter.flutter-gradle-plugin"
}
def localProperties = new Properties()
def localPropertiesFile = rootProject.file('local.properties')
if (localPropertiesFile.exists()) {
localPropertiesFile.withReader('UTF-8') { reader ->
localProperties.load(reader)
}
}
def flutterVersionCode = localProperties.getProperty('flutter.versionCode')
if (flutterVersionCode == null) {
flutterVersionCode = '1'
}
def flutterVersionName = localProperties.getProperty('flutter.versionName')
if (flutterVersionName == null) {
flutterVersionName = '1.0'
}
android {
namespace "com.example.bledataupload"
compileSdkVersion 34
// ndkVersion flutter.ndkVersion
ndkVersion "26.1.10909125"
compileOptions {
sourceCompatibility JavaVersion.VERSION_1_8
targetCompatibility JavaVersion.VERSION_1_8
}
kotlinOptions {
jvmTarget = '1.8'
}
sourceSets {
main.java.srcDirs += 'src/main/kotlin'
}
defaultConfig {
// TODO: Specify your own unique Application ID (https://developer.android.com/studio/build/application-id.html).
applicationId "com.example.bledataupload"
// You can update the following values to match your application needs.
// For more information, see: https://docs.flutter.dev/deployment/android#reviewing-the-gradle-build-configuration.
// minSdkVersion flutter.minSdkVersion
minSdkVersion 24
targetSdkVersion flutter.targetSdkVersion
versionCode flutterVersionCode.toInteger()
versionName flutterVersionName
}
buildTypes {
release {
// TODO: Add your own signing config for the release build.
// Signing with the debug keys for now, so `flutter run --release` works.
signingConfig signingConfigs.debug
}
}
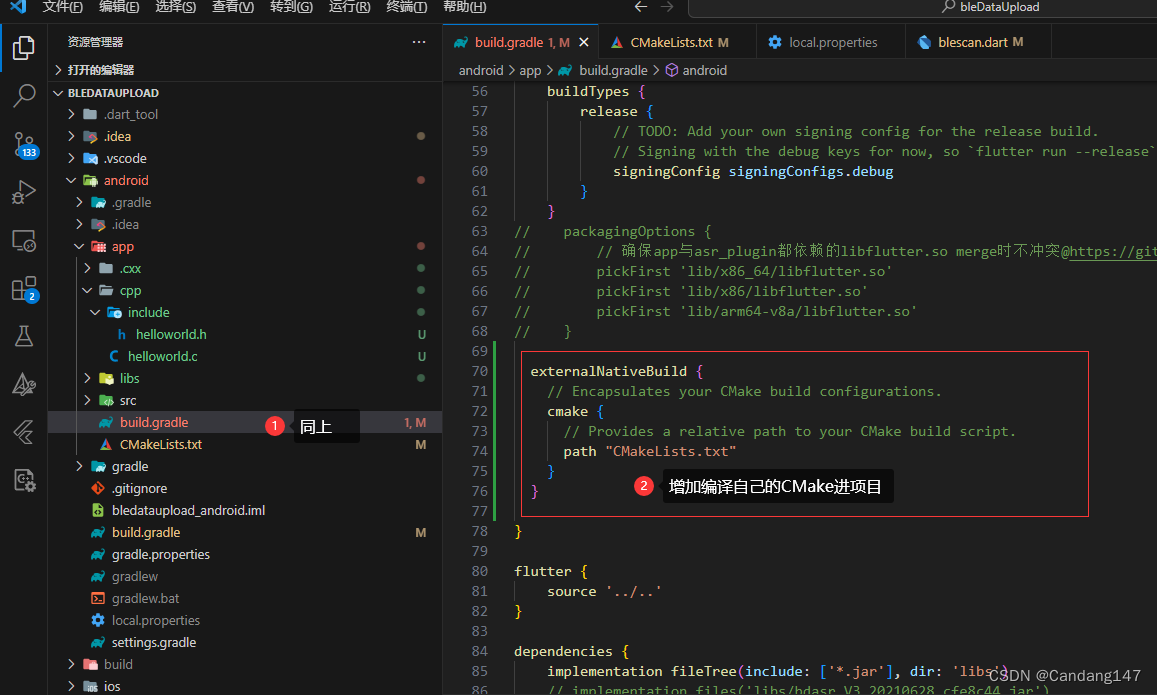
// packagingOptions {
// // 确保app与asr_plugin都依赖的libflutter.so merge时不冲突@https://github.com/card-io/card.io-Android-SDK/issues/186#issuecomment-427552552
// pickFirst 'lib/x86_64/libflutter.so'
// pickFirst 'lib/x86/libflutter.so'
// pickFirst 'lib/arm64-v8a/libflutter.so'
// }
externalNativeBuild {
// Encapsulates your CMake build configurations.
cmake {
// Provides a relative path to your CMake build script.
path "CMakeLists.txt"
}
}
}
flutter {
source '../..'
}
dependencies {
implementation fileTree(include: ['*.jar'], dir: 'libs')
// implementation files('libs/bdasr_V3_20210628_cfe8c44.jar')
// implementation files('libs/Hello.jar')
}
4.目录和结果展示
PS:可能会有用的内容
sdk.dir=D:\\Program Files\\Android\\sdk
# ndk.dir=D:\\Program Files\\Android\\sdk\\ndk\\26.1.10909125
flutter.sdk=D:\\flutter
flutter.buildMode=debug
flutter.versionName=0.1.0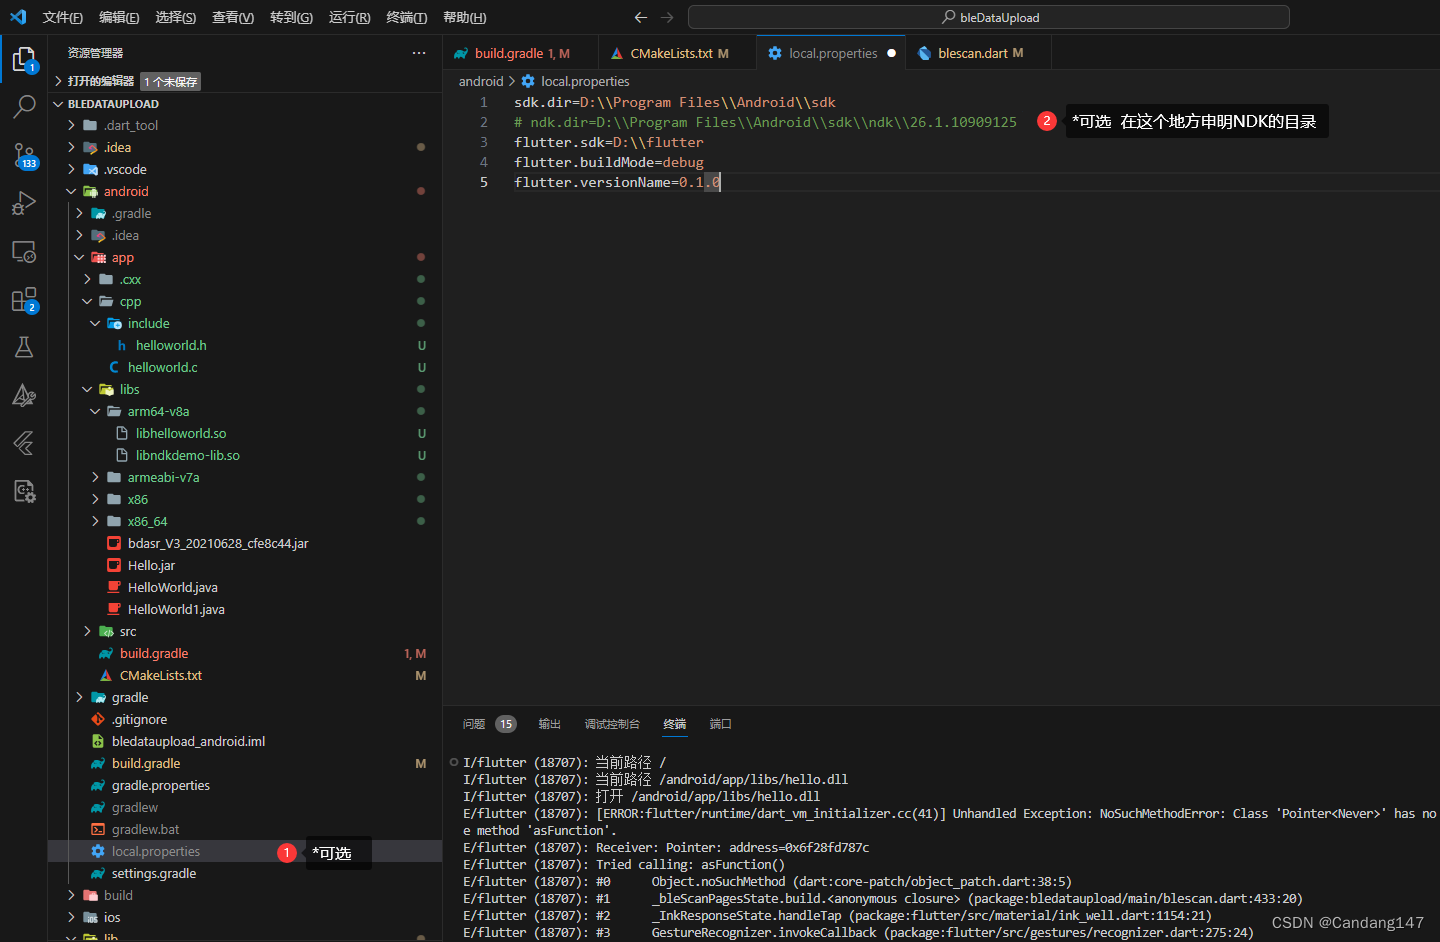
最后特别感谢在此期间所有帮助到我的博客和文章,由于参考数量太多,就不一一列举出来了(主要是参考太多了,很多没有意义的文章更多.....),官方案例写的真的是一言难尽,本身我也是第一次接触,结果好多步骤跨越性那么大,毫无参考意义,故,有此文章的诞生
哦对了,我只是生成了,还没用起来,不过良好的开端是有了,不是吗?
/**************************************************手动分割线*********************************************/
5.使用生成的库
首先你得引入一个三方的库,
import 'package:ffi/ffi.dart';
否则你找不到下面两个内容
 final getdata = getstr().cast<Utf8>();
 debugPrint('${getdata.toDartString()}');

// Utf8 & toDartString 不在官方的库里面
6. 完整的使用代码
6.1 首先申明一些必要的函数,必须是静态的,放在类外,不要丢在类里面,全局的
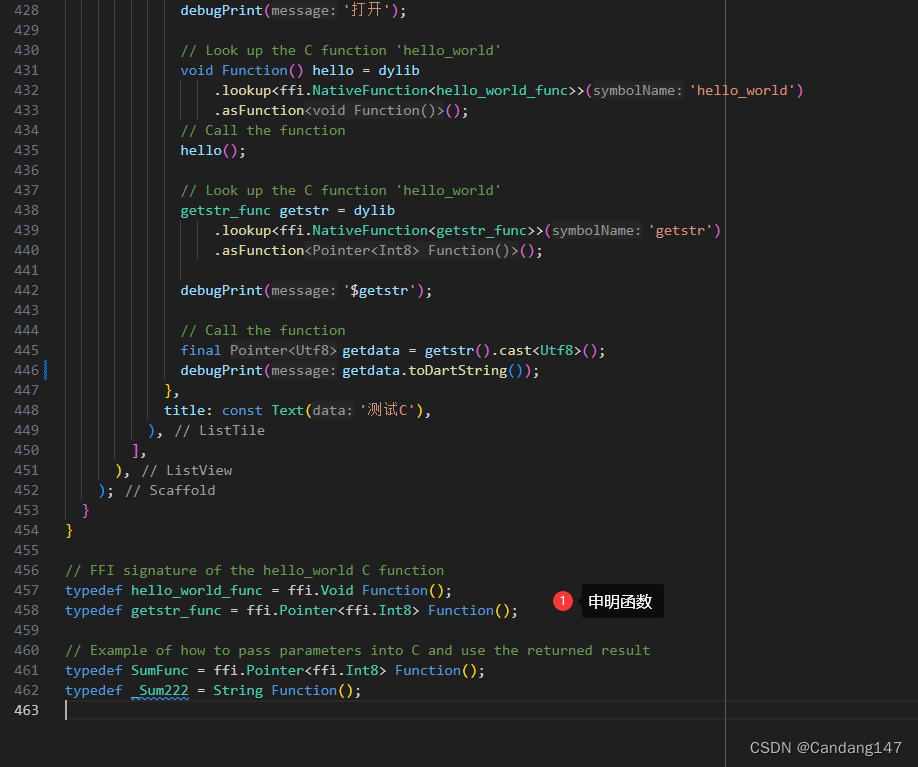
// FFI signature of the hello_world C function
typedef hello_world_func = ffi.Void Function();
typedef getstr_func = ffi.Pointer<ffi.Int8> Function();
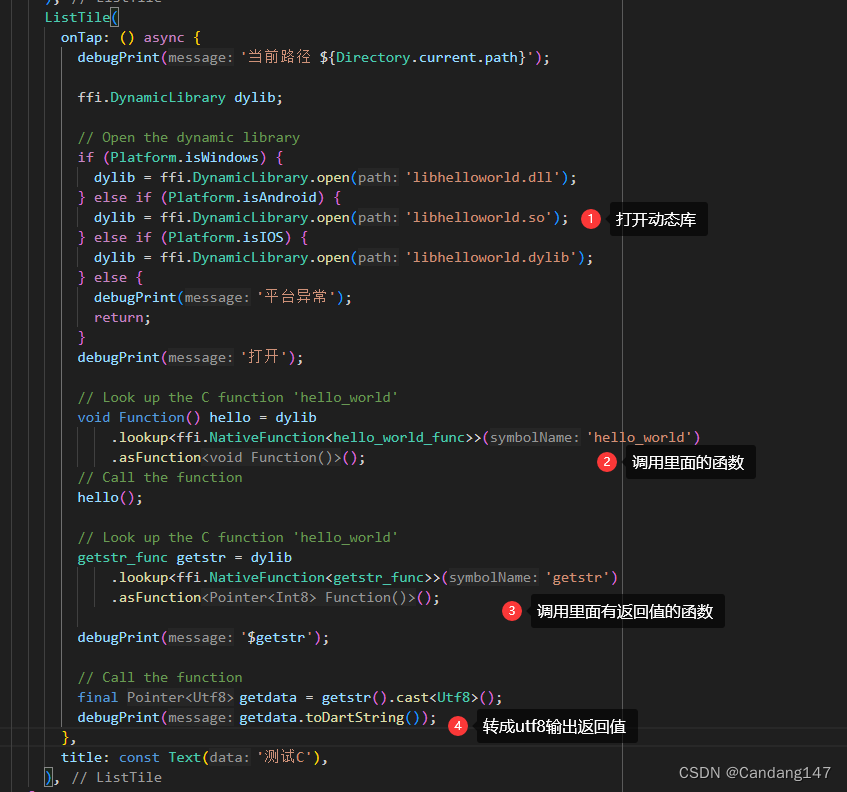
6.2 调用
onTap: () async {
              debugPrint('当前路径 ${Directory.current.path}');

              ffi.DynamicLibrary dylib;

              // Open the dynamic library
              if (Platform.isWindows) {
                dylib = ffi.DynamicLibrary.open('libhelloworld.dll');
              } else if (Platform.isAndroid) {
                dylib = ffi.DynamicLibrary.open('libhelloworld.so');
              } else if (Platform.isIOS) {
                dylib = ffi.DynamicLibrary.open('libhelloworld.dylib');
              } else {
                debugPrint('平台异常');
                return;
              }
              debugPrint('打开');

              // Look up the C function 'hello_world'
              void Function() hello = dylib
                  .lookup<ffi.NativeFunction<hello_world_func>>('hello_world')
                  .asFunction();
              // Call the function
              hello();

              // Look up the C function 'hello_world'
              getstr_func getstr = dylib
                  .lookup<ffi.NativeFunction<getstr_func>>('getstr')
                  .asFunction();

              debugPrint('$getstr');

              // Call the function
              final getdata = getstr().cast<Utf8>();
              debugPrint(getdata.toDartString());
            },


 4051
4051


 被折叠的 条评论
为什么被折叠?
被折叠的 条评论
为什么被折叠?
 到【灌水乐园】发言


