android通过webservice连接SQL Server详细教程(数据库+服务器+客户端)这篇文章中讲到android如何通过webservice连接SQL Server。由于这篇文章距今也有四年了,一些代码在现在比较新的环境中运行不了。所以我根据评论中的提示和自己遇到的问题重新修改了部分代码,使得整个系统能在SQL Server2016+Win10+VS2015+android4.4上能够运行。具体的步骤就不说了,大致上和原来的教程差不多,只说几个比较容易出问题的地方。
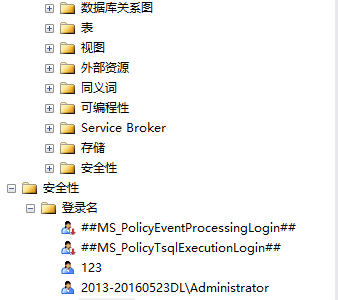
1.原文章中登录SQL Server用的是Windows身份验证方式。如果像我出现登录失败的问题,可以改用SQL Server身份验证方式。在安全性-登录名中添加一个SQL Server身份验证方式登录的用户。
C#的代码里面数据库连接字符串还是粘贴属性里面的连接字符串,把密码改成自己的密码。
private String ConServerStr = "Data Source=2013-20160523DL;Initial Catalog=test;User ID=houjingyi;Password=*******";
2.一定要先在webservice里面确认对数据库的操作没有问题,再去调android程序。只看到页面出来了很可能数据库连接有问题,这样即使android程序没问题也调不出来。
3.android4.0以后不允许在主线程中访问网络,因为万一主线程阻塞了,会使得界面没有响应。我们开启线程访问即可。
	public List<HashMap<String, String>> getAllInfo(final Handler myhandler)
	{
		HashMap<String, String> tempHash = new HashMap<String, String>();
		List<HashMap<String, String>> list = new ArrayList<HashMap<String, String>>();
		tempHash.put("Cno", "Cno");
		tempHash.put("Cname", "Cname");
		tempHash.put("Cnum", "Cnum");
		list.clear();
		arrayList1.clear();
		arrayList2.clear();
		arrayList3.clear();
		list.add(tempHash);

		new Thread()
		{
			public void run()
			{
				arrayList1 = Soap.GetWebServer("selectAllCargoInfor", arrayList1, arrayList2);
				Message msg=new Message();
				msg.what=0x123;
				msg.obj=arrayList1;
				myhandler.sendMessage(msg);
			}
		}.start();

		return list;
	}

	public void insertCargoInfo(String Cname, String Cnum)
	{
		arrayList1.clear();
		arrayList2.clear();
		arrayList1.add("Cname");
		arrayList1.add("Cnum");
		arrayList2.add(Cname);
		arrayList2.add(Cnum);

		new Thread()
		{
			public void run()
			{
				try
				{
					Soap.GetWebServer("insertCargoInfo", arrayList1, arrayList2);
				}
				catch(Exception e)
				{

				}
			}
		}.start();
	}

	public void deleteCargoInfo(String Cno)
	{
		arrayList1.clear();
		arrayList2.clear();
		arrayList1.add("Cno");
		arrayList2.add(Cno);

		new Thread()
		{
			public void run()
			{
				try
				{
					Soap.GetWebServer("deleteCargoInfo", arrayList1, arrayList2);
				}
				catch(Exception e)
				{

				}
			}
		}.start();
	}
	final Handler myhandler=new Handler()
	{
		public void handleMessage(Message msg)
		{
			if(msg.what==0x123)
			{
				ArrayList<String> drrayList=(ArrayList<String>) msg.obj;
				for(int j=0;!drrayList.isEmpty()&&j+2<drrayList.size();j+=3)
				{
					HashMap<String,String> hashMap=new HashMap<String,String>();
					hashMap.put("Cno", drrayList.get(j));
					hashMap.put("Cname", drrayList.get(j+1));
					hashMap.put("Cnum", drrayList.get(j+2));
					list.add(hashMap);
				}
				adapter=new SimpleAdapter(
						MainActivity.this,list,
						R.layout.adapter_item,
						new String[]{"Cno","Cname","Cnum"},
						new int[]{R.id.txt_Cno,R.id.txt_Cname,R.id.txt_Cnum});
				listView.setAdapter(adapter);
			}
		}
};selectAllCargoInfo:
请求:
POST /Service1.asmx HTTP/1.1
Host: localhost
Content-Type: text/xml; charset=utf-8
Content-Length: length
SOAPAction: "http://tempuri.org/selectAllCargoInfor"
<?xml version="1.0" encoding="utf-8"?>
<soap:Envelope xmlns:xsi="http://www.w3.org/2001/XMLSchema-instance" xmlns:xsd="http://www.w3.org/2001/XMLSchema" xmlns:soap="http://schemas.xmlsoap.org/soap/envelope/">
<soap:Body>
<selectAllCargoInfor xmlns="http://tempuri.org/" />
</soap:Body>
</soap:Envelope>
响应:
HTTP/1.1 200 OK
Content-Type: text/xml; charset=utf-8
Content-Length: length
<?xml version="1.0" encoding="utf-8"?>
<soap:Envelope xmlns:xsi="http://www.w3.org/2001/XMLSchema-instance" xmlns:xsd="http://www.w3.org/2001/XMLSchema" xmlns:soap="http://schemas.xmlsoap.org/soap/envelope/">
<soap:Body>
<selectAllCargoInforResponse xmlns="http://tempuri.org/">
<selectAllCargoInforResult>
<string>string</string>
<string>string</string>
</selectAllCargoInforResult>
</selectAllCargoInforResponse>
</soap:Body>
</soap:Envelope>
insertCargoInfo:
请求:
POST /Service1.asmx HTTP/1.1
Host: localhost
Content-Type: text/xml; charset=utf-8
Content-Length: length
SOAPAction: "http://tempuri.org/insertCargoInfo"
<?xml version="1.0" encoding="utf-8"?>
<soap:Envelope xmlns:xsi="http://www.w3.org/2001/XMLSchema-instance" xmlns:xsd="http://www.w3.org/2001/XMLSchema" xmlns:soap="http://schemas.xmlsoap.org/soap/envelope/">
<soap:Body>
<insertCargoInfo xmlns="http://tempuri.org/">
<Cname>string</Cname>
<Cnum>int</Cnum>
</insertCargoInfo>
</soap:Body>
</soap:Envelope>
响应:
HTTP/1.1 200 OK
Content-Type: text/xml; charset=utf-8
Content-Length: length
<?xml version="1.0" encoding="utf-8"?>
<soap:Envelope xmlns:xsi="http://www.w3.org/2001/XMLSchema-instance" xmlns:xsd="http://www.w3.org/2001/XMLSchema" xmlns:soap="http://schemas.xmlsoap.org/soap/envelope/">
<soap:Body>
<insertCargoInfoResponse xmlns="http://tempuri.org/">
<insertCargoInfoResult>boolean</insertCargoInfoResult>
</insertCargoInfoResponse>
</soap:Body>
</soap:Envelope>
deleteCargoInfo:
请求:
POST /Service1.asmx HTTP/1.1
Host: localhost
Content-Type: text/xml; charset=utf-8
Content-Length: length
SOAPAction: "http://tempuri.org/deleteCargoInfo"
<?xml version="1.0" encoding="utf-8"?>
<soap:Envelope xmlns:xsi="http://www.w3.org/2001/XMLSchema-instance" xmlns:xsd="http://www.w3.org/2001/XMLSchema" xmlns:soap="http://schemas.xmlsoap.org/soap/envelope/">
<soap:Body>
<deleteCargoInfo xmlns="http://tempuri.org/">
<Cno>string</Cno>
</deleteCargoInfo>
</soap:Body>
</soap:Envelope>
响应:
HTTP/1.1 200 OK
Content-Type: text/xml; charset=utf-8
Content-Length: length
<?xml version="1.0" encoding="utf-8"?>
<soap:Envelope xmlns:xsi="http://www.w3.org/2001/XMLSchema-instance" xmlns:xsd="http://www.w3.org/2001/XMLSchema" xmlns:soap="http://schemas.xmlsoap.org/soap/envelope/">
<soap:Body>
<deleteCargoInfoResponse xmlns="http://tempuri.org/">
<deleteCargoInfoResult>boolean</deleteCargoInfoResult>
</deleteCargoInfoResponse>
</soap:Body>
</soap:Envelope>
其实这个类就是在GetWebServer先拼XML格式的POST请求发给页面,然后在StreamtoValue里面对返回的数据做解析。GetWebServer这个函数比较简单,而在StreamtoValue里面要根据返回类型的不同执行不同的操作。删除和插入操作返回的是布尔类型,而查询操作返回的是String和int。我们也可以看到,删除和插入操作返回的XML格式是一样的。相信大家对比着XML和注释就能明白。
package com.bottle.stockmanage;

import java.io.IOException;
import java.io.InputStream;
import java.io.OutputStream;
import java.net.HttpURLConnection;
import java.net.URL;
import java.util.ArrayList;

import android.app.Activity;
import android.net.ConnectivityManager;
import android.widget.Toast;

public class HttpConnSoap
{
    public ArrayList<String> GetWebServer(String MethodName, ArrayList<String> Parameters, ArrayList<String> ParValues)
    {
        ArrayList<String> Values = new ArrayList<String>();
        //在android模拟器中测试填写10.0.2.2
        //在真机中测试填写电脑的IP地址
        String ServerUrl = "http://10.8.167.229:6666/Service1.asmx";
        String soapAction = "http://tempuri.org/" + MethodName;
        String soap = "<?xml version=\"1.0\" encoding=\"utf-8\"?>"
                + "<soap:Envelope xmlns:xsi=\"http://www.w3.org/2001/XMLSchema-instance\" xmlns:xsd=\"http://www.w3.org/2001/XMLSchema\" xmlns:soap=\"http://schemas.xmlsoap.org/soap/envelope/\">"
                + "<soap:Body />";
        String s1, s2, s3, s4 = "";
        s4 = "<" + MethodName + " xmlns=\"http://tempuri.org/\">";
        for (int i = 0; i < Parameters.size(); i++)
        {
            s1 = Parameters.get(i).toString();
            s2 = ParValues.get(i).toString();
            s3 = "<" + s1 + ">" + s2 + "</" + s1 + ">";
            s4 = s4 + s3;
        }
        s4 = s4 + "</" + MethodName + ">";
        String s5 = "</soap:Envelope>";
        String requestData = soap + s4 + s5;
        try
        {
            URL url = new URL(ServerUrl);
            HttpURLConnection con = (HttpURLConnection) url.openConnection();
            byte[] bytes = requestData.getBytes("utf-8");
            con.setDoInput(true);
            con.setDoOutput(true);
            con.setUseCaches(false);
            con.setConnectTimeout(6000);
            con.setRequestMethod("POST");
            con.setRequestProperty("Content-Type", "text/xml;charset=utf-8");
            con.setRequestProperty("SOAPAction", soapAction);
            con.setRequestProperty("Content-Length", "" + bytes.length);
            OutputStream outStream = con.getOutputStream();
            outStream.write(bytes);
            outStream.flush();
            outStream.close();
            InputStream inStream = con.getInputStream();
            Values = StreamtoValue(inStream, MethodName);
            return Values;
        }
        catch (Exception e)
        {
            return null;
        }
    }

    public ArrayList<String> StreamtoValue(InputStream in, String MethodName) throws IOException
    {
        StringBuffer out = new StringBuffer();
        String s1 = "";
        byte[] b = new byte[4096];
        ArrayList<String> Values = new ArrayList<String>();
        Values.clear();
        for (int n; (n = in.read(b)) != -1;)
        {
            s1 = new String(b, 0, n);
            out.append(s1);
        }
        System.out.println(out);
        //分割
        String[] s2 = s1.split("><");
        String s5 = MethodName + "Result";
        String s3 = "",s4 = "";
        Boolean getValueBoolean = false;
        for (int i = 0; i < s2.length; i++)
        {
            s3 = s2[i];
            System.out.println(s3);
            int FirstIndexPos, LastIndexPos, LengthofS5;
            FirstIndexPos = s3.indexOf(s5);
            LastIndexPos = s3.lastIndexOf(s5);
            /*
            	删除:deleteCargoInfoResult>boolean</deleteCargoInfoResult
            	插入:insertCargoInfoResult>boolean</insertCargoInfoResult
            	查询:
            	selectAllCargoInforResult
            	string>string</string
            	string>string</string
            	/selectAllCargoInforResult
            */
            if (FirstIndexPos >= 0)
            {
                if (getValueBoolean == false)
                {
                    getValueBoolean = true;
                }
                //如果返回的是布尔值,对应删除和增加操作
                if ((FirstIndexPos >= 0) && (LastIndexPos > FirstIndexPos))
                {
                    LengthofS5 = s5.length() + 1;
                    s4 = s3.substring(FirstIndexPos + LengthofS5, LastIndexPos - 2);
                    Values.add(s4);
                    getValueBoolean = false;
                    return Values;
                }

            }
            //查询操作取值结束
            if (s3.lastIndexOf("/" + s5) >= 0)
            {
                getValueBoolean = false;
                return Values;
            }
            //如果返回的不是布尔值,对应查询操作
            if ((getValueBoolean) && (s3.lastIndexOf("/" + s5) < 0) && (FirstIndexPos < 0))
            {
                LastIndexPos = s3.length();
                s4 = s3.substring(7, LastIndexPos - 8);
                Values.add(s4);
            }
        }
        return Values;
    }
}
6.如果你的电脑和我一样使用的是局域网,那么手机必须连和电脑在同一个网段的WIFI,不能用4G或者3G连接。如果你用的是公网IP或者以后把程序发布到一个服务器上从而获得一个公网IP,就没有这个限制了。
最后欢迎大家一起交流,学习,也感谢原作者的文章。修改后可运行的代码在:https://github.com/houjingyi233/android-connect-to-SQL-Server-On-PC-by-webservice/


 2410
2410

 被折叠的 条评论
为什么被折叠?


