


转载请注明出处:http://write.blog.csdn.net/postedit/52498172
一、建立、配置和使用Activity
(1)首先定义程序的主界面,主界面没有设置布局,直接继承LauncherActivity
package com.example.activitytest;

import android.os.Bundle;
import android.app.LauncherActivity;
import android.content.Intent;
import android.widget.ArrayAdapter;

public class MainActivity extends LauncherActivity {
	private String[] names = new String[]{"设置程序参数","查看俊男靓女"};
        //每一个列表对应另一个Activity
       private Class<?>[] clazzs = {PreferenceActivityTest.class, ExpandableListActivityTest.class};
	@Override
	protected void onCreate(Bundle savedInstanceState) {
	super.onCreate(savedInstanceState);
        ArrayAdapter<String> aa = new ArrayAdapter<String>(this,android.R.layout.simple_list_item_1, names);
        //设置界面的适配器
       setListAdapter(aa);
	}
	@Override
	protected Intent intentForPosition(int position) {
		return new Intent(MainActivity.this , clazzs[position]);
	}
}
package com.example.activitytest;

import android.app.ExpandableListActivity;
import android.os.Bundle;
import android.view.View;
import android.view.ViewGroup;
import android.widget.AbsListView;
import android.widget.BaseExpandableListAdapter;
import android.widget.ExpandableListAdapter;
import android.widget.ExpandableListView;
import android.widget.LinearLayout;
import android.widget.TextView;
import android.widget.Toast;

public class ExpandableListActivityTest extends ExpandableListActivity {
	@Override
	protected void onCreate(Bundle savedInstanceState) {
		super.onCreate(savedInstanceState);
		  ExpandableListAdapter ela = new BaseExpandableListAdapter() {
		   	   //可扩展列表项需要显示的数据
		   	   String[] group = new String[]{"俊男", "靓女" };
		   	   //每一子项需要显示的数据
		   	   String[][] childList = new String[][]{
		   	   {"刘德华","吴彦祖"}, {"杨幂","刘亦菲"}};
				@Override
				public boolean isChildSelectable(int groupPosition, int childPosition) {
					return true;
				}
				@Override
				public boolean hasStableIds() {
					return true;
				}
				@Override
				public View getGroupView(int groupPosition, boolean isExpanded,
						View convertView, ViewGroup parent) {
					LinearLayout ll = new LinearLayout(ExpandableListActivityTest.this);
					ll.setOrientation(0);
					TextView textview = getTextView();
					//设置字体颜色
					textview.setTextColor(android.graphics.Color.rgb(244, 33, 33));
					//设置文本框对象需要显示的具体内容
					textview.setText(getGroup(groupPosition).toString());
					//设置字体大小
			        textview.setTextSize(20);
					ll.addView(textview);
					return ll;
				}
				@Override
				public long getGroupId(int groupPosition) {
					return groupPosition;
				}
				@Override
				public int getGroupCount() {
					return group.length;
				}
				@Override
				public Object getGroup(int groupPosition) {
					return group[groupPosition];
				}
				@Override
				public int getChildrenCount(int groupPosition) {

					return childList[groupPosition].length;
				}
				//getTextView 将返回一个文本框对象用于显示
				private TextView getTextView(){
					@SuppressWarnings("deprecation")
					AbsListView.LayoutParams lp = new  AbsListView.LayoutParams(ViewGroup.LayoutParams.FILL_PARENT,64);
					TextView textview = new TextView(ExpandableListActivityTest.this);
					textview.setLayoutParams(lp);
					textview.setTextSize(15);
					return textview;
				}
				@Override
				public View getChildView(int groupPosition, int childPosition,
						boolean isLastChild, View convertView, ViewGroup parent) {
					TextView textview = getTextView();
					//设置字体大小
					textview.setTextColor(android.graphics.Color.rgb(150, 150, 33));
					//设置文本框对象需要显示的具体内容
					textview.setText(getChild(groupPosition,childPosition).toString());
					return textview;
				}
				@Override
				public long getChildId(int groupPosition, int childPosition) {
					return childPosition;
				}
				@Override
				public Object getChild(int groupPosition, int childPosition) {
					return childList[groupPosition][childPosition];
				}
			};
			//为列表框设置适配器
		    setListAdapter(ela);
	}

	@Override
	public boolean onChildClick(ExpandableListView parent, View v,
			int groupPosition, int childPosition, long id) {
	    Toast.makeText(ExpandableListActivityTest.this, "你点击了:"+parent.getExpandableListAdapter().getChild(groupPosition, childPosition),
    	Toast.LENGTH_LONG).show();
	   return true;
	}
}
PreferenceActivity是一个非常有用的基类,通常我们的程序的设置数据的界面可以通过该类来实现,并且设置的数据可以通过键值对的方式保存在xml文件中,当我们获取到Preferences对象之后,我们可以访问、更新Preferences,并且还可以监听它的变化。
首先我们需要创建一个preference.xml文件:
<?xml version="1.0" encoding="utf-8"?>
<PreferenceScreen xmlns:android="http://schemas.android.com/apk/res/android" >
    <RingtonePreference
        android:title="设置铃声"
        android:summary="选择铃声"
        android:key="ring_key"
        android:showSilent="true"
        android:ringtoneType="all"
        android:showDefault="true"/>
    <PreferenceCategory
        android:title="个人信息设置组">
        <EditTextPreference
            android:dialogTitle="你所使用的用户名为:"
            android:summary="填写你的用户名"
            android:key="name"
            android:title="填写用户名"/>
        <ListPreference
            android:dialogTitle="ListPreference"
            android:summary="选择你的性别"
            android:title="性别"
            android:key="gender"/>
    </PreferenceCategory>
    <PreferenceCategory
        android:title="系统功能设置">
            <CheckBoxPreference
                android:title="自动保存进度"
                android:key="autoSave"
                android:summaryOn="自动保存:开启"
                 android:summaryOff="自动保存:关闭"
                 android:defaultValue="true"/>
    </PreferenceCategory>
</PreferenceScreen>package com.example.activitytest;
import android.os.Bundle;
import android.preference.PreferenceActivity;
public class PreferenceActivityTest extends PreferenceActivity {
@SuppressWarnings("deprecation")
@Override
protected void onCreate(Bundle savedInstanceState) {
super.onCreate(savedInstanceState);
//设置显示参数设置布局
addPreferencesFromResource(R.xml.preferences);
}
}
当我们定义完Activity之后,还必须在AndroidManifest.xml文件中声明相应的组件之后才能进行使用。
<?xml version="1.0" encoding="utf-8"?>
<manifest xmlns:android="http://schemas.android.com/apk/res/android"
    package="com.example.activitytest"
    android:versionCode="1"
    android:versionName="1.0" >
    <uses-sdk
        android:minSdkVersion="8"
        android:targetSdkVersion="18" />
    <application
        android:allowBackup="true"
        android:icon="@drawable/ic_launcher"
        android:label="@string/app_name"
        android:theme="@style/AppTheme" >
        <activity
            android:name="com.example.activitytest.MainActivity"
            android:label="@string/app_name" >
            <intent-filter>
                <action android:name="android.intent.action.MAIN" />
                <category android:name="android.intent.category.LAUNCHER" />
            </intent-filter>
        </activity>
        <activity
            android:name="com.example.activitytest.ExpandableListActivityTest"
            android:label="查看俊男靓女">
        </activity>
        <activity
            android:name="com.example.activitytest.PreferenceActivityTest"
            android:label="设置程序参数">
        </activity>
    </application>
</manifest> 


二、启动Acticity并返回结果
主界面布局:
<RelativeLayout xmlns:android="http://schemas.android.com/apk/res/android"
    xmlns:tools="http://schemas.android.com/tools"
    android:layout_width="match_parent"
    android:layout_height="match_parent"
    android:paddingBottom="@dimen/activity_vertical_margin"
    android:paddingLeft="@dimen/activity_horizontal_margin"
    android:paddingRight="@dimen/activity_horizontal_margin"
    android:paddingTop="@dimen/activity_vertical_margin"
    tools:context=".MainActivity" >
    <TextView
        android:id="@+id/textView1"
        android:layout_width="wrap_content"
        android:layout_height="wrap_content"
        android:textSize="10pt"
        android:text="返回来的数据为:" />
    <EditText
        android:id="@+id/result"
        android:layout_width="fill_parent"
        android:layout_height="60dp"
        android:layout_alignLeft="@+id/textView1"
        android:layout_below="@+id/textView1"
        android:layout_marginTop="38dp"
        android:ems="10" >
    </EditText>
    <Button
        android:id="@+id/Start"
        android:layout_width="match_parent"
        android:layout_height="60dp"
        android:layout_alignLeft="@+id/result"
        android:layout_below="@+id/result"
        android:layout_marginTop="29dp"
        android:text="启动第二个Activity" />
</RelativeLayout>package com.example.forresultactivitytest;
import android.os.Bundle;
import android.app.Activity;
import android.content.Intent;
import android.view.View;
import android.view.View.OnClickListener;
import android.widget.Button;
import android.widget.EditText;
public class MainActivity extends Activity {
private EditText result;
private Button startButton;
@Override
protected void onCreate(Bundle savedInstanceState) {
super.onCreate(savedInstanceState);
setContentView(R.layout.activity_main);
startButton = (Button)findViewById(R.id.Start);
result = (EditText)findViewById(R.id.result);
startButton.setOnClickListener(new OnClickListener() {
@Override
public void onClick(View v) {
Intent intent = new Intent(MainActivity.this,SecondActivity.class);
//启动返回结果的第二个Activity,请求码是1
startActivityForResult(intent, 1);
}
});
}
@Override
protected void onActivityResult(int requestCode, int resultCode, Intent data) {
switch(resultCode){
case 1 : Bundle bundle = data.getExtras();
result.setText(bundle.getString("data"));
break;
default : break;
}
}
}<RelativeLayout xmlns:android="http://schemas.android.com/apk/res/android"
xmlns:tools="http://schemas.android.com/tools"
android:layout_width="match_parent"
android:layout_height="match_parent"
android:paddingBottom="@dimen/activity_vertical_margin"
android:paddingLeft="@dimen/activity_horizontal_margin"
android:paddingRight="@dimen/activity_horizontal_margin"
android:paddingTop="@dimen/activity_vertical_margin"
tools:context=".SecondActivity" >
<TextView
android:id="@+id/textView1"
android:layout_width="fill_parent"
android:layout_height="wrap_content"
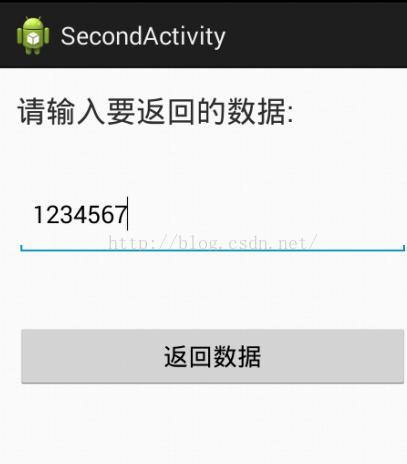
android:text="请输入要返回的数据:"
android:textSize="10pt" >
</TextView>
<EditText
android:id="@+id/Back"
android:layout_width="fill_parent"
android:layout_height="60dp"
android:layout_alignLeft="@+id/textView1"
android:layout_below="@+id/textView1"
android:layout_marginTop="32dp"
android:ems="10" >
<requestFocus />
</EditText>
<Button
android:id="@+id/backButton"
android:layout_width="fill_parent"
android:layout_height="wrap_content"
android:layout_alignLeft="@+id/Back"
android:layout_below="@+id/Back"
android:layout_marginTop="49dp"
android:text="返回数据" />
</RelativeLayout>package com.example.forresultactivitytest;
import android.os.Bundle;
import android.app.Activity;
import android.content.Intent;
import android.view.View;
import android.view.View.OnClickListener;
import android.widget.Button;
import android.widget.EditText;
public class SecondActivity extends Activity {
private Button backButton;
private EditText backdata;
@Override
protected void onCreate(Bundle savedInstanceState) {
super.onCreate(savedInstanceState);
setContentView(R.layout.activity_second);
backButton = (Button)findViewById(R.id.backButton);
backdata = (EditText)findViewById(R.id.Back);
backButton.setOnClickListener(new OnClickListener() {
@Override
public void onClick(View v) {
Intent intent = getIntent();
Bundle bundle = new Bundle();
bundle.putString("data",backdata.getText().toString());
intent.putExtras(bundle);
//返回结果到上一个Activity中
SecondActivity.this.setResult( 1, intent);
SecondActivity.this.finish();
}
});
}
} 

三、Activity的生命周期
Activity是Android开发过程中最最最最最最重要基础的组件,没有此物,其它组件何以生存。一个Activity通常对应于一个界面,那么问题来了,界面之间肯定需要进行切换,那在切换的过程中,Activity到底去哪了?如果当前正在运行的界面需要保存一些数据,那在哪里保存呢?如果再次回到这个界面该在哪里加载数据呢?这些问题的答案需要利用Acticity的生命周期来回答,话不多说,先上一张官方解释图:
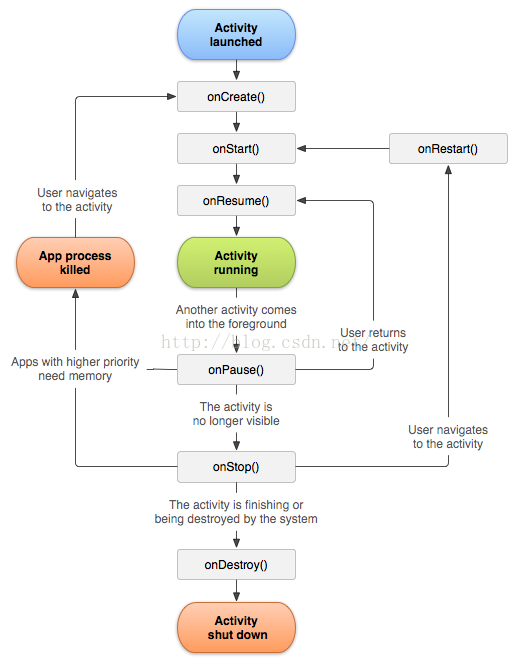
看到这张图可能只是感性的认识,我曾今死记过这张图,但时间不大,就会遗忘,经常搞混淆,我们不妨来实例调试运行一下。
首先定义一个主界面:
package com.example.activitylifetest;

import android.os.Bundle;
import android.app.Activity;
import android.content.Intent;
import android.content.pm.ActivityInfo;
import android.view.View;
import android.view.View.OnClickListener;
import android.widget.Button;

public class MainActivity extends Activity {

    private Button startButton;
    private  Button screenButton;
    @Override
    protected void onCreate(Bundle savedInstanceState) {

        super.onCreate(savedInstanceState);
        setContentView(R.layout.activity_main);
        startButton = (Button)findViewById(R.id.startButton);
        startButton.setOnClickListener(new OnClickListener() {
            @Override
            public void onClick(View v) {
                   Intent intent = new Intent(MainActivity.this,SecondActivity.class);
                   startActivity(intent);
            }
        });
        screenButton = (Button)findViewById(R.id.ScreenButton);
        screenButton.setOnClickListener(new OnClickListener() {
            @Override
            public void onClick(View v) {
                //设置为横屏
                setRequestedOrientation(ActivityInfo.SCREEN_ORIENTATION_LANDSCAPE);
            }
        });

        System.out.println("Activity1-------->"+ "onCreate");
    }
    @Override
    protected void onDestroy() {
        super.onDestroy();
        System.out.println("Activity1-------->"+ "onDestroy");
    }
    @Override
    protected void onRestart() {
        super.onRestart();
        System.out.println("Activity1-------->"+ "onRestart");
    }
    @Override
    protected void onResume() {
        super.onResume();
        System.out.println("Activity1-------->"+ "onResume");
    }
    @Override
    protected void onStart() {
        super.onStart();
        System.out.println("Activity1-------->"+ "onStart");
    }
    @Override
    protected void onStop() {
        super.onStop();
        System.out.println("Activity1-------->"+ "onStop");
    }
    @Override
    protected void onPause() {
        super.onPause();
        System.out.println("Activity1-------->"+ "onPause");
    }
}再定义第二个界面:
package com.example.activitylifetest;
import android.os.Bundle;
import android.app.Activity;
public class SecondActivity extends Activity {

	@Override
	protected void onCreate(Bundle savedInstanceState) {
		super.onCreate(savedInstanceState);
		setContentView(R.layout.activity_second);
		System.out.println("Activity2-------->"+ "onCreate");
	}
	@Override
	protected void onDestroy() {
		super.onDestroy();
		System.out.println("Activity2-------->"+ "onDestroy");
	}
	@Override
	protected void onRestart() {
		super.onRestart();
		System.out.println("Activity2-------->"+ "onRestart");
	}
	@Override
	protected void onResume() {
		super.onResume();
		System.out.println("Activity2-------->"+ "onResume");
	}
	@Override
	protected void onStart() {
		super.onStart();
		System.out.println("Activity2-------->"+ "onStart");
	}
	@Override
	protected void onStop() {
		super.onStop();
		System.out.println("Activity2-------->"+ "onStop");
	}
<pre name="code" class="java">        @Override
        protected void onPause() {
System.out.println("Activity2-------->"+ "onPause");
}
} 下面我们来运行一下,在logcat中看看会输出一些什么东西:
(1)首次启动MainActivity

由此可见:当首次启动一个Activity界面时,会一次调用onCreate、onStart和onResume方法。
(2)启动SecondActivity

当从一个Activity跳转到另外一个Activity时,首先会调用调用Activity的onPause方法,然后调用被调用Acticity的onCreate、onStart和onResume方法,染后再调用调用Activity的onStop方法,此时调用Activity并没有被销毁。
(3)由SecondActivity返回MianActivity

当由被调用Activity跳转回来到调用Activity时,首先调用被调用Activity的onPause方法,由于调用Activity并没有被销毁,因此会依次调用它的onRestart、onStart和onResume方法,染后调用被调用Activity的onStop、onDestory方法。
(4)点击Home键

当点击Home键时,当前Activityhui被放在后台运行,依次调用onPause和onStop方法,单并不销毁当前Activity。
(5)再次进入MainActivity

由于调用Activity并没有被销毁,因此会依次调用它的onRestart、onStart和onResume方法。
(6)点击Back键

点击Back键时,会停止当前程序的进程,因此最后会调用onDestory方法销毁整个Activity。
(7)设置横屏

当设置当前Activity为横屏时,首先销毁当前的竖屏的Activity, 然后重新加载新的横屏的Activity。
通过上述描述,我们已经对Activity的生命周期有了大概的了解,但现在又有一个问题,就是我们究竟应该在onStart、onCreate、onResume、onRestart、onPause、onStop和onDestory中做些什么操作呢?
onCreate: This is where most initialization should go: callingsetContentView(int) to inflate the activity's UI, using findViewById(int) to programmatically interact with widgets in the UI, callingmanagedQuery(android.net.Uri, String[], String, String[], String) to retrieve cursors for data being displayed, etc.
You can call finish() from within this function, in which case onDestroy() will be immediately called without any of the rest of the activity lifecycle (onStart(),onResume(), onPause(), etc) executing.
onStart: Called after
onCreate(Bundle) — or after
onRestart() when the activity had been stopped, but is now again being displayed to the user. It will be followed by
onResume().
onResume: This is a good place to begin animations, open exclusive-access devices (such as the camera), etc
onRestart: For activities that are using rawCursor objects (instead of creating them through managedQuery(android.net.Uri, String[], String, String[], String), this is usually the place where the cursor should be requeried (because you had deactivated it inonStop()
onPause: This callback is mostly used for saving any persistent state the activity is editing, to present a "edit in place" model to the user and making sure nothing is lost if there are not enough resources to start the new activity without first killing this one. This is also a good place to do things like stop animations and other things that consume a noticeable amount of CPU in order to make the switch to the next activity as fast as possible, or to close resources that are exclusive access such as the camera.
In situations where the system needs more memory it may kill paused processes to reclaim resources. Because of this, you should be sure that all of your state is saved by the time you return from this function. In generalonSaveInstanceState(Bundle) is used to save per-instance state in the activity and this method is used to store global persistent data (in content providers, files, etc.)
After receiving this call you will usually receive a following call to onStop() (after the next activity has been resumed and displayed), however in some cases there will be a direct call back toonResume() without going through the stopped state.
onStop: Note that this method may never be called, in low memory situations where the system does not have enough memory to keep your activity's process running after its
onPause() method is called.
onDestroy: Note: do not count on this method being called as a place for saving data! For example, if an activity is editing data in a content provider, those edits should be committed in eitheronPause() or onSaveInstanceState(Bundle), not here. This method is usually implemented to free resources like threads that are associated with an activity, so that a destroyed activity does not leave such things around while the rest of its application is still running. There are situations where the system will simply kill the activity's hosting process without calling this method (or any others) in it, so it should not be used to do things that are intended to remain around after the process goes away.


 248
248

 被折叠的 条评论
为什么被折叠?
被折叠的 条评论
为什么被折叠?
 到【灌水乐园】发言


