


前言: 目前进入的多线程的深入学习,这次还是在学习进阶之光的一个阶段
一、什么是进程?什么是线程?
相信这是许多刚学多线程的人会被问傻的一个问题,明明自己在java se的时候是学过了java多线程编写,new一个Thread啊,Runnable接口啊之类的,但是被人问到这个问题的时候,我相信没有去继续专研的你90%答不出来(排除大牛)…
好了,废话不多说,让我们看看什么是进程?
在操作系统里:进程是操作系统结构的基础,是程序在一个数据集合上运行的过程,是系统资源分配和调度的基本单位。
上面的描述可能很专业,我来通俗的说一下把:
其实我们平时控制管理器的每一个内容就是一个进程(以我mac系统为例):
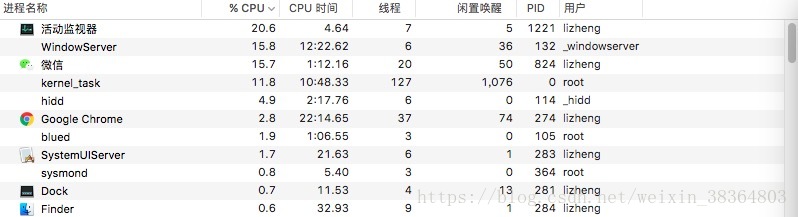
如图上的微信,Chrome这些应用程序其实就是一个进程,所以它们拥有内存资源的分配和调度。所以也可以说进程就是应用程序的实体。
好了,那我们知道了进程是什么,那线程那?
什么是线程?
线程其实就是进程的各个内部任务,就拿微信来说事,你的聊天,个人信息,支付,全都是用各个线程来完成的,所以线程也说是操作系统的最小调度单元,一个进程里可以创建多个线程。
并且线程有一个最关键的不同于进程的东西,就是线程没有内存资源的分配,所以大大减少了资源的浪费。
那么我再问一个问题:为什么要使用多线程呢?我开多几个进程难道就不行吗?
这里我就列出几点线程的优势之处:
- 使用多线程可以减少程序的响应时间。
- 相比进程,线程的开销就显得非常小了,同时多线程在数据共享方面效率很高。
- 多CPU或多核计算机本身就具备多线程的功能。如果只使用单线程,那么无法重复利用好计算机的资源,造成资源浪费。
- 使用多线程可以简化程序的结构,便于理解和维护。
就如同Activity有生命周期一样,线程也有生命周期。线程拥有6种不同的状态:
- New:线程被新创建时。
- Runnable:线程可运行时(调用了start方法时)。
- Blocked:阻塞状态。被阻塞的线程不能活动
- Waiting:等待状态。线程暂时不活动,但是随时可以重新激活它。
- Timed Waiting:超时等待状态。它可以在指定的时间自行返回。
- Terminated: 终止状态。表示当前线程已经执行完毕。一种是run方法完毕后正常退出;另一种就是终止了run方法(异常或手动),导致线程终止。
二、创建线程
1.继承Thread类,重写run()方法
Thread本质上也是实现了Runnable接口的一个实例
代码如下:
public class TestThread extends Thread{
        @Override
        public void run() {
            super.run();
        }
    }
- 1
- 2
- 3
- 4
- 5
- 6
主方法中:
Thread mThread = new TestThread();
mThread.start();
- 1
- 2
2.实现Runnable接口,并实现该接口的run()方法
public class TestThread implements Runnable{

        @Override
        public void run() {

        }
}
- 1
- 2
- 3
- 4
- 5
- 6
- 7
主方法中:
        TestThread testThread = new TestThread();
        Thread mThread = new Thread(testThread);
        mThread.start();
- 1
- 2
- 3
3.实现Callable接口,重写call()方法
Callable接口实现多线程有两种途径:
FutureTask和Callable实现:
Callable<Integer> callable = new Callable<Integer>() {
            public Integer call() throws Exception {
               return "我们要返回的内容";
            }
        };
        FutureTask<Integer> future = new FutureTask<Integer>(callable);
        new Thread(future).start();
        try {
            System.out.println(future.get());
        } catch (InterruptedException e) {
            e.printStackTrace();
        } catch (ExecutionException e) {
            e.printStackTrace();
        }

    //也可以写成
public static class MyTestCallable implements Callable<E>{
    public E call() throws Exception {
               return "我们要返回的内容";
            }

MyTestCallable callable = new MyTestCallable();
FutureTask<E> future = new FutureTask<E>(callable);
Thread mThread = new Thread(future);
mThread.start();
try {
            System.out.println(future.get());
        } catch (InterruptedException e) {
            e.printStackTrace();
        } catch (ExecutionException e) {
            e.printStackTrace();
        }
- 1
- 2
- 3
- 4
- 5
- 6
- 7
- 8
- 9
- 10
- 11
- 12
- 13
- 14
- 15
- 16
- 17
- 18
- 19
- 20
- 21
- 22
- 23
- 24
- 25
- 26
- 27
- 28
- 29
- 30
- 31
- 32
Future和Callable实现:(通过ExecutorService的submit方法执行Callable)
 public static class MyTestCallable implements Callable{

        @Override
        public String call() throws Exception {
            return "我们要返回的内容";
        }
    }
- 1
- 2
- 3
- 4
- 5
- 6
- 7
主方法中:
MyTestCallable myTestCallable = new MyTestCallable();
//利用线程池实现
ExecutorService mExecutorService = Executors.newSingleThreadExecutor();
Future mFuture = mExecutorService.submit(myTestCallable);
try{
//等待线程结束,并返回结果
System.out.println(future.get());
}catch (Exception e){
            e.printStackTrace();
  }
}
- 1
- 2
- 3
- 4
- 5
- 6
- 7
- 8
- 9
- 10
- 11
三、线程中断/终止
我们可以利用interrupt()方法来中断线程,调用Thread.currentThread().isInterrupted()方法来判断是否终止线程。
安全的终止线程
有两种方式去终止线程:
thread.interrupt()方法:
public class StopThread{
 public static void main(String[] args)throws InterruptedException{
 MoonRunner runnable = new Thread(runnable,"MoonThread");
 thread.start();
 TimeUnit.MILLISECONDS.sleep(10);
 thread.interrupt();
 }
public static class MoonRunner implements Runnable{
   private long i;
   @Override
   public void run(){
   while(!Thread.currentThread().isInterrupted()){
   i++;
   System.out.println("i="+i);
   }
   System.out.println("stop");
  }
 }
}
- 1
- 2
- 3
- 4
- 5
- 6
- 7
- 8
- 9
- 10
- 11
- 12
- 13
- 14
- 15
- 16
- 17
- 18
- 19
采用volatile关键字的boolean变量判断:
public class StopThread{
 public static void main(String[] args)throws InterruptedException{
 MoonRunner runnable = new Thread(runnable,"MoonThread");
 thread.start();
 TimeUnit.MILLISECONDS.sleep(10);
 runnable.cancel;
 }
 public static class MoonRunner implements Runnable{
   private long i;
   private volatile boolean on = true;
   @Override
   public void run(){
   while(on){
   i++;
   System.out.println("i="+i);
   }
   System.out.println("stop");
  }
  public void cancel(){
    on = false;
    }
  }
}
- 1
- 2
- 3
- 4
- 5
- 6
- 7
- 8
- 9
- 10
- 11
- 12
- 13
- 14
- 15
- 16
- 17
- 18
- 19
- 20
- 21
- 22
- 23
四、同步
java提供了两种同步的方式
重入锁ReentrantLock():
Lock mLock = new ReentrantLock();
mLock.lock();
try{
...
}
finally{
mLock.unlock();
}
- 1
- 2
- 3
- 4
- 5
- 6
- 7
- 8
我们可以利用条件对象对重入锁添加条件判断阻塞线程,并放弃锁。
public  class Alipay{
    private double[] accounts;
    private Lock alipaylock;
    private Condition condition;
    public Alipay(int n,double money){
        accounts = new double[n];
        alipaylock = new ReentrantLock();
        condition = alipaylock.newCondition();
        for(int i=0;i<accounts.length;i++){
            accounts[i] = money;
        }
    }
    public void transfer(int from,int to,int amount) throws InterruptedException{
            alipaylock.lock();
            try{

                while(accounts[from]<amount){
                    System.out.println("线程阻塞中..."+Thread.currentThread());
                    condition.await();
                }
                accounts[from] = accounts[from]-amount;
                accounts[to] = accounts[to]+amount;
                condition.signalAll();
            }finally{
                alipaylock.unlock();
            }
            System.out.println("传出账号:"+accounts[from]+"转入账号:"+accounts[to]);
        }
}
- 1
- 2
- 3
- 4
- 5
- 6
- 7
- 8
- 9
- 10
- 11
- 12
- 13
- 14
- 15
- 16
- 17
- 18
- 19
- 20
- 21
- 22
- 23
- 24
- 25
- 26
- 27
- 28
- 29
只要调用了condition.await()语句,便会阻塞当前线程,并放弃锁
一旦一个线程调用了await方法,它就会进入一个等待集并且处于阻塞状态,直到另一个线程调用了同一条件下的signalAll方法时,重新激活因为这一条件而等待的所以线程,重新判断条件。
比如代码的这个例子,第一个账户向第二个账户转入60元,可是第一个账户并没有这么多钱accounts[from] < amount 便是true,线程执行condition.await()便处于阻塞状态,并放弃锁。而当第三个账户向第一个账户账户转入30元的时候,执行了condition.signalAll();第一个账户向第二个账户转入60元的线程就重新的激活了,再次判断accounts[from] < amount 时,第一个账户已经收到了第第三个账户转来的钱,所以判断为false,执行转账语句。
public class ThreadTest {

    public static void main(String[] args)  {
        Alipay a = new Alipay(3,50.0);
        new Thread(new Runnable(){
            public void run(){
                try {
                    a.transfer(0, 1, 60);
                } catch (InterruptedException e) {
                    // TODO Auto-generated catch block
                    e.printStackTrace();
                }
            }
        }).start();
        new Thread(new Runnable(){
            public void run(){
                try {
                    a.transfer(2, 0, 30);
                } catch (InterruptedException e) {
                    // TODO Auto-generated catch block
                    e.printStackTrace();
                }
            }
        }).start();
    }
}
- 1
- 2
- 3
- 4
- 5
- 6
- 7
- 8
- 9
- 10
- 11
- 12
- 13
- 14
- 15
- 16
- 17
- 18
- 19
- 20
- 21
- 22
- 23
- 24
- 25
- 26
关键字 synchronized:
public synchronized void method(){
...
}
//等价于上面的重入锁方法
- 1
- 2
- 3
- 4
对于上面的转账例子,我们也可以用声明synchronized实现:
public class AlipaySyn {
        private double[] accounts;
        public AlipaySyn(int n,double money){
            accounts = new double[n];
            for(int i=0;i<accounts.length;i++){
                accounts[i] = money;
            }
        }
public synchronized void transfer(int from,int to,int amount) throws InterruptedException{

                    while(accounts[from]<amount){
                        System.out.println("线程阻塞中..."+Thread.currentThread());
                        wait();
                    }
                    accounts[from] = accounts[from]-amount;
                    accounts[to] = accounts[to]+amount;
                    notifyAll();
                System.out.println("传出账号:"+accounts[from]+"转入账号:"+accounts[to]);
            }
    }
- 1
- 2
- 3
- 4
- 5
- 6
- 7
- 8
- 9
- 10
- 11
- 12
- 13
- 14
- 15
- 16
- 17
- 18
- 19
- 20
主方法中:
public class ThreadTest {

    public static void main(String[] args)  {
        AlipaySyn aSyn = new AlipaySyn(3,50.0);
        new Thread(new Runnable(){
            public void run(){
                try {
                    aSyn.transfer(0, 1, 60);
                } catch (InterruptedException e) {
                    // TODO Auto-generated catch block
                    e.printStackTrace();
                }
            }
        }).start();
        new Thread(new Runnable(){
            public void run(){
                try {
                    aSyn.transfer(2, 0, 30);
                } catch (InterruptedException e) {
                    // TODO Auto-generated catch block
                    e.printStackTrace();
                }
            }
        }).start();
    }
}
- 1
- 2
- 3
- 4
- 5
- 6
- 7
- 8
- 9
- 10
- 11
- 12
- 13
- 14
- 15
- 16
- 17
- 18
- 19
- 20
- 21
- 22
- 23
- 24
- 25
- 26
可以对比得出结论,使用synchronized关键字写代码要简洁很多。wait()方法相当于condition.await();notifyAll()相当于condition.signalAll()。
volatile
1.java内存模型:
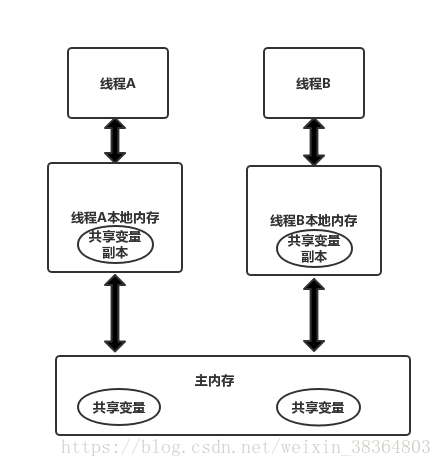
线程A与线程B之间若要通信,必须要经历下面两个步骤:
- 线程A把线程A本地内存中更新过的共享变量刷新到主内存中去。
- 线程B到主内存中去读取线程A之前已经更新过的共享变量。
2.原子性、可见性、有序性
原子性:
对基本数据类型变量的读取和赋值操作是原子性的操作,即这些操作是不可以被中断的,要么执行完毕,要么不执行。
而自增和自减就不是原子性操作。
可见性:
当一个共享变量被volatile修饰时,它会保证修改的值立刻被更新到主内存中去,所以对其他线程是可见的。
有序性:
synchronized和lock可以保证有序性;因为它们保证每个时刻只有一个线程执行同步代码,这相当于是让线程顺序执行同步代码,从而保证了有序性。
3.volatile关键字
volatile不保证原子性
volatile保证有序性
使用场景:
(1) 状态标志
volatile boolean shutdownRequested;
...
public void shutdown(){
  shutdownRequested = true;
  }
public void doWork(){
  while(!shutdownRequested){
  ...
  }
}
- 1
- 2
- 3
- 4
- 5
- 6
- 7
- 8
- 9
- 10
(2) 双重检查模式
public class Singleton{
private volatile static Singleton instance =null;
public static Singleton getInstance(){
  if(instance == null){
    synchronized(Singleton.class){
      if(instance == null){
        instance = new Singleton();
        }
       }
      }
      return instance;
     }
  }
- 1
- 2
- 3
- 4
- 5
- 6
- 7
- 8
- 9
- 10
- 11
- 12
- 13
五、阻塞队列
BlockingQueue的核心方法
放入数据:
- offer(object):将object加到BlockingQueue里。如果可以容纳,则返回true,否则返回false。
- offer(E o,long timeout,TimeUnit unit): 可以设定等待的时间。指定时间内还不能往队列中加入BlockingQueue,则返回失败
put(object): 将object加到BlockingQueue里。
获取数据:
poll(time): 取走BlockingQueue里排在首位的对象。若不能取出可以等time参数规定的时间。取不到返回null。
- poll(long timeout,TimeUnit unit): 取走BlockingQueue里排在首位的对象。在一定时间内一旦有数据可以取,则立刻返回队列中的数据;否则直到时间超过还没有数据可以取,返回false。
- take(): 取走BlockingQueue里排在首位的对象。若BlockingQueue为空,则阻断进入等待状态,直到BlockingQueue有新数据加入。
- drainTo(): 一次性取走BlockingQueue所有获取的数据对象。
java中的阻塞队列
java中提供了7个阻塞队列:- ArrayBlockingQueue: 由数组结构组成的有界阻塞队列
- LinkedBlockingQueue: 由链表结构组成的阻塞队列(不设定长度时为无界阻塞队列)
- PriorityBlockingQueue: 支持优先级的无界阻塞队列
- DelayQueue: 支持延时获取元素的无界阻塞队列,使用优先级PriorityQueue队列来实现
- SynchronousQueue: 不储存元素的阻塞队列
- LinkedTransferQueue: 由链表结构组成的无界阻塞队列
- LinkedBlockingDeque: 由链表结构组成的双向阻塞队列
六、线程池
可以通过ThreadPoolExecutor来创建一个线程池
拥有最多参数的构造方法如下:public ThreadPoolExecutor(int corePoolSize, int maximumPoolSize, long keepAliveTime, TimeUnit unit, BlockingQueue<Runnable> workQueue, ThreadFactory threadFactory, RejectedExecutionHandler handler) { ... }- 1
- 2
- 3
- 4
- 5
- 6
- 7
- 8
- 9
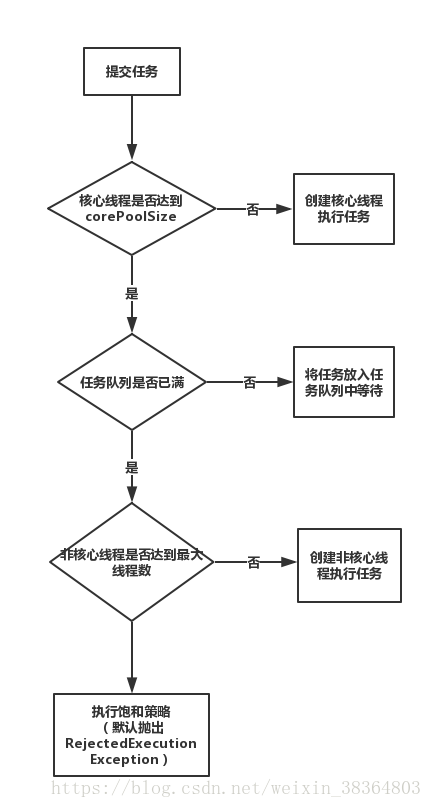
- corePoolSize: 核心线程数。如果当前运行的线程数少于corePoolSize,则创建新线程来处理任务。
- maximumPoolSize: 线程池允许创建的最大线程数。如果任务队列满了并且线程数小于maximumPoolSize时,则线程池仍然会创建线程来处理任务。
- keepAliveTime: 非核心线程闲置的超时时间。超过这个时间则回收。
- TimeUnit: keepAliveTime参数的时间单位。可选的单位有天DAYS、小时HOURS、分钟MINUTES、秒SECONDS、毫秒MILLSECONDS。
- workQueue: 任务队列。如果当前线程数大于corePoolSize,则将任务添加到任务队列中。
- ThreadFactory: 线程工厂。可以为每个线程设置名字。
RejectedExecutionHandler: 饱和策略。默认是AbordPolicy。
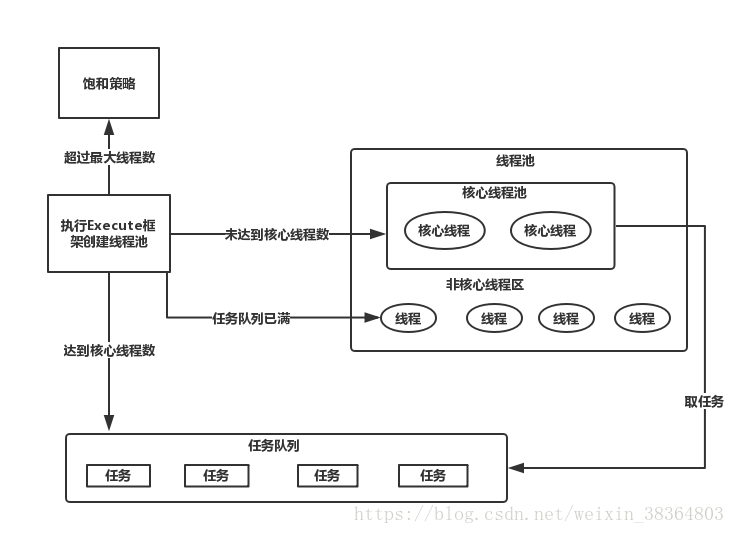
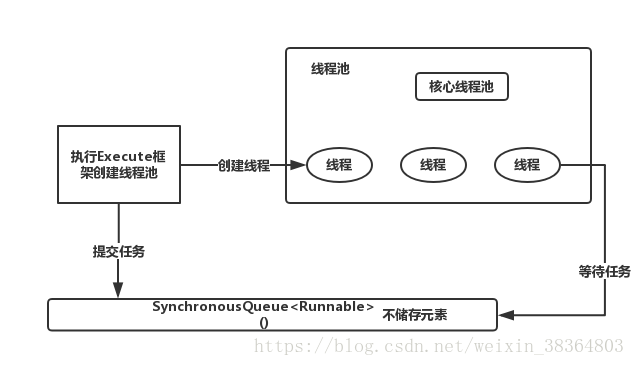
线程池的处理流程和原理我们可以看两个图即可:
线程池的种类
线程池有常用的4大类,其实都是基于ThreadPoolExecutor实现的;分别是FixedThreadPool、CachedThreadPool、SingleThreadExecutor、ScheduledThreadPool。
1.FixedThreadPool
FixedThreadPool只有核心线程,并且线程数量固定,keepAliveTime为无效参数,采用无界阻塞队列LinkedBlockingQueue。public static ExecutorService newFixedThreadPool(int nThreads) { return new ThreadPoolExecutor(nThreads, nThreads, 0L, TimeUnit.MILLISECONDS, new LinkedBlockingQueue<Runnable>()); }- 1
- 2
- 3
- 4
- 5
2.CachedThreadPool
CachedThreadPool没有核心线程,非核心线程是无界的。keepAliveTime设置为60秒,空闲线程等待新任务的最长时间为60秒。采用了SynchronousQueue不储存的元素阻塞队列。public static ExecutorService newCachedThreadPool() { return new ThreadPoolExecutor(0, Integer.MAX_VALUE, 60L, TimeUnit.SECONDS, new SynchronousQueue<Runnable>()); }- 1
- 2
- 3
- 4
- 5
3.SingleThreadExecutor
SingleThreadExecutor核心线程数和总线程数都为1,其他配置都和FixedThreadPool相同。public static ExecutorService newSingleThreadExecutor() { return new FinalizableDelegatedExecutorService (new ThreadPoolExecutor(1, 1, 0L, TimeUnit.MILLISECONDS, new LinkedBlockingQueue<Runnable>())); }- 1
- 2
- 3
- 4
- 5
- 6
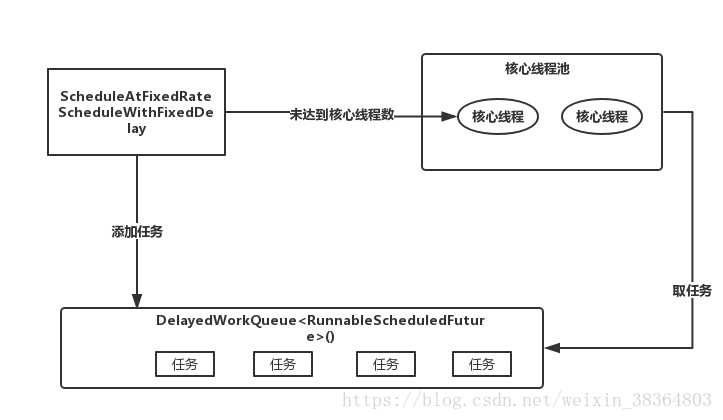
4.ScheduledThreadPool
ScheduledThreadPool的corePoolSize为固定值,采用了DelayWorkQueue,所以maximumPoolSize是无效的。public static ScheduledExecutorService newScheduledThreadPool(int corePoolSize) { return new ScheduledThreadPoolExecutor(corePoolSize); } public ScheduledThreadPoolExecutor(int corePoolSize) { super(corePoolSize, Integer.MAX_VALUE, DEFAULT_KEEPALIVE_MILLIS, MILLISECONDS, new DelayedWorkQueue()); }- 1
- 2
- 3
- 4
- 5
- 6
- 7
- 8
- 9
4种线程池的使用
1.FixedThreadPool// 1. 创建定长线程池对象 & 设置线程池线程数量固定为3 ExecutorService fixedThreadPool = Executors.newFixedThreadPool(3); // 2. 创建好Runnable类线程对象 & 需执行的任务 Runnable task =new Runnable(){ public void run(){ System.out.println("执行任务啦"); } }; // 3. 向线程池提交任务:execute() fixedThreadPool.execute(task); // 4. 关闭线程池 fixedThreadPool.shutdown();- 1
- 2
- 3
- 4
- 5
- 6
- 7
- 8
- 9
- 10
- 11
- 12
- 13
- 14
- 15
2.CachedThreadPool
// 1. 创建可缓存线程池对象 ExecutorService cachedThreadPool = Executors.newCachedThreadPool(); // 2. 创建好Runnable类线程对象 & 需执行的任务 Runnable task =new Runnable(){ public void run(){ System.out.println("执行任务啦"); } }; // 3. 向线程池提交任务:execute() cachedThreadPool.execute(task); // 4. 关闭线程池 cachedThreadPool.shutdown(); //当执行第二个任务时第一个任务已经完成 //那么会复用执行第一个任务的线程,而不用每次新建线程。- 1
- 2
- 3
- 4
- 5
- 6
- 7
- 8
- 9
- 10
- 11
- 12
- 13
- 14
- 15
- 16
- 17
- 18
3.SingleThreadExecutor
// 1. 创建单线程化线程池 ExecutorService singleThreadExecutor = Executors.newSingleThreadExecutor(); // 2. 创建好Runnable类线程对象 & 需执行的任务 Runnable task =new Runnable(){ public void run(){ System.out.println("执行任务啦"); } }; // 3. 向线程池提交任务:execute() singleThreadExecutor.execute(task); // 4. 关闭线程池 singleThreadExecutor.shutdown();- 1
- 2
- 3
- 4
- 5
- 6
- 7
- 8
- 9
- 10
- 11
- 12
- 13
- 14
- 15
4.ScheduledThreadPool
// 1. 创建 定时线程池对象 & 设置线程池线程数量固定为5 ScheduledExecutorService scheduledThreadPool = Executors.newScheduledThreadPool(5); // 2. 创建好Runnable类线程对象 & 需执行的任务 Runnable task =new Runnable(){ public void run(){ System.out.println("执行任务啦"); } }; // 3. 向线程池提交任务:schedule() scheduledThreadPool.schedule(task, 1, TimeUnit.SECONDS); // 延迟1s后执行任务 scheduledThreadPool.scheduleAtFixedRate(task,10,1000,TimeUnit.MILLISECONDS); // 延迟10ms后、每隔1000ms执行任务 // 4. 关闭线程池 scheduledThreadPool.shutdown();- 1
- 2
- 3
- 4
- 5
- 6
- 7
- 8
- 9
- 10
- 11
- 12
- 13
- 14
- 15
- 16


 352
352


 被折叠的 条评论
为什么被折叠?
被折叠的 条评论
为什么被折叠?
 到【灌水乐园】发言


