


目录
1. 文章主要内容
本篇博客聚焦YOLOv8多模态检测的推理模块。通过快速分析多模态推理模块的结构、代码实现及FPS计算流程,系统性地打通多模态检测的完整技术链条!另外,由于本篇幅度太长,多模态推理、热力图和FPS计算原理部分,将在下篇博客中详细更新,如果感兴趣的话,可以点个关注追更!
2. 相关说明
若读者尚未掌握多模态YOLOv8的训练方法、代码原理与核心架构,建议优先阅读本系列前两篇文章,以构建完整的知识体系。另外,本次推理过程,只涉及水平框的推理,至于旋转框,等之后有时间研究再进行博客知识分享。
一文详解YOLOv8多模态目标检测(可见光+红外图像,基于Ultralytics官方代码实现)
YOLOv8多模态检测核心技术解析:跨模态特征融合机制逐层拆解(含独家结构示意图)
3. 多模态YOLOv8推理模块详解
在这一节当中,首先会给出我重新修改整理的多模态推理代码(更加易懂、解耦合)、配套热力图可视化及FPS计算工具链,辅以关键修改点的说明,降低代码迁移成本;让大家能够简单的修改,快速上手代码。
3.1 多模态推理代码(快速上手看效果)
针对于多模态YOLOv8源码(不知道源码的读者,请看我上面推荐的第一篇博客,内含相关地址)水平框推理部分,其代码位于detect/hbbDetect.py(核心推理模块)与detect/hbbHeapmap.py(热力图生成模块),其中前一个是多模态推理的代码,第二个是绘制热力图的代码文件。接下来,将按顺序给出这两个文件的源码部分,并做相关解释。需要注意到的是:这两个源码我都做了相关的修改,因为源代码写的比较耦合,有点让人难以理解,我这里重构了代码,所以大家直接用我的代码进行粘贴复制就行。
3.1.1 hbbDetect推理代码修改
OK,先给出多模态推理修改后的代码hbbDetect.py文件。针对于此文件,需要修改几个部分,分别是:
1. 在def main函数中(下同,如有不同函数会进行说明),首先你需要定义一个path,这个path是你数据集的根目录,比如我这里使用的是DroneVehicle数据集。
2. 另外,定义一个weights_path,这个变量代表着你跑完多模态训练代码后生成的权重文件,博主这里选择best.pt文件。
3. 接着,定义一个rgb_dir,这个变量join函数path后面那一部分即为你可见光想要测试图片文件夹的根目录。(需特别注意:你红外ir图片测试的根目录一定要与这个可见光的一样,只是目录中的imgRGB改为imgIR,大家一定要这样定义)
4. 然后,定义一个save_dir,这个变量join函数path后面跟的是你想要保存推理结构图片的目录,不存在也没有关系,会自动进行创建。
5. 再往下看,会发现两个rgb_save_dir和ir_save_dir两个文件夹,这是基于上面第4点的save_dir文件夹进行构建。因为是多模态,所以推理的图片应该分为两个部分,所以就用两个文件夹分别是rgb和ir来保存推理的图片。
6. 我们再来看看def process_image函数,博主这里添加了FPS计算的相关代码,大家无需修改,可以正常运行!
import os
import cv2
import numpy as np
import torch
from ultralytics import YOLO
from tqdm import tqdm


class MultimodalDetector:
    def __init__(self, weights_path, device='cpu'):
        self.device = device
        self.model = self._load_model(weights_path)
        self.colors = [
            [165, 0, 255],
            [0, 255, 0],
            [102, 255, 255],
            [255, 165, 0],
            [255, 255, 0]
        ]
        self.class_names = ["car", "truck", "bus", "van", "freight"]

    def _load_model(self, weights_path):
        if not os.path.exists(weights_path):
            raise FileNotFoundError("Model weights not found!")
        model = YOLO(weights_path).to(self.device)
        model.fuse()
        model.info(verbose=False)
        return model

    def _draw_boxes(self, image, pt1, pt2, cls_value, cls_conf, thickness=4):
        # 根据类别分配颜色
        color = self.colors[int(cls_value)]
        # 画检测框
        cv2.rectangle(image, tuple(pt1), tuple(pt2), color, thickness)

    def _draw_text(self, image, text, pt1, cls_value, font_scale=1.6, thickness=4):
        color = self.colors[int(cls_value)]
        text_x, text_y = pt1[0], pt1[1]
        text_x = max(text_x, 0)
        text_y = max(text_y, 0)
        cv2.putText(image, text, (text_x, text_y), cv2.FONT_HERSHEY_SIMPLEX, font_scale, color, thickness)

    def process_image(self, rgb_path, ir_path):
        rgb_image = cv2.imread(rgb_path)
        ir_image = cv2.imread(ir_path)

        if rgb_image is None or ir_image is None:
            raise ValueError("Failed to load images")

        # 拼接 RGB 和 IR 图像
        combined_image = np.concatenate((rgb_image, ir_image), axis=2)

        # 模型推理
        result = self.model.predict(combined_image, save=False, imgsz=640, visualize=False, obb=False)
        boxes = result[0].boxes
        preprocess_time = result[0].speed["preprocess"]# 预处理总时间
        inference_time = result[0].speed["inference"] # 推理总时间
        postprocess_time = result[0].speed["postprocess"] # 后处理总时间

        # 计算 FPS
        total_time = preprocess_time + inference_time + postprocess_time
        fps = 1000 / total_time

        print(f"FPS: {fps:.1f}")
        # 绘制结果
        for box in boxes:
            cls_value = int(box.cls)
            conf = box.conf.item()

            xywh = box.xywh.cpu().numpy().flatten()  # 展平为一维数组
            x_center, y_center, width, height = xywh

            pt1 = (int(x_center - width / 2), int(y_center - height / 2))
            pt2 = (int(x_center + width / 2), int(y_center + height / 2))

            # 绘制矩形
            self._draw_boxes(rgb_image, pt1, pt2, cls_value, conf)
            self._draw_boxes(ir_image, pt1, pt2, cls_value, conf)

            # 绘制文本
            class_name = self.class_names[cls_value] if cls_value < len(self.class_names) else "未知类别"
            text = ""# f"{class_name}" # {float(conf):.2f}
            self._draw_text(rgb_image, text, pt1, cls_value)
            self._draw_text(ir_image, text, pt1, cls_value)

        return rgb_image, ir_image


def list_all_files(startpath):
    all_files = []
    for root, dirs, files in os.walk(startpath):
        for name in files:
            if name.lower().endswith(('.jpg', '.png', '.bmp')):
                all_files.append(os.path.join(root, name))
    return all_files


def main():
    path = '/root/autodl-tmp/data/DroneVehicle/'
    weights_path = '/root/autodl-tmp/project/TwoStream_Yolov8-main/runs/detect/train/weights/best.pt'
    detector = MultimodalDetector(weights_path, device='cuda' if torch.cuda.is_available() else 'cpu')

    rgb_dir = os.path.join(path, 'imgRGB/test/images/')
    # ir_dir = os.path.join(path, 'imgIR/test/images/')
    save_dir = os.path.join(path, 'results/')

    rgb_save_dir = os.path.join(save_dir, 'rgb')
    ir_save_dir = os.path.join(save_dir, 'ir')

    # 递归创建目录(包括父目录)
    os.makedirs(rgb_save_dir, exist_ok=True)
    os.makedirs(ir_save_dir, exist_ok=True)

    print(f"save detect result RGB: {os.path.abspath(rgb_save_dir)}")
    print(f"save detect result IR: {os.path.abspath(ir_save_dir)}\n")

    all_files = list_all_files(rgb_dir)
    for file in tqdm(all_files):
        rgb_path = file
        ir_path = file.replace('imgRGB', 'imgIR')
        try:
            rgb_result, ir_result = detector.process_image(rgb_path, ir_path)
            cv2.imwrite(os.path.join(rgb_save_dir, os.path.basename(file)), rgb_result)
            cv2.imwrite(os.path.join(ir_save_dir, os.path.basename(file)), ir_result)
        except Exception as e:
            print(f"Error processing {file}: {e}")


if __name__ == '__main__':
    main()
3.1.2 hbbHeapmap.py热力图代码修改
接下来,再给出热力图绘制的代码detect/hbbHeapmap.py。针对于此文件,需要修改几个部分,分别是:
1. 在if name == ‘main’: 中,依然是先定义数据集的根目录path,这里不过多解释。
2. 同样定义你想要绘制热力图的可见光和红外图像路径path_rgb和path_ir,注意其路径除了对应的imgRGB和imgIR不同之外,其它要相同,不然可能报错。
3. 然后,定义你保存热力图可视化的结果路径save_dir,这些都是比较简单的。
4. 接下来,来到get_params()函数,你只需要修改weight这一个变量,这个变量的意思也就是你训练完保存的权重文件,博主这里依旧选择best.pt。
5. 然后,来到def process函数,观察到有这一行代码: cam_image = show_cam_on_image(img_ir, grayscale_cam, use_rgb=True)。意思是,热力图的可视化是绘制在img_ir,也就是红外图像上。如果你想要绘制在对应的可见光图像上,只需要修改img_ir为img_rgb即可。
# 多模态水平边框热力图
import warnings
warnings.filterwarnings('ignore')
warnings.simplefilter('ignore')
import torch, cv2, os, shutil
import numpy as np
np.random.seed(0)
from tqdm import trange
from PIL import Image
from ultralytics.nn.tasks import attempt_load_weights
from ultralytics.utils.ops import xywh2xyxy, non_max_suppression
from pytorch_grad_cam import GradCAMPlusPlus
from pytorch_grad_cam.utils.image import show_cam_on_image, scale_cam_image
from pytorch_grad_cam.activations_and_gradients import ActivationsAndGradients


def letterbox(im, new_shape=(640, 640), color=(114, 114, 114), auto=True, scaleFill=False, scaleup=True, stride=32):
    # Resize and pad image while meeting stride-multiple constraints
    shape = im.shape[:2]  # current shape [height, width]
    if isinstance(new_shape, int):
        new_shape = (new_shape, new_shape)

    # Scale ratio (new / old)
    r = min(new_shape[0] / shape[0], new_shape[1] / shape[1])
    if not scaleup:  # only scale down, do not scale up (for better val mAP)
        r = min(r, 1.0)

    # Compute padding
    ratio = r, r  # width, height ratios
    new_unpad = int(round(shape[1] * r)), int(round(shape[0] * r))
    dw, dh = new_shape[1] - new_unpad[0], new_shape[0] - new_unpad[1]  # wh padding
    if auto:  # minimum rectangle
        dw, dh = np.mod(dw, stride), np.mod(dh, stride)  # wh padding
    elif scaleFill:  # stretch
        dw, dh = 0.0, 0.0
        new_unpad = (new_shape[1], new_shape[0])
        ratio = new_shape[1] / shape[1], new_shape[0] / shape[0]  # width, height ratios

    dw /= 2  # divide padding into 2 sides
    dh /= 2

    if shape[::-1] != new_unpad:  # resize
        im = cv2.resize(im, new_unpad, interpolation=cv2.INTER_LINEAR)
    top, bottom = int(round(dh - 0.1)), int(round(dh + 0.1))
    left, right = int(round(dw - 0.1)), int(round(dw + 0.1))
    im = cv2.copyMakeBorder(im, top, bottom, left, right, cv2.BORDER_CONSTANT, value=color)  # add border
    return im, ratio, (dw, dh)


class ActivationsAndGradients:
    """ Class for extracting activations and
    registering gradients from targetted intermediate layers """

    def __init__(self, model, target_layers, reshape_transform):
        self.model = model
        self.gradients = []
        self.activations = []
        self.reshape_transform = reshape_transform
        self.handles = []
        for target_layer in target_layers:
            self.handles.append(
                target_layer.register_forward_hook(self.save_activation))
            # Because of https://github.com/pytorch/pytorch/issues/61519,
            # we don't use backward hook to record gradients.
            self.handles.append(
                target_layer.register_forward_hook(self.save_gradient))

    def save_activation(self, module, input, output):
        activation = output

        if self.reshape_transform is not None:
            activation = self.reshape_transform(activation)
        self.activations.append(activation.cpu().detach())

    def save_gradient(self, module, input, output):
        if not hasattr(output, "requires_grad") or not output.requires_grad:
            # You can only register hooks on tensor requires grad.
            return

        # Gradients are computed in reverse order
        def _store_grad(grad):
            if self.reshape_transform is not None:
                grad = self.reshape_transform(grad)
            self.gradients = [grad.cpu().detach()] + self.gradients

        output.register_hook(_store_grad)

    def post_process(self, result):
        logits_ = result[:, 4:]
        boxes_ = result[:, :4]
        sorted, indices = torch.sort(logits_.max(1)[0], descending=True)
        return torch.transpose(logits_[0], dim0=0, dim1=1)[indices[0]], torch.transpose(boxes_[0], dim0=0, dim1=1)[
            indices[0]], xywh2xyxy(torch.transpose(boxes_[0], dim0=0, dim1=1)[indices[0]]).cpu().detach().numpy()

    def __call__(self, x):
        self.gradients = []
        self.activations = []
        model_output = self.model(x)
        post_result, pre_post_boxes, post_boxes = self.post_process(model_output[0])
        return [[post_result, pre_post_boxes]]

    def release(self):
        for handle in self.handles:
            handle.remove()


class yolov8_target(torch.nn.Module):
    def __init__(self, ouput_type, conf, ratio) -> None:
        super().__init__()
        self.ouput_type = ouput_type
        self.conf = conf
        self.ratio = ratio

    def forward(self, data):
        post_result, pre_post_boxes = data
        result = []
        for i in trange(int(post_result.size(0) * self.ratio)):
            if float(post_result[i].max()) < self.conf:
                break
            if self.ouput_type == 'class' or self.ouput_type == 'all':
                result.append(post_result[i].max())
            elif self.ouput_type == 'box' or self.ouput_type == 'all':
                for j in range(4):
                    result.append(pre_post_boxes[i, j])
        return sum(result)


class yolov8_heatmap:
    def __init__(self, weight, device, method, layer, backward_type, conf_threshold, ratio, show_box, renormalize):
        device = torch.device(device)
        ckpt = torch.load(weight)
        model_names = ckpt['model'].names
        model = attempt_load_weights(weight, device)
        model.info()
        for p in model.parameters():
            p.requires_grad_(True)
        model.eval()

        target = yolov8_target(backward_type, conf_threshold, ratio)

        target_layers = [model.model[l] for l in layer]

        print(target_layers)
        method = eval(method)(model, target_layers, use_cuda=device.type == 'cuda')
        method.activations_and_grads = ActivationsAndGradients(model, target_layers, None)

        # colors = np.random.uniform(0, 255, size=(len(model_names), 3)).astype(np.int64)
        colors = [(0, 0, 255) for i in range(len(model_names))]
        self.__dict__.update(locals())

    def post_process(self, result):
        result = non_max_suppression(result, conf_thres=self.conf_threshold, iou_thres=0.65)[0]
        return result

    def draw_detections(self, box, color, name, img):

        xmin, ymin, xmax, ymax = list(map(int, list(box)))
        cv2.rectangle(img, (xmin, ymin), (xmax, ymax), tuple(int(x) for x in color), 2)
        cv2.putText(img, str(name), (xmin - 10, ymin - 5), cv2.FONT_HERSHEY_SIMPLEX, 0.4, tuple(int(x) for x in color),
                    1, lineType=cv2.LINE_AA)
        return img

    def renormalize_cam_in_bounding_boxes(self, boxes, image_float_np, grayscale_cam):
        """Normalize the CAM to be in the range [0, 1]
        inside every bounding boxes, and zero outside of the bounding boxes. """
        renormalized_cam = np.zeros(grayscale_cam.shape, dtype=np.float32)
        for x1, y1, x2, y2 in boxes:
            x1, y1 = max(x1, 0), max(y1, 0)
            x2, y2 = min(grayscale_cam.shape[1] - 1, x2), min(grayscale_cam.shape[0] - 1, y2)
            renormalized_cam[y1:y2, x1:x2] = scale_cam_image(grayscale_cam[y1:y2, x1:x2].copy())
        renormalized_cam = scale_cam_image(grayscale_cam.copy())
        renormalized_cam = scale_cam_image(renormalized_cam)
        eigencam_image_renormalized = show_cam_on_image(image_float_np, renormalized_cam, use_rgb=True)
        return eigencam_image_renormalized

    def preprocess_image(self,image_path):
        """
        预处理单张图片:读取、调整大小、颜色空间转换和归一化。
        """
        image = cv2.imread(image_path)
        image = letterbox(image)[0]
        image = cv2.cvtColor(image, cv2.COLOR_BGR2RGB)
        image = np.float32(image) / 255.0
        return image

    def process(self, img_path, imgir_path, save_path):
        # 预处理RGB图像
        img_rgb = self.preprocess_image(img_path)

        # 预处理IR图像
        img_ir = self.preprocess_image(imgir_path)

        # 拼接RGB和IR图像
        img = np.concatenate((img_rgb, img_ir), axis=2)

        # 转换为PyTorch张量
        tensor = torch.from_numpy(img.transpose(2, 0, 1)).unsqueeze(0).to(self.device)

        # 模型推理与CAM生成
        try:
            grayscale_cam = self.method(tensor, [self.target])
        except AttributeError as e:
            return
        grayscale_cam = grayscale_cam[0, :]
        # 生成热力图
        cam_image = show_cam_on_image(img_ir, grayscale_cam, use_rgb=True)

        # 绘制检测框
        if self.show_box:
            pred = self.model(tensor)[0]
            pred = self.post_process(pred)
            for data in pred:
                data = data.cpu().detach().numpy()
                cam_image = self.draw_detections(
                    data[:4],
                    self.colors[int(data[4:].argmax())],
                    f'{self.model_names[int(data[4:].argmax())]}', #  {float(data[4:].max()):.2f}
                    cam_image
                )

        # 保存结果
        cam_image = Image.fromarray(cam_image)
        cam_image.save(save_path)

    def __call__(self, img_path, imgir_path, save_path):
        # 删除已存在的保存路径(避免历史结果干扰)
        if os.path.exists(save_path):
            shutil.rmtree(save_path)
        os.makedirs(save_path, exist_ok=True)

        # 处理整个文件夹
        if os.path.isdir(img_path) and os.path.isdir(imgir_path):
            for filename in os.listdir(img_path):
                # 检查文件是否为图片
                if filename.lower().endswith(('.jpg', '.png', '.jpeg')):
                    rgb_file = os.path.join(img_path, filename)
                    ir_file = os.path.join(imgir_path, filename)

                    # 确保 IR 文件存在
                    if not os.path.exists(ir_file):
                        print(f"IR 文件 {filename} 不存在,跳过处理")
                        continue

                    # 生成保存路径(保持原文件名)
                    save_file = os.path.join(save_path, filename)
                    self.process(rgb_file, ir_file, save_file)

        # 处理单张图像对
        else:
            # 生成保存路径(避免覆盖,使用输入文件名)
            base_name = os.path.basename(img_path)
            save_file = os.path.join(save_path, base_name)
            self.process(img_path, imgir_path, save_file)


def get_params():
    params = {
        'weight': '/root/autodl-tmp/project/TwoStream_Yolov8-main/runs/detect/train/weights/best.pt',
        # 现在只需要指定权重即可,不需要指定cfg
        'device': 'cuda:0',
        'method': 'GradCAMPlusPlus',
        # GradCAMPlusPlus, GradCAM, XGradCAM, EigenCAM, HiResCAM, LayerCAM, RandomCAM, EigenGradCAM
        'layer': [7],
        'backward_type': 'all',  # class, box, all
        'conf_threshold': 0.2,  # 0.2
        'ratio': 0.02,  # 0.02-0.1
        'show_box': True,
        'renormalize': True
    }
    return params


if __name__ == '__main__':
    model = yolov8_heatmap(**get_params())

    path = "/root/autodl-tmp/data/DroneVehicle"
    # 定义输入和输出路径
    path_rgb = os.path.join(path, 'imgRGB/test/images/')
    path_ir = os.path.join(path, 'imgIR/test/images/')
    save_dir = os.path.join(path, 'result_heapMap')  # 结果保存目录

    # 调用模型处理整个文件夹
    model(path_rgb, path_ir, save_dir)
3.2 推理结构可视化(供参考)
本节展示多模态推理、FPS计算及热力图生成的测试基准数据(基于50轮次快速验证模型,结果仅作算法流程参考,需完整训练后获取稳定指标)。
3.2.1 多模态推理可视化和FPS计算结果
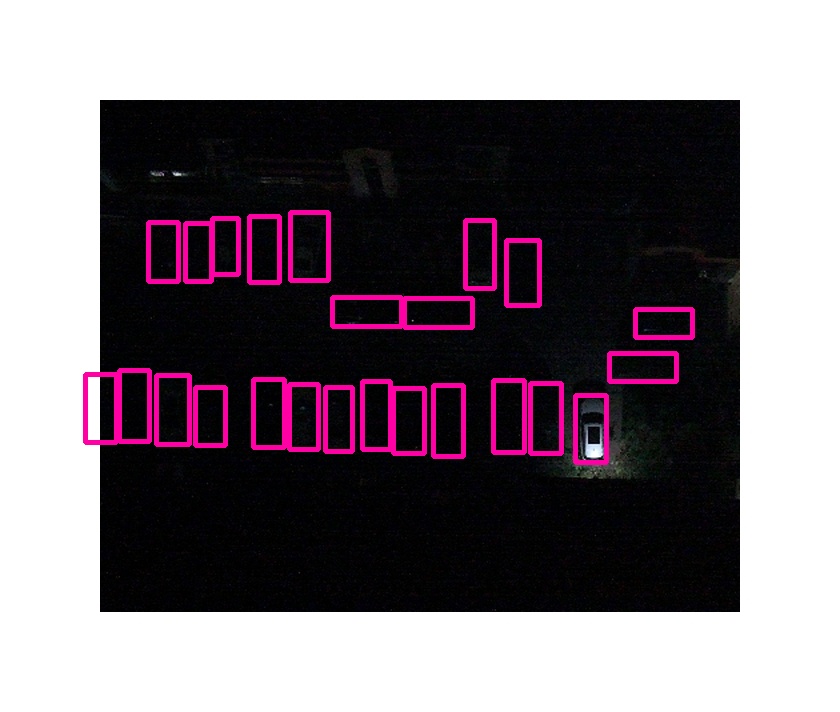
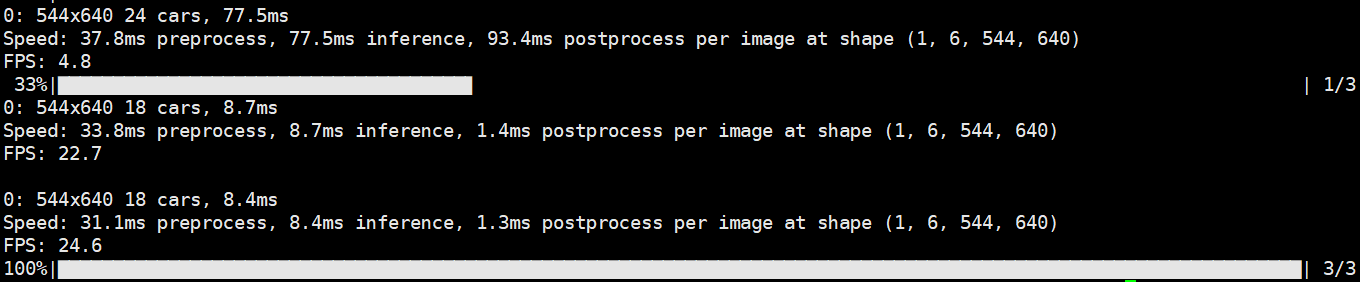
图示依次呈现RGB模态检测效果、红外模态检测结果及FPS性能数据(首帧因模型预热存在计算波动,建议观察后续稳定阶段的22 FPS均值)

3.2.2 多模态热力图可视化
本图展示红外热力图的可视化效果,基于50轮次预训练模型的检测精度尚未完全收敛,导致热力图响应分布欠佳,建议增加训练轮次直至模型充分收敛后复现实验。

4. 总结
本篇博客旨在帮助读者快速掌握多模态推理代码,打通从训练到推理的完整流程。通过本文,您将能够进行深入的代码实验,并为发表论文打下坚实基础。如在学习过程中有任何疑问,欢迎在评论区交流探讨。您的点赞和收藏是对博主极大的支持,博主将持续更新相关代码和论文解读,为您提供更多有价值的内容。


 被折叠的 条评论
为什么被折叠?
被折叠的 条评论
为什么被折叠?
 到【灌水乐园】发言


