


一、添加Struts2依赖的jar包
- commons-fileupload-1.3.1.jar:Struts文件的上传与下载
- commons-io-2.2.jar:文件读取
- commons-lang3-3.2.jar:为java.lang包提供扩展
- freemarker-2.3.22.jar:模板引擎,是一个基于模板生成文本输出的通用工具
- ognl-3.0.6.jar:支持OGNL表达式
- struts2-core-2.3.24.1.jar:Struts2的核心包
- xwork-core-2.3.24.1.jar:xwork的核心包
- javassist-3.11.0.GA.jar:分析、编辑和创建Java字节码的类库
二、配置过滤器
修改web.xml配置文件,配置Struts2过滤器,负责拦截用户请求,从而交给Struts2处理
<web-app xmlns:xsi="http://www.w3.org/2001/XMLSchema-instance"
    xmlns="http://xmlns.jcp.org/xml/ns/javaee"
    xsi:schemaLocation="http://xmlns.jcp.org/xml/ns/javaee http://xmlns.jcp.org/xml/ns/javaee/web-app_3_1.xsd"
    id="WebApp_ID" version="3.1">
    <display-name>Struts2_Data</display-name>
    <welcome-file-list>
        <welcome-file>index.jsp</welcome-file>
    </welcome-file-list>
    <!-- Struts2过滤器配置 -->
    <filter>
        <filter-name>struts2</filter-name>
        <filter-class>org.apache.struts2.dispatcher.ng.filter.StrutsPrepareAndExecuteFilter</filter-class>
    </filter>
    <filter-mapping>
        <filter-name>struts2</filter-name>
        <url-pattern>/*</url-pattern>
    </filter-mapping>
</web-app>
三、使用Struts2输出的三种方式
首先创建struts.xml,内容如下:
<?xml version="1.0" encoding="UTF-8" ?>
<!DOCTYPE struts PUBLIC
    "-//Apache Software Foundation//DTD Struts Configuration 2.3//EN"
    "http://struts.apache.org/dtds/struts-2.3.dtd">

<struts>
    <!--这里编写Struts2配置-->
</struts>
action简介:
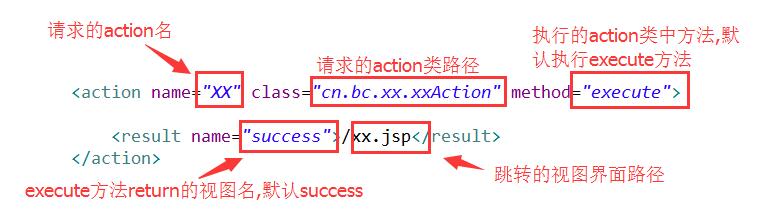
- 1、自己编写Action类
1.action配置

<action name="hello01" class="com.pb01.demo01.HelloAction" method="execute">
    <result name="success">/jsp/01_使用Struts2输出/hello.jsp</result>
</action>

2.action类代码

package com.pb01.demo01;

public class HelloAction {

    public String execute() {
        return "success";
    }
}

3.视图界面略

4.访问路径及结果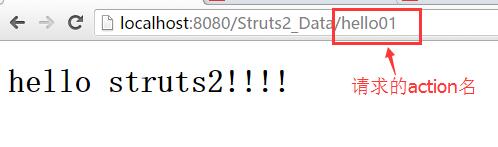
- 2、实现Action接口
1.action配置

<action name="hello02" class="com.pb01.demo02.HelloAction">
    <result>/jsp/01_使用Struts2输出/hello.jsp</result>
</action>

2.action类

package com.pb01.demo02;

import com.opensymphony.xwork2.Action;
/**
 *实现Action接口
 **/
public class HelloAction implements Action {

    @Override
    public String execute() throws Exception {
        return "success";
    }

}

3.视图页面略- 3、继承ActionSupport类
1.action配置

<action name="hello03" class="com.pb01.demo03.HelloAction">
    <result>/jsp/01_使用Struts2输出/hello.jsp</result>
</action>

2.action类

package com.pb01.demo03;

import com.opensymphony.xwork2.ActionSupport;
/**
 *继承ActionSupport
 */
public class HelloAction extends ActionSupport {

    @Override
    public String execute() throws Exception {
        return SUCCESS;
    }

}

3.视图界面略
四、总结
实际开发中,推荐使用第三种方式,因为ActionSupport类已经实现了很多常用的功能,如国际化、输入验证等。


 2552
2552

 被折叠的 条评论
为什么被折叠?
被折叠的 条评论
为什么被折叠?
 到【灌水乐园】发言


