规范要求
Spring Boot 配置
在pom.xml中引入如下依赖内容
| <dependency>
<groupId>org.springframework.boot</groupId>
<artifactId>spring-boot-starter-amqp</artifactId>
</dependency>
<dependency>
<groupId>com.alibaba.mq-amqp</groupId>
<artifactId>mq-amqp-client</artifactId>
<version>1.0.4</version>
</dependency>
|
| spring.rabbitmq.host=1618060924840827.mq-amqp.cn-shenzhen-a.aliyuncs.com #地址
spring.rabbitmq.port=5672 #端口
spring.rabbitmq.username=LTAI4FchjfDJ5L54MRr6DngE 用户名
spring.rabbitmq.password=****** 密码
spring.rabbitmq.virtual-host=hscf-oa 连接到AMQP的那个vhost
spring.rabbitmq.exchange-name=amq.topic Exchang名称 会有多种Exchang.
#-----发送方的确认
spring.rabbitmq.publisher-confirms=true # 是否启用【发布确认】
spring.rabbitmq.publisher-returns=true # 是否启用【发布返回】
spring.rabbitmq.template.mandatory=true # 触发returnedMessage回调必须设置mandatory=true, 否则Exchange没有找到Queue就会丢弃掉消息, 而不会触发回调
#-------------消费端配置
spring.rabbitmq.listener.simple.acknowledge-mode=manual # 设置手动确认(ack) Queue -> C 消费端配置
spring.rabbitmq.listener.simple.concurrency=1 #最小的消费者数量
spring.rabbitmq.listener.simple.max-concurrency=5 #最大的消费者数量
# spring.rabbitmq.listener.simple.default-requeue-rejected=true #消费者消费失败,自动重新入队
|
配置权限认证相关类,创建一个 AliyunCredentialsProvider类实现CredentialsProvider类
| 1 2 3 4 5 6 7 8 9 10 11 12 13 14 15 16 17 18 19 20 21 22 23 24 25 26 27 28 29 30 31 32 33 34 35 36 37 38 39 40 41 42 43 44 45 46 47 48 49 50 51 52 53 54 55 56 57 | /**
* @author wangmingsen
* @create 2019-09-21-10:17
**/
public class AliyunCredentialsProvider implements CredentialsProvider {
/**
* Access Key ID.
*/
private final String accessKeyId;
/**
* Access Key Secret.
*/
private final String accessKeySecret;
/**
* security temp token. (optional)
*/
private final String securityToken;
/**
* 资源owner账号(主账号)
*/
private final long resourceOwnerId;
public AliyunCredentialsProvider(final String accessKeyId, final String accessKeySecret,
final long resourceOwnerId) {
this(accessKeyId, accessKeySecret, null, resourceOwnerId);
}
public AliyunCredentialsProvider(final String accessKeyId, final String accessKeySecret,
final String securityToken, final long resourceOwnerId) {
this.accessKeyId = accessKeyId;
this.accessKeySecret = accessKeySecret;
this.securityToken = securityToken;
this.resourceOwnerId = resourceOwnerId;
}
@Override
public String getUsername() {
if(StringUtils.isNotEmpty(securityToken)) {
return UserUtils.getUserName(accessKeyId, resourceOwnerId, securityToken);
} else {
return UserUtils.getUserName(accessKeyId, resourceOwnerId);
}
}
@Override
public String getPassword() {
try {
return UserUtils.getPassord(accessKeySecret);
} catch (InvalidKeyException e) {
//todo
} catch (NoSuchAlgorithmException e) {
//todo
}
return null;
}
}
|
| 1 2 3 4 5 6 7 8 9 10 11 12 13 14 15 16 17 18 19 20 21 22 23 24 25 26 27 28 29 30 31 32 33 34 35 36 37 38 39 40 41 42 43 | /**
* @author wangmingsen
* @create 2019-09-21-10:15
**/
@Configuration
public class RabbitConfig {
/**
* 资源owner账户 ID 信息
*/
private static final long RESOURCE_OWNER_ID =1618060924840827L;
@Autowired
private RabbitProperties rabbitProperties;
@Bean
public RabbitTemplate rabbitTemplate(ConnectionFactory connectionFactory) {
RabbitTemplate template = new RabbitTemplate(connectionFactory);
template.setMessageConverter(new Jackson2JsonMessageConverter());
return template;
}
@Bean
public ConnectionFactory connectionFactory() {
com.rabbitmq.client.ConnectionFactory rabbitConnectionFactory =
new com.rabbitmq.client.ConnectionFactory();
rabbitConnectionFactory.setHost(rabbitProperties.getHost());
rabbitConnectionFactory.setPort(rabbitProperties.getPort());
rabbitConnectionFactory.setVirtualHost(rabbitProperties.getVirtualHost());
AliyunCredentialsProvider credentialsProvider = new AliyunCredentialsProvider(
rabbitProperties.getUsername(), rabbitProperties.getPassword(), RESOURCE_OWNER_ID);
rabbitConnectionFactory.setCredentialsProvider(credentialsProvider);
rabbitConnectionFactory.setNetworkRecoveryInterval(5000);
rabbitConnectionFactory.setConnectionTimeout(300000);
rabbitConnectionFactory.setHandshakeTimeout(300000);
rabbitConnectionFactory.setShutdownTimeout(0);
CachingConnectionFactory connectionFactory = new CachingConnectionFactory(rabbitConnectionFactory);
connectionFactory.setPublisherConfirms(rabbitProperties.isPublisherConfirms());
connectionFactory.setPublisherReturns(rabbitProperties.isPublisherReturns());
return connectionFactory;
}
}
|
创建消息生产者,通过注入RabbitTemplate实例来实现消息的发送
| 1 2 3 4 5 6 7 8 9 10 11 12 13 14 15 16 17 18 19 20 21 22 23 24 | @Autowired
RabbitTemplate rabbitTemplate;
@PostMapping("/test")
public void test(){
this.rabbitTemplate.setConfirmCallback((correlationData, ack, cause) -> {
if (!ack) {
System.out.println("HelloSender消息发送失败" + cause + correlationData.toString());
} else {
System.out.println("HelloSender 消息发送成功 " );
}
});
Car car = new Car();
//方式一发送
Message message = MessageBuilder.withBody(JSON.toJSONString(car).getBytes()).build();
message.getMessageProperties().setDeliveryMode(MessageDeliveryMode.PERSISTENT); //持久化
rabbitTemplate.send(exchange,routingkey ,message);
//方式二发送
rabbitTemplate.convertAndSend(exchange,routingkey ,car,mes -> {
mes.getMessageProperties().setDeliveryMode(MessageDeliveryMode.PERSISTENT);
return mes;
});
}
|
创建消费者来消费消息.。通过@RabbitListener注解定义该类对Queue队列的监听,通过@RabbitHandler注解来指定对消息的处理方法
| 1 2 3 4 5 6 7 8 9 10 11 12 13 | RabbitHandler
@RabbitListener(queues = {"${spring.rabbitmq.queue.after-loan}"})
public void process(Message message, Channel channel) throws IOException {
try{
String carInfo = new String(message.getBody(), StandardCharsets.UTF_8);
log.info("【MQ消息接收】xxx信息: {}", carInfo);
Car car = JSON.parseObject(carInfo, Car.class);
channel.basicAck(message.getMessageProperties().getDeliveryTag(),false); //确认消费
} catch (Exception e) {
log.error("【MQ消息接收】xxxx处理异常", e);
//channel.basicNack(message.getMessageProperties().getDeliveryTag(), false,false); //丢弃这条消息
}
}
|
下面是几种Exchange类型,我们目前使用的是Topic Exchange.
Exchange 类型
本文介绍消息队列 AMQP 中不同类型的 Exchange 的路由规则及其使用场景,帮助您更好地根据使用场景选择合适的 Exchange 类型。
背景信息
Producer 将消息发送至 Exchange。Exchange 根据 Routing Key 和 Binding Key 路由消息。Routing Key 是 Producer 为消息添加的属性。Binding Key 是 Exchange 和 Queue 之间的绑定关系。不同类型的 Exchange 在路由消息时的规则不同,适用于不同的使用场景。
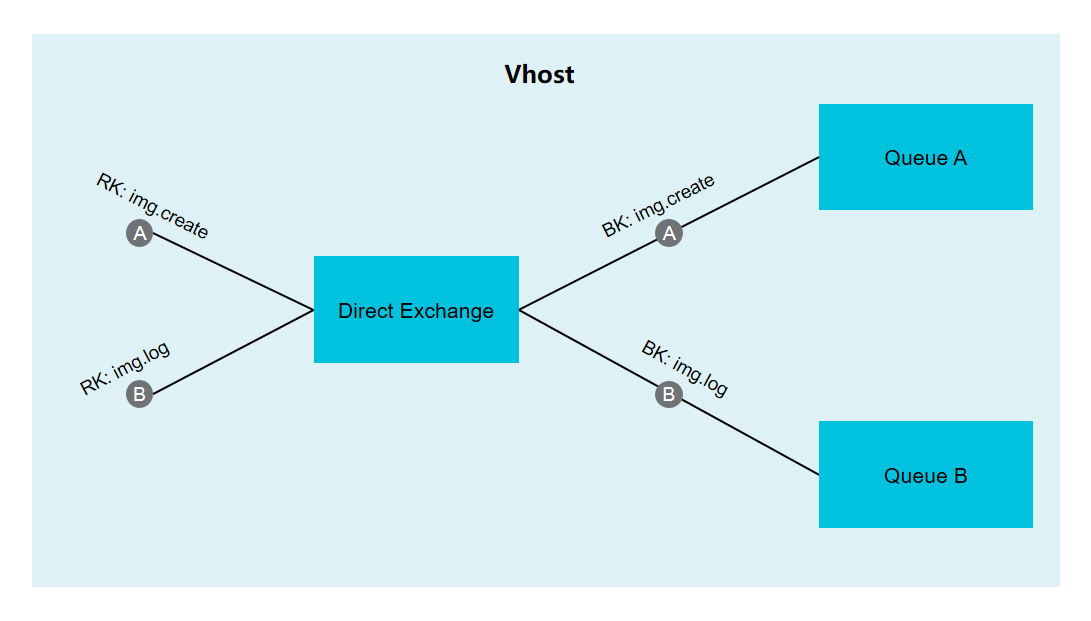
Direct Exchange
路由规则
Direct Exchange 将消息路由至 Binding Key 与消息的 Routing Key 完全匹配的 Queue。
使用场景
Direct Exchange 根据 Binding Key = Routing Key 的规则路由消息,适用于区分发往同一个 Exchange 的消息。
示例
图 1. Direct Exchange
如图 1 所示,Direct Exchange 分别与 Queue A 和 Queue B 绑定。Consumer 可以从 Queue A 中拉取所有图片(img)创建(create)消息,从 Queue B 中拉取所有图片(img)日志(log)消息。
Producer 向 Direct Exchange 发送消息:
- 消息 A 的 Routing Key 为 img.create。
- 消息 B 的 Routing Key 为 img.log。
Direct Exchange 绑定 Queue:
- Direct Exchange 和 Queue A 的 Binding Key 为 img.create。
- Direct Exchange 和 Queue B 的 Binding Key 为 img.log。
Direct Exchange 根据 Binding Key = Routing Key 的规则路由消息:
- Routing Key 为 img.create 消息 A 路由至 Binding Key 为 img.create 的 Queue A。
- Routing Key 为 img.log 消息 B 路由至 Binding Key 为 img.log 的 Queue B。
Topic Exchange
路由规则
Topic Exchange 根据 Binding Key 和 Routing Key 的通配符匹配路由消息至 Queue。
说明
- 星号(*)代表一个单词(例如,cn)。
- 井号(#)代表零个或多个单词(例如,cn.zj.hz)。
使用场景
Topic Exchange 使用通配符匹配的路由模式,适用于通过 Topic 对消息进行区分的场景。
示例
图 2. Topic Exchange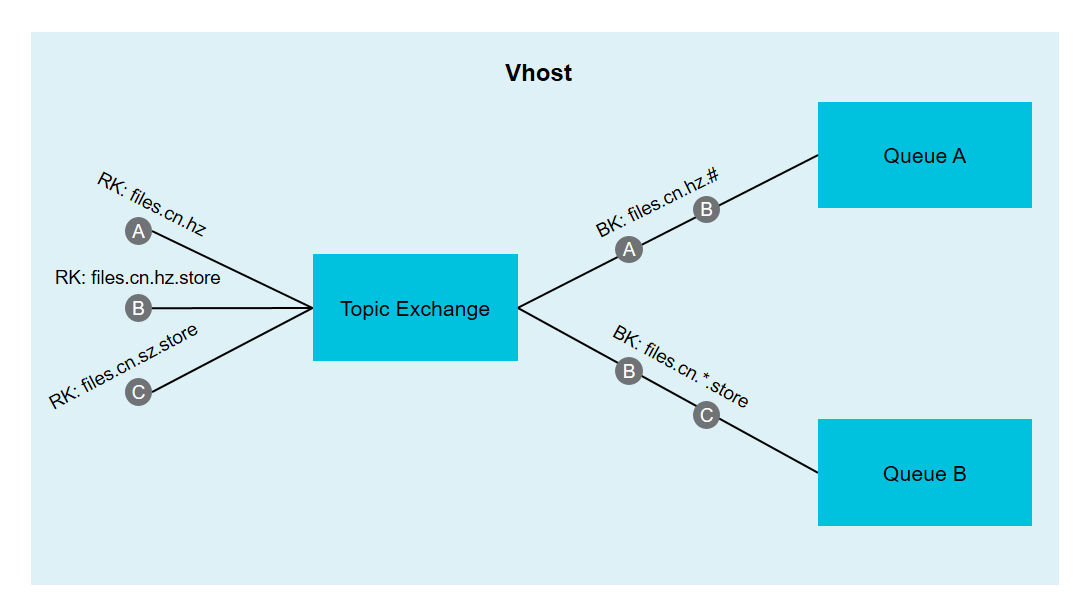
如图 2 所示,Topic Exchange 分别与 Queue A 和 Queue B 绑定。Consumer 可以从 Queue A 中拉取所有中国(cn)杭州(hz)的文件(files),从 Queue B 中拉取所有中国(cn)商店(store)的文件(files)。
Producer 向 Topic Exchange 发送消息:
Topic Exchange 绑定 Queue:
- Topic Exchange 和 Queue A 的 Binding Key 为 files.cn.hz.#。
- Topic Exchange 和 Queue B 的 Binding Key 为 files.cn.*.store。
Topic Exchange 根据通配符匹配的规则路由消息:
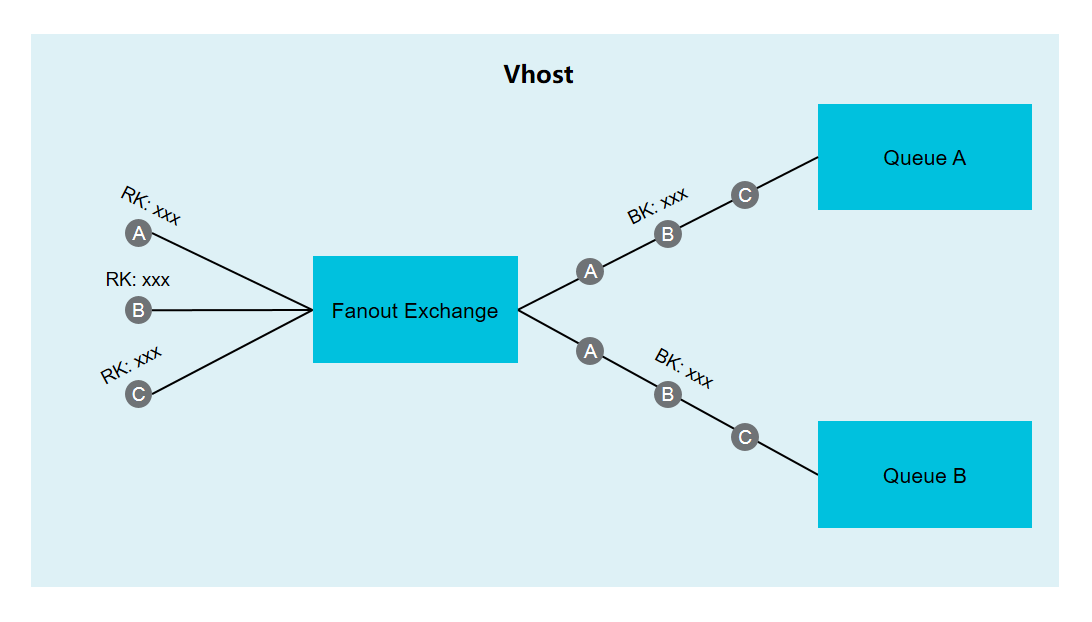
Fanout Exchange
路由规则
Fanout Exchange 将消息路由至所有绑定的 Queue。
使用场景
Fanout Exchange 无视 Routing Key 和 Binding Key 的匹配规则,将消息投递至所有绑定的 Queue,适用于广播消息。
示例
图 3. Fanout Exchange
如图 3 所示,Fanout Exchange 将消息投递至所有绑定的 Queue,Consumer 可以从所有 Queue 中拉取同一消息。
Producer 向 Fanout Exchange 发送消息:
消息 A 的 Routing Key 可以为任意值。
Fanout Exchange 绑定 Queue:
Fanout Exchange 和 Queue A、Queue B、Queue C 的 Binding Key 都可以为任意值。
Fanout Exchange 将消息路由至所有绑定的 Queue:
Routing Key 为任意值的消息 A 分别路由至 Binding Key 为任意值的 Queue A、Queue B、Queue C。
参考文献
阿里云AMQP官网


 394
394


 被折叠的 条评论
为什么被折叠?
被折叠的 条评论
为什么被折叠?
 到【灌水乐园】发言


