


上一篇讲述了如何搭建config服务端,这篇开始搭建client端的配置
1、依然是新建一个springboot项目
2、加入对应的依赖文件
        <!--spring config配置-->
        <dependency>
            <groupId>org.springframework.cloud</groupId>
            <artifactId>spring-cloud-config-client</artifactId>
        </dependency>

        <dependency>
            <groupId>org.springframework.cloud</groupId>
            <artifactId>spring-cloud-starter-bus-amqp</artifactId>
        </dependency>
3、在启动类中加入标签 @EnableDiscoveryClient @RefreshScope,其中@EnableDiscoveryClient 是config客户端的标签,@RefreshScope是后续用来触发刷新配置的标签,@RestController是用来做测试接口使用,具体如下:
@EnableEurekaClient
@EnableDiscoveryClient
@SpringBootApplication
@RefreshScope
@RestController
public class AdminOsApplication {

    public static void main(String[] args) {
        SpringApplication.run(AdminOsApplication.class, args);
    }

    @Value("${environment}")
    private String environment;

    @GetMapping("/value")
    public String returnValue(){
        return environment;
    }
}
4、把之前的比如application.yml配置文件改名为bootstrap.yml,让springboot优先从bootstrap.yml读取配置。xx.properties同理改为bootstrap.properties
5、在bootstrap.yml中加入配置,由于我是从指定的地址拉取config服务所以指定了uri路径,还可以通过注册中心拉取,通过注册中心发现config服务,下方配置中有说明
#actuator
management:
  endpoints:
    web:
      exposure:
        include: "*"
  endpoint:
    health:
      show-details: ALWAYS
spring:
  profiles:
    active: dev
---
#spring dev
spring:
  profiles: dev
  #rabbitmq
  rabbitmq:
    host: xxx
    port: xxx
    username: admin
    password: admin
  application:
    name: admin-os
  #指定从config读取配置
  cloud:
    config:
      profile: dev
      #建议用lable去区分环境,默认是lable是master分支
      label: dev
      uri: http://localhost:7009/
      #除了通过uri去config服务中拉取配置,还能从注册中心中拉取
      #discovery:
      # service-id: CONFIG-SERVER
      # enabled: true
 #链路追踪
  zipkin:
    base-url: http://localhost:7011/
  sleuth:
    sampler:
      probability: 1
#eureka
eureka:
  instance:
    leaseRenewalIntervalInSeconds: 10
    health-check-url-path: /actuator/health
  client:
    registryFetchIntervalSeconds: 5
    service-url:
      defaultZone: http://localhost:7001/eureka/
以上的config的配置简单解释一下 从config服务中拉取名字为 /dev/admin-os-dev.yml配置 :分支/服务名-描述
OK 客户端的配置已经配置完毕,预留了一个可以访问做测试的接口,紧接着在git的仓库中加入上面所说的admin-os-dev.yml配置文件,加入environment参数。

启动服务器,启动成功!端口号依然是7006 并没有因为我没在bootstrap.yml加入端口号而报错也不是默认的8080,用的是在git仓库中的配置

接着访问我们预留做测试的接口:http://localhost:7006/value

也是能成功访问,表明从config服务中成功拉取了配置文件,并且是在加载配置文件之前。
还没有结束,我们还需要通过改变git仓库中的配置,让服务端无缝加载。
上面我们加入了bus的依赖,还有rabbitmq有了作用,通过bus的广播机制,形成一个广播队列,让所有加上config配置的服务都重新拉取配置。如果是服务放在外网的小伙伴可以通过gitlab的webhook的机制触发刷新。
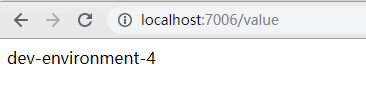
把仓库中的environment修改为4(原来是3),由于我这是本地服务 只好手动来刷新输入地址:http://localhost:7009/actuator/bus-refresh,必须是post请求,大家可以使用postman来做测试

刷新成功!再重新请求/value接口,成功显示和仓库中配置一致
以上就完成了整个动态刷新配置的功能,有什么问题或者建议可在下方评论。谢谢各位!


 474
474


 被折叠的 条评论
为什么被折叠?
被折叠的 条评论
为什么被折叠?
 到【灌水乐园】发言


