


功能介绍
WebVirtMgr是一个基于libvirt的Web界面,用于管理虚拟机。它允许您创建和配置新域并调整域的资源分配
环境准备
两台机器都要关闭防火墙,selinux,WebVirtMgr通过SSH传公钥给KVM
WebVirtMgr主机:192.168.202.132
kvm主机:192.168.202.131
关闭防火墙
systemctl status firewalld  #查看防火墙状态
systemctl stop firewalld   #关闭防火墙,暂时关闭操作
systemctl disable firewalld.service  #在这里最好把防火墙开机自启也关了,免了一些不必要的麻烦
关闭selinux
vim /etc/sysconfig/selinux #selinux=enforcing 改为 selinux=disabled
此时再次查看selinux的状态为(注意此时需要关机重启一下(reboot),否则查看到的状态还是和之前一样的了)
/usr/sbin/sestatus 查看一下状态
kvm开启路由转发
[root@kvm ~]# echo "1" > /proc/sys/net/ipv4/ip_forward永久开启
在 vim /etc/sysctl.conf 下 加入此行 net.ipv4.ip_forward = 1 命令 sysctl -p ----加载一下
[root@kvm ~]# sysctl -a |grep "ip_forward"    ----查看一下
net.ipv4.ip_forward = 1
net.ipv4.ip_forward_use_pmtu = 0
在KVM端配置ssh
[root@KVM images]# vim /etc/polkit-1/localauthority/50-local.d/50-libvirt-remote-access.pkla
[Remote libvirt SSH access]Identity=unix-user:root
Action=org.libvirt.unix.manage
ResultAny=yes
ResultInactive=yes
ResultActive=yes
[root@KVM images]# chown -R root.root /etc/polkit-1/localauthority/50-local.d/50-libvirt-remote-access.pkla
[root@KVM images]# systemctl restart libvirtd
部署WebVirtMgr
安装软件工具
[root@WebVirtMgr ~]# yum -y install epel-release
[root@WebVirtMgr ~]# yum -y install git python-pip libvirt-python libxml2-python python-websockify supervisor nginx python-devel
安装webvirtmgr
[root@WebVirtMgr ~]# mkdir /webvirtmgr
[root@WebVirtMgr ~]# cd /webvirtmgr/
[root@WebVirtMgr webvirtmgr]# git config --global url."https://github.com".insteadOf git://github.com     #需要用https才能读到数据
[root@webvirtmgr webvirtmgr]# git clone git://github.com/retspen/webvirtmgr.git
正克隆到 'webvirtmgr'...
remote: Enumerating objects: 5614, done.
remote: Total 5614 (delta 0), reused 0 (delta 0), pack-reused 5614
接收对象中: 100% (5614/5614), 2.97 MiB | 80.00 KiB/s, done.
处理 delta 中: 100% (3606/3606), done.
[root@WebVirtMgr webvirtmgr]# cd webvirtmgr/
[root@WebVirtMgr webvirtmgr]# pip install -i https://pypi.douban.com/simple -r requirements.txt# (就是安装一些需要的包和环境)-i指定下载源,不然会非常慢,就会超时失败。账号初始化
[root@WebVirtMgr webvirtmgr]# python manage.py syncdb
WARNING:root:No local_settings file found.
Creating tables ...
Creating table auth_permission
Creating table auth_group_permissions
Creating table auth_group
Creating table auth_user_groups
Creating table auth_user_user_permissions
Creating table auth_user
Creating table django_content_type
Creating table django_session
Creating table django_site
Creating table servers_compute
Creating table instance_instance
Creating table create_flavor

You just installed Django's auth system, which means you don't have any superusers defined.
Would you like to create one now? (yes/no): yes
Username (leave blank to use 'root'): admin      #创建超级管理员,如果不输入默认就是root
Email address: 123@qq.com
Password:             #设置密码
Password (again):
Superuser created successfully.
Installing custom SQL ...
Installing indexes ...
Installed 6 object(s) from 1 fixture(s)
配置公钥
[root@webvirtmgr webvirtmgr]# ssh-keygen
Generating public/private rsa key pair.
Enter file in which to save the key (/root/.ssh/id_rsa):
Created directory '/root/.ssh'.
Enter passphrase (empty for no passphrase):
Enter same passphrase again:
Your identification has been saved in /root/.ssh/id_rsa.
Your public key has been saved in /root/.ssh/id_rsa.pub.
The key fingerprint is:
SHA256:OaiDlT+VGFr9V8A4nk4O1XguLrNaNMoMBUnfCt0ys+Y root@webvirtmgr
The key's randomart image is:
+---[RSA 2048]----+
|   .o.     =.    |
|    .+ +  = +.   |
|    . X +o =  .  |
|     * X.+= ..   |
|    = * S*...    |
|   o O +oo+.     |
|  . o E .+       |
|     . o.        |
|      ..         |
+----[SHA256]-----+
[root@webvirtmgr webvirtmgr]# ssh-copy-id -i 192.168.202.131   #kvm地址
/usr/bin/ssh-copy-id: INFO: Source of key(s) to be installed: "/root/.ssh/id_rsa.pub"
The authenticity of host '192.168.202.131  (192.168.202.131 )' can't be established.
ECDSA key fingerprint is SHA256:HdZL+HUC3tFCIkOv1cEh4ec9AICqQJ+Q+C4HLFe6SiE.
ECDSA key fingerprint is MD5:eb:f6:ef:d6:72:62:3e:c0:6a:3b:36:07:5b:50:b7:5b.
Are you sure you want to continue connecting (yes/no)? yes
/usr/bin/ssh-copy-id: INFO: attempting to log in with the new key(s), to filter out any that are already installed
/usr/bin/ssh-copy-id: INFO: 1 key(s) remain to be installed -- if you are prompted now it is to install the new keys
root@192.168.202.131 's password:

Number of key(s) added: 1

Now try logging into the machine, with:   "ssh '192.168.202.131 '"
and check to make sure that only the key(s) you wanted were added.
配置站点
[root@WebVirtMgr webvirtmgr]# rm -rf /usr/share/nginx/html/*
[root@WebVirtMgr webvirtmgr]# cp -r /webvirtmgr/webvirtmgr/ /usr/share/nginx/html/
[root@WebVirtMgr webvirtmgr]# chown -R nginx.nginx /usr/share/nginx/html/webvirtmgr/
配置nginx
[root@sWebVirtMgr html]# vim /etc/nginx/nginx.conf
...
server {
        listen       80 default_server;
        listen       [::]:80 default_server;
        server_name  _;
        root         /usr/share/nginx/html/;# Load configuration files for the default server block.
        include /etc/nginx/default.d/*.conf;
        location /static/ {
                root /usr/share/nginx/html/webvirtmgr/webvirtmgr;
                expires max;}

        location / {
               proxy_pass http://127.0.0.1:8000;
               proxy_set_header X-Real-IP $remote_addr;
               proxy_set_header X-Forwarded-for $proxy_add_x_forwarded_for;
               proxy_set_header Host $host:$server_port;
               proxy_set_header X-Forwarded-Proto $remote_addr;
               proxy_connect_timeout 600;
               proxy_read_timeout 600;
               proxy_send_timeout 600;
               client_max_body_size 1024M;}
.....
主要是修改上面的内容

# 检查语法[root@webvirtmgr webvirtmgr]# nginx -t
nginx: the configuration file /etc/nginx/nginx.conf syntax is ok
nginx: configuration file /etc/nginx/nginx.conf test is successful
配置端口
[root@WebVirtMgr html]# vim /usr/share/nginx/html/webvirtmgr/conf/gunicorn.conf.py
...
bind = '0.0.0.0:8000'
设置supervisor
#在配置文件最后加入以下行
[root@WebVirtMgr html]# vim /etc/supervisord.conf
[include]
files = supervisord.d/*.ini
[program:webvirtmgr]
command=/usr/bin/python2 /usr/share/nginx/html/webvirtmgr/manage.py run_gunicorn -c /usr/share/nginx/html/webvirtmgr/conf/gunicorn.conf.py   //启动8000端口
directory=/usr/share/nginx/html/webvirtmgr/
autostart=true
autorestart=true
logfile=/var/log/supervisor/webvirtmgr.log
log_stderr=trueuser=nginx

[program:webvirtmgr-console]
command=/usr/bin/python2 /usr/share/nginx/html/webvirtmgr/console/webvirtmgr-console //启动6080端口(这是控制台vnc端口)
directory=/usr/share/nginx/html/webvirtmgr/
autostart=true
autorestart=true
stdout_logfile=/var/log/supervisor/webvirtmgr-console.log
redirect_stderr=true
user=nginx
启动服务
[root@WebVirtMgr html]# systemctl start nginx
[root@WebVirtMgr html]# systemctl start supervisord.service
[root@WebVirtMgr html]# systemctl enable supervisord.service
[root@WebVirtMgr html]# systemctl enable nginx
[root@WebVirtMgr  html]# ss -antlp
[root@webvirtmgr webvirtmgr]# netstat -tnlp
Active Internet connections (only servers)
Proto Recv-Q Send-Q Local Address           Foreign Address         State       PID/Program name
tcp        0      0 0.0.0.0:80              0.0.0.0:*               LISTEN      19125/nginx: master
tcp        0      0 0.0.0.0:22              0.0.0.0:*               LISTEN      1046/sshd
tcp        0      0 127.0.0.1:25            0.0.0.0:*               LISTEN      1131/master
tcp        0      0 0.0.0.0:6080            0.0.0.0:*               LISTEN      19450/python2
tcp        0      0 127.0.0.1:8000          0.0.0.0:*               LISTEN      19451/python2
tcp        0      0 127.0.0.1:1514          0.0.0.0:*               LISTEN      1813/docker-proxy
tcp6       0      0 :::80                   :::*                    LISTEN      19125/nginx: master
tcp6       0      0 :::22                   :::*                    LISTEN      1046/sshd
tcp6       0      0 ::1:25                  :::*                    LISTEN      1131/master
配置nginx用户
[root@webvirtmgr webvirtmgr]# su - nginx -s /bin/bash
-bash-4.2$ ssh-keygen -t rsa
Generating public/private rsa key pair.
Enter file in which to save the key (/var/lib/nginx/.ssh/id_rsa):
Created directory '/var/lib/nginx/.ssh'.
Enter passphrase (empty for no passphrase):
Enter same passphrase again:
Your identification has been saved in /var/lib/nginx/.ssh/id_rsa.
Your public key has been saved in /var/lib/nginx/.ssh/id_rsa.pub.
The key fingerprint is:
SHA256:vPrEbEPpNZ1D6W8ZQBnpx5Jx0K5evZx2PBv8rKKpmsc nginx@webvirtmgr
The key's randomart image is:
+---[RSA 2048]----+
|            +*   |
|           .+.o  |
|           .+*   |
|       . . ++o+  |
|        S o =+.. |
|       = o ..ooo.|
|       .O  . .=+o|
|       =E. .o. B=|
|      ++o.o. .oo*|
+----[SHA256]-----+
-bash-4.2$ touch ~/.ssh/config && echo -e "StrictHostKeyChecking=no\nUserKnownHostsFile=/dev/null" >> ~/.ssh/config
-bash-4.2$ chmod 0600 ~/.ssh/config
-bash-4.2$ ssh-copy-id root@192.168.202.131    # 配置ssh-key到kvm服务器
/bin/ssh-copy-id: INFO: Source of key(s) to be installed: "/var/lib/nginx/.ssh/id_rsa.pub"
/bin/ssh-copy-id: INFO: attempting to log in with the new key(s), to filter out any that are already installed
/bin/ssh-copy-id: INFO: 1 key(s) remain to be installed -- if you are prompted now it is to install the new keys
Warning: Permanently added '192.168.202.131' (ECDSA) to the list of known hosts.
root@192.168.202.131's password:

Number of key(s) added: 1

Now try logging into the machine, with:   "ssh 'root@192.168.202.131'"
and check to make sure that only the key(s) you wanted were added.

-bash-4.2$ exit
logout
web页面
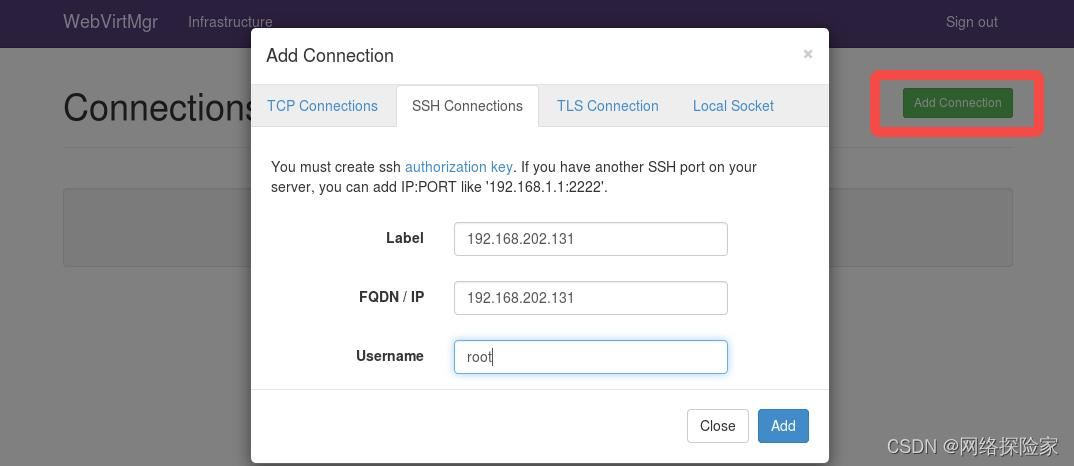
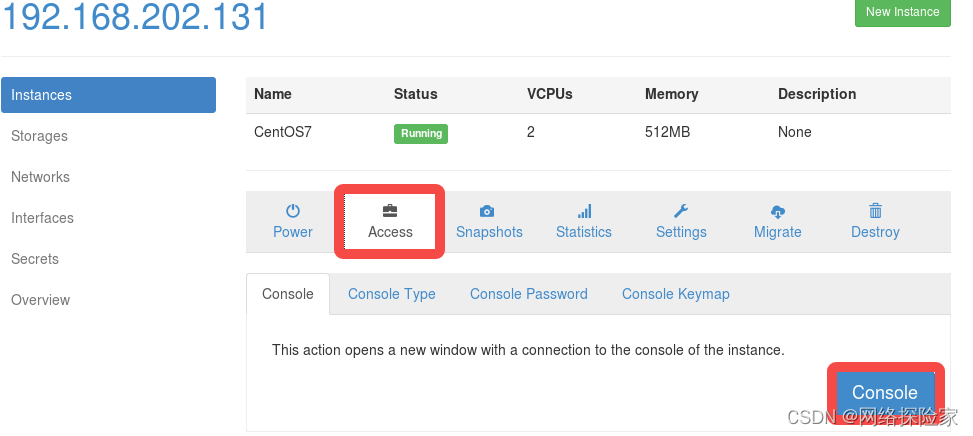
此时访问192.168.202.132即可看到登录页面,输入创建超级用户时的用户名和密码即可登录。
下图为登录后使用SSH连接KVM。
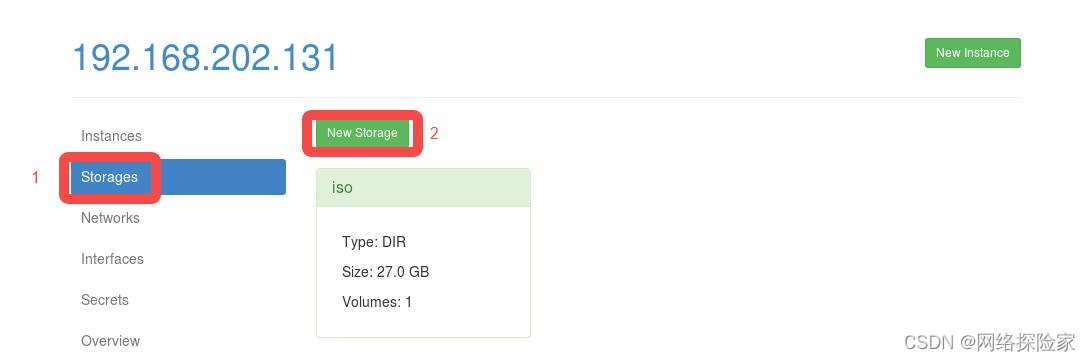
创建实例
创建两个存储池:
(1) 用来存放 iso 文件
(2) 用来存放虚拟磁盘文件

镜像池的目录和里面的镜像文件需要提前在KVM中创建

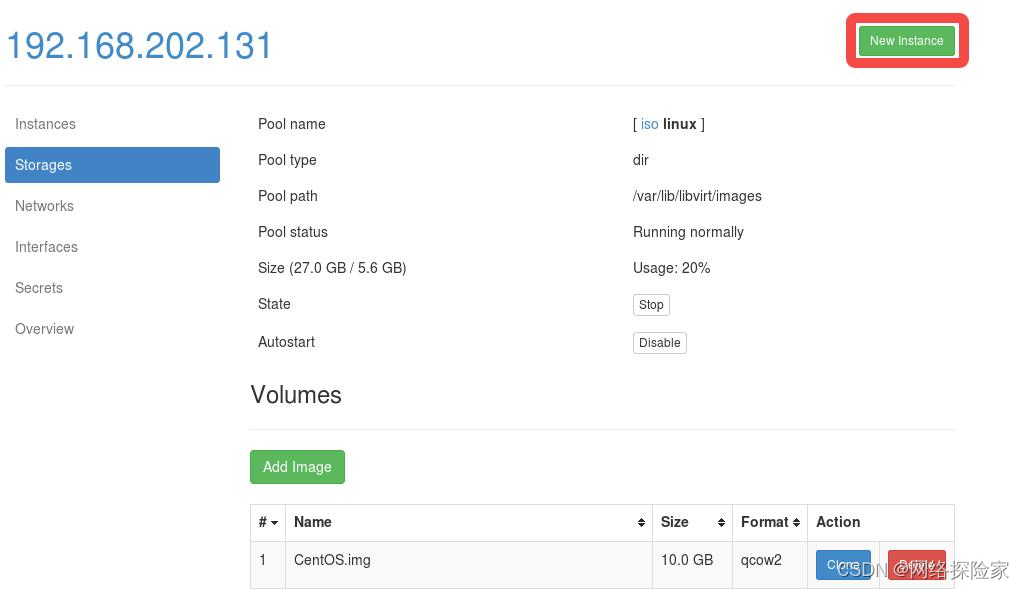
 创建存放虚拟磁盘文件的存储池


测试验证


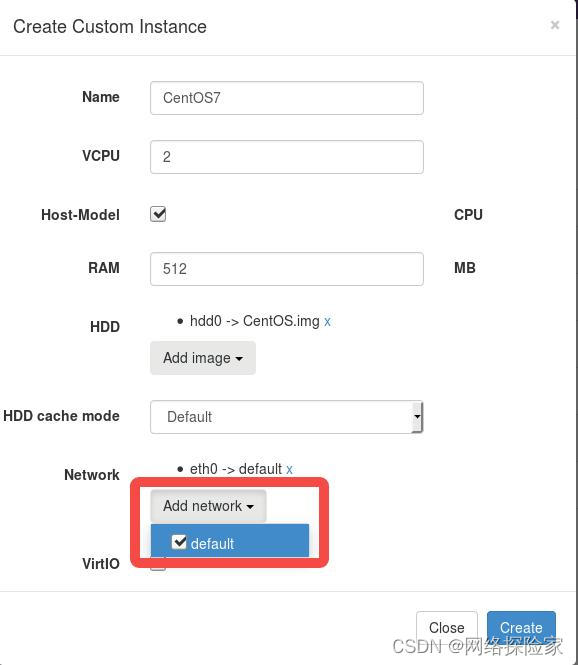
使用镜像


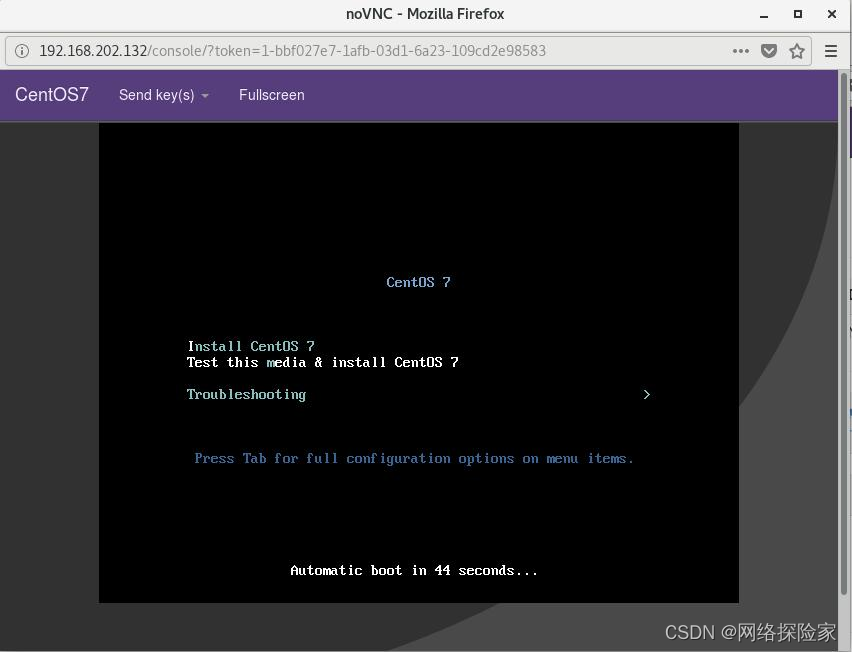
使用控制台查看虚拟机
安装系统正常


 1273
1273


 被折叠的 条评论
为什么被折叠?
被折叠的 条评论
为什么被折叠?
 到【灌水乐园】发言


