


封装Router
废话不多说了,在封装Router之前我们需要做些需求的准备:
·app从字面量变为Application类
·丰富HTTP请求方法
·封装Router
·路径一样的路由整合为一组,引入Layer的概念
·增加路由控制,支持next方法,并增加错误捕获功能
·执行Router.handle的时候传入out参数
1.先来个测试用例来看看我们要干些什么:
```
app.get('/',function(req,res,next){
console.log(1);
next();
},function(req,res,next){
console.log(11);
next();
}).get('/',function(req,res,next){
console.log(2);
next();
}).get('/',function(req,res,next){
console.log(3);
res.end('ok');
});
app.listen(3000);
控制台打印出来的结果是:1,11,2,3
```
酱紫啊,那么那么我们来实现代码吧
首先新建下文件目录了
expross
|
|-- lib
| |
| |-- router
| | |
| | |-- index.js
| | |
| | |-- layer.js
| | |
| | |-- route.js
| | |
| |-- expross.js
| |
| |-- application.js
|
|-- test
| |
| |-- router.js
|
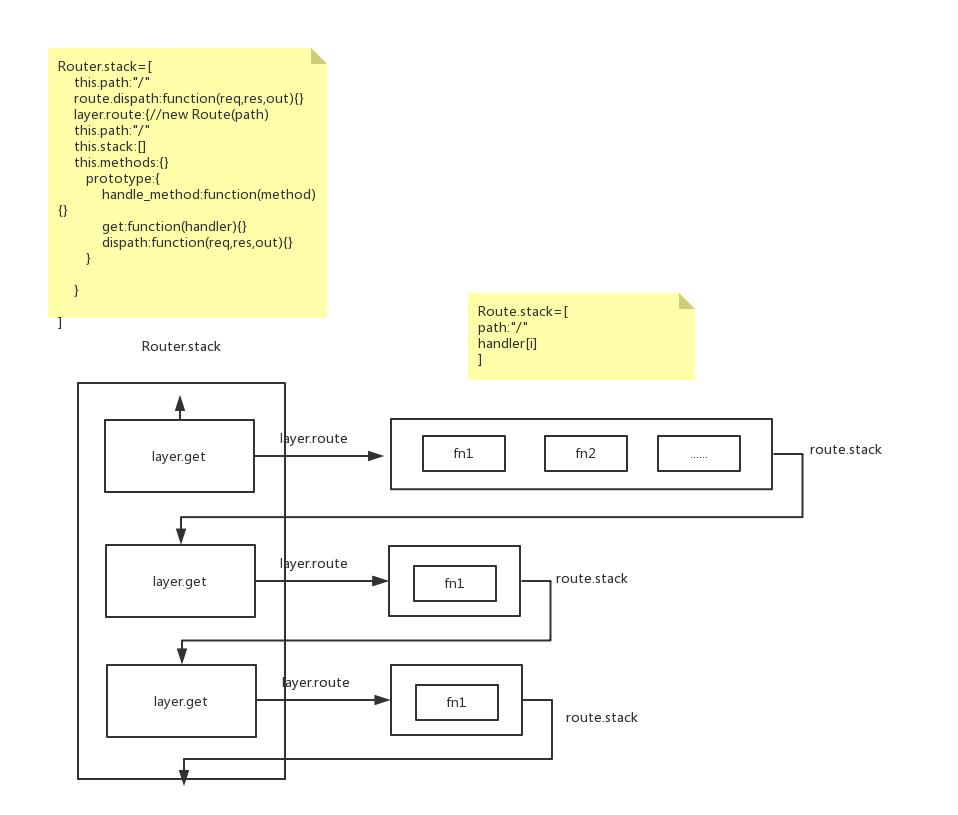
大概思维图如下:
首先expross.js里面
```
const http=require("http");
const url=require("url");
const Application=require("./application");
function createApplication(){
return new Application();
};
module.exports=createApplication;
```
createApplication函数内部return了一个构造函数Application通过module.exports导出这个构造函数,在router.js里面用express变量赋值require("../lib/express")来接收,然后用变量app=express(),相当于app是Application的实例了。
application.js里面代码如下:
```
//实现Router和应用的分离
const http=require("http");
const Router=require("./router");
const methods=require("methods");
const slice=Array.prototype.slice;
Application.prototype.lazyrouter=function(){
if(!this._router){
this._router=new Router();
}
}
methods.forEach(function(method){
Application.prototype[method]=function(path){
this.lazyrouter();
//这样写可以支持多个处理函数
this._router[method].apply(this._router,slice.call(arguments));
return this;//支持app.get().get().post().listen()连写
}
})
Application.prototype.listen=function(){
let self=this;
let server=http.createServer(function(req,res){
function done(){
res.end(`Cannot ${req.method} ${req.url}`)
};
self._router.handle(req,res,done);
});
server.listen(...arguments);
}
```
1.lazyrouter方法只会在首次调用时实例化Router对象,然后将其赋值给app._router字段
2.动态匹配方法,methods是一个数组里面存放着一系列的web请求方法例如:app.get,app.post,appp.put等首先通过调用this. lazyrouter实例化一个Router对象,然后调用this._router.get方法实例化一个Route对象和new Layer对象,最后调用route[method]方法并传入对应的处理程序完成path与handle的关联。Router和Route都各自维护了一个stack数组,该数组就是用来存放每一层layer。
3.监听一个端口为3000的服务,传入一个回调函数,里面有一个done方法和执行Router原型对象上的handle方法并传入3个参数请求(req)响应(res)done回调函数。
router文件夹里的index.js里面代码如下:
```
const Route=require("./route");
const url=require("url");
const Layer=require("./layer");
const methods=require("methods");
const slice=Array.prototype.slice;
function Router(){
this.stack=[];
}
//创建一个Route实例,向当前路由系统中添加一个层
Router.prototype.route=function(path){
let route=new Route(path);
layer=new Layer(path,route.dispath.bind(route));
layer.route=route;
this.stack.push(layer);
return route;
}
methods.forEach(function(method){
Router.prototype[method]=function(path){
//创建路由实例,添加Router Layer
let route=this.route(path);
//调用路由方法 添加route Layer
route[method].apply(route,slice.call(arguments,1));
}
return this;
})
Router.prototype.handle=function(req,res,out){
let idx=0,self=this;
let {pathname}=url.parse(req.url,true);
function next(){//下个路由层
if(idx>=self.stack.length){
return out();
}
let layer=self.stack[idx++];
//值匹配路径router.stack
if(layer.match(pathname)&&layer.route&&layer.route.handle_method(req.method.toLowerCase())){
layer.handle_request(req,res,next);
}else{
next();
}
}
}
```
1.创建一个Router对象初始化Router.stack第一层是个空数组
2.创建一个Route实例,向当前路由系统添加一层,Router Layer 路径 处理函数(route.dispath) 有一个特殊的route属性,Route layer 路径 处理函数(真正的业务代码) 有一特殊的属性method,把第一层的路由路径(path)、对应方法(method)、函数(handle)放入到Router.stack中
3.methods动态匹配方法,return this是方便链式调用
4.Router原型上handle方法有3个参数请求(req)、响应(res)、out(上面的done方法),内部定义了索引idx=0,和保存了this,定义了个pathname变量解构请求的url地址,定义了next函数主要作用是判断是否继续下个路由层,next内部只匹配路径Router.stack(判断method是否匹配),如果匹配就执行Route.layer当前路由的第二层,否则就退出当前路由匹配下一个路由层
router文件夹里的route.js里面代码如下:
```
const Layer=require("./layer");
const methods=require("methods");
const slice=Array.prototype.slice;
function Route(path){
this.path=path;
this.stack=[];
this.methods={};
}
Route.prototype.handle_method=function(method){
method=method.toLowerCase();
return this.methods[method];
}
methods.forEach(function(method){
Route.prototype[method]=function(){
let handlers=slice.call(arguments);
this.methods[method]=true;
for(let i=0;i<handlers.length;i++){
let layer=new Layer("/",handlers[i]);
layer.method=method;
this.stack.push(layer);
}
return this;//方便链式调用
}
})
Route.prototype.dispath=function(req,res,out){
let idx=0,self=this;
function next(){//执行当前路由中的下一个函数
if(idx>=this.stack.length){
return out();//route.dispath里的out刚好是Router的next
}
let layer=this.stack[idx++];
if(layer.method==req.method.toLowerCase()){//匹配方法名是否一样
layer.handler_request(req,res,next);//为了以后扩展
}else{
next();
}
}
next();
}
module.exports=Route;
```
1.这里的Route.stack存的是当前路由的第二次
2.Route原型上的dispath方法主要是判断是否执行当前路由中的下个函数,匹配的是方法名是否一样。如果不匹配同样是跳过当前路由找下一层路由来匹配
router文件夹里的layer.js里面代码如下:
```
function Layer(path,handler){
this.path=path;
this.handler=handler;
}
//判断这一层和传入的路径是否匹配
Layer.prototype.match=function(path){
return this.path=path;
}
Layer.prototype.handle_request=function(req,res,next){
this.handler(req,res,next);
}
```
layer里主要保存了path和根据不同情况传过来的handle函数,原型上match方法是匹配当前层和传入的路径是否匹配,而原型上handle_request是执行传过来的handle函数,也是为了后期扩展做准备。
好了,个人理解写完了,如有理解有误的地方,热烈欢迎指正。
敬请期待中间件(use)原理的解读~~~嘻嘻


 695
695

 被折叠的 条评论
为什么被折叠?
被折叠的 条评论
为什么被折叠?
 到【灌水乐园】发言


