


1 概述
- 前端打包构建的不二选择
- 重点在使用和配置,原理并不高优
面试题:
- 前端代码为何要进行构建和打包
- module chunk bundle分别是什么意思,有何区别
- loader 和plugin的区别
- webpack如何实现懒加载
- webpack常见性能优化
- babel-runtime 和bable-polyfill的区别
内容:
- 基本配置
- 高级配置
- 优化打包效率
- 优化产出代码
- 构建流程概述
- babel
思维导图:

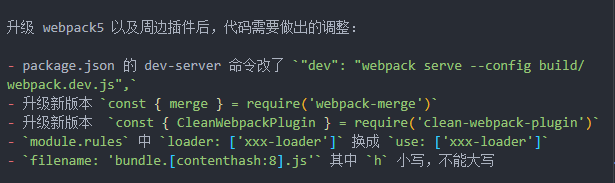
2 webpack5
- webpack5主要是内部效率的优化
- 对比webpack4,没有太多使用上的改动
3 webpack基本配置
3.1拆分配置
配置分为common,dev,prod三个部分,在dev中使用merge引入common,prod同理


3.2启动本地服务
- 跨域请求其他端口:通过proxy代理
   devServer: {
       port: 8080,
       progress: true,  // 显示打包的进度条
       contentBase: distPath,  // 根目录
       open: true,  // 自动打开浏览器
       compress: true,  // 启动 gzip 压缩

       // 设置代理
       proxy: {
           // 将本地 /api/xxx 代理到 localhost:3000/api/xxx
           '/api': 'http://localhost:3000',

           // 将本地 /api2/xxx 代理到 localhost:3000/xxx
           '/api2': {
               target: 'http://localhost:3000',
               pathRewrite: {
                   '/api2': ''
               }
           }
       }
   }
3.3处理ES6 (变成ES5,兼容浏览器)
        {
              test: /\.js$/,
              loader: ['babel-loader'],
              include: srcPath,
              exclude: /node_modules/
          },
3.4处理样式
            {
                test: /\.css$/,
                // loader 的执行顺序是:从后往前
                loader: ['style-loader', 'css-loader', 'postcss-loader'] // 加了 postcss,兼容性
            },
            {
                test: /\.less$/,
                // 增加 'less-loader' ,注意顺序
                loader: ['style-loader', 'css-loader', 'less-loader']
            }
3.5处理图片
//dev
        rules: [
            // 直接引入图片 url
            {
                test: /\.(png|jpg|jpeg|gif)$/,
                use: 'file-loader'
            }
        ]
//prod
        rules: [
            // 图片 - 考虑 base64 编码的情况
            {
                test: /\.(png|jpg|jpeg|gif)$/,
                use: {
                    loader: 'url-loader',
                    options: {
                        // 小于 5kb 的图片用 base64 格式产出
                        // 否则,依然延用 file-loader 的形式,产出 url 格式
                        limit: 5 * 1024,

                        // 打包到 img 目录下
                        outputPath: '/img1/',

                        // 设置图片的 cdn 地址(也可以统一在外面的 output 中设置,那将作用于所有静态资源)
                        // publicPath: 'http://cdn.abc.com'
                    }
                }
            },
        ]
3.6模块化
4 webpack高级配置
- 基本配置只能做demo,不能做线上项目
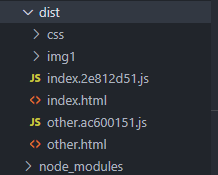
4.1多入口
    entry: {
        index: path.join(srcPath, 'index.js'),
        other: path.join(srcPath, 'other.js')
    },

    output: {
        // filename: 'bundle.[contentHash:8].js',  // 打包代码时,加上 hash 戳
        filename: '[name].[contentHash:8].js', // name 即多入口时 entry 的 key
        path: distPath,
        // publicPath: 'http://cdn.abc.com'  // 修改所有静态文件 url 的前缀(如 cdn 域名),这里暂时用不到
    },


    plugins: [
        // new HtmlWebpackPlugin({
        //     template: path.join(srcPath, 'index.html'),
        //     filename: 'index.html'
        // })

        // 多入口 - 生成 index.html
        new HtmlWebpackPlugin({
            template: path.join(srcPath, 'index.html'),
            filename: 'index.html',
            // chunks 表示该页面要引用哪些 chunk (即上面的 index 和 other),默认全部引用
            chunks: ['index']  // 只引用 index.js
        }),
        // 多入口 - 生成 other.html
        new HtmlWebpackPlugin({
            template: path.join(srcPath, 'other.html'),
            filename: 'other.html',
            chunks: ['other']  // 只引用 other.js
        })
    ]
4.2抽离CSS文件
// dev 开发模式下不需要单独抽离
            {
                test: /\.css$/,
                // loader 的执行顺序是:从后往前
                loader: ['style-loader', 'css-loader', 'postcss-loader'] // 加了 postcss
            },
            {
                test: /\.less$/,
                // 增加 'less-loader' ,注意顺序
                loader: ['style-loader', 'css-loader', 'less-loader']
            }


// 生产模式下需要单独抽离,优化性能
const MiniCssExtractPlugin = require('mini-css-extract-plugin')
            // 抽离 css
            {
                test: /\.css$/,
                loader: [
                    MiniCssExtractPlugin.loader,  // 注意,这里不再用 style-loader
                    'css-loader',
                    'postcss-loader'
                ]
            },
            // 抽离 less --> css
            {
                test: /\.less$/,
                loader: [
                    MiniCssExtractPlugin.loader,  // 注意,这里不再用 style-loader
                    'css-loader',
                    'less-loader',
                    'postcss-loader'
                ]
            }
    plugins: [
        new CleanWebpackPlugin(), // 会默认清空 output.path 文件夹
        new webpack.DefinePlugin({
            // window.ENV = 'production'
            ENV: JSON.stringify('production')
        }),

        // 抽离 css 文件
        new MiniCssExtractPlugin({
            filename: 'css/main.[contentHash:8].css'
        })
    ],
    optimization: {
        // 压缩 css
        minimizer: [new TerserJSPlugin({}), new OptimizeCSSAssetsPlugin({})],
    }
4.3抽离公共代码
- 第三方模块抽离
- 公共模块抽离
- 别的部分改动后不会对抽离部分重新打包,优化性能
    optimization: {
        // 压缩 css
        minimizer: [new TerserJSPlugin({}), new OptimizeCSSAssetsPlugin({})],

        // 分割代码块
        splitChunks: {
            chunks: 'all',
            /**
             * initial 入口 chunk,对于异步导入的文件不处理
                async 异步 chunk,只对异步导入的文件处理
                all 全部 chunk
             */

            // 缓存分组
            cacheGroups: {
                // 第三方模块
                vendor: {
                    name: 'vendor', // chunk 名称
                    priority: 1, // 权限更高,优先抽离,重要!!!
                    test: /node_modules/,
                    minSize: 0,  // 大小限制
                    minChunks: 1  // 最少复用过几次
                },

                // 公共的模块
                common: {
                    name: 'common', // chunk 名称
                    priority: 0, // 优先级
                    minSize: 0,  // 公共模块的大小限制
                    minChunks: 2  // 公共模块最少复用过几次
                }
            }
        }
    }
4.4懒加载

4.5处理Vue
           {
               test: /\.vue$/,
               loader: ['vue-loader'],
               include: srcPath
           },
5 module chunk bundle 的区别
- module -各个源码文件,webpack中一切皆模块
- chunk-多模块合并成的,如entry import() spiltChunk
- bundle-最终的输出文件

6 webpack性能优化
- 优化打包构建速度-——开发体验和效率
- 优化产出代码——产品性能
6.1优化打包构建速度
- 优化babel——loader
- IgnorePlugin
- noParse
- happyPack
- ParallelUglifyPlugin
- 自动刷新
- 热更新
- DLLPlugin
6.1.1 优化babel—loader
- 缓存
- 明确打包范围

6.1.2 IgnorePlugin——避免引入无用模块
- 例如: import moment from ‘moment’
- 默认会引入所有语言的JS代码,代码过大
- 如何只引入中文?


6.1.3 noParse——避免重复打包
- 已经打包过的文件不再打包

- IgnorePlugin直接不引入,代码中没有
- noParse引入,但不打包
6.1.4 happyPack多进程打包
- JS单线程,开启多进程打包
- 提高构建速度(特别是多核CPU)
const HappyPack = require('happypack')


            {
                test: /\.js$/,
                // 把对 .js 文件的处理转交给 id 为 babel 的 HappyPack 实例
                use: ['happypack/loader?id=babel'],
                include: srcPath,
                // exclude: /node_modules/
            },


        // happyPack 开启多进程打包
        new HappyPack({
            // 用唯一的标识符 id 来代表当前的 HappyPack 是用来处理一类特定的文件
            id: 'babel',
            // 如何处理 .js 文件,用法和 Loader 配置中一样
            loaders: ['babel-loader?cacheDirectory']
        }),
6.1.5 ParallelUglifyPlugin——压缩JS代码
- webpack 内置 Uglify工具压缩JS
- JS单线程,开启多进程压缩更快
- 和happyPack同理
const ParallelUglifyPlugin = require('webpack-parallel-uglify-plugin')


        // 使用 ParallelUglifyPlugin 并行压缩输出的 JS 代码
        new ParallelUglifyPlugin({
            // 传递给 UglifyJS 的参数
            // (还是使用 UglifyJS 压缩,只不过帮助开启了多进程)
            uglifyJS: {
                output: {
                    beautify: false, // 最紧凑的输出
                    comments: false, // 删除所有的注释
                },
                compress: {
                    // 删除所有的 `console` 语句,可以兼容ie浏览器
                    drop_console: true,
                    // 内嵌定义了但是只用到一次的变量
                    collapse_vars: true,
                    // 提取出出现多次但是没有定义成变量去引用的静态值
                    reduce_vars: true,
                }
            }
        })
6.1.6 关于开启多进程
- 项目较大多进程打包会提高性能
- 项目较小多进程打包回较低速度(进程开销)
- 按需使用
6.1.7 自动刷新(保存代码页面会自动更新)

6.1.8 热更新
- 自动刷新:整个网页全部刷新,速度较慢
- 自动刷新:整个网页全部刷新,状态会丢失
- 热更新:新代码生效,网页不刷新,状态不丢失
//dev
const HotModuleReplacementPlugin = require('webpack/lib/HotModuleReplacementPlugin');


    entry: {
        // index: path.join(srcPath, 'index.js'),
        index: [
            'webpack-dev-server/client?http://localhost:8080/',
            'webpack/hot/dev-server',
            path.join(srcPath, 'index.js')
        ],
        other: path.join(srcPath, 'other.js')
    },
    plugins: [
        new webpack.DefinePlugin({
            // window.ENV = 'production'
            ENV: JSON.stringify('development')
        }),
        new HotModuleReplacementPlugin()
    ],


    devServer: {
        port: 8080,
        progress: true,  // 显示打包的进度条
        contentBase: distPath,  // 根目录
        open: true,  // 自动打开浏览器
        compress: true,  // 启动 gzip 压缩

        hot: true,


//js
// 增加,开启热更新之后的代码逻辑
if (module.hot) {
    module.hot.accept(['./math'], () => {
        const sumRes = sum(10, 30)
        console.log('sumRes in hot', sumRes)
    })
}
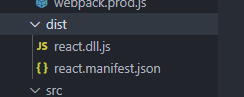
6.1.9 DLLplugin 动态链接库插件
-
前端框架如Vue react,体积大,构建慢
-
较稳定,不常升级版本
-
同一个版本只构建一次即可,不用每次都重新构建
-
webpack已内置Dllplugin支持
-
DllPlugin - 打包出dll文件
-
DllReferencePlugin -使用dll文件
const path = require('path')
const DllPlugin = require('webpack/lib/DllPlugin')
const { srcPath, distPath } = require('./paths')

module.exports = {
  mode: 'development',
  // JS 执行入口文件
  entry: {
    // 把 React 相关模块的放到一个单独的动态链接库
    react: ['react', 'react-dom']
  },
  output: {
    // 输出的动态链接库的文件名称,[name] 代表当前动态链接库的名称,
    // 也就是 entry 中配置的 react 和 polyfill
    filename: '[name].dll.js',
    // 输出的文件都放到 dist 目录下
    path: distPath,
    // 存放动态链接库的全局变量名称,例如对应 react 来说就是 _dll_react
    // 之所以在前面加上 _dll_ 是为了防止全局变量冲突
    library: '_dll_[name]',
  },
  plugins: [
    // 接入 DllPlugin
    new DllPlugin({
      // 动态链接库的全局变量名称,需要和 output.library 中保持一致
      // 该字段的值也就是输出的 manifest.json 文件 中 name 字段的值
      // 例如 react.manifest.json 中就有 "name": "_dll_react"
      name: '_dll_[name]',
      // 描述动态链接库的 manifest.json 文件输出时的文件名称
      path: path.join(distPath, '[name].manifest.json'),
    }),
  ],
}


const path = require('path')
const webpack = require('webpack')
const { merge } = require('webpack-merge')
const webpackCommonConf = require('./webpack.common.js')
const { srcPath, distPath } = require('./paths')

// 第一,引入 DllReferencePlugin
const DllReferencePlugin = require('webpack/lib/DllReferencePlugin');

module.exports = merge(webpackCommonConf, {
    mode: 'development',
    module: {
        rules: [
            {
                test: /\.js$/,
                use: ['babel-loader'],
                include: srcPath,
                exclude: /node_modules/ // 第二,不要再转换 node_modules 的代码
            },
        ]
    },
    plugins: [
        new webpack.DefinePlugin({
            // window.ENV = 'production'
            ENV: JSON.stringify('development')
        }),
        // 第三,告诉 Webpack 使用了哪些动态链接库
        new DllReferencePlugin({
            // 描述 react 动态链接库的文件内容
            manifest: require(path.join(distPath, 'react.manifest.json')),
        }),
    ],
    devServer: {
        port: 8080,
        progress: true,  // 显示打包的进度条
        contentBase: distPath,  // 根目录
        open: true,  // 自动打开浏览器
        compress: true,  // 启动 gzip 压缩

        // 设置代理
        proxy: {
            // 将本地 /api/xxx 代理到 localhost:3000/api/xxx
            '/api': 'http://localhost:3000',

            // 将本地 /api2/xxx 代理到 localhost:3000/xxx
            '/api2': {
                target: 'http://localhost:3000',
                pathRewrite: {
                    '/api2': ''
                }
            }
        }
    }
})
6.1.10 优化构建速度(可用于生产环境)
- 优化babel—loader
- IgnorePlugin
- noParse
- happyPack
- ParallelUglifyPlugin
不可用于生产环境:
- 自动刷新
- 热更新
- DLLPlugin
6.2 webpack性能优化—产出代码
- 体积更小
- 合理分包,不重复加载
- 速度更快,内存使用更少
6.2.1 小图片base64编码
            // 图片 - 考虑 base64 编码的情况
            {
                test: /\.(png|jpg|jpeg|gif)$/,
                use: {
                    loader: 'url-loader',
                    options: {
                        // 小于 5kb 的图片用 base64 格式产出
                        // 否则,依然延用 file-loader 的形式,产出 url 格式
                        limit: 5 * 1024,

                        // 打包到 img 目录下
                        outputPath: '/img1/',

                        // 设置图片的 cdn 地址(也可以统一在外面的 output 中设置,那将作用于所有静态资源)
                        // publicPath: 'http://cdn.abc.com'
                    }
                }
            },
6.2.2 bundle加hash
filename: '[name].[contentHash:8].js', // name 即多入口时 entry 的 key
6.2.3 懒加载
6.2.4 提取公共代码
6.2.5 IngorePlugin
6.2.6 使用production(开启生产模式)
- 自动开启代码压缩
- Vue React等会自动删掉调试代码(如开发环境的warning)
- 启动Tree-Shaking(打包时删减掉没有使用的代码部分)
//Tree-Shaking
// ES module才能让tree——shaking生效
//commonjs不行
ES6 Module和Commonjs区别


6.2.7 Scope Hosting
- 代码体积更小
- 创建函数作用域更少
- 代码可读性更好


7 babel(ES6–>ES5)
- 环境搭建&基本配置
- babel-polyfill
- babel-runtime
7.1 环境搭建&基本配置
{
    "presets": [
        [
            "@babel/preset-env",
            {
                "useBuiltIns": "usage",
                "corejs": 3
            }
        ]
    ],
    "plugins": [
        [
            "@babel/plugin-transform-runtime",
            {
                "absoluteRuntime": false,
                "corejs": 3,
                "helpers": true,
                "regenerator": true,
                "useESModules": false
            }
        ]
    ]
}
7.2 babel-polyfill
- polyfill 补丁


7.3 babel-polyfill如何按需引入
const sum = (a, b) => a + b

// 新的 API babel处理不了
Promise.resolve(100).then(data => data);

// 新的 API
[10, 20, 30].includes(20)

// 语法,符合 ES5 语法规范
// 不处理模块化(webpack)
- babel处理不了新的API
- 需要引入polyfill进行打包

- babel-polyfill文件非常大
- 需要按需引入
  "presets": [
    [
      "@babel/preset-env",
      {
        "useBuiltIns": "usage",
        "corejs": 3 //版本
      }
    ]
  ],
babel-polyfill问题:
- 污染全局环境 =>解决方案:babel-runtime
window.Promise1 = function() {}
Array.prototype.includes1 = function () {}

//使用方
window.Promise = 'abc'
Array.prototype.includes = 100
7.4 babel-runtime
- 对方法重命名
  "plugins": [
    [
      "@babel/plugin-transform-runtime",
      {
        "absoluteRuntime": false,
        "corejs": 3,
        "helpers": true,
        "regenerator": true,
        "useESModules": false
      }
    ]
  ]


 226
226


 被折叠的 条评论
为什么被折叠?
被折叠的 条评论
为什么被折叠?
 到【灌水乐园】发言


