一.Linux的命令格式
举例子:
[root@192 ~]# ls -lh /etc/
表示的是etc目录下的文件的所有详细信息
[root@192 ~]# ls -l
总用量 44
-rw-------. 1 root root 1285 1月 3 02:56 anaconda-ks.cfg
-rw-r--r--. 1 root root 27338 1月 3 02:56 install.log
-rw-r--r--. 1 root root 7572 1月 3 02:55 install.log.syslog
在Linux中第一个字符代表这个文件是目录、文件或链接文件等等。
当为[ d ]则是目录
当为[ - ]则是文件;
若是[ l ]则表示为链接文档(link file);
若是[ b ]则表示为装置文件里面的可供储存的接口设备(可随机存取装置);
若是[ c ]则表示为装置文件里面的串行端口设备,例如键盘、鼠标(一次性读取装置)。
二.文件处理命令
1.建立目录
mkdir -p [目录名]
-p的意思为递归创建
例子:
这个是直接创建
下面的就是递归创建,直接创建会发现创建不了,加了 -p就可以了
2.进入目录
3.目录的路径
小技巧:tab 具有补全功能
4.删除目录
rmdir 目录 :只能是空目录
[root@192 ~]# rm -r china
rm:是否进入目录"china"? y
rm:是否删除目录 "china/zj"?y
rm:是否删除目录 "china"?y
[root@192 ~]# rm -rf china
会直接强制删掉目录下的文件
但是注意的是删掉后就不能恢复了,因为linux没有回收站,所以要格外细心
5.复制目录或文件
[root@192 ~]# cp anaconda-ks.cfg china/
cp -r [文件目录] [目标目录]
cp -a 的话就是复制的属性都是一样的,属性
6.剪切 或更改命令
mv [原文件或目录][目标文件或目录]
如果在同一目录下就是改名命令
三.系统目录结构
你会看到如下图所示:

树状目录结构:

以下是对这些目录的解释:
-
/bin:
bin是Binary的缩写, 这个目录存放着最经常使用的命令。
-
/boot:
这里存放的是启动Linux时使用的一些核心文件,包括一些连接文件以及镜像文件。
-
/dev :
dev是Device(设备)的缩写, 该目录下存放的是Linux的外部设备,在Linux中访问设备的方式和访问文件的方式是相同的。
-
/etc:
这个目录用来存放所有的系统管理所需要的配置文件和子目录。
-
/home:
用户的主目录,在Linux中,每个用户都有一个自己的目录,一般该目录名是以用户的账号命名的。
-
/lib:
这个目录里存放着系统最基本的动态连接共享库,其作用类似于Windows里的DLL文件。几乎所有的应用程序都需要用到这些共享库。
-
/lost+found:
这个目录一般情况下是空的,当系统非法关机后,这里就存放了一些文件。
-
/media:
linux系统会自动识别一些设备,例如U盘、光驱等等,当识别后,linux会把识别的设备挂载到这个目录下。
-
/mnt:
系统提供该目录是为了让用户临时挂载别的文件系统的,我们可以将光驱挂载在/mnt/上,然后进入该目录就可以查看光驱里的内容了。
-
/opt:
这是给主机额外安装软件所摆放的目录。比如你安装一个ORACLE数据库则就可以放到这个目录下。默认是空的。
-
/proc:
这个目录是一个虚拟的目录,它是系统内存的映射,我们可以通过直接访问这个目录来获取系统信息。
这个目录的内容不在硬盘上而是在内存里,我们也可以直接修改里面的某些文件,比如可以通过下面的命令来屏蔽主机的ping命令,使别人无法ping你的机器:
echo 1 > /proc/sys/net/ipv4/icmp_echo_ignore_all
-
/root:
该目录为系统管理员,也称作超级权限者的用户主目录。
-
/sbin:
s就是Super User的意思,这里存放的是系统管理员使用的系统管理程序。
-
/selinux:
这个目录是Redhat/CentOS所特有的目录,Selinux是一个安全机制,类似于windows的防火墙,但是这套机制比较复杂,这个目录就是存放selinux相关的文件的。
-
/srv:
该目录存放一些服务启动之后需要提取的数据。
-
/sys:
这是linux2.6内核的一个很大的变化。该目录下安装了2.6内核中新出现的一个文件系统 sysfs 。
sysfs文件系统集成了下面3种文件系统的信息:针对进程信息的proc文件系统、针对设备的devfs文件系统以及针对伪终端的devpts文件系统。
该文件系统是内核设备树的一个直观反映。
当一个内核对象被创建的时候,对应的文件和目录也在内核对象子系统中被创建。
-
/tmp:
这个目录是用来存放一些临时文件的。
-
/usr:
这是一个非常重要的目录,用户的很多应用程序和文件都放在这个目录下,类似于windows下的program files目录。
-
/usr/bin:
系统用户使用的应用程序。
-
/usr/sbin:
超级用户使用的比较高级的管理程序和系统守护程序。
-
/usr/src:内核源代码默认的放置目录。
-
/var:
这个目录中存放着在不断扩充着的东西,我们习惯将那些经常被修改的目录放在这个目录下。包括各种日志文件。
在linux系统中,有几个目录是比较重要的,平时需要注意不要误删除或者随意更改内部文件。
/etc: 上边也提到了,这个是系统中的配置文件,如果你更改了该目录下的某个文件可能会导致系统不能启动。
/bin, /sbin, /usr/bin, /usr/sbin: 这是系统预设的执行文件的放置目录,比如 ls 就是在/bin/ls 目录下的。
值得提出的是,/bin, /usr/bin 是给系统用户使用的指令(除root外的通用户),而/sbin, /usr/sbin 则是给root使用的指令。
/var: 这是一个非常重要的目录,系统上跑了很多程序,那么每个程序都会有相应的日志产生,而这些日志就被记录到这个目录下,具体在/var/log 目录下,另外mail的预设放置也是在这里。
四/链接命令

硬链接:
软连接:
五.搜索命令
1.locate命令
注意:1.你刚创建的文件数据,不会被立即搜索到,只有更新后才能搜索,默认更新周期是一天一次
但是如果你主动更新就可以执行updatedb命令
[root@localhost ~]# ls
anaconda-ks.cfg install.log install.log.syslog new1
[root@localhost ~]# locate new1
[root@localhost ~]# updatedb
[root@localhost ~]# locate new1
/root/new1
2.如果你在一些指定的文件目录下创建文件,就算updatedb也找不到
[root@localhost ~]# mkdir /tmp/new2
[root@localhost ~]# updatedb
[root@localhost ~]# locate new2
[root@localhost ~]#
原因:可以vi 该配置文件
PRUNE_BIND_MOUNTS = "yes"//代表以下的内容全部生效
PRUNEFS = "9p afs anon_inodefs auto autofs bdev binfmt_misc cgroup cifs coda configfs cpuset debugfs devpts ecryptfs exofs fuse fusectl gfs gfs2 hugetlbfs inotifyfs iso9660 jffs2 lustre mqueue ncpfs nfs nfs4 nfsd pipefs proc ramfs rootfs rpc_pipefs securityfs selinuxfs sfs sockfs sysfs tmpfs ubifs udf usbfs"
PRUNENAMES = ".git .hg .svn"
PRUNEPATHS = "/afs /media /net /sfs /tmp/udev /var/cache/ccache /var/spool/cups /var/spool/squid /var/tmp"
//拒绝以上的数据请求
2.命令搜索命令
[root@localhost ~]# whereis ls
ls: /bin/ls /usr/share/man/man1/ls.1.gz /usr/share/man/man1p/ls.1p.g
[root@localhost ~]# whereis -b ls
ls: /bin/ls
[root@localhost ~]# whereis -m ls
ls: /usr/share/man/man1/ls.1.gz /usr/share/man/man1p/ls.1p.gz
which命令
[root@localhost ~]# which ls
alias ls='ls --color=auto'
/bin/ls
3.find命令
示例代码:
[root@localhost ~]# ls
anaconda-ks.cfg install.log install.log.syslog new1
[root@localhost ~]# find /root -name install.log
/root/install.log
* 示例代码:
[root@localhost ~]# find /root -name "install*"
/root/install.log
/root/install.log.syslog
?示例代码:
[root@localhost ~]# ls
aac abc anaconda-ks.cfg install.log install.log.syslog new1
[root@localhost ~]# find /root -name "a?c"
/root/abc
/root/aac
[]示例代码:
[root@localhost ~]# find /root -name "a[ab]c"
/root/abc
/root/aac
[root@localhost ~]# ls -i
521250 aac 534465 anaconda-ks.cfg 521220 install.log.syslog
521243 abc 521219 install.log 521242 new1
[root@localhost ~]# find /root -inum 521250
/root/aac
注意:{}与\中间有空格
[root@localhost ~]# find /root -size +20k -a -size -2M -exec ls -lh {} \;
-rw-r--r--. 1 root root 27K 1月 3 02:56 /root/install.log
4.grep命令
[root@localhost ~]# ls
aac abc anaconda-ks.cfg install.log install.log.syslog new1
[root@localhost ~]# grep "size" install.log
[root@localhost ~]# grep "size" anaconda-ks.cfg
#part /boot --fstype=ext4 --size=200
#part swap --size=2000
#part /home --fstype=ext4 --size=2000
#part / --fstype=ext4 --grow --size=200
六.帮助命令
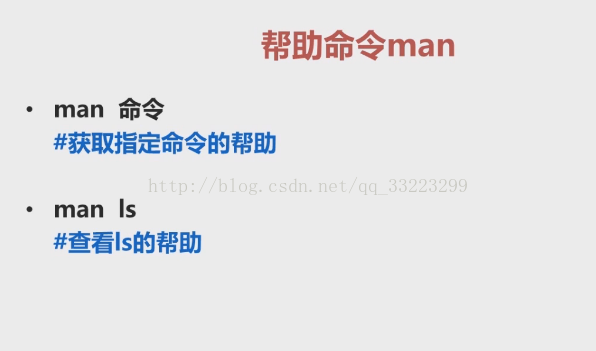
[root@localhost ~]# man -f passwd
passwd (1) - update user's authentication tokens
passwd (5) - password file
passwd [sslpasswd] (1ssl) - compute password hashes
[root@localhost ~]# man 1 passwd
级别:
将相关的一些文件也显示出来
七.压缩命令
一.
示例1:压缩文件
[root@localhost ~]# zip news.zip news
adding: news (stored 0%)
[root@localhost ~]# ls
anaconda-ks.cfg install.log install.log.syslog news
news.zip
2.压缩目录
[root@localhost ~]# zip -r jp.zip jp
adding: jp/ (stored 0%)
[root@localhost ~]# ls
anaconda-ks.cfg install.log install.log.syslog jp jp.zip

二
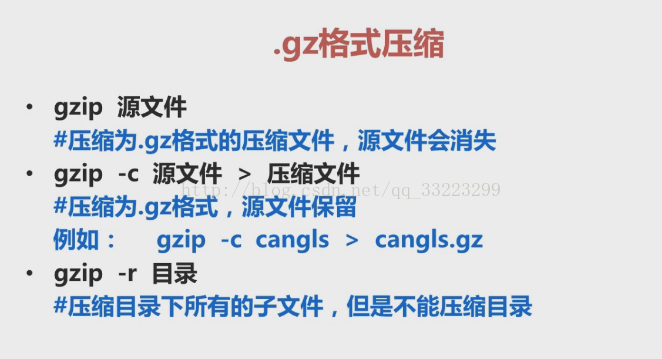
实例1压缩文件:
[root@localhost ~]# gzip new1
[root@localhost ~]# ls
anaconda-ks.cfg install.log install.log.syslog new1.gz
2.压缩目录
[root@localhost ~]# gzip -r animal
[root@localhost ~]# ls
anaconda-ks.cfg animal dog install.log install.log.syslog new1.gz
[root@localhost ~]# cd animal
[root@localhost animal]# ls
cat.gz dog.gz monkey.gz
三
实例1:
[root@localhost ~]# bzip2 new1
[root@localhost ~]# ls
anaconda-ks.cfg animal dog install.log install.log.syslog new1.bz2
2.[root@localhost ~]# bzip2 -k new1
[root@localhost ~]# ls
anaconda-ks.cfg animal dog install.log install.log.syslog new1 new1.bz2
四
压缩例子:
[root@localhost ~]# tar -zcvf animal.tar.gz animal
animal/
animal/cat
animal/monkey
animal/dog
[root@localhost ~]# ls
anaconda-ks.cfg animal animal.tar.gz dog install.log install.log.syslog new1 new1.bz2
解压例子:
[root@localhost ~]# ls
anaconda-ks.cfg animal.tar.gz dog install.log install.log.syslog new1 new1.bz2
[root@localhost ~]# tar -zxvf animal.tar.gz
animal/
animal/cat
animal/monkey
animal/dog
[root@localhost ~]# ls
anaconda-ks.cfg animal animal.tar.gz dog install.log install.log.syslog new1 new1.bz2
------------------------------------------------------------------------------------------------------------------------------------------------------
实例1:压缩
[root@localhost ~]# tar -jcvf animal.tar.bz2 animal
animal/
animal/cat
animal/monkey
animal/dog
2.解压到tmp目录下
[root@localhost ~]# tar -jxvf animal.tar.bz2 -C /tmp/
animal/
animal/cat
animal/monkey
animal/dog
3.同时压缩几个文件到指定目录下
[root@localhost ~]# tar -jcvf /tmp/test.tar.bz2 a b
a
b
[root@localhost ~]# ls
a anaconda-ks.cfg b install.log install.log.syslog
[root@localhost ~]# cd /tmp;
[root@localhost tmp]# ls
test.tar.bz2 yum.log
4.只查看不解压
[root@localhost tmp]# ls
animal new2 test.tar.bz2 yum.log
[root@localhost tmp]# tar -jtvf test.tar.bz2
-rw-r--r-- root/root 0 2018-01-06 04:55 a
-rw-r--r-- root/root 0 2018-01-06 04:55 b
七.关机与开启命令
[root@localhost ~]#cat /etc/inittab
# inittab is only used by upstart for the default runlevel.
#
# ADDING OTHER CONFIGURATION HERE WILL HAVE NO EFFECT ON YOUR SYSTEM.
#
# System initialization is started by /etc/init/rcS.conf
#
# Individual runlevels are started by /etc/init/rc.conf
#
# Ctrl-Alt-Delete is handled by /etc/init/control-alt-delete.conf
#
# Terminal gettys are handled by /etc/init/tty.conf and /etc/init/serial.conf,
# with configuration in /etc/sysconfig/init.
#
# For information on how to write upstart event handlers, or how
# upstart works, see init(5), init(8), and initctl(8).
#
# Default runlevel. The runlevels used are:
# 0 - halt (Do NOT set initdefault to this)
# 1 - Single user mode
# 2 - Multiuser, without NFS (The same as 3, if you do not have networking)
# 3 - Full multiuser mode
# 4 - unused
# 5 - X11
# 6 - reboot (Do NOT set initdefault to this)
#
id:3:initdefault:
注意:不要把init 后面设置成1或者6,因为那是关机和重启命令
要养成不用时退出logout的习惯
八.其他常用命令
1.linux挂载命令
实例代码:
[root@localhost ~]# mkdir /mnt/cdrom
[root@localhost ~]# mount /dev/sr0 /mnt/cdrom
mount: block device /dev/sr0 is write-protected, mounting read-only
[root@localhost ~]# cd mnt/cdrom
-bash: cd: mnt/cdrom: 没有那个文件或目录
[root@localhost ~]# cd /mnt/cdrom
[root@localhost cdrom]# ls
CentOS_BuildTag EULA images Packages repodata RPM-GPG-KEY-CentOS-Debug-6 RPM-GPG-KEY-CentOS-Testing-6
EFI GPL isolinux RELEASE-NOTES-en-US.html RPM-GPG-KEY-CentOS-6 RPM-GPG-KEY-CentOS-Security-6 TRANS.TBL
实例代码:
[root@localhost cdrom]# umount /mnt/cdrom
umount: /mnt/cdrom: device is busy.
(In some cases useful info about processes that use
the device is found by lsof(8) or fuser(1))
[root@localhost cdrom]# cd
[root@localhost ~]# umount /mnt/cdrom
[root@localhost ~]# cd /mnt/cdrom
[root@localhost cdrom]# ls
注意:不要自身的文件目录下卸载光盘
-------------------------------------------------------------------------------------------------------------------------------------------------------------------------------------------------------------------
2.用户登录查看命令


 被折叠的 条评论
为什么被折叠?
被折叠的 条评论
为什么被折叠?
 到【灌水乐园】发言


