全面介绍Android的MVVM框架 - 数据绑定

原文地址 MasteringAndroidDataBinding


本教程是跟着 Data Binding Guide 学习过程中得出的一些实践经验,同时修改了官方教程的一些错误,每一个知识点都有对应的源码,争取做到实践与理论相结合。

Data Binding 解决了 Android UI 编程中的一个痛点,官方原生支持 MVVM 模型可以让我们在不改变既有代码框架的前提下,非常容易地使用这些新特性。其实在此之前,已经有些第三方的框架(RoboAndroid) 可以支持 MVVM 模型,无耐由于框架的侵入性太强,导致一直没有流行起来。

准备

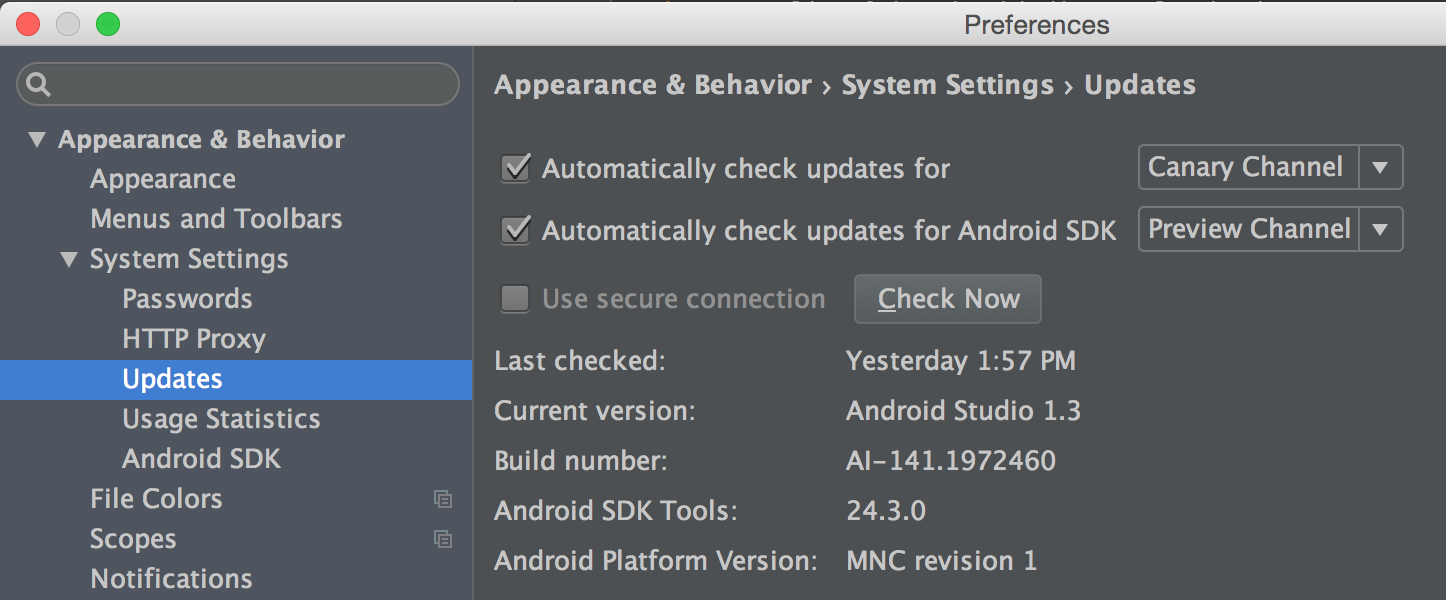
Android Studio 更新到 1.3 版本

打开 Preferences,找到 Appearances & Behavior 下的 Updates 选项,把 Automatically Check updates for 修改成 Canary Channel

注意

Data Binding 是一个 support 包,因此与 android M 没什么关系,可以不用下载 Android MNC Preview 的 SDK。

新建一个 Project

修改 Project 的 build.gradle,为 build script 添加一条依赖,Gradle 版本为 1.2.3。

classpath 'com.android.tools.build:gradle:1.2.3'
classpath 'com.android.databinding:dataBinder:1.0-rc0'
   
   
  • 1
  • 2
  • 1
  • 2

为用到 Data Binding 的模块添加插件,修改对应的 build.gradle

apply plugin: 'com.android.databinding'
   
   
  • 1
  • 1

注意

如果 Module 用到的 buildToolsVersion 高于 22.0.1,比如 23 rc1,那com.android.databinding:dataBinder 的版本要改为 1.3.0-beta1,否则会出现如下错误:

基础

工程创建完成后,我们通过一个最简单的例子来说明 Data Binding 的基本用法。

布局文件

使用 Data Binding 之后,xml的布局文件就不再单纯地展示 UI 元素,还需要定义 UI 元素用到的变量。所以,它的根节点不再是一个 ViewGroup,而是变成了 layout,并且新增了一个节点 data

<layout xmlns:android="http://schemas.android.com/apk/res/android">
    <data>
    </data>
    <!--原先的根节点(Root Element)-->
    <LinearLayout>
    ....
    </LinearLayout>
</layout>
   
   
  • 1
  • 2
  • 3
  • 4
  • 5
  • 6
  • 7
  • 8
  • 1
  • 2
  • 3
  • 4
  • 5
  • 6
  • 7
  • 8

要实现 MVVM 的 ViewModel 就需要把数据与UI进行绑定,data 节点就为此提供了一个桥梁,我们先在data 中声明一个 variable,这个变量会为 UI 元素提供数据(例如 TextView 的 android:text),然后在Java 代码中把”后台”数据与这个 variable 进行绑定。

如果要用一个表格来展示用户的基本信息,用 Data Binding 应该怎么实现呢?

数据对象

添加一个 POJO 类 - User,非常简单,四个属性以及他们的 getter 和 setter。

public class User {
    private final String firstName;
    private final String lastName;
    private String displayName;
    private int age;

    public User(String firstName, String lastName) {
        this.firstName = firstName;
        this.lastName = lastName;
    }

    public User(String firstName, String lastName, int age) {
        this(firstName, lastName);
        this.age = age;
    }

    public int getAge() {
        return age;
    }

    public String getFirstName() {
        return firstName;
    }

    public String getLastName() {
        return lastName;
    }

    public String getDisplayName() {
        return firstName + " " + lastName;
    }

    public boolean isAdult() {
        return age >= 18;
    }
}
   
   
  • 1
  • 2
  • 3
  • 4
  • 5
  • 6
  • 7
  • 8
  • 9
  • 10
  • 11
  • 12
  • 13
  • 14
  • 15
  • 16
  • 17
  • 18
  • 19
  • 20
  • 21
  • 22
  • 23
  • 24
  • 25
  • 26
  • 27
  • 28
  • 29
  • 30
  • 31
  • 32
  • 33
  • 34
  • 35
  • 36
  • 1
  • 2
  • 3
  • 4
  • 5
  • 6
  • 7
  • 8
  • 9
  • 10
  • 11
  • 12
  • 13
  • 14
  • 15
  • 16
  • 17
  • 18
  • 19
  • 20
  • 21
  • 22
  • 23
  • 24
  • 25
  • 26
  • 27
  • 28
  • 29
  • 30
  • 31
  • 32
  • 33
  • 34
  • 35
  • 36

稍后,我们会新建一个 User 类型的变量,然后把它跟布局文件中声明的变量进行绑定。

定义 Variable

再回到布局文件,在 data 节点中声明一个变量 user

<data>
    <variable name="user" type="com.liangfeizc.databindingsamples.basic.User" />
</data>
   
   
  • 1
  • 2
  • 3
  • 1
  • 2
  • 3

其中 type 属性就是我们在 Java 文件中定义的 User 类。

当然,data 节点也支持 import,所以上面的代码可以换一种形式来写。

<data>
    <import type="com.liangfeizc.databindingsamples.basic.User" />
    <variable name="user" type="User" />
</data>
   
   
  • 1
  • 2
  • 3
  • 4
  • 1
  • 2
  • 3
  • 4

然后我们刚才在 build.gradle 中添加的那个插件 - com.android.databinding会根据xml文件的名称Generate 一个继承自 ViewDataBinding 的类。

例如,这里 xml 的文件名叫 activity_basic.xml,那么生成的类就是 ActivityBasicBinding

注意

java.lang.* 包中的类会被自动导入,可以直接使用,例如要定义一个 String 类型的变量:

<variable name="firstName" type="String" />
   
   
  • 1
  • 1

绑定 Variable

修改 BasicActivity 的 onCreate 方法,用 DatabindingUtil.setContentView() 来替换掉setContentView(),然后创建一个 user 对象,通过 binding.setUser(user) 与 variable 进行绑定。

@Override
protected void onCreate(Bundle savedInstanceState) {
    super.onCreate(savedInstanceState);
    ActivityBasicBinding binding = DataBindingUtil.setContentView(
            this, R.layout.activity_basic);
    User user = new User("fei", "Liang");
    binding.setUser(user);
}
   
   
  • 1
  • 2
  • 3
  • 4
  • 5
  • 6
  • 7
  • 8
  • 1
  • 2
  • 3
  • 4
  • 5
  • 6
  • 7
  • 8

注意

ActivityBasicBinding 类是自动生成的,所有的 set 方法也是根据 variable 名称生成的。例如,我们定义了两个变量。

<data>
    <variable name="firstName" type="String" />
    <variable name="firstName" type=""
</data>
   
   
  • 1
  • 2
  • 3
  • 4
  • 1
  • 2
  • 3
  • 4

那么就会生成对应的两个 set 方法。

setFirstName(String firstName);
setLastName(String lastName);
   
   
  • 1
  • 2
  • 1
  • 2

使用 Variable

数据与 Variable 绑定之后,xml 的 UI 元素就可以直接使用了。

<TextView
    android:layout_width="wrap_content"
    android:layout_height="wrap_content"
    android:text="@{user.lastName}" />
   
   
  • 1
  • 2
  • 3
  • 4
  • 1
  • 2
  • 3
  • 4

至此,一个简单的数据绑定就完成了,可参考完整代码

高级用法

使用类方法

首先为类添加一个静态方法

public class MyStringUtils {
    public static String capitalize(final String word) {
        if (word.length() > 1) {
            return String.valueOf(word.charAt(0)).toUpperCase() + word.substring(1);
        }
        return word;
    }
}
   
   
  • 1
  • 2
  • 3
  • 4
  • 5
  • 6
  • 7
  • 8
  • 1
  • 2
  • 3
  • 4
  • 5
  • 6
  • 7
  • 8

然后在 xml 的 data 节点中导入:

<import type="com.liangfeizc.databindingsamples.utils.MyStringUtils" />
   
   
  • 1
  • 1

使用方法与 Java 语法一样:

<TextView
    android:layout_width="wrap_content"
    android:layout_height="wrap_content"
    android:text="@{StringUtils.capitalize(user.firstName)}" />
   
   
  • 1
  • 2
  • 3
  • 4
  • 1
  • 2
  • 3
  • 4

类型别名

如果我们在 data 节点了导入了两个同名的类怎么办?

<import type="com.example.home.data.User" />
<import type="com.examle.detail.data.User" />
<variable name="user" type="User" />
   
   
  • 1
  • 2
  • 3
  • 1
  • 2
  • 3

这样一来出现了两个 User 类,那 user 变量要用哪一个呢?不用担心,import 还有一个 alias 属性。

<import type="com.example.home.data.User" />
<import type="com.examle.detail.data.User" alias="DetailUser" />
<variable name="user" type="DetailUser" />
   
   
  • 1
  • 2
  • 3
  • 1
  • 2
  • 3

Null Coalescing 运算符

android:text="@{user.displayName ?? user.lastName}"
   
   
  • 1
  • 1

就等价于

android:text="@{user.displayName != null ? user.displayName : user.lastName}"
   
   
  • 1
  • 1

属性值

通过 ${} 可以直接把 Java 中定义的属性值赋值给 xml 属性。

<TextView
   android:text="@{user.lastName}"
   android:layout_width="wrap_content"
   android:layout_height="wrap_content"
   android:visibility="@{user.isAdult ? View.VISIBLE : View.GONE}"/>
   
   
  • 1
  • 2
  • 3
  • 4
  • 5
  • 1
  • 2
  • 3
  • 4
  • 5

使用资源数据

这个例子,官方教程有错误,可以参考Android Data Binder 的一个bug,完整代码在此

<TextView
    android:padding="@{large? (int)@dimen/largePadding : (int)@dimen/smallPadding}"
    android:background="@android:color/black"
    android:textColor="@android:color/white"
    android:layout_width="wrap_content"
    android:layout_height="wrap_content"
    android:text="@string/hello_world" />
   
   
  • 1
  • 2
  • 3
  • 4
  • 5
  • 6
  • 7
  • 1
  • 2
  • 3
  • 4
  • 5
  • 6
  • 7
23
  • 0
    点赞
  • 0
    收藏
    觉得还不错? 一键收藏
  • 0
    评论

“相关推荐”对你有帮助么?

  • 非常没帮助
  • 没帮助
  • 一般
  • 有帮助
  • 非常有帮助
提交
评论
添加红包

请填写红包祝福语或标题

红包个数最小为10个

红包金额最低5元

当前余额3.43前往充值 >
需支付:10.00
成就一亿技术人!
领取后你会自动成为博主和红包主的粉丝 规则
hope_wisdom
发出的红包
实付
使用余额支付
点击重新获取
扫码支付
钱包余额 0

抵扣说明:

1.余额是钱包充值的虚拟货币,按照1:1的比例进行支付金额的抵扣。
2.余额无法直接购买下载,可以购买VIP、付费专栏及课程。

余额充值