苹果在iOS10上对APNS推送做了修改 , 极光也是很给力的, 在第一时间就对sdk进行了更新
下面对iOS10注册极光推送进行一下记录.
- 注意:兼容iOS10的是极光2.1.9版本的sdk.
1.使用cocoaPods添加JPush-ios-sdk(cocoaPods会帮您下载idk并配置)
2.在apple Developer配置证书(开发证书和生产证书,并记得包含推送功能),配置描述文件
3.将开发证书和生产证书下载到桌面,双击。在钥匙串中,可以看到您刚下载的这两个证书,右击导出为P12格式的文件(分别命名为certPush.p12和certDevelop.p12),保存在桌面。
4.在极光官网,注册账号,并创建应用。创建应用时,需要导入开发证书和生产证书,就是我们刚放导出的p12文件(certDevelop.p12为开发证书,certPush.p12为生产证书),创建成功后,我们可看到,注册应用获取appKey和bundle id。
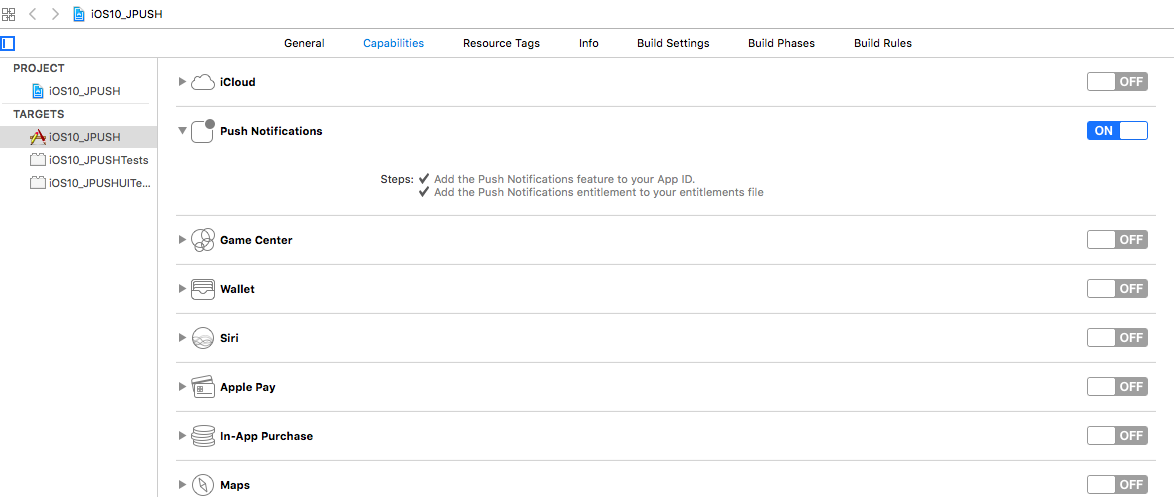
5.找到Capabilities->Push Notifications并打开
6.Xcode7以上需要支持http传输方式
- 在AppDelegate.m中, 引入头文件
// 极光推送
#import "JPUSHService.h"
#import <AdSupport/AdSupport.h>
#ifdef NSFoundationVersionNumber_iOS_9_x_Max
#import <UserNotifications/UserNotifications.h> // 这里是iOS10需要用到的框架
8.设置注册极光推送需要的一些参数
static NSString * const JPUSHAPPKEY = @"xxxxxxxxxxxxxxxxx"; // 极光appKey
static NSString * const channel = @"Publish channel"; // 固定的

#ifdef DEBUG // 开发
static BOOL const isProduction = FALSE; // 极光FALSE为开发环境
#else // 生产
static BOOL const isProduction = TRUE; // 极光TRUE为生产环境
#endif
9.这里是AppDelegate.m中的代码, 分了几大块, 全部粘到下面, 直接复制可用(只需要下面这些代码就可以实现通知)
@interface AppDelegate ()<JPUSHRegisterDelegate> // 最新版的sdk需要实现这个代理方法

@end

@implementation AppDelegate


- (BOOL)application:(UIApplication *)application didFinishLaunchingWithOptions:(NSDictionary *)launchOptions {

    // 注册apns通知
    if ([[UIDevice currentDevice].systemVersion floatValue] >= 10.0) // iOS10
    {
#ifdef NSFoundationVersionNumber_iOS_9_x_Max
        JPUSHRegisterEntity * entity = [[JPUSHRegisterEntity alloc] init];
        entity.types = UNAuthorizationOptionAlert|UNAuthorizationOptionBadge | UNAuthorizationOptionSound;
        [JPUSHService registerForRemoteNotificationConfig:entity delegate:self];
#endif
    }
    else if ([[UIDevice currentDevice].systemVersion floatValue] >= 8.0) // iOS8, iOS9
    {
        //可以添加自定义categories
        [JPUSHService registerForRemoteNotificationTypes:(UIUserNotificationTypeBadge | UIUserNotificationTypeSound | UIUserNotificationTypeAlert) categories:nil];
    }
    else // iOS7
    {
        //categories 必须为nil
        [JPUSHService registerForRemoteNotificationTypes:(UIRemoteNotificationTypeBadge | UIRemoteNotificationTypeSound | UIRemoteNotificationTypeAlert) categories:nil];
    }
    /*
     *  launchingOption 启动参数.
     *  appKey 一个JPush 应用必须的,唯一的标识.
     *  channel 发布渠道. 可选.
     *  isProduction 是否生产环境. 如果为开发状态,设置为 NO; 如果为生产状态,应改为 YES.
     *  advertisingIdentifier 广告标识符(IDFA) 如果不需要使用IDFA,传nil.
     * 此接口必须在 App 启动时调用, 否则 JPush SDK 将无法正常工作.
     */
    // 广告标识符
    NSString *advertisingId = [[[ASIdentifierManager sharedManager] advertisingIdentifier] UUIDString];

    // 如不需要使用IDFA,advertisingIdentifier 可为nil
    // 注册极光推送
    [JPUSHService setupWithOption:launchOptions appKey:JPUSHAPPKEY channel:channel apsForProduction:isProduction advertisingIdentifier:advertisingId];

    //2.1.9版本新增获取registration id block接口。
    [JPUSHService registrationIDCompletionHandler:^(int resCode, NSString *registrationID) {
        if(resCode == 0)
        {
            // iOS10获取registrationID放到这里了, 可以存到缓存里, 用来标识用户单独发送推送
            NSLog(@"registrationID获取成功:%@",registrationID);
            [[NSUserDefaults standardUserDefaults] setObject:registrationID forKey:@"registrationID"];
            [[NSUserDefaults standardUserDefaults] synchronize];
        }
        else
        {
            NSLog(@"registrationID获取失败,code:%d",resCode);
        }
    }];

    return YES;
}

// ---------------------------------------------------------------------------------
- (void)applicationWillResignActive:(UIApplication *)application {
}


- (void)applicationDidEnterBackground:(UIApplication *)application {
    [[UIApplication sharedApplication] setApplicationIconBadgeNumber:0];
}


- (void)applicationWillEnterForeground:(UIApplication *)application {
    [application setApplicationIconBadgeNumber:0];
    [application cancelAllLocalNotifications];
}


- (void)applicationDidBecomeActive:(UIApplication *)application {
}


- (void)applicationWillTerminate:(UIApplication *)application {
}

// ---------------------------------------------------------------------------------
#pragma mark - 注册推送回调获取 DeviceToken
#pragma mark -- 成功
- (void)application:(UIApplication *)application didRegisterForRemoteNotificationsWithDeviceToken:(NSData *)deviceToken
{
    // 注册成功
    // 极光: Required - 注册 DeviceToken
    [JPUSHService registerDeviceToken:deviceToken];
}

#pragma mark -- 失败
- (void)application:(UIApplication *)application didFailToRegisterForRemoteNotificationsWithError:(NSError *)error
{
    // 注册失败
    NSLog(@"did Fail To Register For Remote Notifications With Error: %@", error);
}

// ---------------------------------------------------------------------------------

// 这部分是官方demo里面给的, 也没实现什么功能, 放着以备不时之需
#if __IPHONE_OS_VERSION_MAX_ALLOWED > __IPHONE_7_1
- (void)application:(UIApplication *)application didRegisterUserNotificationSettings:(UIUserNotificationSettings *)notificationSettings
{

}

// Called when your app has been activated by the user selecting an action from
// a local notification.
// A nil action identifier indicates the default action.
// You should call the completion handler as soon as you've finished handling
// the action.
- (void)application:(UIApplication *)application handleActionWithIdentifier:(NSString *)identifier forLocalNotification:(UILocalNotification *)notification completionHandler:(void (^)())completionHandler
{

}

// Called when your app has been activated by the user selecting an action from
// a remote notification.
// A nil action identifier indicates the default action.
// You should call the completion handler as soon as you've finished handling
// the action.
- (void)application:(UIApplication *)application handleActionWithIdentifier:(NSString *)identifier forRemoteNotification:(NSDictionary *)userInfo completionHandler:(void (^)())completionHandler
{

}
#endif

// ---------------------------------------------------------------------------------
- (void)application:(UIApplication *)application didReceiveLocalNotification:(UILocalNotification *)notification
{
    [JPUSHService showLocalNotificationAtFront:notification identifierKey:nil];
}

// ---------------------------------------------------------------------------------

#pragma mark - iOS7: 收到推送消息调用
- (void)application:(UIApplication *)application didReceiveRemoteNotification:(NSDictionary *)userInfo fetchCompletionHandler:(void (^)(UIBackgroundFetchResult))completionHandler {

    // iOS7之后调用这个
    [JPUSHService handleRemoteNotification:userInfo];
    NSLog(@"iOS7及以上系统,收到通知");

    if ([[UIDevice currentDevice].systemVersion floatValue] < 10.0 || application.applicationState > 0)
    {
        // 程序在前台或通过点击推送进来的会弹这个alert
        NSString *message = [NSString stringWithFormat:@"iOS7-8-9收到的推送%@", [userInfo[@"aps"] objectForKey:@"alert"]];
        UIAlertView *alert = [[UIAlertView alloc] initWithTitle:@"提示" message:message delegate:self cancelButtonTitle:@"确定" otherButtonTitles:nil, nil nil];
        [alert show];
    }
    completionHandler(UIBackgroundFetchResultNewData);
}

// ---------------------------------------------------------------------------------

#pragma mark - iOS10: 收到推送消息调用(iOS10是通过Delegate实现的回调)
#pragma mark- JPUSHRegisterDelegate
#ifdef NSFoundationVersionNumber_iOS_9_x_Max
// 当程序在前台时, 收到推送弹出的通知
- (void)jpushNotificationCenter:(UNUserNotificationCenter *)center willPresentNotification:(UNNotification *)notification withCompletionHandler:(void (^)(NSInteger))completionHandler {

    NSDictionary * userInfo = notification.request.content.userInfo;

    if([notification.request.trigger isKindOfClass:[UNPushNotificationTrigger class]])
    {
        [JPUSHService handleRemoteNotification:userInfo];
        NSString *message = [NSString stringWithFormat:@"will%@", [userInfo[@"aps"] objectForKey:@"alert"]];
        NSLog(@"iOS10程序在前台时收到的推送: %@", message);
        UIAlertView *alert = [[UIAlertView alloc] initWithTitle:@"提示" message:message delegate:self cancelButtonTitle:@"确定" otherButtonTitles:nil, nil nil];
        [alert show];
    }

    completionHandler(UNNotificationPresentationOptionBadge|UNNotificationPresentationOptionSound|UNNotificationPresentationOptionAlert); // 需要执行这个方法,选择是否提醒用户,有Badge、Sound、Alert三种类型可以设置
}


// 程序关闭后, 通过点击推送弹出的通知
- (void)jpushNotificationCenter:(UNUserNotificationCenter *)center didReceiveNotificationResponse:(UNNotificationResponse *)response withCompletionHandler:(void (^)())completionHandler {

    NSDictionary * userInfo = response.notification.request.content.userInfo;

    if([response.notification.request.trigger isKindOfClass:[UNPushNotificationTrigger class]])
    {
        [JPUSHService handleRemoteNotification:userInfo];
        NSString *message = [NSString stringWithFormat:@"did%@", [userInfo[@"aps"] objectForKey:@"alert"]];
        NSLog(@"iOS10程序关闭后通过点击推送进入程序弹出的通知: %@", message);
        UIAlertView *alert = [[UIAlertView alloc] initWithTitle:@"提示" message:message delegate:self cancelButtonTitle:@"确定" otherButtonTitles:nil, nil nil];
        [alert show];
    }

    completionHandler();  // 系统要求执行这个方法
}
#endif


 991
991

 被折叠的 条评论
为什么被折叠?


