


购物网站点击商品后,都会有一个查看物品图片,并且可以放大仔细观察物品的功能。这个功能看起来复杂,其实实现起来非常简单。下面我们来一起做这个小效果吧!
首先,我们看一下页面的布局:

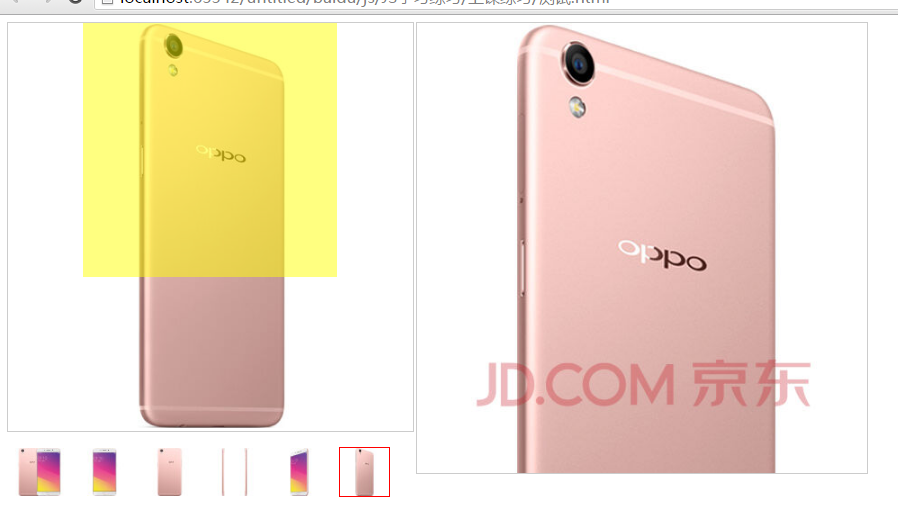
1.小图片显示区,上面有一个方形遮罩层
2.缩略图横向列表
3.大图显示区域
然后,我们写出开发步骤:
1.编写3个区域的html布局,使他们位于同一个容器内
2.显示区域2的图片列表
3.给区域2的图片添加mouseover事件,使图片显示在区域1内
4.鼠标移入区域1,生成半透明的选择框
5.区域3显示区域2选择框对应的图片位置放大的效果
6.鼠标移除区域2,区域3隐藏
最后,根据需求写出相应代码:
html和css:
<style>
        ul{
            list-style: none;
            padding: 0;
        }
        .zoom-box{
            position: relative;
            width: 452px;
        }
        .small-box{
            border: 1px solid #ccc;
            position: relative;
        }
        .small-box .square{
            position: absolute;
            background-color: yellow;
            opacity: 0.5;
            display: none;
        }
        .small-box .mask{
            width: 100%;
            height: 100%;
            opacity: 0;
            position: absolute;
            top:0;
            left:0;
        }
        .img-list ul:after{
            clear: both;
            content: '';
            display: table;
        }
        .img-list ul li{
            float: left;
            padding: 0 8px;
        }
        .img-list img{
            border: 2px solid transparent;
        }
        .img-list img.active{
            border: 2px solid red;
        }
        .big-box{
            position: absolute;
            top:0;
            left: 100%;
            margin-left: 2px;
            width: 500px;
            height: 500px;
            border: 1px solid #ccc;
            display: none;
            overflow: hidden;
        }
        .big-box img{
            position: absolute;
        }
    </style>

</head>
<body>
<div class="zoom-box">
    <div class="small-box">
        <img src="../../../img/京东放大镜/m1.jpg" alt="">
        <div class="square">

        </div>
        <div class="mask"></div>
    </div>

    <div class="img-list">
        <ul>
            <li><img class="active" src="../../../img/京东放大镜/s1.jpg" alt="" data-small="../../../img/京东放大镜/m1.jpg"
                     data-big="../../../img/京东放大镜/b1.jpg"></li>
            <li><img src="../../../img/京东放大镜/s2.jpg" alt="" data-small="../../../img/京东放大镜/m2.jpg"
                     data-big="../../../img/京东放大镜/b2.jpg"></li>
            <li><img src="../../../img/京东放大镜/s3.jpg" alt="" data-small="../../../img/京东放大镜/m3.jpg"
                     data-big="../../../img/京东放大镜/b3.jpg"></li>
            <li><img src="../../../img/京东放大镜/s4.jpg" alt="" data-small="../../../img/京东放大镜/m4.jpg"
                     data-big="../../../img/京东放大镜/b4.jpg"></li>
            <li><img src="../../../img/京东放大镜/s5.jpg" alt="" data-small="../../../img/京东放大镜/m5.jpg"
                     data-big="../../../img/京东放大镜/b5.jpg"></li>
            <li><img src="../../../img/京东放大镜/s6.jpg" alt="" data-small="../../../img/京东放大镜/m6.jpg"
                     data-big="../../../img/京东放大镜/b6.jpg"></li>
        </ul>
    </div>
    <div class="big-box">
        <img src="../../../img/京东放大镜/b1.jpg" alt="">
    </div>
</div>
js代码:
<script>
    var smallBox=$('.small-box .mask');
    var smallImg=$('.small-box img');
    var square=$('.square');
    var imagesList=$all('.img-list img');
    var bigBox=$('.big-box');
    var bigImg=$('.big-box img');

    //选项卡切换
    for(var i=0;i<imagesList.length;i++){
        imagesList[i].onmouseover=function () {
            for (var j=0;j<imagesList.length;j++){
                imagesList[j].className='';
            }
            this.className='active';
            bigImg.src=this.getAttribute('data-big');
            smallImg.src=this.getAttribute('data-small');
        }
    }
    //鼠标移进事件
    smallBox.onmouseover=function () {
        square.style.display='block';
        bigBox.style.display='block';
        //利用比例公式计算square的宽高
        //square的宽/smallImg的宽 = bigBox的宽/bigIma的宽
        square.style.width=smallImg.offsetWidth * bigBox.offsetWidth / bigImg.offsetWidth + 'px';
        square.style.height=smallImg.offsetHeight * bigBox.offsetHeight / bigImg.offsetHeight + 'px';
    };
    //鼠标移出事件
    smallBox.onmouseout=function () {
        square.style.display='none';
        bigBox.style.display='none';
    };
    //鼠标移动事件
    smallBox.onmousemove=function (e) {
        var e=e||window.event;
        var x,y;
        //x和y的坐标
        x=e.offsetX-square.offsetWidth/2;
        y=e.offsetY-square.offsetHeight/2;
        if(x<0){
            x=0;
        }
        if(x>smallBox.offsetWidth-square.offsetWidth){
            x=smallBox.offsetWidth-square.offsetWidth;
        }
        if(y<0){
            y=0;
        }
        if(y>smallBox.offsetHeight-square.offsetHeight){
            y=smallBox.offsetHeight-square.offsetHeight;
        }
        square.style.left=x+'px';
        square.style.top=y+'px';

        //利用公式计算大图的坐标
        //<!--// x/?=smallimg.w/bigimg.w-->
        //<!--// y/?=smallimg.h/bigimg.h-->

        bigImg.style.left=-x * bigImg.offsetWidth / smallImg.offsetWidth + 'px';
        bigImg.style.top=-y * bigImg.offsetHeight / smallImg.offsetHeight + 'px';
    };
    function $(name) {
        return document.querySelector(name);
    }
    function $all(name) {
        return document.querySelectorAll(name);
    }
</script>
大家可以做一下看看效果:
添加一个mask的div是因为,如果直接在smallBox上添加事件,会受到其中的子元素的影响,导致图片抖动。而对一个空内容的mask操作就不会有影响了。


 2065
2065


 被折叠的 条评论
为什么被折叠?
被折叠的 条评论
为什么被折叠?
 到【灌水乐园】发言


