


一次关于bootstrap.yaml文件的思考
1.简介
本文不是介绍yaml的语法,是本人看微信推送文章的时候,看到了一篇关于bootstrap.yaml配置文件加载的原理,才想多去深究一下其加载原理。
因为看的文章讲解的云里雾里的,讲解的不是很明白,自己就想着深入去了解一下加载的原理,所有才写了这篇文章。
好了,明确一下文章的真正主题:bootstrap.yaml文件的加载原理。
需要事先说明一下Bootstrap.yaml这个文件是在我们使用spring cloud的时候才会有用,一个普通的spring Boot项目,bootstrap.yaml文件内容是不会被加载的。
版本:
springboot 2.2.5.RELEASE
spring-cloud Hoxton.SR3
nacos: 1.4.1
条件:
对spring boot源码要有一定程度的了解。
下面就正式开始!
2.前言
我们在创建Spring Cloud项目的时候,通常在resources目录下面会创建一个bootstrap.yaml的文件,在整合nacos的时候我们通常会这样配置:
spring:
  application:
    name: web-provider
  cloud:
    nacos:
      discovery:
        server-addr: 127.0.0.1:8848 # 注册中心
        username: nacos
        password: nacos
        enabled: true
      config:
        refresh-enabled: true
        username: nacos
        password: nacos
        server-addr: 127.0.0.1:8848 # 配置中心
        file-extension: yaml
        enabled: true
这样就会去拉取远端的配置,并作为最高优先级的配置,加载的容器中。
那么spring是如何是识别并加载的呢?
熟悉spring boot的同学可能知道配置的加载时机:
public ConfigurableApplicationContext run(String... args) {
		// ...
		// 环境配置的加载时机
		ConfigurableEnvironment environment = prepareEnvironment(listeners, applicationArguments);
		configureIgnoreBeanInfo(environment);
		// 打印 Banner
		Banner printedBanner = printBanner(environment);
		// ...
}
重点就在prepareEnvironment(listeners, applicationArguments);准备容器环境。
private ConfigurableEnvironment prepareEnvironment(SpringApplicationRunListeners listeners,
			ApplicationArguments applicationArguments) {
	// Create and configure the environment
	ConfigurableEnvironment environment = getOrCreateEnvironment();
	configureEnvironment(environment, applicationArguments.getSourceArgs());
	// 重点是这个地方,会发布一个ApplicationEnvironmentPreparedEvent事件
	listeners.environmentPrepared(environment);
	ConfigurationPropertySources.attach(environment);
	return environment;
}
ApplicationEnvironmentPreparedEvent事件的接收处理类是org.springframework.cloud.bootstrap.BootstrapApplicationListener所属包在spring-cloud-context包下面。
3.BootstrapApplicationListener
直接看核心的onApplicationEvent方法:
public static final String BOOTSTRAP_PROPERTY_SOURCE_NAME = "bootstrap";

@Override
public void onApplicationEvent(ApplicationEnvironmentPreparedEvent event) {
	ConfigurableEnvironment environment = event.getEnvironment();
	// spring.cloud.bootstrap.enabled 默认是 true
	if (!environment.getProperty("spring.cloud.bootstrap.enabled", Boolean.class,
			true)) {
		return;
	}
	// 先判断是否有bootstrap的配置
	// 这个判断是为了防止重复加载,存在直接结束,先记住这个地方,后面会说
	if (environment.getPropertySources().contains(BOOTSTRAP_PROPERTY_SOURCE_NAME)) {
		return;
	}
	// 这个地方声明了一个ApplicationContext??什么鬼??
	// 后面会进行说明
	ConfigurableApplicationContext context = null;
	// 这个地方我们也可以看出bootstrap这个名字是可以自定义的
	String configName = environment
			.resolvePlaceholders("${spring.cloud.bootstrap.name:bootstrap}");
	// ....
	if (context == null) {
		// 会走到这里,这里返回了一个ApplicationContext
		context = bootstrapServiceContext(environment, event.getSpringApplication(),
				configName);
	}
	apply(context, event.getSpringApplication(), environment);
}
bootstrapServiceContext()方法:
private ConfigurableApplicationContext bootstrapServiceContext(
			ConfigurableEnvironment environment, final SpringApplication application,
			String configName) {
	// 手动创建了一个新的StandardEnvironment
	StandardEnvironment bootstrapEnvironment = new StandardEnvironment();
	MutablePropertySources bootstrapProperties = bootstrapEnvironment
			.getPropertySources();
	// spring.cloud.bootstrap.location 文件位置
	String configLocation = environment
			.resolvePlaceholders("${spring.cloud.bootstrap.location:}");
	Map<String, Object> bootstrapMap = new HashMap<>();
	// 文件名称
	bootstrapMap.put("spring.config.name", configName);
	bootstrapMap.put("spring.main.web-application-type", "none");
	// 文件位置
	bootstrapMap.put("spring.config.location", configLocation);
	// 添加到 容器环境中,name = bootstrap
	bootstrapProperties.addFirst(
			new MapPropertySource(BOOTSTRAP_PROPERTY_SOURCE_NAME, bootstrapMap));
	// SpringApplicationBuilder 是构建 SpringApplication的快捷辅助类
	SpringApplicationBuilder builder = new SpringApplicationBuilder()
			.profiles(environment.getActiveProfiles()).bannerMode(Mode.OFF)
			.environment(bootstrapEnvironment)
			.registerShutdownHook(false).logStartupInfo(false)
			// 容器类型,none 是最普通的sprin容器
			.web(WebApplicationType.NONE);
	// 构建 SpringApplication,
	final SpringApplication builderApplication = builder.application();
	builder.sources(BootstrapImportSelectorConfiguration.class);
	// 调用run方法,返回 AnnotationConfigApplicationContext
	final ConfigurableApplicationContext context = builder.run();
	context.setId("bootstrap");
	// 这个作用是把新创建的容器设为主容器的父容器
	addAncestorInitializer(application, context);
	// 这个地方移除 name=bootstrap 的配置信息
	bootstrapProperties.remove(BOOTSTRAP_PROPERTY_SOURCE_NAME);
	mergeDefaultProperties(environment.getPropertySources(), bootstrapProperties);
	return context;
}
上面的部分代码,我们可以看出,方法内部手动创建了一个SpringApplication对象,并且又调用了run方法,即创建了一个新的spring容器这个spring容器真正的类型是AnnotationConfigApplicationContext,非web环境的容器。
至此现在的流程变成了:
主容器流程—》run —》 prepareEnvironment —》
BootstrapApplicationListener —》新的容器 —》run —》prepareEnvironment —》BootstrapApplicationListener —》…
现在的整个调用链类似一个递归,新创建的容器一定也会执行到这个地方,是递归一定是有出口的,还记得最前面的那个判断嘛
	if (environment.getPropertySources().contains(BOOTSTRAP_PROPERTY_SOURCE_NAME)) {
		return;
	}
这个就是出口,新容器在执行到这个的时候,直接就返回了,不会再去继续创建新容器了,
同时也解释了为啥方法开头bootstrapProperties先填加了name=bootstrap 的配置信息,方法的最后又移除了。
理解上面的这个调用流程至关重要。
讲到这里,不还是没看到spring去查找读取bootstrap.yaml文件里面的配置嘛!
我们知道在新容器里面执行到prepareEnvironment肯定也发布了ApplicationEnvironmentPreparedEvent事件,
处理这个事件的主要监听器有BootstrapApplicationListener ,
同时也有一个更重要的监听器:ConfigFileApplicationListener。
说明:
- BootstrapApplicationListener是优于ConfigFileApplicationListener先执行的。
- ConfigFileApplicationListener:负责读取 bootstrap.yaml 配置文件的内容并加载到Environment中。
其实它也会读取application.yaml系列的配置,只不过是在主容器读取的。
4.ConfigFileApplicationListener
类继承图:
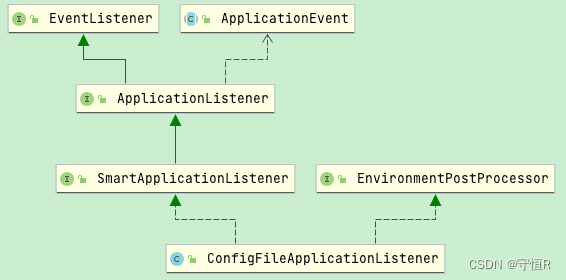
实现了 EnvironmentPostProcessor, ApplicationListener
看主要的方法:
@Override
	public void onApplicationEvent(ApplicationEvent event) {
		// 处理发布的 ApplicationEnvironmentPreparedEvent
		if (event instanceof ApplicationEnvironmentPreparedEvent) {
			onApplicationEnvironmentPreparedEvent((ApplicationEnvironmentPreparedEvent) event);
		}
		if (event instanceof ApplicationPreparedEvent) {
			// 初始化spring容器时会执行这个
			onApplicationPreparedEvent(event);
		}
	}

	private void onApplicationEnvironmentPreparedEvent(ApplicationEnvironmentPreparedEvent event) {
		// 获取所有的EnvironmentPostProcessor,当前类也实现了EnvironmentPostProcessor
		List<EnvironmentPostProcessor> postProcessors = loadPostProcessors();
		postProcessors.add(this);
		AnnotationAwareOrderComparator.sort(postProcessors);
		for (EnvironmentPostProcessor postProcessor : postProcessors) {
			// 执行 postProcessEnvironment()
			postProcessor.postProcessEnvironment(event.getEnvironment(), event.getSpringApplication());
		}
	}

	@Override
	public void postProcessEnvironment(ConfigurableEnvironment environment, SpringApplication application) {
		// 也就是执行这个方法
		addPropertySources(environment, application.getResourceLoader());
	}

	protected void addPropertySources(ConfigurableEnvironment environment, ResourceLoader resourceLoader) {
		RandomValuePropertySource.addToEnvironment(environment);
		// 核心是这个地方,Loader类
		new Loader(environment, resourceLoader).load();
	}
EnvironmentPostProcessor是个针对Environment的扩展接口,我们可以自定义做扩展。
这里简要说明一下Loader这个类的功能:
private class Loader {
	// 默认的查找配置路径
	private static final String DEFAULT_SEARCH_LOCATIONS = "classpath:/,classpath:/config/,file:./,file:./config/";
	// 默认的配置名称
	private static final String DEFAULT_NAMES = "application";

	Loader(ConfigurableEnvironment environment, ResourceLoader resourceLoader) {
			this.environment = environment;
			// ...
			// 这一句是核心:利用 SPI机制去加载 PropertySourceLoader 的实现类
			this.propertySourceLoaders = SpringFactoriesLoader.loadFactories(PropertySourceLoader.class,
					getClass().getClassLoader());
		}

	void load() {
			FilteredPropertySource.apply(this.environment, DEFAULT_PROPERTIES, LOAD_FILTERED_PROPERTY,
			(defaultProperties) -> {
					// ...
					while (!this.profiles.isEmpty()) {
						Profile profile = this.profiles.poll();
						if (isDefaultProfile(profile)) {
							addProfileToEnvironment(profile.getName());
						}
						// 加载文件
						load(profile, this::getPositiveProfileFilter,
								addToLoaded(MutablePropertySources::addLast, false));
						this.processedProfiles.add(profile);
					}
					// ...
				});
		}

		private void load(Profile profile, DocumentFilterFactory filterFactory, DocumentConsumer consumer) {
			// 会尝试从不同的位置去加载,指定了profile环境的话,就会拼对应的环境,进行文件读取
			getSearchLocations().forEach((location) -> {
				boolean isFolder = location.endsWith("/");
				Set<String> names = isFolder ? getSearchNames() : NO_SEARCH_NAMES;
				// 下面就是循环PropertySourceLoader尝试读取文件
				names.forEach((name) -> load(location, name, profile, filterFactory, consumer));
			});
	}
}
PropertySourceLoader是加载器,可以理解为真正去读取配置的类,因为配置文件的类型不同所以会有多个实现类:
- NacosJsonPropertySourceLoader
- NacosXmlPropertySourceLoader
- NacosPropertySourceLocator:加载远端nacos配置的加载器。
- PropertiesPropertySourceLoader:加载类型是.properties后缀的配置,application.properties。
- YamlPropertySourceLoader:加载类型是.yaml后缀的配置,bootstrap.yaml,application.yaml都是它加载的。
本文暂时不打算深究ConfigFileApplicationListener的读取流程,读者可自行按照上面的流程套路进行分析。
这样就把bootstrap.yaml的配置文件内容读取出来放到Environment中了。
这里要说明一点nacos在拉取远端配置时使用的是NacosPropertySourceLocator这个类,但是这个类没有在spring.factories文件中指定,是在自动配置类里面注入的,也就是说上面是获取不到这个Bean的。
org.springframework.boot.env.PropertySourceLoader=\
com.alibaba.cloud.nacos.parser.NacosJsonPropertySourceLoader,\
com.alibaba.cloud.nacos.parser.NacosXmlPropertySourceLoader
那么从远端获取配置的时机在哪里呢?首先这个类的执行是在主容器里面执行的,具体的执行的时机是在:
prepareContext(); —> applyInitializers(context);这个地方进行调用的。
感兴趣的可以自行分析,关于Nacos配置的加载流程以前的文章有过介绍,这里就不多说了。
最后
文章大致介绍了bootstrap.yaml文件的加载流程,采用了父子容器的实现方式。
几个重要的类,看懂了本文章,也就大致知道了spring对配置是如何读取的。
这篇文章其实是拖了好久才写的,不知不觉已经上班2年了,共勉吧!


 5945
5945

 被折叠的 条评论
为什么被折叠?
被折叠的 条评论
为什么被折叠?
 到【灌水乐园】发言


