


Spring框架学习(二)
AOP(面向切面编程)
概念:由于正常程序执行流程都是纵向执行流程,在原有纵向流程中添加横切面,不需要修改原有程序代码,针对某一个或某些方法添加通知,形成切面的过程。具有高扩展性。

原有功能:切点(pointcut)
前置通知:在切点之前执行的功能(before advice)
后置通知:在切点之后执行的功能(after advice)
当切点执行过程中出现异常,触发异常通知throw advice
所有功能总称为切面
织入:将界面嵌入到原功能的过程
Spring有两种AOP实现方式:
Schema-based:
每个通知都需要实现接口或类,配置spring配置文件时在aop:config配置。
AspectJ:
每个通知不需要实现接口或类,配置Spring文件在aop:config的子标签aop:aspect中配置。
Schema-based实现步骤
-
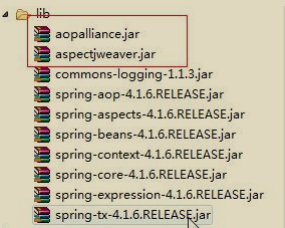
导入jar
-
新建通知类
新建前置通知类
arg0:切点方法对象
arg1:切点方法参数
arg2:切点在那个对象中
public class MyBeforeAdvice implements MethodBeforeAdvice{
@Override
public void before(Method arg0, Object[] arg1, Objectarg2) throws Throwable {
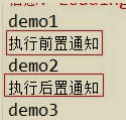
System.out.println("执行前置通知");
}
}
新建后置通知类
arg0:切点方法返回值
arg1:切点方法对象
arg2:切点方法参数
arg3:切点方法所在类对象
public class MyAfterAdvice implements AfterReturningAdvice {
	@Override
	public void afterReturning(Object arg0, Method arg1, Object[] arg2, Object arg3) throws Throwable {
		System.out.println("执行后置通知");
		}
	}
- 配置spring配置文件
引入aop命名空间,配置通知类的,配置切面。*通配符匹配任一方法名,类名,一级包名。
<?xml version="1.0" encoding="UTF-8"?>
	<beans xmlns="http://www.springframework.org/schema/beans"
		   xmlns:xsi="http://www.w3.org/2001/XMLSchema-instance"
	 	   xmlns:aop="http://www.springframework.org/schema/aop"
		   xsi:schemaLocation="http://www.springframework.org/sc hema/beans
		   http://www.springframework.org/schema/beans/spring-be ans.xsd
		   http://www.springframework.org/schema/aop
		   http://www.springframework.org/schema/aop/spring-aop. xsd">
		<!-- 配置通知类对象,在切面中引入 -->
		<bean id="mybefore" class="com.bjsxt.advice.MyBeforeAdvice"></bean>
		<bean id="myafter" class="com.bjsxt.advice.MyAfterAdvice"></bean>
		<!-- 配置切面 -->
 		<aop:config>
 		<!-- 配置切点 -->
 		<aop:pointcut expression="execution(* com.bjsxt.test.Demo.demo2())" id="mypoint"/>
 		<!-- 通知 -->
 		<aop:advisor advice-ref="mybefore" pointcut-ref="mypoint"/>
 		<aop:advisor advice-ref="myafter" pointcut-ref="mypoint"/>
 		</aop:config>
 		<!-- 配置 Demo 类,测试使用 -->
 		<bean id="demo" class="com.bjsxt.test.Demo"></bean>
 	</beans>
- 创建测试类text
public class Test {
	public static void main(String[] args) {
	// Demo demo = new Demo();
	// demo.demo1();
	// demo.demo2();
	// demo.demo3();
	ApplicationContext ac = new ClassPathXmlApplicationContext("applicationContext.xm l");
	Demo demo = ac.getBean("demo",Demo.class);
	demo.demo1();
	demo.demo2();
	demo.demo3();
	}
}
运行结果:
配置异常通知的步骤(AspectJ方法)
- 只有当切点报差个才会触发异常通知
- 在spring中AspectJ方式提供异常通知方法
- 实现步骤:
新建类,在类中写任意名称的方法:
public class MyThrowAdvice{
	public void myexception(Exception e1){
		System.out.println("执行异常通知 "+e1.getMessage());
	}
}
在spring配置文件中配置:
	<aop:aspect>的ref属性表示:方法在哪个类中
	<aop:xxxx/>表示什么通知
	method:当触发该通知时调用哪个方法
	throwing:异常对象名,必须和通知中的方法参数名相同
<bean id="mythrow" class="com.bjsxt.advice.MyThrowAdvice"></bean>
	<aop:config>
		<aop:aspect ref="mythrow">
			<aop:pointcut expression="execution(* com.bjsxt.test.Demo.demo1())" id="mypoint"/>
			<aop:after-throwing method="myexception" pointcut-ref="mypoint" throwing="e1"/>
		</aop:aspect>
	</aop:config>
<bean id="demo" class="com.bjsxt.test.Demo"></bean>
异常通知(Schema-based)
- 新建一个类实现throwAdvice接口,必须自己写方法,且必须是afterThrowing,有两种参数方式:必须是1个或者4个,异常类型要与切点报的异常类型一致。
public class MyThrow implements ThrowsAdvice{
// public void afterThrowing(Method m, Object[] args, Object target, Exception ex) {
	// System.out.println("执行异常通知");  // }
	public void afterThrowing(Exception ex) throws Throwable {
		 System.out.println("执行异常通过-schema-base 方式 ");
		 }
	}
- 在ApplicationContext配置:
<bean id="mythrow" class="com.bjsxt.advice.MyThrow"></bean>
<aop:config>
	<aop:pointcut expression="execution(* com.bjsxt.test.Demo.demo1())" id="mypoint"/>
		<aop:advisor advice-ref="mythrow" pointcut-ref="mypoint" />
</aop:config>
<bean id="demo" class="com.bjsxt.test.Demo"></bean>
环绕通知(Schema-based)
- 将前置通知和后置通知都写到同一个通知中,形成环绕通知。
- 实现步骤:
1.新建一个类实现MethodInterceptor
public class MyArround implements MethodInterceptor{
	@Override
	public object invoke(MethodInvocation arg0) throws Throwable{
		System.out.println("环绕前置");
		Obejct result=arg0.proceed();
		System.out.println("环绕后置");
		return result;
	}
}
2.配置applicationContext.xml
<bean id="myarround" class="com.bjsxt.advice.MyArround"></bean>
	<aop:config>
		<aop:pointcut expression="execution(* com.bjsxt.test.Demo.demo1())" id="mypoint"/>
		<aop:advisor advice-ref="myarround" pointcut-ref="mypoint" />
	</aop:config>
<bean id="demo" class="com.bjsxt.test.Demo"></bean>
使用AspectJ方式实现
- 新建类,不用实现,类中方法名任意:
public class MyAdvice {
	public void mybefore(String name1,int age1){
		System.out.println("前置"+name1 );
		}
	public void mybefore1(String name1){
		System.out.println("前置:"+name1);
		}
	public void myaftering(){
		System.out.println("后置 2");
		}
	public void myafter(){
		System.out.println("后置 1");
		}
	public void mythrow(){
		System.out.println("异常");
		}
	public Object myarround(ProceedingJoinPoint p) throws Throwable{
		System.out.println("执行环绕");
		System.out.println("环绕-前置");
		Object result = p.proceed();
		System.out.println("环绕后置");
		return result;
		}
}
- 配置spring配置文件
<aop:after/>:后置通知,是否出现异常都执行
<aop:after-returing/>:后置通知,只有当切点正确执行时才执行
<aop:after/>和<aop:after-returig/>和<aop:after-throwing/>执行顺序和配置顺序有关。
execution(),括号中不能有args
中间使用 and 不能使用&& 由 spring 把 and 解析成&&。
args(名称) 名称自定义的.顺序和 demo1(参数,参数)对应。
<aop:before/>arg-names=” 名 称 ” 名 称 来 源 于 expression=”” 中 args(),名称必须一样。args() 有几个参数,arg-names 里面必须有几个参数。arg-names=”” 里面名称必须和通知方法参数名对应。
<aop:config>
	<aop:aspect ref="myadvice">
		<aop:pointcut expression="execution(* com.bjsxt.test.Demo.demo1(String,int)) and args(name1,age1)" id="mypoint"/>
		<aop:pointcut expression="execution(* com.bjsxt.test.Demo.demo1(String)) and args(name1)" id="mypoint1"/>
		<aop:before method="mybefore" pointcut-ref="mypoint" arg-names="name1,age1"/>
		<aop:before method="mybefore1" pointcut-ref="mypoint1" arg-names="name1"/>
	<!-- <aop:after method="myafter" pointcut-ref="mypoint"/> <aop:after-returning method="myaftering" pointcut-ref="mypoint"/>
		 <aop:after-throwing method="mythrow" pointcut-ref="mypoint"/> <aop:around method="myarround" pointcut-ref="mypoint"/>
	-->
	</aop:aspect>
</aop:config>
使用注解
- spring不会自动寻找注解,必须告知spring那些包下的类中可能有注解。引入xmls:context。
<context:component-scan base-package="com.bjsxt.advice">
</context:component-scan>
- @Component:相当于
<bean/>,如果没有参数则把类名称首字母变小写,相当于<bean id=""/>,@Component(“自定义名称”) - 实现步骤:
1.在spring配置文件中设置注解在那些包中。
<context:component-scan base-package="com.bjsxt.advice,com.bjsxt.test">
</cont ext:component-scan>
2.在实现类中添加@Componet,在方法上添加@Pointcut(" ")定义切点。
@Component
public class Demo {
	@Pointcut("execution(* com.bjsxt.test.Demo.demo1())")
	public void demo1() throws Exception{
		// int i = 5/0;
		System.out.println("demo1");
		}
	}
3.在通知类中配置,@Component类被spring管理,@Aspect相当于<aop:aspect/>表示通知方法在当前类中。
@Component
@Aspect
public class MyAdvice {
	@Before("com.bjsxt.test.Demo.demo1()")
	public void mybefore(){
		System.out.println("前置"); }
	@After("com.bjsxt.test.Demo.demo1()")
	public void myafter(){
		System.out.println("后置通知"); }
	@AfterThrowing("com.bjsxt.test.Demo.demo1()")
	public void mythrow(){
		System.out.println("异常通知"); }
	@Around("com.bjsxt.test.Demo.demo1()")
	public Object myarround(ProceedingJoinPoint p) throws Throwable{
		System.out.println("环绕-前置");
		Object result = p.proceed();
		System.out.println("环绕-后置");
		return result;
		}
	}
代理设计模式
优点:保护真实对象,让真实对象职责更明确,很好的扩展性。
- 静态代理设计模式
由代理对象代理所有真实对象的功能,自己编写代理类,每个代理类的功能需要单独编写。
静态代理设计模式缺点:
当代理功能比较多时,代理类中的方法需要写很多。
例:
核心功能:
public interface Gongneng{
	void zhidingxiaomubiao();

	void chifan();
}
真实对象:
package com.bjsxt.pojo;

public class Laozong implements Gongneng {
	private String name;
	public String getName() {
		return name;
	}
	public void setName(String name) {
		this.name = name;
	}
	public Laozong(String name) {
		super();
		this.name = name;
	}
	public Laozong() {
		super();
	}
	public void zhidingxiaomubiao(){
		System.out.println("制定小目标");
	}
	@Override
	public void chifan() {
		System.out.println("老总吃饭");
	}
}
代理对象:
public class MiShu implements Gongneng{
	private Laozong laozong = new Laozong("云云");

	@Override
	public void zhidingxiaomubiao() {
		System.out.println("约定时间");
		laozong.zhidingxiaomubiao();
		System.out.println("把访客信息备注");
	}

	@Override
	public void chifan() {
		System.out.println("约定时间");
		laozong.chifan();
		System.out.println("把访客信息备注");
	}


}
测试类:
public class Women {
	public static void main(String[] args) {
		MiShu mishu = new MiShu();
		mishu.zhidingxiaomubiao();
	}
}
- 动态代理设计模式
为了解决静态代理频繁编写代理功能的缺点,分为jdk动态代理和cglib动态代理。
JDK动态代理:
优点:与cglib动态代理相比,jdk自带,不需要额外导入jar。
缺点:真实对象必须实现接口,利用反射机制,效率不高。
核心功能:
public interface Gongneng {
	void chifan();
	void mubiao();
}
真实对象:
public class Laozong implements Gongneng{

	@Override
	public void chifan() {
		System.out.println("吃饭");
	}

	@Override
	public void mubiao() {
		System.out.println("目标");
	}

}
代理对象:
import java.lang.reflect.InvocationHandler;
import java.lang.reflect.Method;

public class Mishu implements InvocationHandler {
	private Laozong laozong=new Laozong() ;
	@Override
	public Object invoke(Object proxy, Method method, Object[] args) throws Throwable {
		System.out.println("预约时间");
		Object result = method.invoke(laozong, args);
		System.out.println("记录访客信息");
		return result;
	}

}
测试类:
import java.lang.reflect.Proxy;

public class Women {
	public static void main(String[] args) {
		System.out.println(Women.class.getClassLoader()==Laozong.class.getClassLoader());
		Mishu mishu = new Mishu();
		//第一个参数:反射时使用的类加载器
		//第二个参数:Proxy需要实现什么接口
		//第三个参数:通过接口对象调用方法时,需要调用哪个类的invoke方法
		Gongneng gongneng = (Gongneng) Proxy.newProxyInstance(Women.class.getClassLoader(), new Class[]{Gongneng.class}, mishu);

		Laozong laozong = (Laozong) gongneng;
//		gongneng.chifan();
	}
}
cglib动态代理
优点:基于字节码,生成真实对象的子类。运行效率高于JDK动态代理,不需要实现接口。
缺点:非jdk功能,需要额外导入jar。
使用spring aop时,只要出现Proxy和真实对象转换异常,设置为true使用cglib,设置为false使用jdk。
<aop:aspectj-autoproxy proxy-target-class="true">
</aop:aspectj-autoproxy>
真实对象:
public class Laozong {

	public void chifan() {
		System.out.println("吃饭");
	}

	public void mubiao() {
		System.out.println("目标");
	}

}
代理对象:
public class Mishu implements MethodInterceptor{


	@Override
	public Object intercept(Object arg0, Method arg1, Object[] arg2, MethodProxy arg3) throws Throwable {
		System.out.println("预约时间");
		//invoke()调用子类重写的方法
//		arg1.invoke(arg0, arg2);
//		arg3.invokeSuper(arg0, arg2);
		Object result = arg3.invokeSuper(arg0, arg2);
		System.out.println("备注");
		return result;
	}

}
测试类:
public class Women {
	public static void main(String[] args) {
		Enhancer enhancer = new Enhancer();
		enhancer.setSuperclass(Laozong.class);
		enhancer.setCallback(new Mishu());

		Laozong laozong = (Laozong) enhancer.create();
		laozong.chifan();

	}
}


 38万+
38万+


 被折叠的 条评论
为什么被折叠?
被折叠的 条评论
为什么被折叠?
 到【灌水乐园】发言


