weex-gcanvas+animation模块实现雷达扫描效果


集成weex-gcanvas请参考Weex Gcanves集成和使用
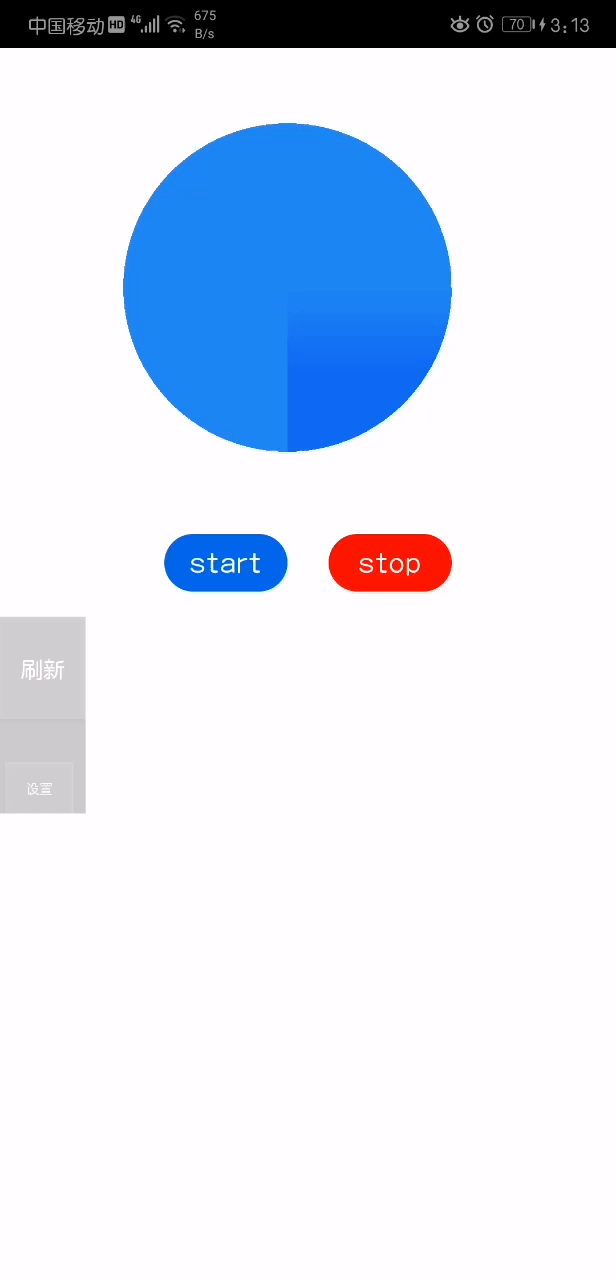
先上图

示例图
示例图

上代码: 

<template>
    <div ref="test" style="background-color: #ffffff">
        <gcanvas  @touchstart="touchstart" @touchmove="touchmove" @touchend="touchend" ref="areas"
                 style="width: 400px;height:400px;margin-left: 150px;
              margin-top: 150px;border-radius: 200px;"></gcanvas>
        <div style="width: 750px;flex-direction: row;align-items: center;justify-content: center">
            <div class="button_start" @click="animation(1)">
                <text style="color: white;font-size: 34px">start</text>
            </div>
            <div style="margin-left: 50px" class="button_stop" @click="animation(0)">
                <text style="color: white;font-size: 34px">stop</text>
            </div>
        </div>

    </div>
</template>
<style type="text/css" scoped>
    .button_start{
        height: 70px;width: 150px;background-color: #006ce7;margin-top: 100px;
        border-radius: 35px;
        align-items: center;
        justify-content: center;
    }
    .button_stop{
        height: 70px;width: 150px;background-color: #ff0000;margin-top: 100px;
        border-radius: 35px;
        align-items: center;
        justify-content: center;
      }

</style>
<script>
    var libGCanvas=require("weex-gcanvas")
    var animation=weex.requireModule('animation');
    var modal=weex.requireModule("modal");
    module.exports = {
        data:{
            startX:0,
            startY:0,
            currentX:0,
            currentY:0,
            context:{},
            canvasObj:{},
            angle:1,
            doAnimation:0,
        },
        methods:{
            animation(p){
                this.doAnimation=p;
                if(this.doAnimation){
                    this.exeAnimation();
                }
            },
            touchstart(event){
                this.startX=event.changedTouches[0].pageX;
                this.startY=event.changedTouches[0].pageY;
                this.context.strokeStyle = "#17acf6" ;  //设置线的颜色状态
                this.context.lineWidth = 10;          //设置线宽状态
            },
            touchmove(event){
                this.currentX=event.changedTouches[0].pageX;
                this.currentY=event.changedTouches[0].pageY;
                //进行绘制
                this.context.moveTo(this.startX,this.startY);
                this.context.lineTo(this.currentX,this.currentY);
                this.context.stroke();

                this.startX=event.changedTouches[0].pageX;
                this.startY=event.changedTouches[0].pageY;

            },
            touchend(event){

               // this.$navigator.push('login.js');
            },
            exeAnimation(){
                let self=this;
                animation.transition(self.$refs.areas,{
                    styles:{
                        transform:`rotate(${Math.PI*2*this.angle})`
                    },
                    duration:1000,
                    delay:0,
                    needLayout:false,
                    timingFunction:"linear"
                },function () {
                    if(self.doAnimation){
                        self.angle++;
                        self.exeAnimation();
                    }
                })
            }
        },
        created: function () {
            var self=this;
            var globalEvent = weex.requireModule('globalEvent');
            globalEvent.addEventListener("onPageInit", function (e) {
                /*获取元素引用*/
                var ref=self.$refs.areas;
                /*通过元素引用获取canvas对象*/
                self.canvasObj =libGCanvas.start(ref);
                /*获取绘图所需的上下文,目前不支持3d*/
                self.context =  self.canvasObj.getContext('2d');

                //绘制圆形
                self.context.beginPath();
                self.context.arc(200,200,200,0,2*Math.PI);
                self.context.fillStyle="#268cf0";
                self.context.fill();

                //绘制渐变的扇形区域
                self.context.beginPath();
                self.context.moveTo(200,200);
                self.context.arc(200,200,200,0,0.5*Math.PI);
                var gradient=self.context.createLinearGradient(200,300,200,200);
                gradient.addColorStop("0","#176cf0");
                gradient.addColorStop("1.0","#268cf0");
                self.context.fillStyle=gradient;
                self.context.fill();
            })
        }
    };
</script>    


  • 0
    点赞
  • 2
    收藏
    觉得还不错? 一键收藏
  • 打赏
    打赏
  • 0
    评论
实现雷达图的动态扫描效果,可以使用 echarts 中的动画效果,结合经纬度控制雷达扫描的起点和终点。 首先,需要定义一个雷达图的模板,包含需要展示的维度和初始数据。例如: ```javascript option = { radar: { indicator: [ { name: '维度1', max: 100 }, { name: '维度2', max: 100 }, { name: '维度3', max: 100 }, { name: '维度4', max: 100 }, { name: '维度5', max: 100 } ], center: ['50%', '50%'], radius: '60%', startAngle: 90, splitNumber: 4, shape: 'circle', name: { formatter: '{value}', textStyle: { color: '#fff', backgroundColor: '#999', borderRadius: 3, padding: [3, 5] } }, splitArea: { areaStyle: { color: ['rgba(114, 172, 209, 0.2)', 'rgba(114, 172, 209, 0.4)', 'rgba(114, 172, 209, 0.6)', 'rgba(114, 172, 209, 0.8)', 'rgba(114, 172, 209, 1)'], shadowColor: 'rgba(0, 0, 0, 0.3)', shadowBlur: 10 } }, axisLine: { lineStyle: { color: 'rgba(255, 255, 255, 0.5)' } }, splitLine: { lineStyle: { color: 'rgba(255, 255, 255, 0.5)' } } }, series: [ { name: '雷达图', type: 'radar', data: [ { value: [60, 73, 85, 40, 90], name: '数据1', areaStyle: { normal: { opacity: 0.9, color: new echarts.graphic.RadialGradient(0.5, 0.5, 1, [ { color: '#B8D3E4', offset: 0 }, { color: '#72ACD1', offset: 1 } ]) } }, lineStyle: { normal: { width: 1, opacity: 0.5, color: '#B8D3E4' } } } ] } ] }; ``` 然后,可以通过 echarts 提供的动画效果实现雷达图的扫描。具体实现方式如下: ```javascript var myChart = echarts.init(document.getElementById('chart')); // 设置雷达图的起点和终点经纬度 var startPoint = [120.1293, 30.2581]; var endPoint = [116.4551, 40.2539]; // 定义一个动画函数,每隔一段时间更新雷达图的起点和终点,实现扫描效果 function animation() { // 计算当前扫描位置的经纬度 var currentPoint = [ startPoint[0] + (endPoint[0] - startPoint[0]) / 10, startPoint[1] + (endPoint[1] - startPoint[1]) / 10 ]; // 更新雷达图的起点和终点 myChart.setOption({ series: [ { data: [ { value: [60, 73, 85, 40, 90], name: '数据1', areaStyle: { normal: { opacity: 0.9, color: new echarts.graphic.RadialGradient(0.5, 0.5, 1, [ { color: '#B8D3E4', offset: 0 }, { color: '#72ACD1', offset: 1 } ]) } }, lineStyle: { normal: { width: 1, opacity: 0.5, color: '#B8D3E4' } } } ], // 设置雷达扫描的起点和终点 markPoint: { symbol: 'circle', symbolSize: 5, itemStyle: { normal: { color: '#FFF' } }, label: { normal: { show: false }, emphasis: { show: false } }, data: [ { coord: currentPoint, name: '扫描点' } ] }, // 设置动画效果 animationDurationUpdate: 2000, animationEasingUpdate: 'linear' } ] }); // 每隔一段时间执行一次动画函数 setTimeout(animation, 200); } // 执行动画函数 animation(); ``` 在动画函数中,计算当前扫描位置的经纬度,并通过 setOption 方法更新雷达图的起点和终点。在每次更新雷达图时,都设置一个扫描点的 markPoint,表示当前扫描位置。同时,设置动画效果,让扫描点在雷达图上平滑移动。最后,通过 setTimeout 方法每隔一段时间执行一次动画函数,实现连续的扫描效果

“相关推荐”对你有帮助么?

  • 非常没帮助
  • 没帮助
  • 一般
  • 有帮助
  • 非常有帮助
提交
评论
添加红包

请填写红包祝福语或标题

红包个数最小为10个

红包金额最低5元

当前余额3.43前往充值 >
需支付:10.00
成就一亿技术人!
领取后你会自动成为博主和红包主的粉丝 规则
hope_wisdom
发出的红包

打赏作者

一拳小和尚LXY

你的鼓励将是我创作的最大动力

¥1 ¥2 ¥4 ¥6 ¥10 ¥20
扫码支付:¥1
获取中
扫码支付

您的余额不足,请更换扫码支付或充值

打赏作者

实付
使用余额支付
点击重新获取
扫码支付
钱包余额 0

抵扣说明:

1.余额是钱包充值的虚拟货币,按照1:1的比例进行支付金额的抵扣。
2.余额无法直接购买下载,可以购买VIP、付费专栏及课程。

余额充值