vue element-ui表格table 表格动态 添加行、删除行、添加列、删除列 自定义表头

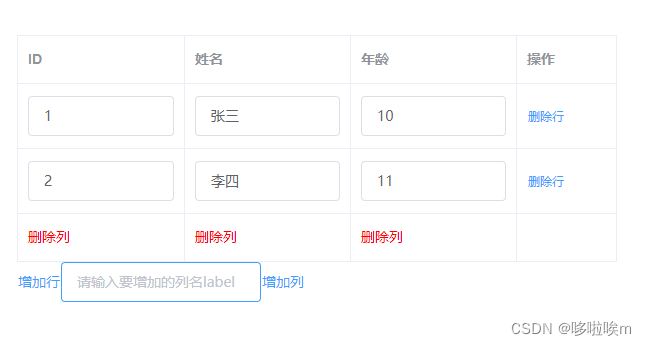
  vue table表格动态 添加行、删除行、添加列、删除列 自定义表头; 

增加一行、删除一行、添加一列、删除一列;每行带输入框input

代码

1、HTML部分:

<template>
  <div class="app-container">
    <el-table :data="tableData" border style="width: 600px; margin-top: 20px">
      <el-table-column v-for="item in columnData" :label="item.label" :prop="item.prop" :width="item.width">
        <template slot-scope="scope">
          <span v-if="scope.row[item.prop] !== null">
            <el-input v-model="scope.row[item.prop]"></el-input>
          </span>
          <span style="color: red; cursor: pointer;" v-else @click="deleteColumns(item.prop)">删除列</span>
        </template>
      </el-table-column>
      <el-table-column fixed="right" label="操作" width="100">
        <template slot-scope="scope">
          <el-button @click="deleteRows(scope)" v-if="scope.$index < tableData.length - 1" type="text" size="small">删除行
          </el-button>
        </template>
      </el-table-column>
    </el-table>

    <el-button type="text" @click="addRows()">增加行</el-button>
    <el-input v-model='columnLabel' style="width: 200px" placeholder="请输入要增加的列名label"></el-input>
    <el-button type="text" @click="addColumn()">增加列</el-button>
  </div>
</template>

2、JS 部分:

<script>
export default {
  name: "Index",
  data() {
    return {
      columnLabel: '', //要增加的列名
      columnPropIndex: 0, //列属性自增
      columnData: [],//列标题数组
      tableData: [{}] //表格数据
    };
  },
  methods: {

    //添加行
    addRows() {
      const circle = this.tableData[0]; //取出数组中第一个对象
      if (circle) {
        const newObj = {};
        for (let key in circle) { //把第一个对象的属性都赋值给新对象newObj  然后每个属性的值都设置为空;
          newObj[key] = '';
        }
        this.tableData.splice(this.tableData.length - 1, 0, newObj);
      }
    },

    //删除行
    deleteRows(scope) {
      this.tableData.splice(scope.$index, 1);
    },

    //添加列
    addColumn() {

      if (this.columnLabel) {
        const _this = this;
        // 1、//列标题数组中 增加一个标题
        const columnObj = {};
        var propStr = 'items'; //自定义一个列属性;
      
        columnObj.prop = propStr + this.columnPropIndex; //拼接自增数
        columnObj.label = this.columnLabel;
        this.columnData.push(columnObj);
        _this.columnPropIndex++; //自增数每次加一

        //2、数据包中每个对象增加一个生成的新属性
        _this.tableData.forEach(function (item, index) { //遍历数据包
          //每个对象新加一个属性 每一行数据值默认给''
          if (index < (_this.tableData.length - 1)) {
            _this.$set(item, columnObj.prop, '');
          } else {
            //最后一个给null  才会是删除列的按钮 不然是输入框
            _this.$set(item, columnObj.prop, null);

          }
        });

      }
    },

    //删除列
    deleteColumns(property) {
      const _this = this;
      // 你想删除属性:property
      _this.tableData.forEach(function (item, index) { //遍历数组中的每个对象 删除指定的属性
        _this.$delete(item, property);

      });
      // 2、删除表头数组里的数据
      _this.columnData.forEach(function (item, index) {
        if (item.prop === property) {
          _this.columnData.splice(index, 1);
        }
      });

    },


  },
};
</script>

  • 5
    点赞
  • 0
    收藏
    觉得还不错? 一键收藏
  • 打赏
    打赏
  • 0
    评论
您可以通过自定义合并规则来实现vue element-ui table单元格的动态合并。以下是一个简单的示例代码: ``` <template> <el-table :data="tableData" ref="multiTable" border> <el-table-column prop="name" label="Name" width="180"> </el-table-column> <el-table-column prop="age" label="Age" width="180"> </el-table-column> <el-table-column prop="gender" label="Gender" width="180" :cell-style="{padding: '0px'}" :render-header="renderHeader" :render-cell="renderCell"> </el-table-column> </el-table> </template> <script> export default { data() { return { tableData: [ { name: 'Tom', age: 18, gender: 'M' }, { name: 'Jane', age: 22, gender: 'F' }, { name: 'John', age: 28, gender: 'M' }, { name: 'Lisa', age: 24, gender: 'F' } ] } }, methods: { // 自定义表头渲染函数 renderHeader(h, { column }) { if (column.property === 'gender') { return h('div', [ h('span', 'Gender'), h('el-checkbox', { on: { change: this.handleMultiHeaderChange } }) ]) } else { return h('div', column.label) } }, // 自定义单元格渲染函数 renderCell(h, { row, column }, index) { const rowspan = this.getMultiRowspan(row, column) if (rowspan === 0) { return '' } else { return h('div', { style: { lineHeight: `${80 * rowspan}px` }, attrs: { rowspan: rowspan } }, row.gender) } }, // 计算单元格跨数 getMultiRowspan(row, column) { const data = this.tableData let rowspan = 1 let currentIndex = data.indexOf(row) for (let i = currentIndex + 1; i < data.length; i++) { if (data[i][column.property] === row[column.property]) { rowspan++ } else { break } } return rowspan }, // 表头复选框改变事件 handleMultiHeaderChange(value) { const table = this.$refs.multiTable const columns = table.columns columns.forEach((column) => { if (column.property === 'gender') { column.filteredValue = value ? ['M', 'F'] : [] table.store.commit('filterChange', { column: column }) } }) } } } </script> ``` 在这个示例代码中,我们使用了自定义渲染函数来渲染表格,其中: - `renderHeader` 函数用于渲染表头,其中包含一个复选框来控制表格动态合并; - `renderCell` 函数用于渲染单元格,其中通过 `getMultiRowspan` 函数计算出单元格需要跨越的数。 需要注意的是,这里的示例代码仅供参考,具体实现可能会因为表格数据结构和合并规则的不同而有所不同。

“相关推荐”对你有帮助么?

  • 非常没帮助
  • 没帮助
  • 一般
  • 有帮助
  • 非常有帮助
提交
评论
添加红包

请填写红包祝福语或标题

红包个数最小为10个

红包金额最低5元

当前余额3.43前往充值 >
需支付:10.00
成就一亿技术人!
领取后你会自动成为博主和红包主的粉丝 规则
hope_wisdom
发出的红包

打赏作者

从struts开始

你的鼓励将是我创作的最大动力

¥1 ¥2 ¥4 ¥6 ¥10 ¥20
扫码支付:¥1
获取中
扫码支付

您的余额不足,请更换扫码支付或充值

打赏作者

实付
使用余额支付
点击重新获取
扫码支付
钱包余额 0

抵扣说明:

1.余额是钱包充值的虚拟货币,按照1:1的比例进行支付金额的抵扣。
2.余额无法直接购买下载,可以购买VIP、付费专栏及课程。

余额充值