


如果想从头学起Cypress,可以看下面的系列文章哦
https://www.cnblogs.com/poloyy/category/1768839.html
作用
管理控制整个网络请求
重要注意事项
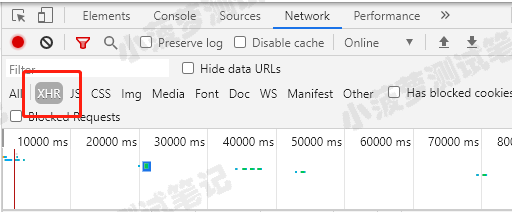
Cypress 目前仅支持拦截 XMLHttpRequest(XHR)
可在开发者工具(network 一栏)看到请求的 type 是 xhr,或者直接点击 xhr 进行筛选
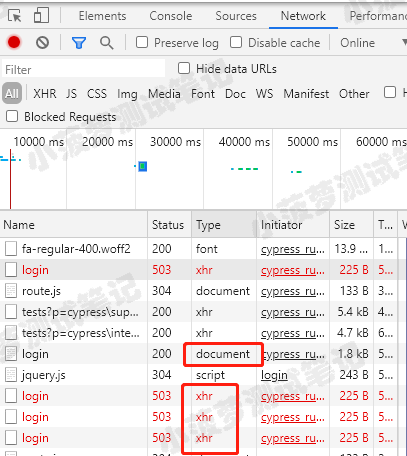
同样是 login 请求,有些是 xhr,有些却是 document,对于 type=document 的请求, .route() 默认是不会拦截到的
非 XHR 请求
使用 Fetch API 的请求以及其他类型的网络请求(例如页面加载和 <script> 标记)将不会在命令日志中被拦截或看到
实验性功能
实验性 route2() 命令,该命令支持使用 Fetch API 的请求以及其他类型的网络请求,例如页面加载;该命令将在后面wenz展开讲解
语法格式
cy.route(url)
cy.route(url, response)
cy.route(method, url)
cy.route(method, url, response)
cy.route(callbackFn)
cy.route(options)
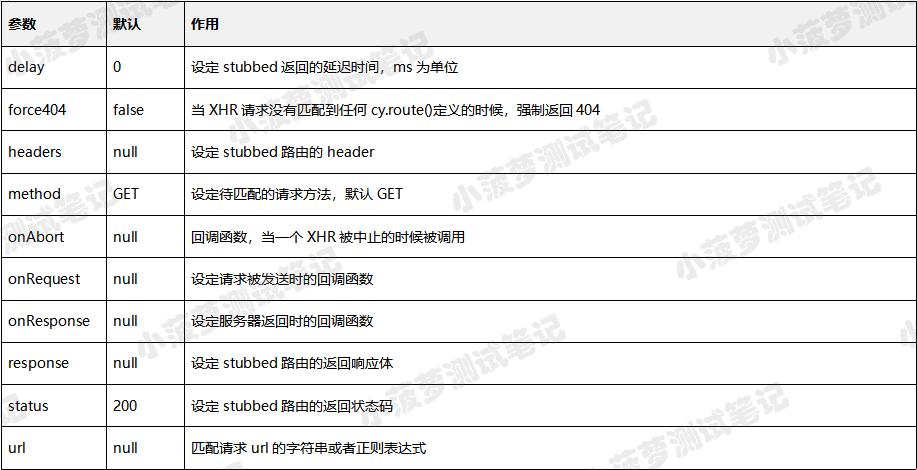
参数说明
url
需要监听的 URL,遵循 minimatch 模式
response
为匹配上的 URL 提供自定义响应体
method
待匹配监听 URL 的请求方法
callbackFn
回调函数
options
通俗理解的总结
- 当发出请求的 url + method 匹配上路由的 url + method,就会被该路由监听到
- 简单理解:response 是自定义响应体,status 是自定义响应状态码,headers 是自定义响应头
- 如果设置了 response、status、headers 参数,则被监听到的请求会获取到这三个参数
命令执行结果
- 执行结果是 null
- 且后续不能再链接其他命令
URL minimatch 的栗子
前言
可以通过 *、** 来匹配动态的路由,咱们直接看栗子就好了
栗子一
cy.server()
cy.route('**/users/*/comments')

// https://localhost:7777/users/123/comments     <-- 匹配
// https://localhost:7777/users/123/comments/465 <-- 不匹配
栗子二
cy.server()
cy.route('**/posts/**')

// https://localhost:7777/posts/1            <-- 匹配
// https://localhost:7777/posts/foo/bar/baz  <-- 匹配
// https://localhost:7777/posts/quuz?a=b&1=2 <-- 匹配
// https://localhost:7777/posts <-- 不匹配
栗子三
cy.route('**/users/*')

// 下面的都匹配
/users/1
http://localhost:2020/users/2
https://google.com/users/3

// 下面的都不匹配
/users/4/foo
http://localhost:2020/users/5/foo
实际栗子
进入演示项目目录下
注:演示项目是 cypress 提供的,如何下载可看 Cypress 系列文章的一开始几篇都有写
cd C:\Users\user\Desktop\py\cypress-example-recipes\examples\logging-in__xhr-web-forms
启动演示项目
npm start
浏览器访问项目
http://localhost:7079/
测试代码
    const username = 'jane.lane'
    const password = 'password123'

    before(function () {
        cy.visit('http://localhost:7079/')
    })

    it('正常登录,修改登录请求的status、response', function () {
        cy.server()
        cy.route({
            url: '**/login',
            method: 'POST',
            status: 503,
            delay: 1000,
            response: {
                success: false,
                data: 'Not success'
            },
        }).as("login")
        cy.get("input[name=username]").type(username)
        cy.get("input[name=password]").type(`${password}{enter}`)
        cy.wait('@login').then((res) => {
            cy.log(res)
            expect(res.status).to.eq(503)
            expect(res.responseBody.data).to.eq('Not success')
        })
    });
测试结果

查看 route 路由的日志
- 每当启动服务器( cy.server() )并添加路由( cy.route() )时,Cypress 都会显示一个名为 ROUTES(n) 的新模块日志
- 它将在日志中列出路由表,包括方法,URL,是否Stubbed,别名和成功匹配请求的数量
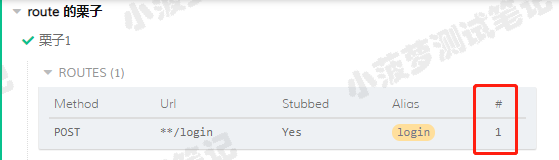
可以看到成功匹配一个请求
查看 XHR 命令日志
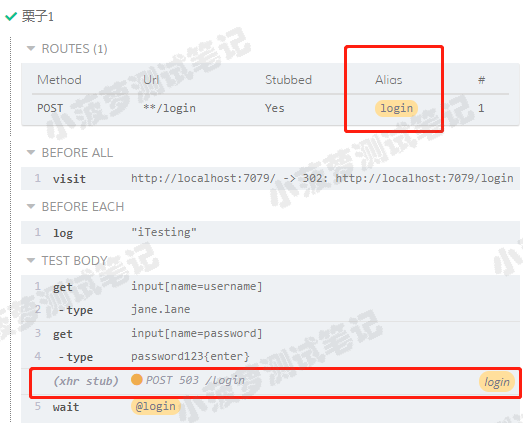
- 当发出 XHR 请求后,Cypress 会记录此请求是否匹配到某个路由的别名
- 这里的 /login 请求就匹配到了 @login
console 查看响应结果
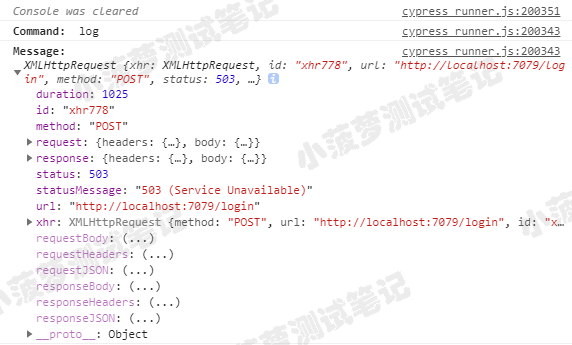
如果要对响应体做断言,可以从这对象里面拿到对应的值
重点
Cypress 通过 cy.route().as() 和 cy.wait() ,可以自动等到接口返回以后再执行后续操作,增强了测试用例的健壮性
// 简单的代码结构(仅演示)

// 启动 Mock 服务器
cy.server({
    // 添加 options...
})

// 添加多个 route 路由
cy.route({
    // 添加 options...
}).as("route1")

cy.route({
    // 添加 options...
}).as("route2")

....

// UI 界面的操作...
// 某些操作发出请求

// 等待请求的完成
cy.wait('route1').then((res)=>{

    // 对接口的响应做后续操作或断言
    expect(res.status).to.eq(200)
})
强制返回 404 的栗子
不匹配路由的请求,强制返回 404 状态和空 response
测试代码
 cy.server({ force404: true })
        cy.route({
            url: '**/logins',
            method: 'POST',
            status: 503,
            delay: 1000,
            response: {
                success: false,
                data: 'Not success'
            },
        }).as("login")

// 伪代码
// 发出 /login 请求的操作
测试结果
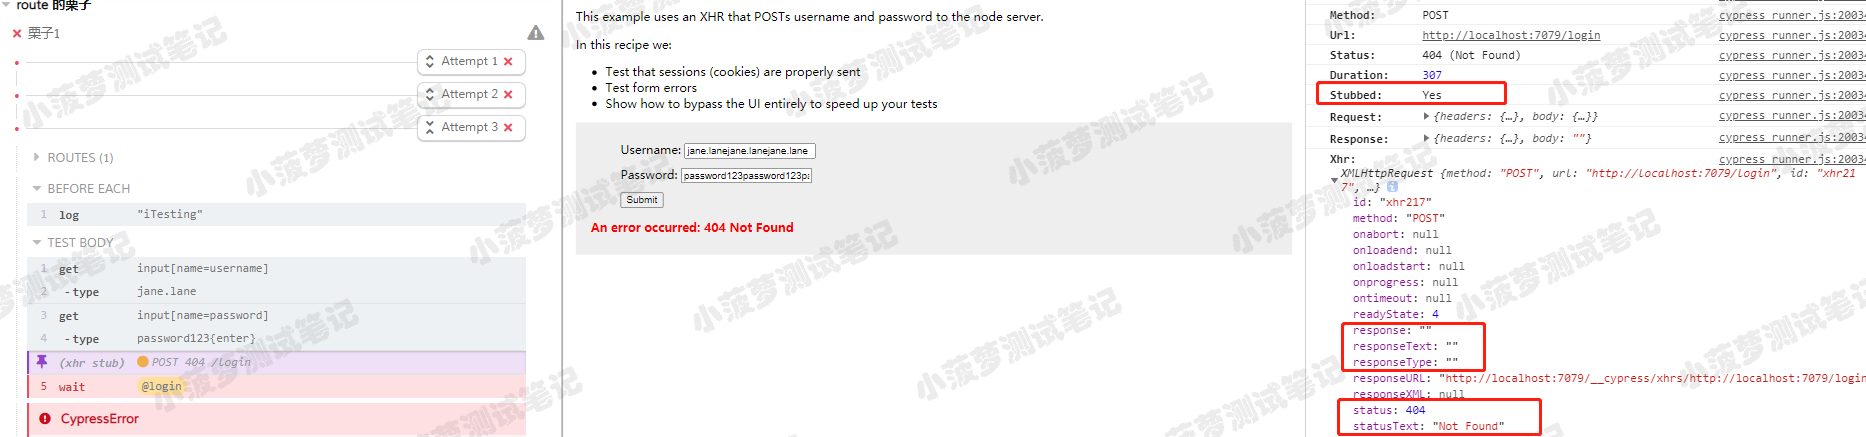
当 /login 没有匹配到任意路由的时候,会返回 404
查看 route 路由的日志
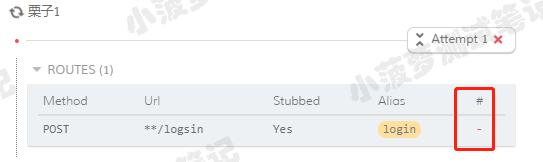
可以看到没有请求匹配成功此路由
官方的栗子
    it('cy.route() - route responses to matching requests', () => {
        // https://on.cypress.io/route
        // 访问
        cy.visit('https://example.cypress.io/commands/network-requests')

        // 预置变量
        let message = 'whoa, this comment does not exist'

        // 启动 Mock 服务器
        cy.server()

        // 路由1:监听 url 是 comments/* 且 请求方法是 GET 的请求
        cy.route('GET', 'comments/*').as('getComment')

        // 点击按钮触发请求
        cy.get('.network-btn').click()

        // 等待请求响应成功后获取 status 进行断言
        cy.wait('@getComment').its('status').should('eq', 200)

        // 路由2:监听 url 是 /commets 且 请求方法是 POST 的请求
        cy.route('POST', '/comments').as('postComment')

        // 点击按钮触发请求
        cy.get('.network-post').click()

        // 等待请求响应成功后进行断言
        cy.wait('@postComment').should((xhr) => {
            expect(xhr.requestBody).to.include('email')
            expect(xhr.requestHeaders).to.have.property('Content-Type')
            expect(xhr.responseBody).to.have.property('name', 'Using POST in cy.route()')
        })

        /*
        路由3:监听 url 是 comments/* 且 请求方法是 POST 的请求
        自定义 status、response、delay 并返回给监听到的请求
         */
        cy.route({
            method: 'PUT',
            url: 'comments/*',
            status: 503,
            response: {error: message},
            delay: 500,
        }).as('putComment')

        // // 等待请求响应成功后进行断言
        cy.get('.network-put').click()

        cy.wait('@putComment')

        // 出现 404 之后断言文案
        cy.get('.network-put-comment').should('contain', message)
    })
注意事项
了解存根与常规XHR
Cypress 会在命令日志中显示 XHR 是发送给服务器还是 stub

在命令日志中显示(XHR STUB)的XHR就是发送到 stub的,并且它们的 response,status,headers,delay 已由匹配的 cy.route() 控制
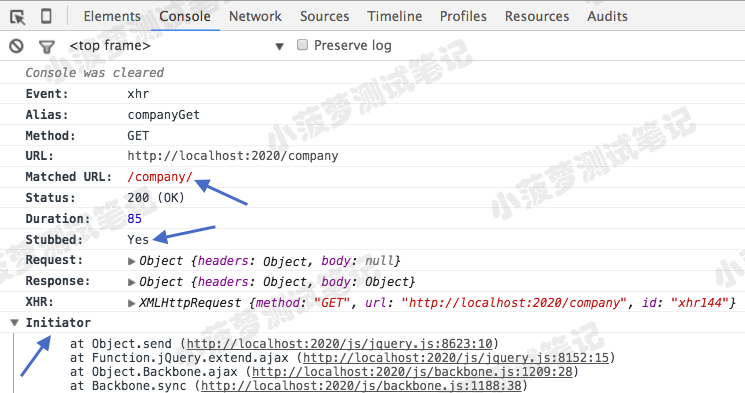
- 单击命令日志中的命令时,在开发者工具 Console 中 Cypress 还会显示 XHR是 否存根到控制台、匹配到的 URL
- Initiator 是启动器,里面是发送 XHR 的堆栈跟踪
无法使用 cy.request() 调试 cy.route()

- cy.request() 会将请求直接发送到服务器,直接绕开 .route() 路由
- cy.request() 目的是用于检查实际云心的服务器,而无须启动前端应用程序


 1641
1641

 被折叠的 条评论
为什么被折叠?
被折叠的 条评论
为什么被折叠?
 到【灌水乐园】发言


