


前言
看到这篇文章写得不错,转载一下,既是温习又是笔记了
在原文的基础上做了一些调整
- 将XML的配置改成了springboot @Configuration的配置方式
- 增加了nacos的yml对@Cacheable失效时间的配置
1. 基于注解的支持
Spring为我们提供了几个注解来支持Spring Cache。其核心主要是@Cacheable和@CacheEvict。使用@Cacheable标记的方法在执行后Spring Cache将缓存其返回结果,而使用@CacheEvict标记的方法会在方法执行前或者执行后移除Spring Cache中的某些元素。下面我们将来详细介绍一下Spring基于注解对Cache的支持所提供的几个注解。
1.1 @Cacheable
@Cacheable可以标记在一个方法上,也可以标记在一个类上。
- 当标记在一个方法上时表示该方法是支持缓存的
- 当标记在一个类上时则表示该类所有的方法都是支持缓存的
对于一个支持缓存的方法,Spring会在其被调用后将其返回值缓存起来,以保证下次利用同样的参数来执行该方法时可以直接从缓存中获取结果,而不需要再次执行该方法。Spring在缓存方法的返回值时是以键值对进行缓存的,值就是方法的返回结果,至于键的话,Spring又支持两种策略,默认策略和自定义策略,这个稍后会进行说明。
需要注意的是当一个支持缓存的方法在对象内部被调用时是不会触发缓存功能的。
@Cacheable可以指定三个属性,value、key和condition。
1.1.1 value属性指定Cache名称
alue属性是必须指定的,其表示当前方法的返回值是会被缓存在哪个Cache上的,对应Cache的名称。其可以是一个Cache也可以是多个Cache,当需要指定多个Cache时其是一个数组。
	//Cache是发生在cache1上的
	@Cacheable("cache1")
  	public User find(Integer id) {
   	  returnnull;
   	}

	//Cache是发生在cache1和cache2上的
	@Cacheable({"cache1", "cache2"})
	public User find(Integer id) {
	   returnnull;

	}
1.1.2 使用key属性自定义key
key属性是用来指定Spring缓存方法的返回结果时对应的key的。该属性支持SpringEL表达式。当我们没有指定该属性时,Spring将使用默认策略生成key。我们这里先来看看自定义策略,至于默认策略会在后文单独介绍。
自定义策略是指我们可以通过Spring的EL表达式来指定我们的key。这里的EL表达式可以使用方法参数及它们对应的属性。使用方法参数时我们可以直接使用“#参数名”或者“#p参数index”。下面是几个使用参数作为key的示例。
   @Cacheable(value="users", key="#id")
   public User find(Integer id) {
      returnnull;
   }

   @Cacheable(value="users", key="#p0")
   public User find(Integer id) {
      returnnull;
   }

   @Cacheable(value="users", key="#user.id")
   public User find(User user) {
      returnnull;
   }

   @Cacheable(value="users", key="#p0.id")
   public User find(User user) {
      returnnull;

   }
除了上述使用方法参数作为key之外,Spring还为我们提供了一个root对象可以用来生成key。通过该root对象我们可以获取到以下信息。
| 属性名称 | 描述 | 示例 |
|---|---|---|
| methodName | 当前方法名 | #root.methodName |
| method | 当前方法 | #root.method.name |
| target | 当前被调用的对象 | #root.target |
| targetClass | 当前被调用的对象的class | #root.targetClass |
| args | 当前方法参数组成的数组 | #root.args[0] |
| caches | 当前被调用的方法使用的Cache | #root.caches[0].name |
当我们要使用root对象的属性作为key时我们也可以将“#root”省略,因为Spring默认使用的就是root对象的属性。如:
   @Cacheable(value={"users", "xxx"}, key="caches[1].name")
   public User find(User user) {
      returnnull;

   }
1.1.3 condition属性指定发生的条件
有的时候我们可能并不希望缓存一个方法所有的返回结果。通过condition属性可以实现这一功能。condition属性默认为空,表示将缓存所有的调用情形。其值是通过SpringEL表达式来指定的,当为true时表示进行缓存处理;当为false时表示不进行缓存处理,即每次调用该方法时该方法都会执行一次。如下示例表示只有当user的id为偶数时才会进行缓存。
   @Cacheable(value={"users"}, key="#user.id", condition="#user.id%2==0")
   public User find(User user) {
      System.out.println("find user by user " + user);

      return user;

   }
1.2 @CachePut
在支持Spring Cache的环境下
- @Cacheable标注的方法,Spring在每次执行前都会检查Cache中是否存在相同key的缓存元素,如果存在就不再执行该方法,而是直接从缓存中获取结果进行返回,否则才会执行并将返回结果存入指定的缓存中。
- @CachePut也可以声明一个方法支持缓存功能。与@Cacheable不同的是使用@CachePut标注的方法在执行前不会去检查缓存中是否存在之前执行过的结果,而是每次都会执行该方法,并将执行结果以键值对的形式存入指定的缓存中。
- @CachePut也可以标注在类上和方法上。使用@CachePut时我们可以指定的属性跟@Cacheable是一样的。
	//每次都会执行方法,并将结果存入指定的缓存中
	@CachePut("users")
	public User find(Integer id) {
	   returnnull;
	}
1.3 @CacheEvict
@CacheEvict是用来标注在需要清除缓存元素的方法或类上的。
当标记在一个类上时表示其中所有的方法的执行都会触发缓存的清除操作。
@CacheEvict可以指定的属性有value、key、condition、allEntries和beforeInvocation。其中value、key和condition的语义与@Cacheable对应的属性类似。即value表示清除操作是发生在哪些Cache上的(对应Cache的名称);key表示需要清除的是哪个key,如未指定则会使用默认策略生成的key;condition表示清除操作发生的条件。下面我们来介绍一下新出现的两个属性allEntries和beforeInvocation。
1.3.1 allEntries属性
allEntries是boolean类型,表示是否需要清除缓存中的所有元素。默认为false,表示不需要。当指定了allEntries为true时,Spring Cache将忽略指定的key。有的时候我们需要Cache一下清除所有的元素,这比一个一个清除元素更有效率。
   @CacheEvict(value="users", allEntries=true)
   public void delete(Integer id) {
      System.out.println("delete user by id: " + id);

   }
1.3.2 beforeInvocation属性
清除操作默认是在对应方法成功执行之后触发的,即方法如果因为抛出异常而未能成功返回时也不会触发清除操作。使用beforeInvocation可以改变触发清除操作的时间,当我们指定该属性值为true时,Spring会在调用该方法之前清除缓存中的指定元素。
   @CacheEvict(value="users", beforeInvocation=true)
   public void delete(Integer id) {
     System.out.println("delete user by id: " + id);

   }
1.4 @Caching
@Caching注解可以让我们在一个方法或者类上同时指定多个Spring Cache相关的注解。其拥有三个属性:cacheable、put和evict,分别用于指定@Cacheable、@CachePut和@CacheEvict。
   @Caching(cacheable = @Cacheable("users"), evict = { @CacheEvict("cache2"),
         @CacheEvict(value = "cache3", allEntries = true) })
   public User find(Integer id) {
      returnnull;

   }
2. 配置Spring对Cache的支持
2.1 RedisConfig配置
package com.applet.common.redis.configure;

import com.fasterxml.jackson.annotation.JsonAutoDetect;
import com.fasterxml.jackson.annotation.PropertyAccessor;
import com.fasterxml.jackson.databind.ObjectMapper;
import org.springframework.beans.factory.annotation.Autowired;
import org.springframework.beans.factory.annotation.Value;
import org.springframework.cache.CacheManager;
import org.springframework.cache.annotation.CachingConfigurerSupport;
import org.springframework.cache.annotation.EnableCaching;
import org.springframework.cloud.context.config.annotation.RefreshScope;
import org.springframework.context.annotation.Bean;
import org.springframework.core.io.ResourceLoader;
import org.springframework.data.redis.cache.RedisCacheConfiguration;
import org.springframework.data.redis.cache.RedisCacheManager;
import org.springframework.data.redis.connection.RedisConnectionFactory;
import org.springframework.data.redis.core.RedisTemplate;
import org.springframework.data.redis.serializer.Jackson2JsonRedisSerializer;
import org.springframework.data.redis.serializer.RedisSerializationContext;
import org.springframework.data.redis.serializer.StringRedisSerializer;

import java.time.Duration;
import java.util.HashMap;
import java.util.Map;


/**
 * redis配置
 * @date 2021-11-15 13:35:08
 * @author weiheng
 */
@EnableCaching
public class RedisConfig extends CachingConfigurerSupport
{
    /** nacos application.yml 中配置 cacheableKey 的失效时间 */
    @Value("#{${cacheable.expirekey}}")
    private Map<String, String> expirekey;

    @Autowired
    ResourceLoader resourceLoader;

    @Bean
    public RedisTemplate<Object, Object> redisTemplate(RedisConnectionFactory connectionFactory)
    {
        RedisTemplate<Object, Object> template = new RedisTemplate<>();
        template.setConnectionFactory(connectionFactory);

        FastJson2JsonRedisSerializer serializer = new FastJson2JsonRedisSerializer(Object.class);

        ObjectMapper mapper = new ObjectMapper();
        mapper.setVisibility(PropertyAccessor.ALL, JsonAutoDetect.Visibility.ANY);
        mapper.enableDefaultTyping(ObjectMapper.DefaultTyping.NON_FINAL);
        serializer.setObjectMapper(mapper);

        template.setValueSerializer(serializer);
        // 使用StringRedisSerializer来序列化和反序列化redis的key值
        template.setKeySerializer(new StringRedisSerializer());
        template.afterPropertiesSet();
        return template;
    }

    @Bean
    @RefreshScope
    public CacheManager cacheManager(RedisConnectionFactory redisConnectionFactory) {
        return RedisCacheManager.builder(redisConnectionFactory)
            //默认的缓存配置(没有配置键的key均使用此配置)
            .cacheDefaults(getDefaultCacheConfiguration())
            .withInitialCacheConfigurations(getCacheConfigurations())
            //在spring事务正常提交时才缓存数据
            .transactionAware()
            .build();
    }

    /**
     * @date 2021/11/15 10:37
     * @author wei.heng
     */
    private Map<String, RedisCacheConfiguration> getCacheConfigurations() {
        Map<String, RedisCacheConfiguration> configurationMap = new HashMap<>();
        //缓存键,配置默认过期时间
        if (this.expirekey != null) {
            for (String s : this.expirekey.keySet()) {
                configurationMap.put(s, this.getDefaultCacheConfiguration(Long.valueOf(this.expirekey.get(s))));
            }
        }
        return configurationMap;
    }

    /**
     * 获取redis的缓存配置(针对于键)
     *
     * @param seconds 键过期时间
     * @return
     */
    private RedisCacheConfiguration getDefaultCacheConfiguration(long seconds) {
        Jackson2JsonRedisSerializer<Object> jackson2JsonRedisSerializer = new Jackson2JsonRedisSerializer<>(Object.class);
        ObjectMapper om = new ObjectMapper();
        om.setVisibility(PropertyAccessor.ALL, JsonAutoDetect.Visibility.ANY);
        om.enableDefaultTyping(ObjectMapper.DefaultTyping.NON_FINAL);
        jackson2JsonRedisSerializer.setObjectMapper(om);
        RedisCacheConfiguration redisCacheConfiguration = RedisCacheConfiguration.defaultCacheConfig();
        redisCacheConfiguration = redisCacheConfiguration.serializeValuesWith(
            RedisSerializationContext
                .SerializationPair
                .fromSerializer(jackson2JsonRedisSerializer)
        ).entryTtl(Duration.ofSeconds(seconds));
        return redisCacheConfiguration;
    }

    /**
     * 获取Redis缓存配置,此处获取的为默认配置
     * 如对键值序列化方式,是否缓存null值,是否使用前缀等有特殊要求
     * 可另行调用 RedisCacheConfiguration 的构造方法
     *
     * @return
     */
    private RedisCacheConfiguration getDefaultCacheConfiguration() {
        // 注意此构造函数为 spring-data-redis-2.1.9 及以上拥有,经试验 已知spring-data-redis-2.0.9及以下版本没有此构造函数
        // 但观察源码可得核心不过是在值序列化器(valueSerializationPair)的构造中注入 ClassLoader 即可
        return RedisCacheConfiguration.defaultCacheConfig(resourceLoader.getClassLoader());
    }
}
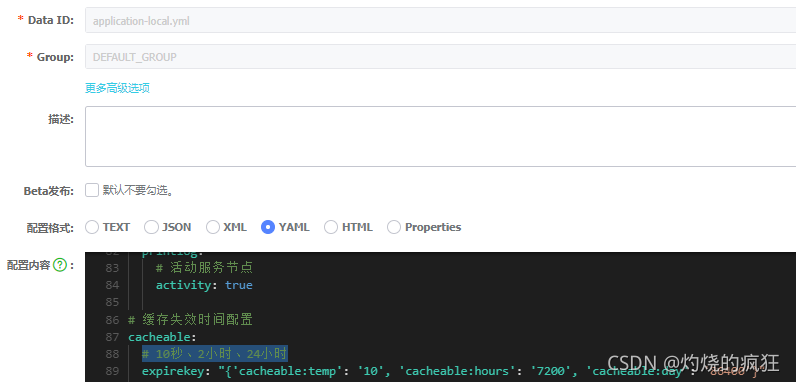
2.2 添加expireKey的配置
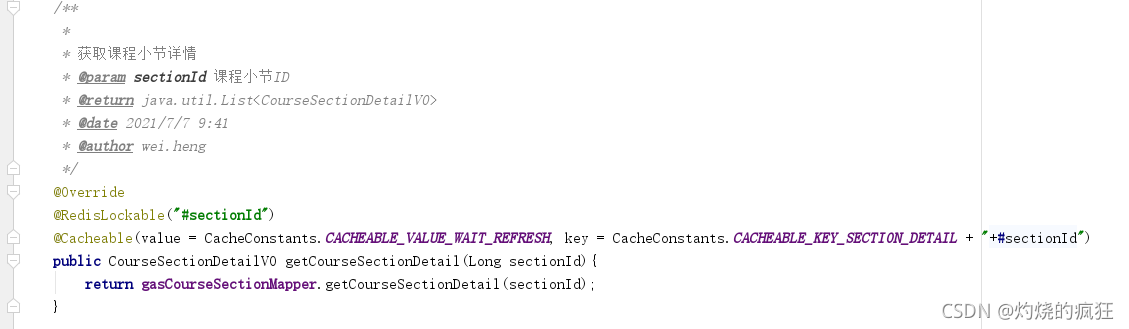
2.3 redisKey常量定义

2.4 redisKey的使用
Cacheable的value过期时间交由nacos配置,拼接Cacheable的Key值进行业务区分
后台管理系统修改对象后,使用@CachePut 刷新缓存
亲测OK,就到这里了


 541
541


 被折叠的 条评论
为什么被折叠?
被折叠的 条评论
为什么被折叠?
 到【灌水乐园】发言


