


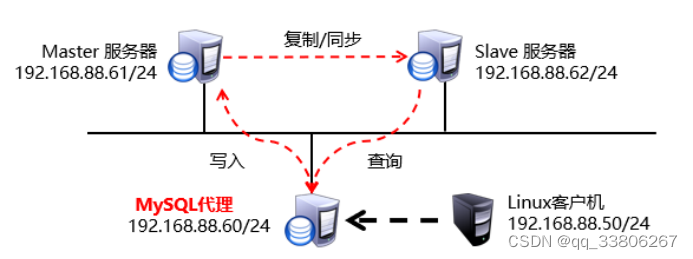
Mysql主从同步介绍:
- 主从同步字面意义:一台主(Master)数据库服务器,一台从(slave)数据库服务器
- 主数据库提供给客户端访问,从数据库同步主数据库服务数据;
主从同步过程
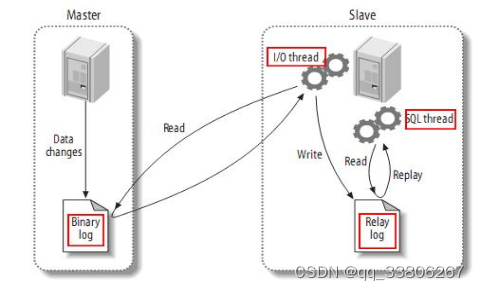
- 主服务开启binlog日志,从服务器通过IO线程读取主服务器binlog日志里的sql语句
- 将读到数据写入从服务器relay-log 日志文件中,sql线程读取relay-log 中继日志 sql 执行
主从同步配置
配置master服务器
- vim /etc/my.cnf 配置文件
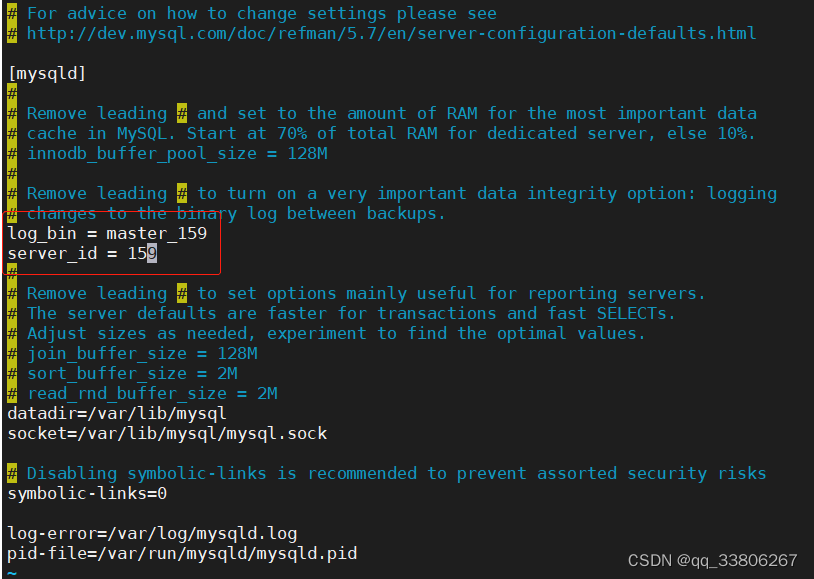
配置log_bin 日志 文件名为master_159
增加server_id = 取值范围1~255 之间
- systemctl restart mysqld 重启服务
- show master status;登录数据库 查看master 状态信息
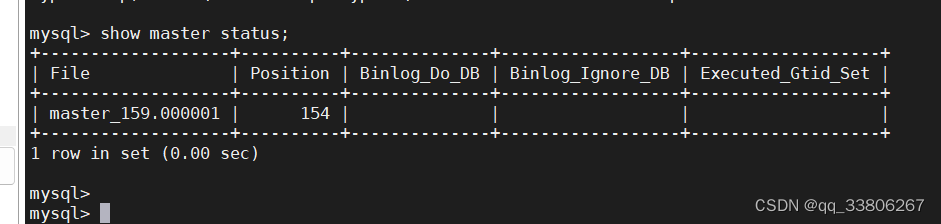
File 当前binlog 文件名 Position 当前记录偏移量
binlog备份文件 每满1G就会自动新增一个文件,或者通过重启数据库服务也会新增一个日志文件
执行mysqldump 备份数据库也会生成一个新的日志文件
添加同步用户
mysql> grant replication slave on *.* to repluser@"%" identified by "123qqq…A";
密码手敲 粘贴 有格式问题
配置slave服务器
- vim /etc/my.cnf
- 添加server_id = 160 保存退出
- systemctl restart mysqld 重启服务
- mysql -uroot -p密码 登录数据库服务
- show slave status;

配置同步的数据库主服务器信息
mysql> change master to
master_host="192.168.134.159",
master_user="repluser" ,
master_password="123qqq...A",
master_log_file="master_159.000001" ,
master_log_pos=154 ;
master_host="主服务器Ip地址"
master_user="主服务器添加用户名"
master_password="用户密码"
master_log_file="主服务器binlog日志名"
master_log_pos=偏移量
mysql> start slave;
mysql> show slave status \G
mysql> show slave status \G
*************************** 1. row ***************************
Slave_IO_State: Connecting to master
Master_Host: 192.168.134.159
Master_User: repluser
Master_Port: 3306
Connect_Retry: 60
Master_Log_File: master_159.000001
Read_Master_Log_Pos: 154
Relay_Log_File: pc3-relay-bin.000001
Relay_Log_Pos: 4
Relay_Master_Log_File: master_159.000001
Slave_IO_Running: Connecting 这个 都得必须是YES才成功
Slave_SQL_Running: Yes 这个 都得必须是YES才成功
Replicate_Do_DB:
Replicate_Ignore_DB:
Replicate_Do_Table:
Replicate_Ignore_Table:
Replicate_Wild_Do_Table:
Replicate_Wild_Ignore_Table:
Last_Errno: 0
Last_Error:
Skip_Counter: 0
Exec_Master_Log_Pos: 154
Relay_Log_Space: 154
Until_Condition: None
Until_Log_File:
Until_Log_Pos: 0
Master_SSL_Allowed: No
Master_SSL_CA_File:
Master_SSL_CA_Path:
Master_SSL_Cert:
Master_SSL_Cipher:
Master_SSL_Key:
Seconds_Behind_Master: NULL
Master_SSL_Verify_Server_Cert: No
Last_IO_Errno: 1045
Last_IO_Error: error connecting to master 'repluser@192.168.134.159:3306' - retry-time: 60 retries: 1 错误异常信息
Last_SQL_Errno: 0 错误异常信息
Last_SQL_Error:
Replicate_Ignore_Server_Ids:
Master_Server_Id: 0
Master_UUID:
Master_Info_File: /var/lib/mysql/master.info
SQL_Delay: 0
SQL_Remaining_Delay: NULL
Slave_SQL_Running_State: Slave has read all relay log; waiting for more updates
Master_Retry_Count: 86400
Master_Bind:
Last_IO_Error_Timestamp: 230623 03:27:57
Last_SQL_Error_Timestamp:
Master_SSL_Crl:
Master_SSL_Crlpath:
Retrieved_Gtid_Set:
Executed_Gtid_Set:
Auto_Position: 0
Replicate_Rewrite_DB:
Channel_Name:
Master_TLS_Version:
1 row in set (0.00 sec)
当上述Slave_IO_Running,Slave_SQL_Running 都为YES 时则成功
测试数据同步
1)在主服务器host52 建库建表 插入记录
]#mysql -uroot -p123qqq...A
create database db1;
create  table db1.t1(id int);
insert into db1.t1 values(119);
insert into db1.t1 values(120);
insert into db1.t1 values(114);

2) 在从服务器 可以查看到同样的数据
]#mysql -uroot -p123qqq...A
Mysql> select * from db1.t1;
所有错误的 统一解决办法:
把slave角色的服务器恢复为独立的数据库服务器,重新配置为从服务器。
在从服务器执行如下操作:
 systemctl  stop   mysqld
 cd  /var/lib/mysql/
 rm  -rf master.info
 rm -rf   *-relay-bin.*
 rm -rf relay-log.info
 systemctl   start  mysqld
Spring boot 读写分离配置
读写分离策略方案:
- 程序内部,自己编写读写分离,访问数据库逻辑
- 数据库中间件,mycat,mysql-proxy,maxscale
SpringBoot 封装读写分离
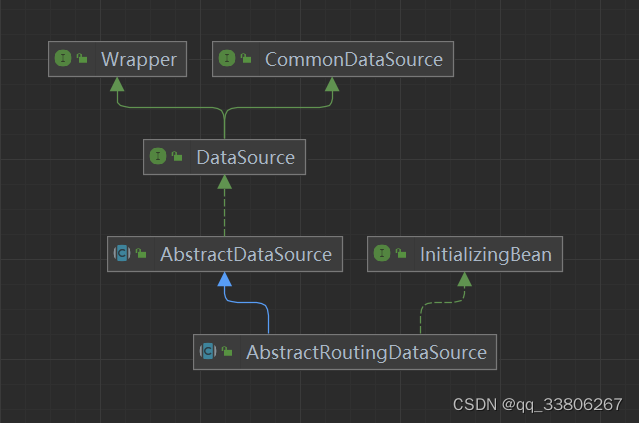
- 上述类图可以看的出AbstractRoutingDataSource 实现了javax.sql.DataSource 接口;
- DataSource 是JAVA为数据库厂商提供数据库连接定义驱动实现规范。
- AbstractRoutingDataSource 是spring jdbc提供动态数据源切换抽象类
- 按照spring.xml 大家会配置一个dataSourceBean对象,在springboot 加载对象也会从配置文件读取dataSource资源 创建DataSource对象
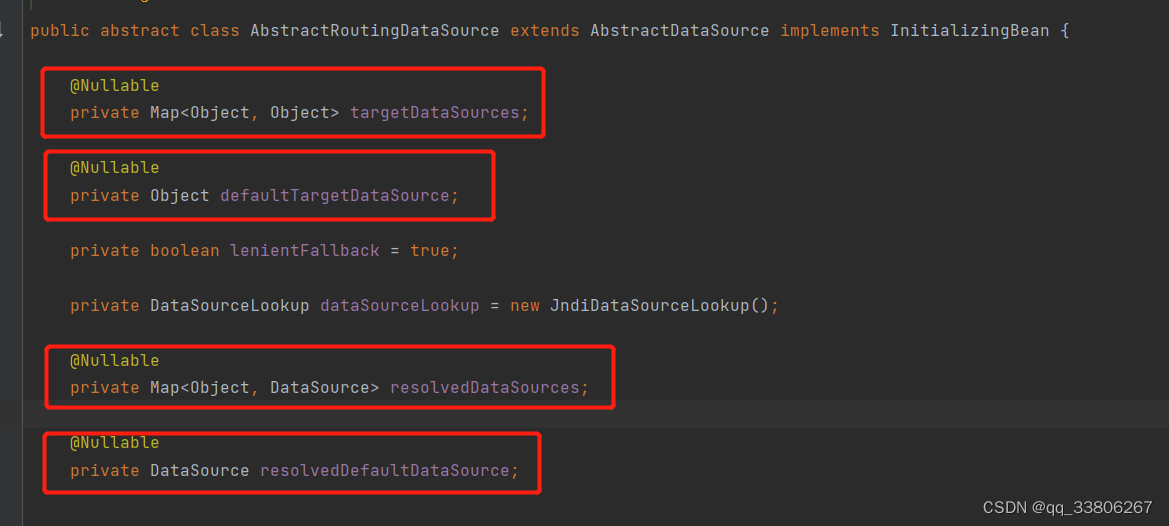 上图可以看出,属性 默认数据源,map集合目标数据源;因为实现了InitializingBean 在注册完bean对象会通过钩子函数方式调用afterPropertiesSet方法。只需要在是注册bean对象时指定,targetDataSource和DefaultTargetDataSource即可
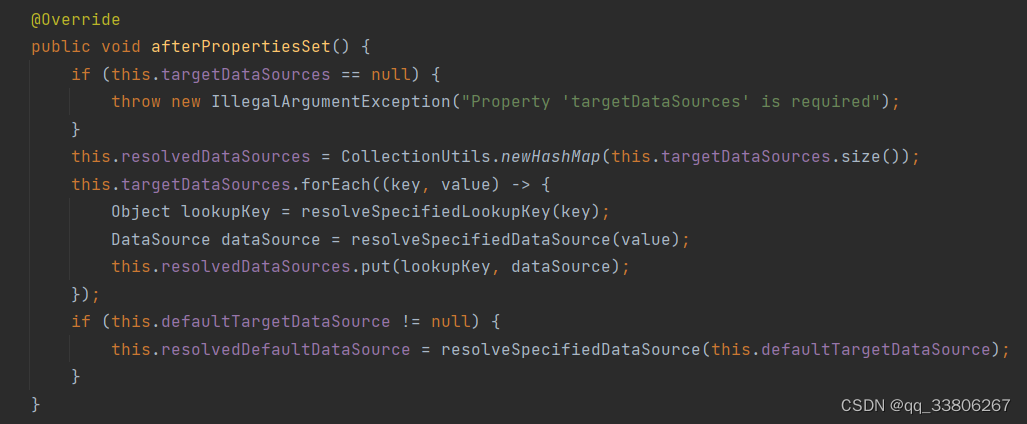
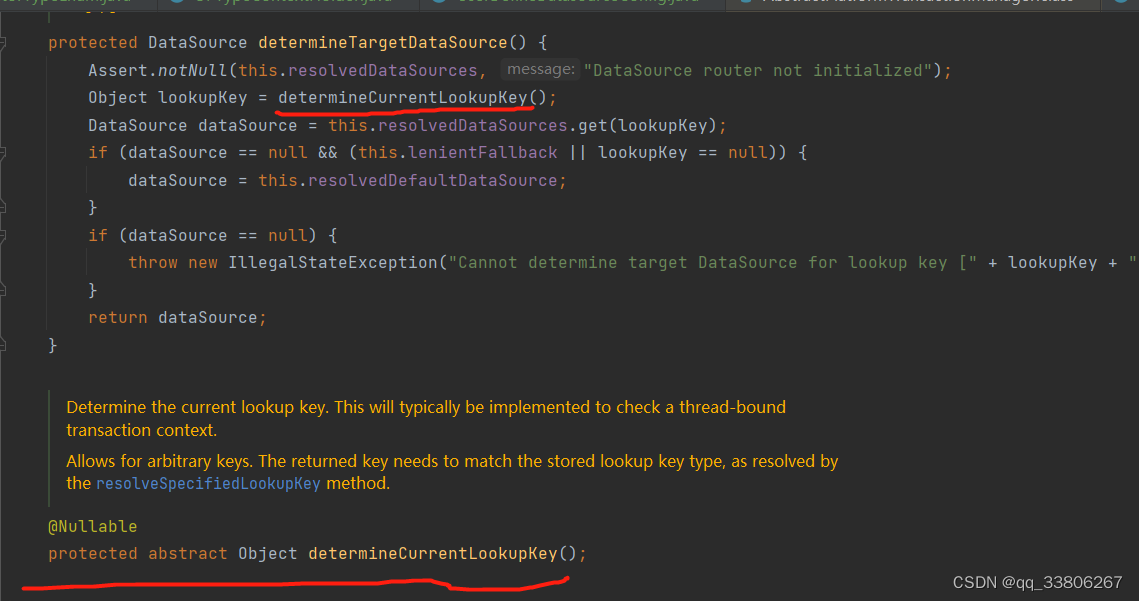
当动态需要切换数据源时,可以看到getConnection方法 调用determineTargetDataSource
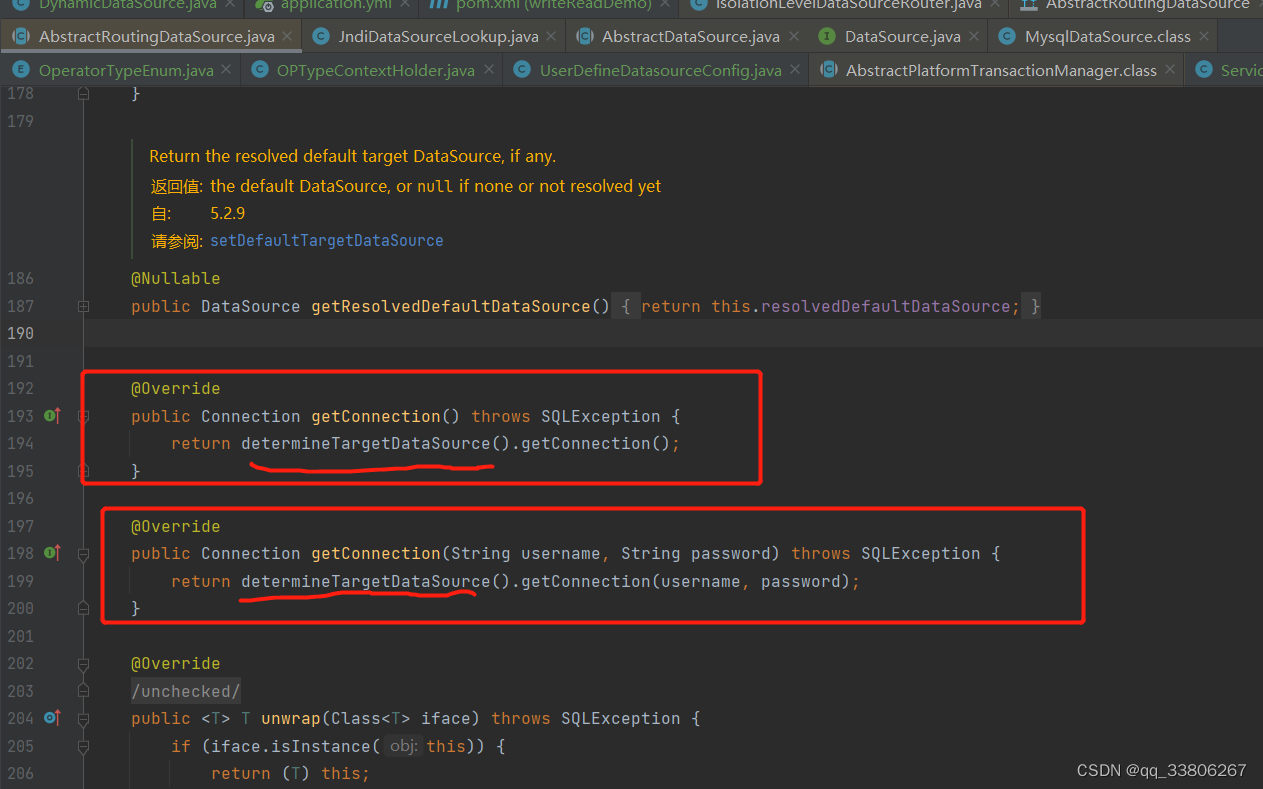
调用了determineCurrentLookupKey,所以实现AbstractRoutingDataSource 覆盖该方法,返回map中Key就可以实现数据源切换
整体实现代码
1.pom依赖
<!--MySQL & MyBatis-->
<dependency>
    <groupId>mysql</groupId>
    <artifactId>mysql-connector-java</artifactId>
    <version>5.1.47</version>
</dependency>

<dependency>
    <groupId>org.springframework.boot</groupId>
    <artifactId>spring-boot-starter-aop</artifactId>
</dependency>

<dependency>
 <groupId>org.springframework.boot</groupId>
  <artifactId>spring-boot-starter-test</artifactId>
  <scope>test</scope>
</dependency>


<dependency>
    <groupId>org.springframework.boot</groupId>
    <artifactId>spring-boot-starter-jdbc</artifactId>
</dependency>

<dependency>
    <groupId>org.mybatis.spring.boot</groupId>
    <artifactId>mybatis-spring-boot-starter</artifactId>
    <version>2.2.2</version>
</dependency>

<dependency>
    <groupId>org.mybatis.spring.boot</groupId>
    <artifactId>mybatis-spring-boot-autoconfigure</artifactId>
    <version>2.2.2</version>
</dependency>
2.自定义数据源
package com.example.demo.config;

import org.apache.ibatis.session.ExecutorType;
import org.apache.ibatis.session.SqlSessionFactory;
import org.mybatis.spring.SqlSessionFactoryBean;
import org.mybatis.spring.SqlSessionTemplate;
import org.springframework.beans.factory.annotation.Qualifier;
import org.springframework.boot.context.properties.ConfigurationProperties;
import org.springframework.boot.jdbc.DataSourceBuilder;
import org.springframework.context.annotation.Bean;
import org.springframework.context.annotation.Configuration;
import org.springframework.core.io.support.PathMatchingResourcePatternResolver;
import org.springframework.jdbc.datasource.DataSourceTransactionManager;
import org.springframework.transaction.PlatformTransactionManager;

import javax.sql.DataSource;
import java.util.HashMap;
import java.util.Map;

/**
 * 该类是自定义数据源,由于必须将系统的数据源给替换掉。
 */
@Configuration
public class UserDefineDatasourceConfig {

    // 加载自定义配置数据源
    @Bean
    @ConfigurationProperties("spring.datasource.master")
    public DataSource masterDataSource() {
        return DataSourceBuilder.create().build();
    }
    // 加载自定义配置数据源
    @Bean
    @ConfigurationProperties("spring.datasource.slave")
    public DataSource slaveDataSource() {
        return DataSourceBuilder.create().build();
    }

    // 将自定义数据源配置到 AbstractRoutingDataSource 实现类中
    @Bean
    public DataSource proxyDataSource(@Qualifier("masterDataSource") DataSource masterDataSource,
                                      @Qualifier("slaveDataSource") DataSource slaveDataSource ){

        DynamicDataSource proxy = new DynamicDataSource();
        proxy.setDefaultTargetDataSource(masterDataSource);//设置默认数据源

        Map<Object, Object> mappedDataSource = new HashMap<>();
        mappedDataSource.put("master", masterDataSource);
        mappedDataSource.put("slave", slaveDataSource);

        proxy.setTargetDataSources(mappedDataSource); //注册所有数据源
        return proxy;
    }

    /**
     * 当自定义数据源,用户必须覆盖SqlSessionFactory创建
     *
     * @param dataSource
     * @return
     * @throws Exception
     */
    @Bean
    public SqlSessionFactory sqlSessionFactory(@Qualifier("proxyDataSource") DataSource dataSource) throws Exception {
        SqlSessionFactoryBean sqlSessionFactoryBean = new SqlSessionFactoryBean();

        sqlSessionFactoryBean.setDataSource(dataSource);
        sqlSessionFactoryBean.setTypeAliasesPackage("com.Dora.entities");
        sqlSessionFactoryBean.setMapperLocations(new PathMatchingResourcePatternResolver().getResources("classpath*:mappers/*.xml"));
        SqlSessionFactory sqlSessionFactory = sqlSessionFactoryBean.getObject();

        return sqlSessionFactory;
    }

    /**
     * 当自定义数据源,用户必须覆盖SqlSessionTemplate,开启BATCH处理模式
     *
     * @param sqlSessionFactory
     * @return
     */
    @Bean
    public SqlSessionTemplate sqlSessionTemplate(@Qualifier("sqlSessionFactory") SqlSessionFactory sqlSessionFactory) {
        return new SqlSessionTemplate(sqlSessionFactory, ExecutorType.BATCH);
    }

    /***
     * 当自定义数据源,用户必须注入,否则事务控制不生效
     * @param dataSource
     * @return
     */
    @Bean
    public PlatformTransactionManager platformTransactionManager(@Qualifier("proxyDataSource") DataSource dataSource) {
        return new DataSourceTransactionManager(dataSource);
    }

}
3. AbstractRoutingDataSource实现类
package com.example.demo.config;

import org.springframework.jdbc.datasource.lookup.AbstractRoutingDataSource;

import java.util.Arrays;
import java.util.List;

public class DynamicDataSource extends AbstractRoutingDataSource {

    private String masterDBKey = "master";
    private List<String> slaveDBKeys = Arrays.asList("slave");
    @Override
    protected Object determineCurrentLookupKey() {
        String dbKey = null;
        OperatorTypeEnum typeEnum = OPTypeContextHolder.get();
        if (OperatorTypeEnum.WRITE.equals(typeEnum)) {
            dbKey = masterDBKey;
        } else {
            dbKey = slaveDBKeys.get(0);
        }
        logger.debug("当前的DBkey:" + dbKey);
        return dbKey;
    }
}
4.枚举类
package com.example.demo.config;

public enum OperatorTypeEnum {
    WRITE, READ;
}
5.AOP 拦截
package com.example.demo.aop;

import com.example.demo.annotation.SlaveDB;
import com.example.demo.config.OPTypeContextHolder;
import com.example.demo.config.OperatorTypeEnum;
import org.aspectj.lang.ProceedingJoinPoint;
import org.aspectj.lang.annotation.Around;
import org.aspectj.lang.annotation.Aspect;
import org.aspectj.lang.reflect.MethodSignature;
import org.slf4j.Logger;
import org.slf4j.LoggerFactory;
import org.springframework.core.annotation.Order;
import org.springframework.stereotype.Component;

import java.lang.reflect.Method;

/**
 * 用户自定义切面,负责读取SlaveDB注解,并且在DBTypeContextHolder中设置读写类型
 */
@Aspect
@Order(0) //控制切面顺序,保证在事务切面之前运行切面
@Component
public class ServiceMethodAOP {
    private static final Logger logger = LoggerFactory.getLogger(ServiceMethodAOP.class);

    @Around("execution(* com.example.demo.service.*.*(..))")
    public Object methodInterceptor(ProceedingJoinPoint pjp) {
        Object result = null;
        try {
            //获取当前的方法信息
            MethodSignature methodSignature = (MethodSignature) pjp.getSignature();
            Method method = methodSignature.getMethod();
            //判断方法上是否存在注解@SlaveDB
            boolean present = method.isAnnotationPresent(SlaveDB.class);

            OperatorTypeEnum operType = null;
            if (!present) {
                operType = OperatorTypeEnum.WRITE;
            } else {
                operType = OperatorTypeEnum.READ;
            }
            OPTypeContextHolder.set(operType);
            logger.debug("当前操作:" + operType);
            result = pjp.proceed();
            //清除线程变量
            OPTypeContextHolder.clear();
        } catch (Throwable throwable) {
            throwable.printStackTrace();
        }
        return result;
    }
}
package com.example.demo.config;

public class OPTypeContextHolder {
    private static final ThreadLocal<OperatorTypeEnum> OPERATOR_TYPE_THREAD_LOCAL = new ThreadLocal<>();
    public static void set(OperatorTypeEnum dbType) {
        OPERATOR_TYPE_THREAD_LOCAL.set(dbType);
    }

    public static OperatorTypeEnum get() {
        return OPERATOR_TYPE_THREAD_LOCAL.get();
    }
    public static void clear(){
        OPERATOR_TYPE_THREAD_LOCAL.remove();
    }
}
writeReadDemo: springBoot读写分离实现代码https://gitee.com/cleraa/writeReadDemo.git本文参考链接


 5693
5693


 被折叠的 条评论
为什么被折叠?
被折叠的 条评论
为什么被折叠?
 到【灌水乐园】发言


