


Spring IoC 与容器的初始化
IoC 解决了到底解决了什么?
控制翻转 Inversion of Control
控制-对象的创建者
翻转-角色的转变
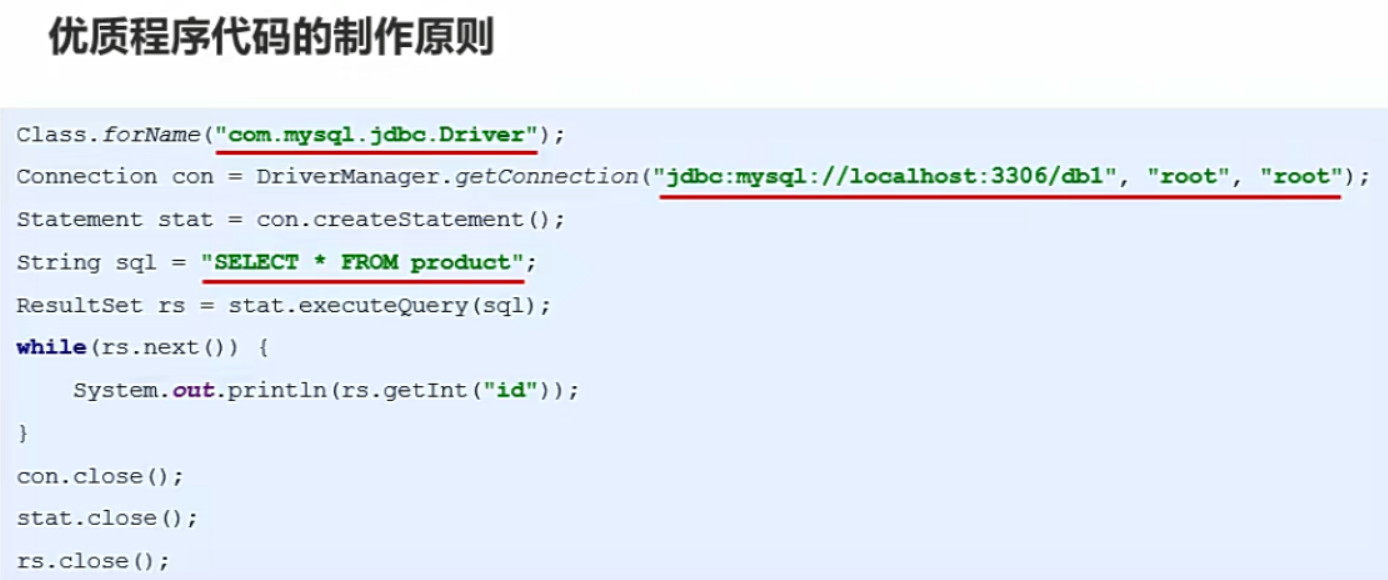
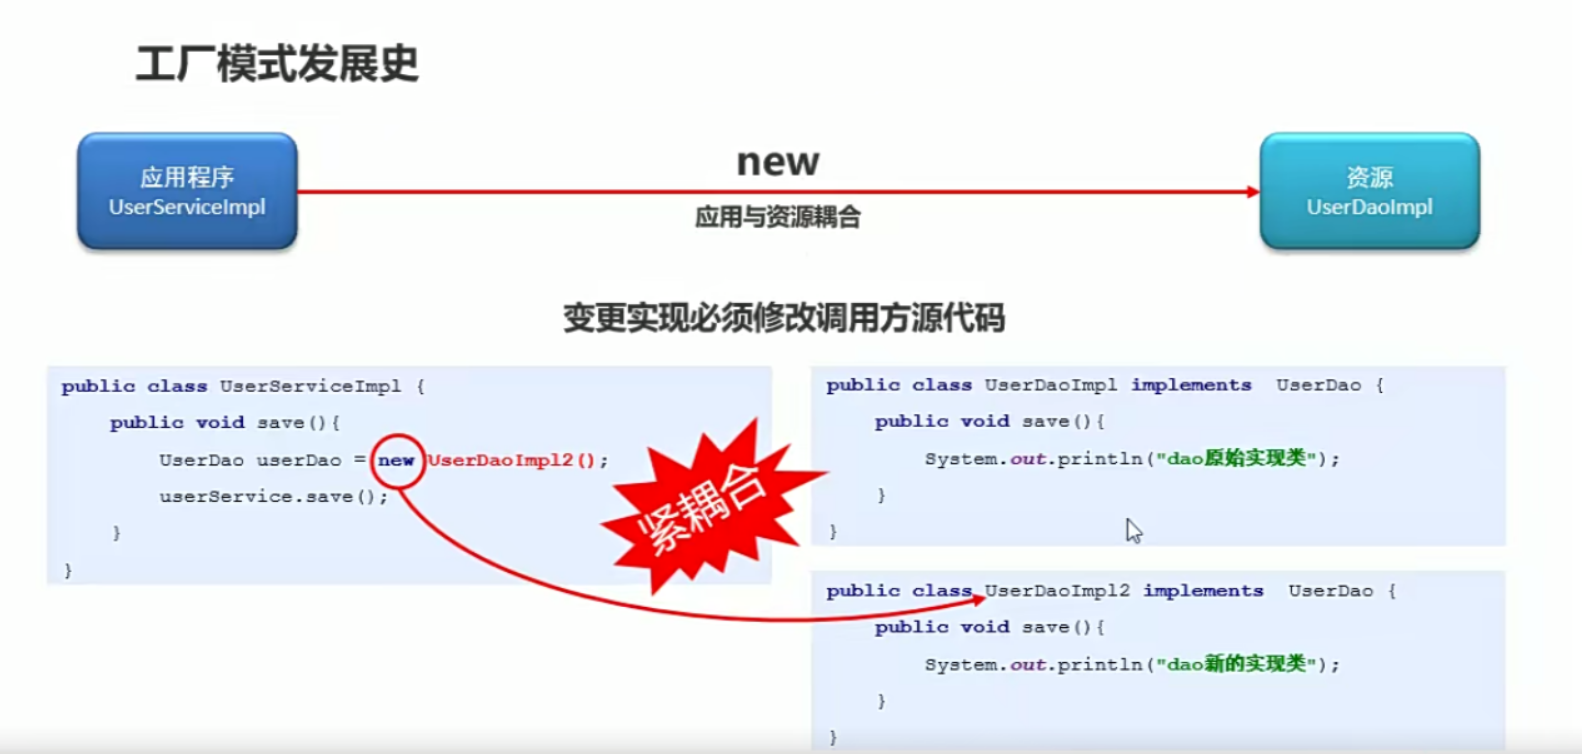
凡是在高级的编程语言中面对程序的设计总会提到的一点就是,低耦合、高内聚。那么对于低耦合与高内聚应该怎么去理解这两点呢?
低耦合强调的是模块应该尽可能的单一,模块内部细节对内私有封装,对外只暴露对应的接口,利用可配置替换的模块更换其“硬编码”的操作
public interface UserService {
    void run();
}
/**
 * @author peggy
 * @data 2023/2/13 10:09
 */
public class UserServiceImpl implements UserService {
    public void run() {
        System.out.println("小孩跑起来了");
    }
}
<?xml version="1.0" encoding="UTF-8"?>
<beans xmlns="http://www.springframework.org/schema/beans"
xmlns:xsi="http://www.w3.org/2001/XMLSchema-instance"
xsi:schemaLocation="http://www.springframework.org/schema/beans
https://www.springframework.org/schema/beans/spring-beans.xsd">
<!-- services -->
<bean id="userService" class="com.peggy.service.impl.UserServiceImpl"/>
<!-- more bean definitions for services go here -->
</beans>
Spring 的容器创建的时机
关于 scope 属性的配置
<?xml version="1.0" encoding="UTF-8"?>
<beans xmlns="http://www.springframework.org/schema/beans"
xmlns:xsi="http://www.w3.org/2001/XMLSchema-instance"
xsi:schemaLocation="http://www.springframework.org/schema/beans
https://www.springframework.org/schema/beans/spring-beans.xsd">
<!--多例模式-->
<bean id="userServicePrototype" scope="prototype" class="com.peggy.service.impl.UserServiceImpl"/>
<!--默认单例模式-->
<!--创建的所有的对象都是同一个对象-->
<bean id="userServiceSingleton" class="com.peggy.service.impl.UserServiceImpl"/>
</beans>
public class App {
public static void main( String[] args ) {
// 加载配置文件
ApplicationContext applicationContext=new ClassPathXmlApplicationContext("applicationContext.xml");
// 获取加载资源
UserService userServiceSingleton1 = (UserService) applicationContext.getBean("userServiceSingleton");
UserService userServiceSingleton2 = (UserService) applicationContext.getBean("userServiceSingleton");
UserService userServiceSingleton3 = (UserService) applicationContext.getBean("userServiceSingleton");
System.out.println("userServiceSingleton1 对象地址:"+userServiceSingleton1);
System.out.println("userServiceSingleton2 对象地址:"+userServiceSingleton2);
System.out.println("userServiceSingleton3 对象地址:"+userServiceSingleton3);
UserService userServicePrototype1 = (UserService) applicationContext.getBean("userServicePrototype");
UserService userServicePrototype2 = (UserService) applicationContext.getBean("userServicePrototype");
UserService userServicePrototype3 = (UserService) applicationContext.getBean("userServicePrototype");
System.out.println("userServicePrototype1 对象地址:"+userServicePrototype1);
System.out.println("userServicePrototype2 对象地址:"+userServicePrototype2);
System.out.println("userServicePrototype3 对象地址:"+userServicePrototype3);
}
}

我们可以发现当我们在 Spring 中我们采用默认的配置,通过 ApplicationContext 对象获取 id 指定的 Bean 对象都是同一个对象(对象的地址相同)
如果我们将 scope 属性设置为 prototype 后,再次通过 id 指定获取的 Bean 对象不在是同一个对象
那么对于这两种方式在初始化的时候,在 Spring 中是什么时候创建的对象呢?我们对 UserService 接口的实现类的构造方法进行改造测试
/**
* @author peggy
* @data 2023/2/13 10:09
*/
public class UserServiceImpl implements UserService {
public UserServiceImpl() {
System.out.println("UserServiceImpl 对象被创建");
}
public void run() {
System.out.println("小孩跑起来了");
}
}
public static void main( String[] args ) {
// 加载配置文件
ApplicationContext applicationContext=new ClassPathXmlApplicationContext("applicationContext.xml");
System.out.println("采用Spring单例模式加载。。。。。。。");
// 获取加载资源
UserService userServiceSingleton1 = (UserService) applicationContext.getBean("userServiceSingleton");
System.out.println("userServiceSingleton1 对象地址:"+userServiceSingleton1);
System.out.println("采用Spring多例模式加载。。。。。。。");
UserService userServicePrototype1 = (UserService) applicationContext.getBean("userServicePrototype");
System.out.println("userServicePrototype1 对象地址:"+userServicePrototype1);
}
public class App {
public static void main( String[] args ) {
// 加载配置文件
ApplicationContext applicationContext=new ClassPathXmlApplicationContext("applicationContext.xml");
System.out.println("采用Spring多例模式加载。。。。。。。");
UserService userServicePrototype1 = (UserService) applicationContext.getBean("userServicePrototype");
System.out.println("userServicePrototype1 对象地址:"+userServicePrototype1);
}
}

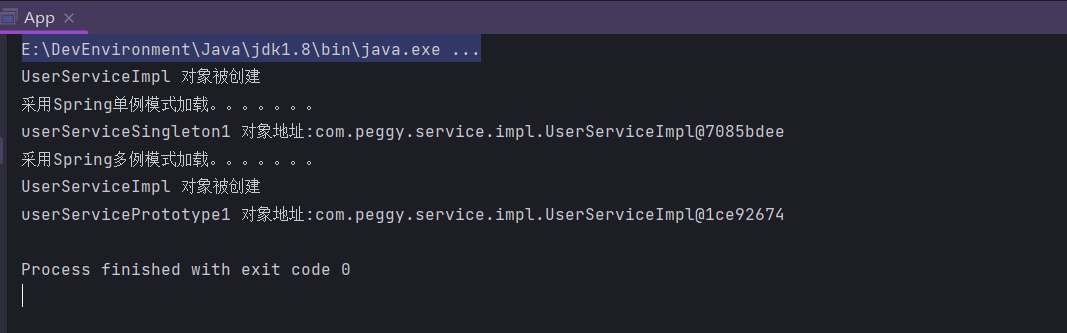
最终的输出结果如图所示
可以发现我们的 Spring 在第一次加载我们的 applicationContext.xml 配置文件的时候,已经初始化好了一个 UserServiceImpl 的 Bean 对象。
而当我们指定默认配置的 id 的时候,会直接从初始化好的 Bean 容器中获取对象。
当我们指定多例模式的配置的 id 获取 UserServiceImpl 对象的时候,就会创建一个新的对象(该对象已经不是由 Spring 进行管理)向我们的引用,而不是直接从 Bean 容器中获取当前之前已经创建好的对象。
关于Spring Bean 的生命周期的控制管理
<!-- 格式 -->
<bean init-method="init" destroy-method="destroy"/>
-
init-method 属性指定 Bean 对象在初始化创建的时候优先调用
-
destroy-method 属性指定 Bean 对象在结束销毁的时候进行调用
案例
在单例的情况下 init-method 与 destroy-method
<?xml version="1.0" encoding="UTF-8"?>
<beans xmlns="http://www.springframework.org/schema/beans"
xmlns:xsi="http://www.w3.org/2001/XMLSchema-instance"
xsi:schemaLocation="http://www.springframework.org/schema/beans
https://www.springframework.org/schema/beans/spring-beans.xsd">
<!--单例模式创建 Bean 对象-->
<bean id="userService" init-method="init" destroy-method="destroy" class="com.peggy.service.impl.UserServiceImpl"/>
</beans>
public class App {
public static void main( String[] args ) {
ApplicationContext applicationContext=new ClassPathXmlApplicationContext("applicationContext.xml");
UserService userService = (UserService) applicationContext.getBean("userService");
System.out.println("userService对象地址:"+userService);
}
}
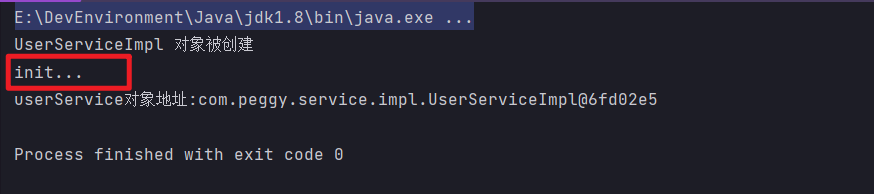
可以发现只有 init 方法执行了,而我们的 destroy 方法好像没有执行,这是为什么呢?
这是因为,我们的 Java 虚拟机的结束时我们的 Spring 中的 Bean 容器还没有来的及释放我们的资源,所以看不到 destroy 的执行结果。
那么我们就提前让我们的 Spring 对象结束,资源提前释放就可以看到 destroy 的执行结果。
由于 ApplicationContext 对象中没有提供关闭 Spring 对象资源的方法,所以我们需要调用,配置文件加载的对象 ClassPathXmlApplicationContext 中的 close 关闭资源。
public class App {
public static void main( String[] args ) {
ClassPathXmlApplicationContext applicationContext=new ClassPathXmlApplicationContext("applicationContext.xml");
UserService userService = (UserService) applicationContext.getBean("userService");
System.out.println("userService对象地址:"+userService);
applicationContext.close();
}
}
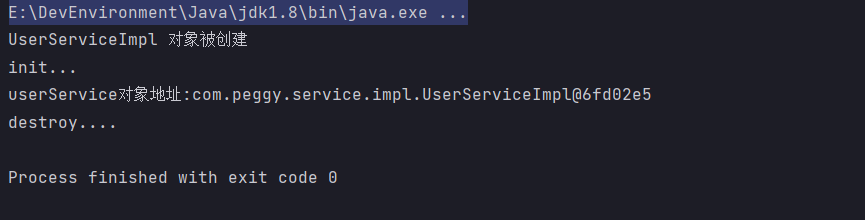
此时的 destroy 的方法在虚拟机结束之前,Spring 容器销毁之后执行
如果我们将 Spring 的 Bean 对象修改成多例模式,那么在创建 UserServiceImpl 的时候是怎么样的呢?
<?xml version="1.0" encoding="UTF-8"?>
<beans xmlns="http://www.springframework.org/schema/beans"
xmlns:xsi="http://www.w3.org/2001/XMLSchema-instance"
xsi:schemaLocation="http://www.springframework.org/schema/beans
https://www.springframework.org/schema/beans/spring-beans.xsd">
<!--单例模式创建 Bean 对象-->
<bean id="userService" scope="prototype" init-method="init" destroy-method="destroy" class="com.peggy.service.impl.UserServiceImpl"/>
</beans>
public class App {
public static void main( String[] args ) {
ClassPathXmlApplicationContext applicationContext=new ClassPathXmlApplicationContext("applicationContext.xml");
UserService userService1 = (UserService) applicationContext.getBean("userService");
System.out.println("userService1对象地址:"+userService1);
UserService userService2 = (UserService) applicationContext.getBean("userService");
System.out.println("userService2对象地址:"+userService2);
UserService userService3 = (UserService) applicationContext.getBean("userService");
System.out.println("userService3对象地址:"+userService3);
applicationContext.close();
}
}
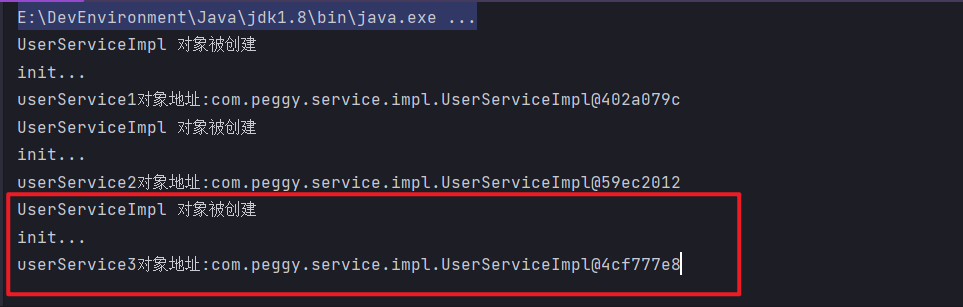
我们发现只有对象创建的时候调用了一次 init 初始化的对象,而没有在 Spring 容器销毁的时候执行 destroy 方法。
其实这是因为,当我将 Spring 的 scope 修改为 prototype 时,创建的 UserServiceImpl 已经不再受 Spring 管理,只是一个普通的对象。
关于 BeanFactory 与 ApplicationContext 接口
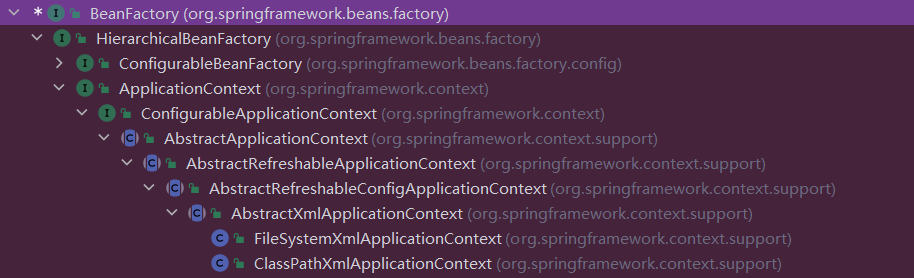
通过继承关系可以发现,BeanFactory接口是最早的 Spring 容器的原型,而后续在 BeanFactory 的基础上延续出了 ApplicaiotnContext 接口。
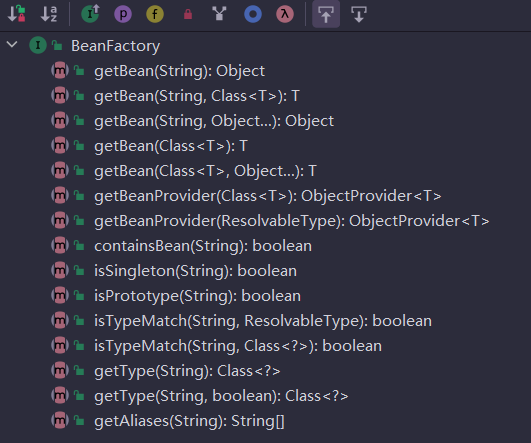
在 BeanFactory 中已经存在了 getBean 的方法,那么在 BeanFactory接口中的 getBean 与 ApplicationCpntext接口中的 getBean 有什么区别呢?
我们使用与原先在探究 Spring 容器单例与多例的代码进行再次测试
<?xml version="1.0" encoding="UTF-8"?>
<beans xmlns="http://www.springframework.org/schema/beans"
       xmlns:xsi="http://www.w3.org/2001/XMLSchema-instance"
       xsi:schemaLocation="http://www.springframework.org/schema/beans
        https://www.springframework.org/schema/beans/spring-beans.xsd">

    <bean id="userService" class="com.peggy.service.impl.UserServiceImpl"/>
</beans>
/**
* @author peggy
* @data 2023/2/13 10:09
*/
public class UserServiceImpl implements UserService {
public UserServiceImpl() {
System.out.println("UserServiceImpl 对象被创建");
}
public void run() {
System.out.println("小孩跑起来了");
}
}
- 使用 ApplicationContext 获取 Bean 对象
public class App {
public static void main( String[] args ) {
ApplicationContext applicationContext=new ClassPathXmlApplicationContext("applicationContext.xml");
System.out.println("开始执行 getBean 方法");
applicationContext.getBean("userService");
}
}

- 使用 BeanFactory 获取 Bean 对象
public class App {
    public static void main( String[] args ) {
        Resource resource = new ClassPathResource("applicationContext.xml");
        BeanFactory beanFactory = new XmlBeanFactory(resource);
        System.out.println("开始执行 getBean 方法");
        beanFactory.getBean("userService");
    }
}
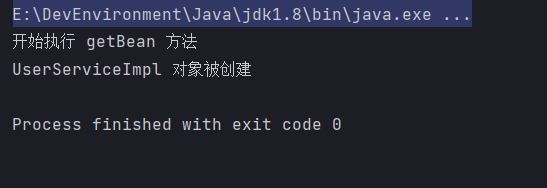
通过上面的执行结果其实我们就可以得出 BeanFactory 与 ApplicationContext 之间的差别
BeanFactory 只要在调用 getBean 方法的时候才会初始化我们的 Bean 对象
ApplicationContext 在我们首次读取加载 Spring 的配置文件的时候就会初始化单例的 Bean 对象


 1737
1737


 被折叠的 条评论
为什么被折叠?
被折叠的 条评论
为什么被折叠?
 到【灌水乐园】发言


