


安装docker和docker compose
docker和docker compose安装方法
建议安装最新版Docker-ce
基于Ubuntu20.04的docker-ce安装

sudo apt-get remove docker docker-engine docker.io containerd runc
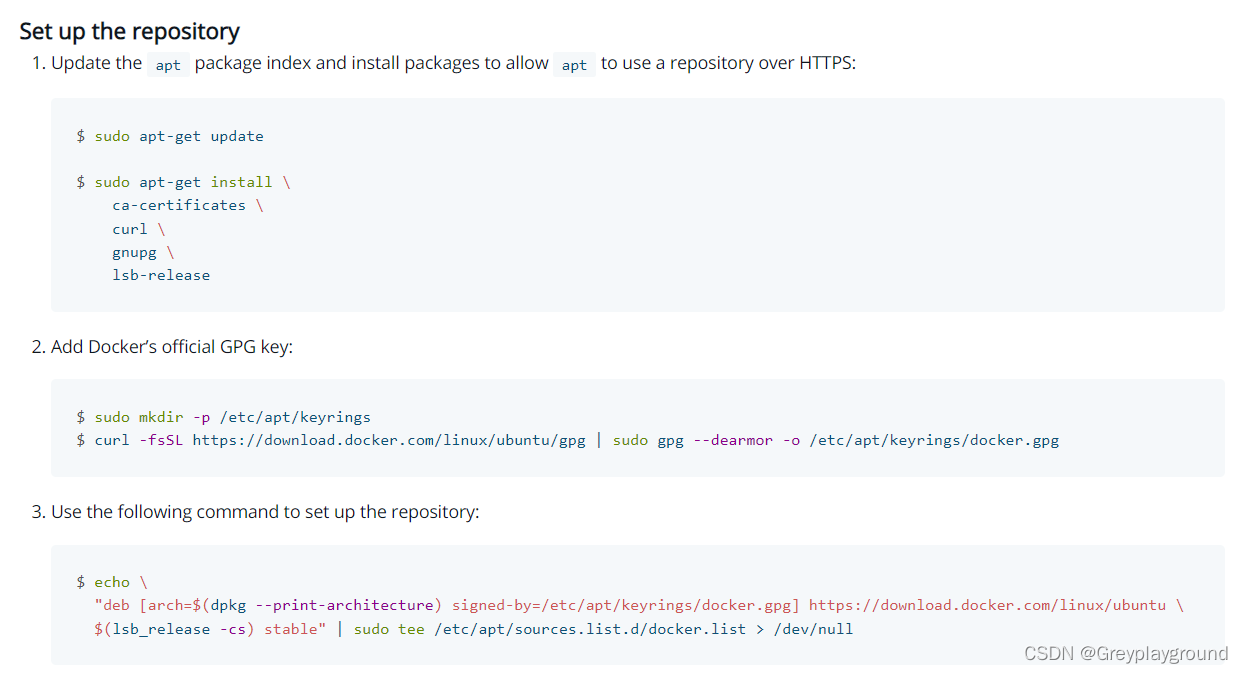
 $ sudo apt-get update
 $ sudo apt-get install \
    ca-certificates \
    curl \
    gnupg \
    lsb-release
 $ sudo mkdir -p /etc/apt/keyrings
 $ curl -fsSL https://download.docker.com/linux/ubuntu/gpg | sudo gpg --dearmor -o /etc/apt/keyrings/docker.gpg
echo \
  "deb [arch=$(dpkg --print-architecture) signed-by=/etc/apt/keyrings/docker.gpg] https://download.docker.com/linux/ubuntu \
  $(lsb_release -cs) stable" | sudo tee /etc/apt/sources.list.d/docker.list > /dev/null

通过安装包的名字我们得知该步骤会顺便安装docker-compose-plugin,也就是我们打算安装的docker-compose
 sudo apt-get update
 sudo apt-get install docker-ce docker-ce-cli containerd.io docker-compose-plugin

 $ sudo service docker start
 $ sudo docker run hello-world
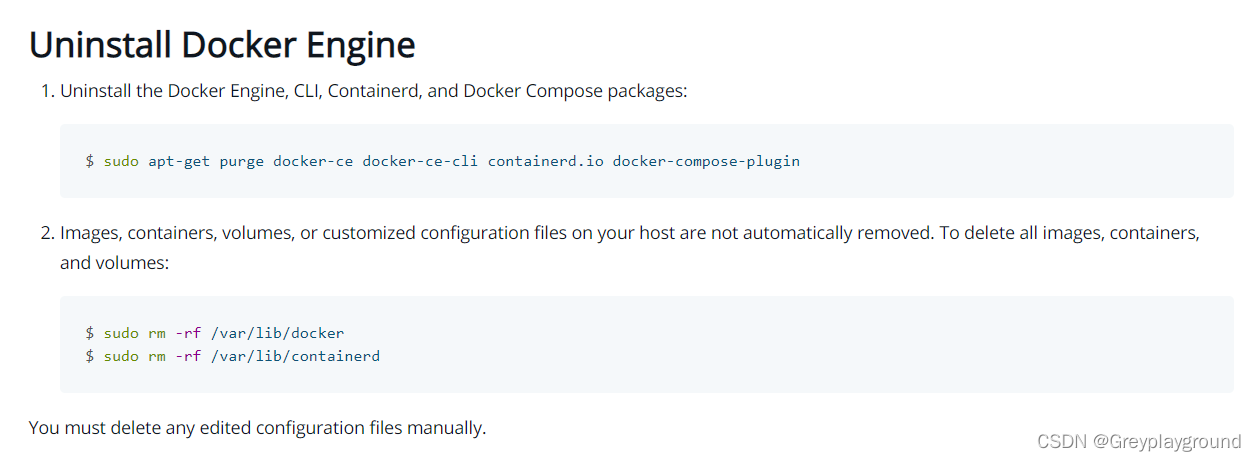
docker和docker compose卸载方法
安装结果检验
Docker版本显示
root@harbor:~# docker version
Client: Docker Engine - Community
 Version:           20.10.19
 API version:       1.41
 Go version:        go1.18.7
 Git commit:        d85ef84
 Built:             Thu Oct 13 16:46:17 2022
 OS/Arch:           linux/amd64
 Context:           default
 Experimental:      true

Server: Docker Engine - Community
 Engine:
  Version:          20.10.19
  API version:      1.41 (minimum version 1.12)
  Go version:       go1.18.7
  Git commit:       c964641
  Built:            Thu Oct 13 16:44:09 2022
  OS/Arch:          linux/amd64
  Experimental:     false
 containerd:
  Version:          1.6.8
  GitCommit:        9cd3357b7fd7218e4aec3eae239db1f68a5a6ec6
 runc:
  Version:          1.1.4
  GitCommit:        v1.1.4-0-g5fd4c4d
 docker-init:
  Version:          0.19.0
  GitCommit:        de40ad0
Docker运行状态是否为running
root@harbor:~# systemctl status docker
● docker.service - Docker Application Container Engine
     Loaded: loaded (/lib/systemd/system/docker.service; enabled; vendor preset: enabled)
     Active: active (running) since Mon 2022-10-17 14:46:34 UTC; 21min ago
TriggeredBy: ● docker.socket
       Docs: https://docs.docker.com
   Main PID: 31843 (dockerd)
      Tasks: 48
     Memory: 45.6M
     CGroup: /system.slice/docker.service
             ├─31843 /usr/bin/dockerd -H fd:// --containerd=/run/containerd/containerd.sock
             ├─37200 /usr/bin/docker-proxy -proto tcp -host-ip 127.0.0.1 -host-port 1514 -container-ip 172.18.0.2 -container-port 10514
             ├─37860 /usr/bin/docker-proxy -proto tcp -host-ip 0.0.0.0 -host-port 12345 -container-ip 172.18.0.9 -container-port 8080
             └─37867 /usr/bin/docker-proxy -proto tcp -host-ip :: -host-port 12345 -container-ip 172.18.0.9 -container-port 8080

Oct 17 14:55:40 harbor.example.com dockerd[31843]: time="2022-10-17T14:55:40.096336413Z" level=info msg="No non-localhost DNS nameservers are left in resolv.conf. Using default external se>
Oct 17 14:55:40 harbor.example.com dockerd[31843]: time="2022-10-17T14:55:40.096380269Z" level=info msg="IPv6 enabled;
...
查看Docker-compose的版本
root@harbor:~# docker compose version
Docker Compose version v2.11.2
Harbor安装
下载安装包(offline安装)
本次我们安装Harbor的2.6.1版本
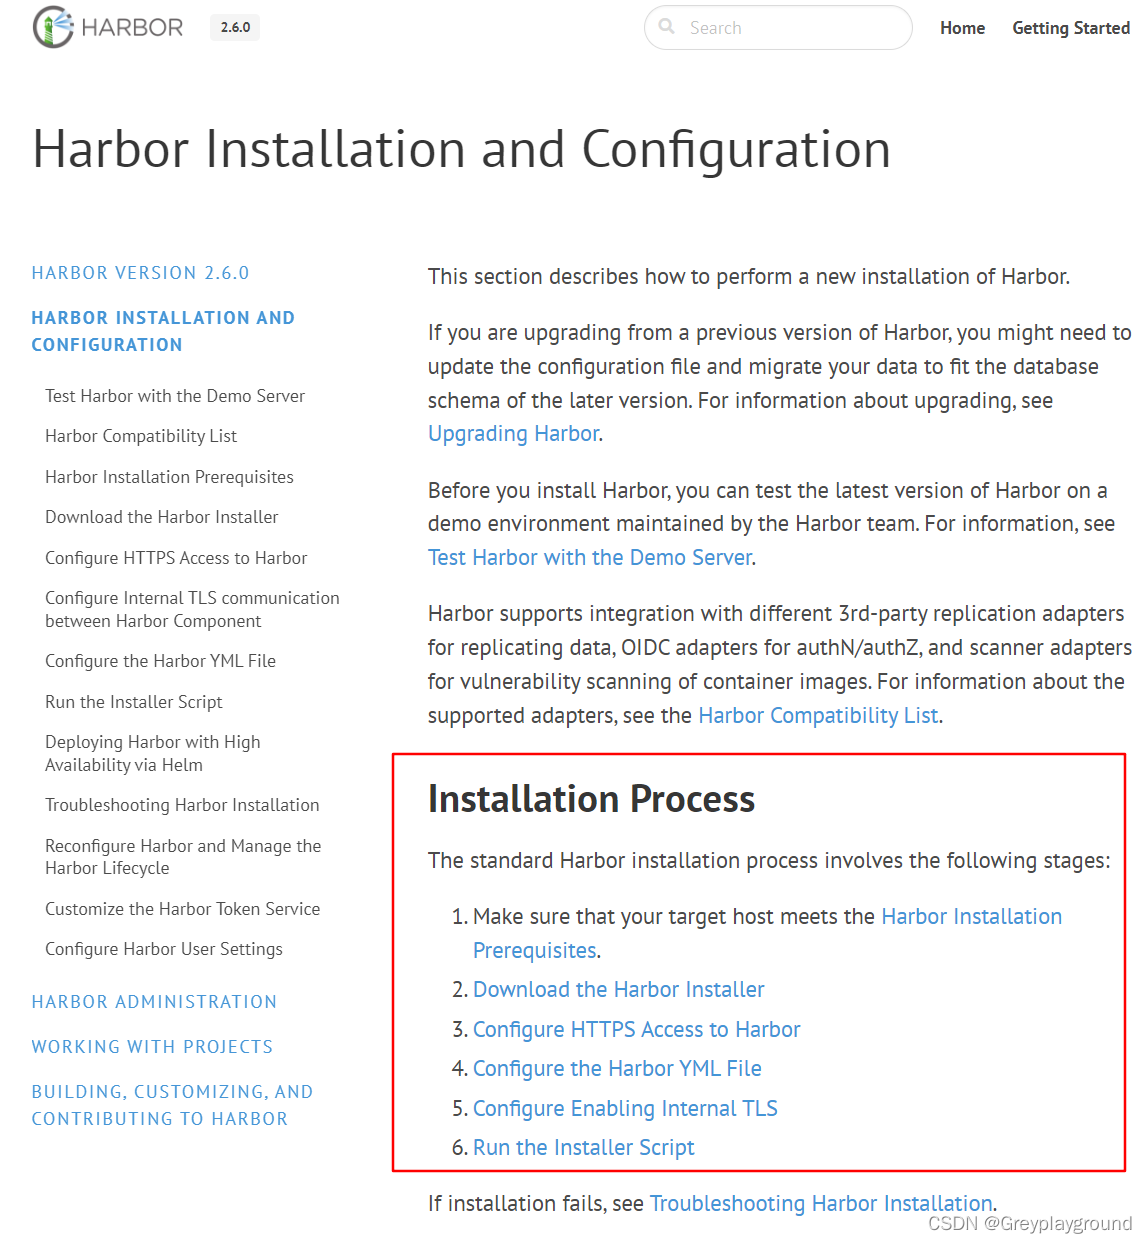
我们按照红框中的步骤进行安装:
1.前提条件
安装docker和docker-compose
我们已经在上一步完成前提条件的搭建
2.下载Harbor安装器
前往Harbor的官方Github
https://github.com/goharbor/harbor
在主页中点击releases
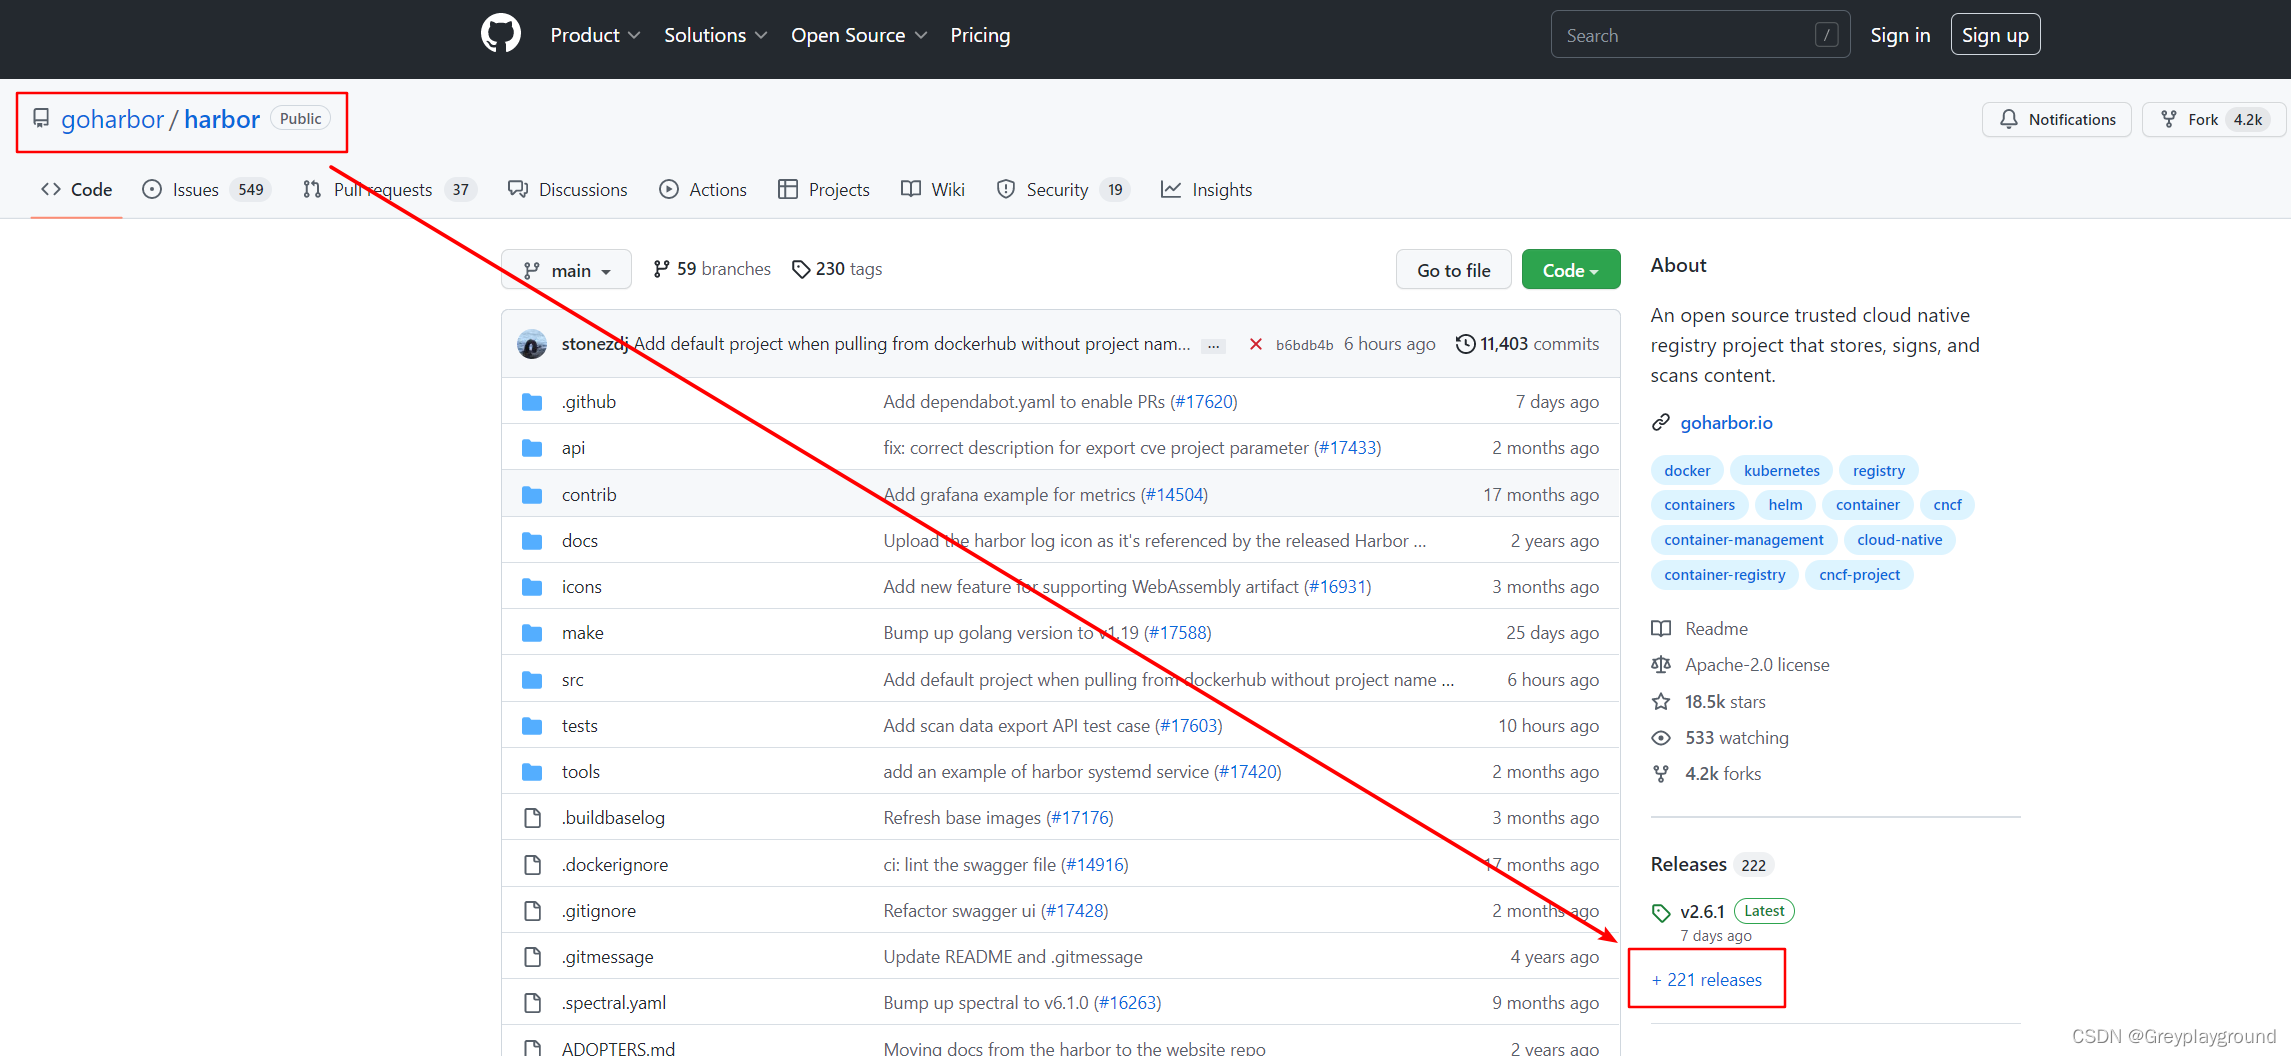
先择下载红框中的离线安装包
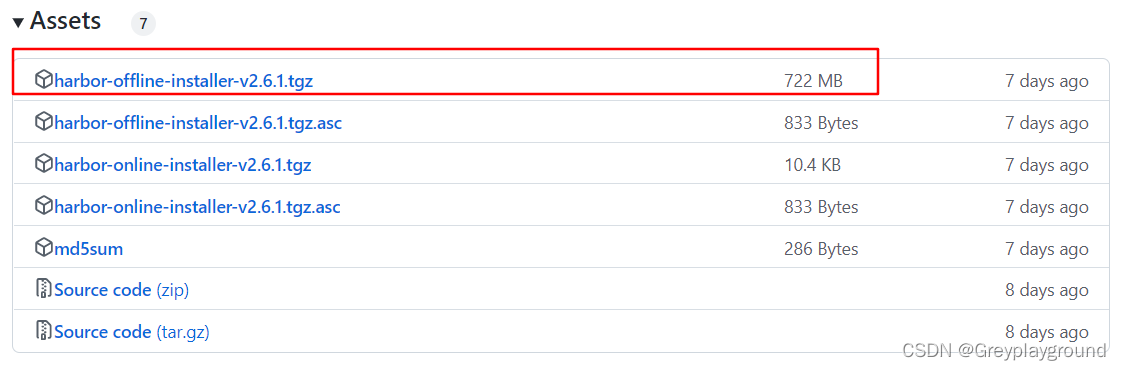
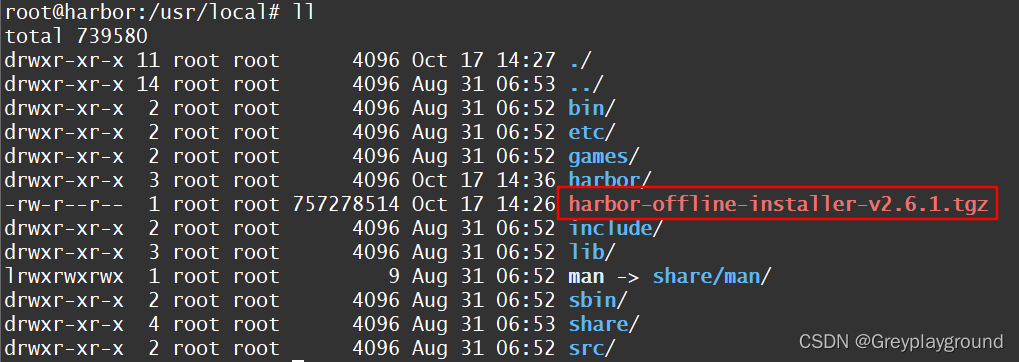
下载成功后将其上传至服务器的任意目录下,并解压该文件
tar zxvf harbor-offline-installer-v2.6.1.tgz
3. 配置HTTPS登录Harbor的方法
不好意思,跳过该步骤
4. 配置Harbor的YML文件
这一步比较核心
刚刚解压的harbor离线安装包中包含harbor.yml.tmpl配置文件,我们将它复制并改名
$ cp harbor.yml.tmpl harbor.yml
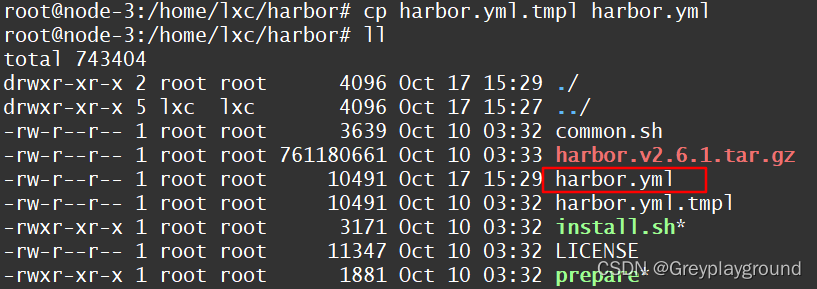
这个harbor.yml就是我们要处置的对象
$ vim harbor.yml
配置文件中关注几个要点即可,其他配置保持默认就好
- hostname
- http的port(这里我设置为12345)
- 如果不需要https,则像我这样将其注释掉
- harbor_admin_password你自己决定要不要改
# Configuration file of Harbor

# The IP address or hostname to access admin UI and registry service.
# DO NOT use localhost or 127.0.0.1, because Harbor needs to be accessed by external clients.
hostname: harbor.example.com

# http related config
http:
  # port for http, default is 80. If https enabled, this port will redirect to https port
  port: 12345

# https related config
#https:
#  # https port for harbor, default is 443
#  port: 443
#  # The path of cert and key files for nginx
#  certificate: /your/certificate/path
#  private_key: /your/private/key/path

# # Uncomment following will enable tls communication between all harbor components
# internal_tls:
#   # set enabled to true means internal tls is enabled
#   enabled: true
#   # put your cert and key files on dir
#   dir: /etc/harbor/tls/internal

# Uncomment external_url if you want to enable external proxy
# And when it enabled the hostname will no longer used
# external_url: https://reg.mydomain.com:8433

# The initial password of Harbor admin
# It only works in first time to install harbor
# Remember Change the admin password from UI after launching Harbor.
harbor_admin_password: Harbor12345

# Harbor DB configuration
database:
  # The password for the root user of Harbor DB. Change this before any production use.
  password: root123
  # The maximum number of connections in the idle connection pool. If it <=0, no idle connections are retained.
  max_idle_conns: 100
  # The maximum number of open connections to the database. If it <= 0, then there is no limit on the number of open connections.
  # Note: the default number of connections is 1024 for postgres of harbor.
  max_open_conns: 900
5. TLS相关配置
不好意思,跳过这步
6. 运行安装脚本
进入harbor配置文件所在的目录下
root@harbor:~# cd /usr/local/harbor/
执行install.sh脚本进行安装,
root@harbor:/usr/local/harbor# ./install.sh
执行成功后目录内容发生变化,增加了两个文件:
- common/
- docker-compose.yml
root@harbor:~# cd /usr/local/harbor/
root@harbor:/usr/local/harbor# ll
total 743416
drwxr-xr-x  3 root root      4096 Oct 17 15:36 ./
drwxr-xr-x 11 root root      4096 Oct 17 14:27 ../
drwxr-xr-x  3 root root      4096 Oct 17 14:36 common/
-rw-r--r--  1 root root      3639 Oct 10 03:32 common.sh
-rw-r--r--  1 root root      5892 Oct 17 14:36 docker-compose.yml
-rw-r--r--  1 root root 761180661 Oct 10 03:33 harbor.v2.6.1.tar.gz
-rw-r--r--  1 root root     10502 Oct 17 14:32 harbor.yml
-rw-r--r--  1 root root     10491 Oct 10 03:32 harbor.yml.tmpl
-rwxr-xr-x  1 root root      3171 Oct 10 03:32 install.sh*
-rw-r--r--  1 root root     11347 Oct 10 03:32 LICENSE
-rwxr-xr-x  1 root root      1881 Oct 10 03:32 prepare*
在/etc/docker/文件夹中创建一个daemon.json文件,在其中添加必要的配置
root@harbor:/etc/docker# vim daemon.json
添加的配置内容如下,
- 其中registry-mirrors是在阿里云上搞到的镜像加速器
- insecure-registries中包含主机地址和harbor.yml文件中定义的端口号12345
镜像加速器获取地址,你最好有自己的阿里云账号
https://cr.console.aliyun.com/cn-hangzhou/instances/mirrors?accounttraceid=aeba6b631ea048dfb09c48077c3c05fdgspm
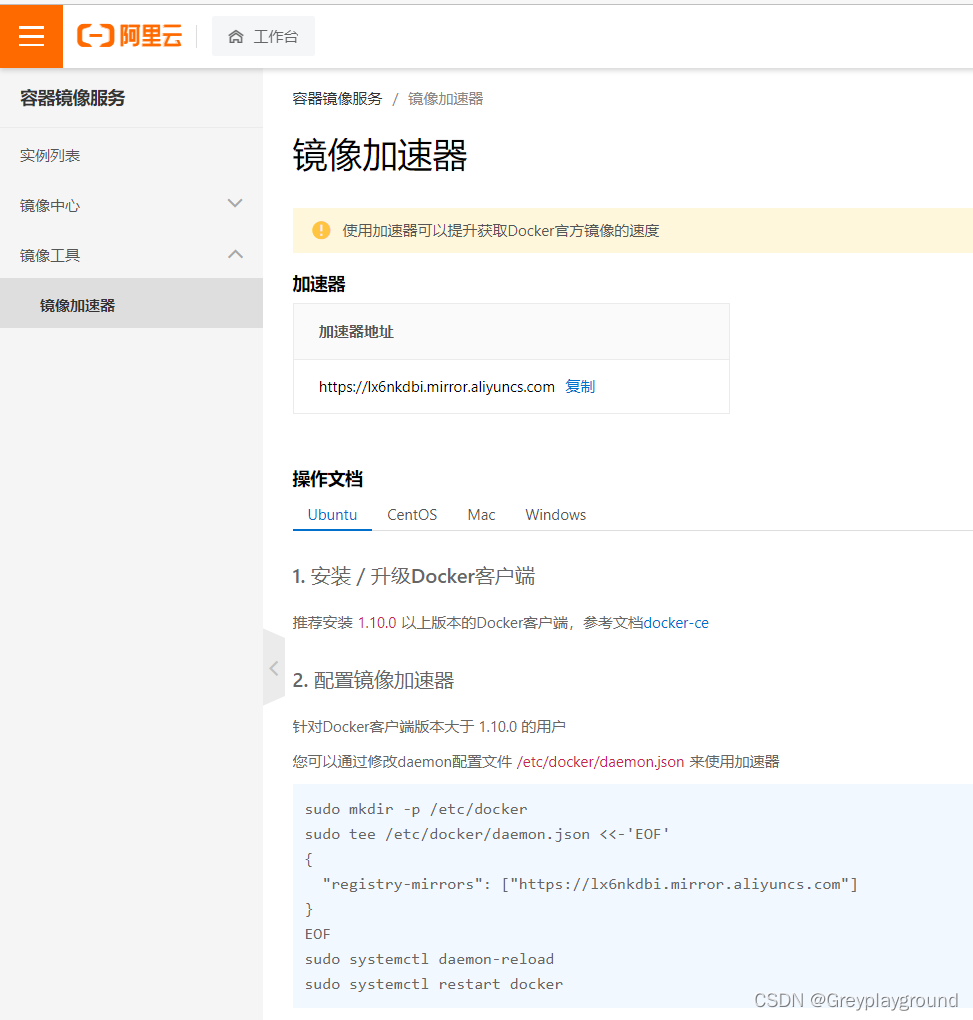
最终我的json文件是下面这个样子的:
{
  "registry-mirrors": ["https://lx6nkdbi.mirror.aliyuncs.com"],
  "insecure-registries" : ["222.1.1.24:12345", "0.0.0.0"]
}
重启docker
$ sudo systemctl daemon-reload
$ sudo systemctl restart docker
重启harbor,或者说重启harbor的docker-compose
root@harbor:~# cd /usr/local/harbor/
root@harbor:~# docker compose down
root@harbor:~# docker compose up -d
查看docker的配置信息是否更新,直接看下面的Insecure Registries和Registry Mirrors两个参数是否改的合您心意
root@harbor:/usr/local/harbor# docker info
Client:
 Context:    default
...
 Registry: https://index.docker.io/v1/
 Labels:
 Experimental: false
 Insecure Registries:
  0.0.0.0
  222.1.1.24:12345
  127.0.0.0/8
 Registry Mirrors:
  https://lx6nkdbi.mirror.aliyuncs.com/
 Live Restore Enabled: false

WARNING: No swap limit support
查看系统是否在监听我们设置的端口号12345
root@harbor:/usr/local/harbor# netstat -nltp
Active Internet connections (only servers)
Proto Recv-Q Send-Q Local Address           Foreign Address         State       PID/Program name
tcp        0      0 127.0.0.53:53           0.0.0.0:*               LISTEN      800/systemd-resolve
tcp        0      0 0.0.0.0:22              0.0.0.0:*               LISTEN      865/sshd: /usr/sbin
tcp        0      0 0.0.0.0:12345           0.0.0.0:*               LISTEN      37860/docker-proxy
tcp        0      0 127.0.0.1:1514          0.0.0.0:*               LISTEN      37200/docker-proxy
tcp6       0      0 :::22                   :::*                    LISTEN      865/sshd: /usr/sbin
tcp6       0      0 :::12345                :::*                    LISTEN      37867/docker-proxy
检查Harbor相关的容器是否都在正常运行
root@harbor:/usr/local/harbor# docker ps
CONTAINER ID   IMAGE                                COMMAND                  CREATED             STATUS                       PORTS                                         NAMES
d7bf9f3083b0   goharbor/harbor-jobservice:v2.6.1    "/harbor/entrypoint.…"   About an hour ago   Up About an hour (healthy)                                                 harbor-jobservice
93494f5eda43   goharbor/nginx-photon:v2.6.1         "nginx -g 'daemon of…"   About an hour ago   Up About an hour (healthy)   0.0.0.0:12345->8080/tcp, :::12345->8080/tcp   nginx
88d147b6bab7   goharbor/harbor-core:v2.6.1          "/harbor/entrypoint.…"   About an hour ago   Up About an hour (healthy)                                                 harbor-core
64ccf288f945   goharbor/harbor-db:v2.6.1            "/docker-entrypoint.…"   About an hour ago   Up About an hour (healthy)                                                 harbor-db
df64f48f430a   goharbor/harbor-portal:v2.6.1        "nginx -g 'daemon of…"   About an hour ago   Up About an hour (healthy)                                                 harbor-portal
9938c6837c87   goharbor/harbor-registryctl:v2.6.1   "/home/harbor/start.…"   About an hour ago   Up About an hour (healthy)                                                 registryctl
f66471b862e5   goharbor/redis-photon:v2.6.1         "redis-server /etc/r…"   About an hour ago   Up About an hour (healthy)                                                 redis
5235c8a17ed7   goharbor/registry-photon:v2.6.1      "/home/harbor/entryp…"   About an hour ago   Up About an hour (healthy)                                                 registry
8af5cb25ac49   goharbor/harbor-log:v2.6.1           "/bin/sh -c /usr/loc…"   About an hour ago   Up About an hour (healthy)   127.0.0.1:1514->10514/tcp                     harbor-log
测试
检查无误后我们尝试登录到Harbor上
1. 本地测试
curl后有如下打印证明harbor运行正常
root@harbor:/usr/local/harbor# curl 222.1.1.24:12345
<!DOCTYPE html>
<html>
    <head>
        <meta charset="utf-8"/>
        <title>Harbor</title>
        <base href="/"/>
        <meta name="viewport" content="width=device-width, initial-scale=1"/>
        <link rel="icon" type="image/x-icon" href="favicon.ico?v=2"/>
    <link rel="preload" as="style" href="./light-theme.css?buildTimestamp=1665371820018">
    <link rel="preload" as="style" href="./dark-theme.css?buildTimestamp=1665371820018">
    <link rel="stylesheet" href="styles.3b40b9a31b07355f.css"></head>
    <body>
        <harbor-app>
            <div class="spinner spinner-lg app-loading app-loading-fixed">
                Loading...
            </div>
        </harbor-app>
    <script src="runtime.c15715d20532ee5a.js" type="module"></script><script src="polyfills.af4f4bbe373e95ea.js" type="module"></script><script src="scripts.37fdee196f98340e.js" defer></script><script src="main.928b63333eabf95a.js" type="module"></script></body>
</html>
2. 浏览器测试
将局域网内的浏览器打开,输入http://222.1.1.24:12345
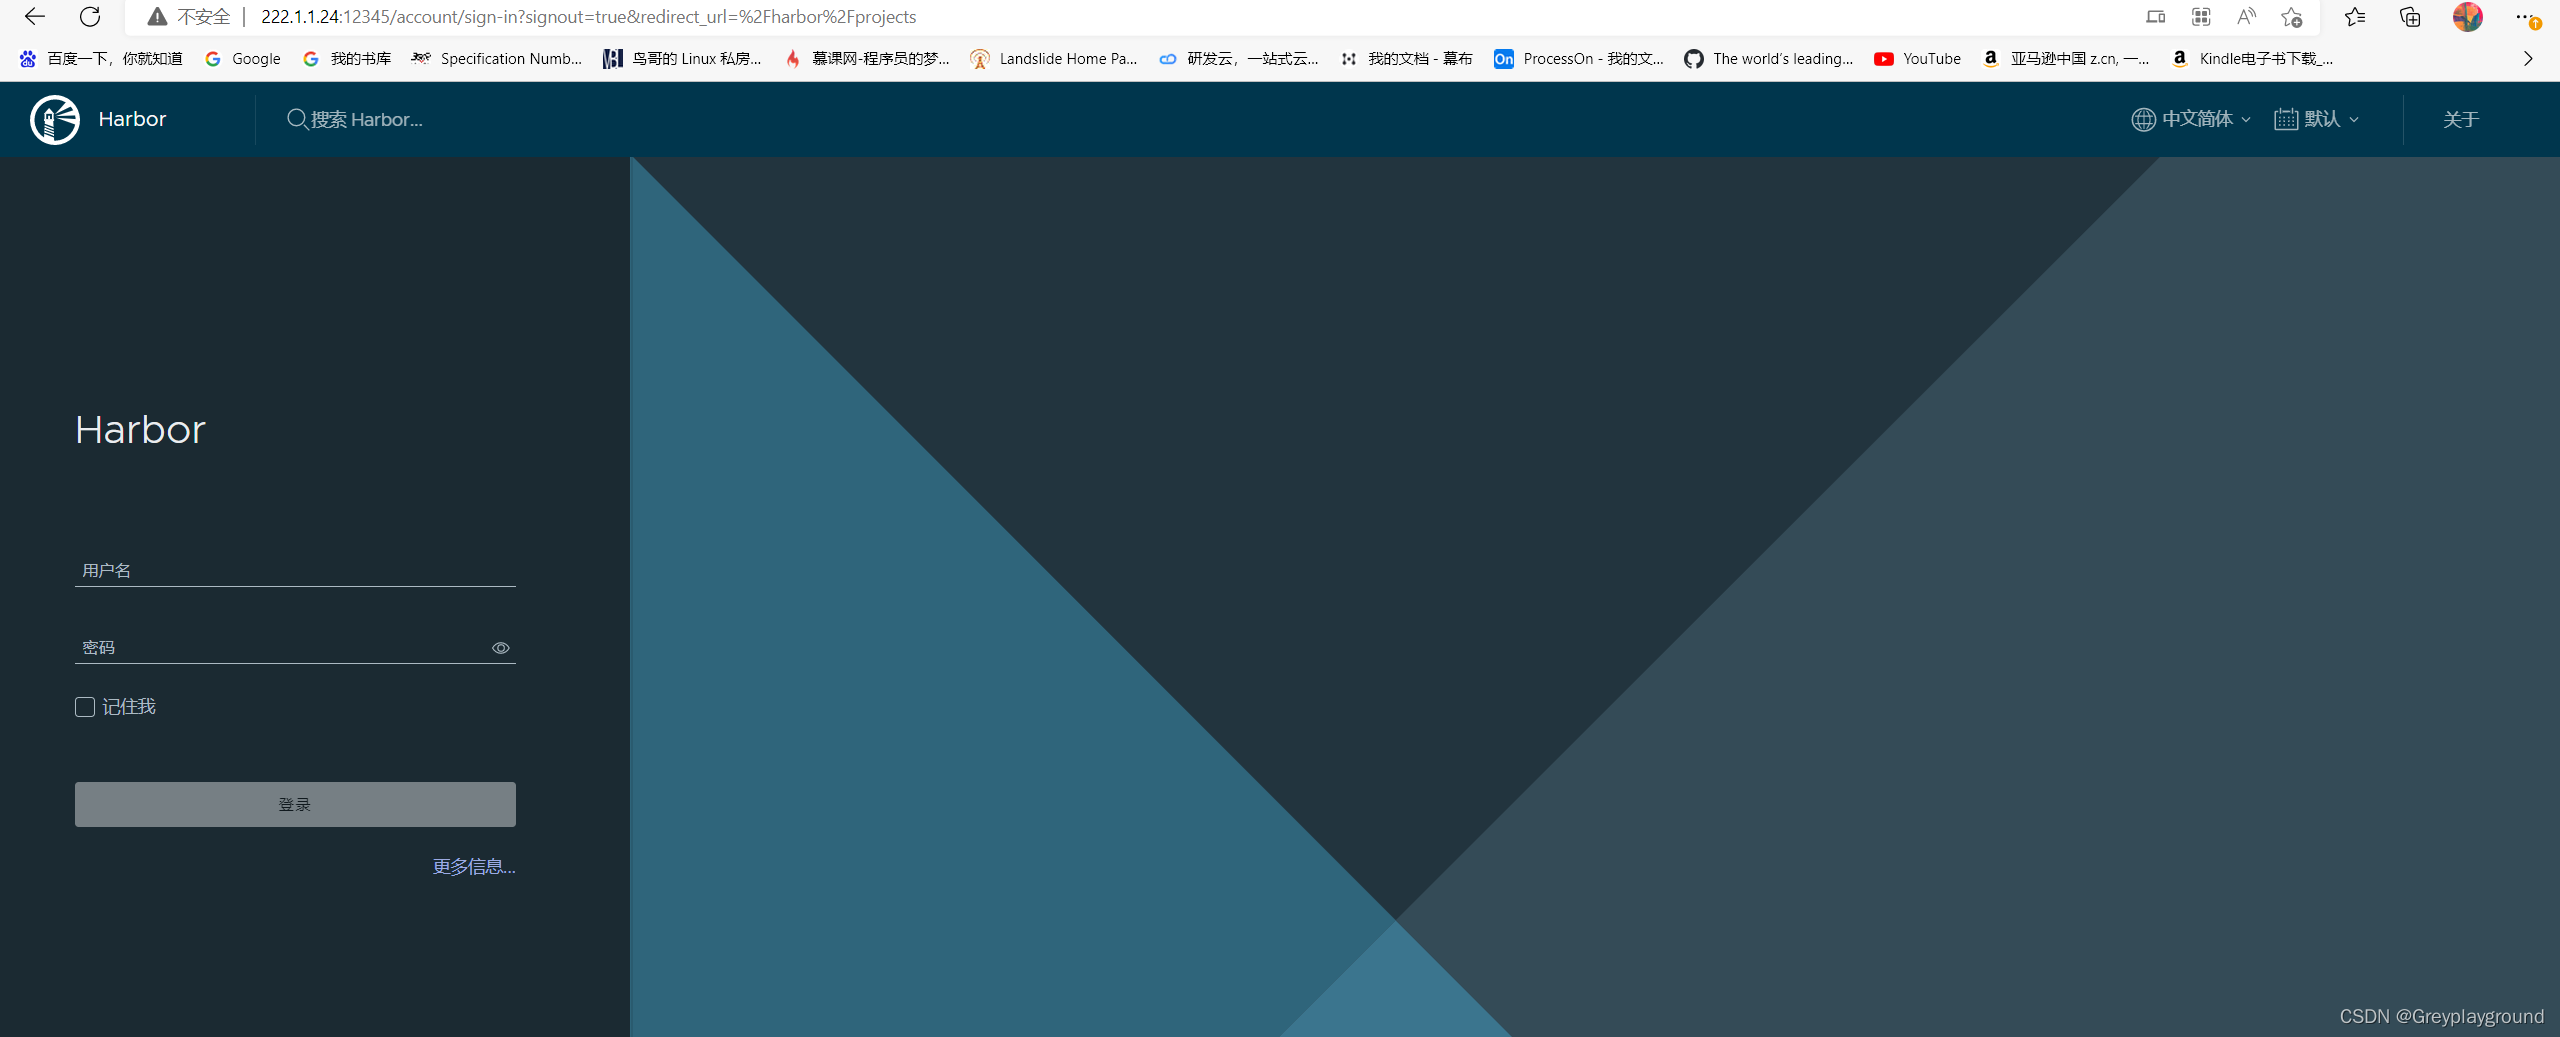
默认账户:
用户名:admin
密码:Harbor12345

恭喜:测试成功!


 2669
2669


 被折叠的 条评论
为什么被折叠?
被折叠的 条评论
为什么被折叠?
 到【灌水乐园】发言


