


1.使用kaptcha配置生成验证码
使用maven坐标引入pom
<dependency>
 <groupId>com.github.penggle</groupId>
 <artifactId>kaptcha</artifactId>
 <version>2.3.2</version>
 <exclusions>
 <exclusion>
 <artifactId>javax.servlet-api</artifactId>
 <groupId>javax.servlet</groupId>
 </exclusion>
 </exclusions>
</dependency>
新建配置文件kaptcha.properties,下面的验证码配置,从英文单词的角度很容易理解,当我们需要调整验证码的边框、颜色、大小、字体等属性的时候,可以修改这些配置。
kaptcha.border=no
kaptcha.border.color=105,179,90
kaptcha.image.width=200
kaptcha.image.height=60
kaptcha.session.key=code
kaptcha.textproducer.font.color=blue
kaptcha.textproducer.font.size=35
kaptcha.textproducer.char.length=4
kaptcha.textproducer.font.names=宋体,楷体,微软雅黑
新建配置类CaptchaConfig加载配置文件
@Component
@PropertySource(value = {"classpath:kaptcha.properties"})
public class CaptchaConfig {

 @Value("${kaptcha.border}")
 private String border;
    @Value("${kaptcha.border.color}")
 private String borderColor;
    @Value("${kaptcha.textproducer.font.color}")
 private String fontColor;
    @Value("${kaptcha.image.width}")
 private String imageWidth;
    @Value("${kaptcha.image.height}")
 private String imageHeight;
    @Value("${kaptcha.session.key}")
 private String sessionKey;
    @Value("${kaptcha.textproducer.char.length}")
 private String charLength;
    @Value("${kaptcha.textproducer.font.names}")
 private String fontNames;
    @Value("${kaptcha.textproducer.font.size}")
 private String fontSize;

    @Bean(name = "captchaProducer")
 public DefaultKaptcha getKaptchaBean() {
 DefaultKaptcha defaultKaptcha = new DefaultKaptcha();
        Properties properties = new Properties();
        properties.setProperty("kaptcha.border", border);
        properties.setProperty("kaptcha.border.color", borderColor);
        properties.setProperty("kaptcha.textproducer.font.color", fontColor);
        properties.setProperty("kaptcha.image.width", imageWidth);
        properties.setProperty("kaptcha.image.height", imageHeight);
        properties.setProperty("kaptcha.session.key", sessionKey);
        properties.setProperty("kaptcha.textproducer.char.length", charLength);
        properties.setProperty("kaptcha.textproducer.font.names", fontNames);
        properties.setProperty("kaptcha.textproducer.font.size",fontSize);
        Config config = new Config(properties);
        defaultKaptcha.setConfig(config);
        return defaultKaptcha;
    }

}
至此,Kaptcha开源验证码软件的配置我们就完成了。
2.生成验证码并保存
通过captchaProducer.createText()生成验证码文字,并和失效时间一起保存到CaptchaImageVO中。
将CaptchaImageVO验证码信息类对象,保存到session中。
通过captchaProducer.createImage(capText)生成验证码图片,并通过ServletOutputStream返回给前端
@RestController
public class CaptchaController {

 @Resource
 DefaultKaptcha captchaProducer;

    /**
 * 获取验证码
 */
 @GetMapping("kaptcha")
 public void kaptcha(HttpSession session, HttpServletResponse response) throws Exception {

 response.setDateHeader("Expires", 0);
        response.setHeader("Cache-Control", "no-store, no-cache, must-revalidate");
        response.addHeader("Cache-Control", "post-check=0, pre-check=0");
        response.setHeader("Pragma", "no-cache");
        response.setContentType("image/jpeg");

        String capText = captchaProducer.createText();
        CaptchaImageVO captchaImageVO = new CaptchaImageVO(capText,2 * 60);
        //将验证码存到session
 session.setAttribute(Constants.KAPTCHA_SESSION_KEY, captchaImageVO);

        //将图片返回给前端
 try(ServletOutputStream out = response.getOutputStream();) {
 BufferedImage bi = captchaProducer.createImage(capText);
            ImageIO.write(bi, "jpg", out);
            out.flush();
        }//使用try-with-resources不用手动关闭流
 }

}
CaptchaImageVO实体类: @Data
public class CaptchaImageVO {
//验证码文字
private String code;
//验证码失效时间
private LocalDateTime expireTime;
public CaptchaImageVO(String code, int expireAfterSeconds){
this.code = code;
this.expireTime = LocalDateTime.now().plusSeconds(expireAfterSeconds);
}
//验证码是否失效
public boolean isExpried() {
return LocalDateTime.now().isAfter(expireTime);
}
}
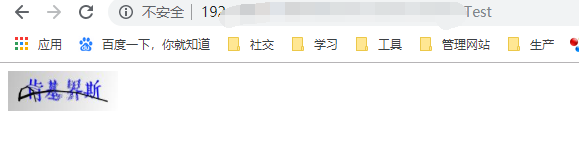
3.测试
<!DOCTYPE html>
<html lang="en">
<head>
 <meta charset="UTF-8">
 <title>Title</title>
 <script th:inline="javascript">
 var url_image = [[@{/kaptcha}]];
 </script>
</head>
<body>
 <img th:src="@{/kaptcha}" id="kaptcha" width="110px" height="40px"/>
</body>
<script th:inline="javascript">
 window.onload=function(){
 var kaptchaImg = document.getElementById("kaptcha");
        kaptchaImg.onclick = function(){
 kaptchaImg.src = url_image + "?" + Math.floor(Math.random() * 100);
        }
 }
</script>
</html>
实现的效果是,页面初始化即加载验证码。以后每一次点击,都会更新验证码。
4.kaptcha配置项
| Constant | 描述 | 默认值 |
|---|---|---|
| kaptcha.border | 图片边框,合法值:yes , no | yes |
| kaptcha.border.color | 边框颜色,合法值: r,g,b (and optional alpha) 或者 white,black,blue. | black |
| kaptcha.image.width | 图片宽 | 200 |
| kaptcha.image.height | 图片高 | 50 |
| kaptcha.producer.impl | 图片实现类 | com.google.code.kaptcha.impl.DefaultKaptcha |
| kaptcha.textproducer.impl | 文本实现类 | com.google.code.kaptcha.text.impl.DefaultTextCreator |
| kaptcha.textproducer.char.string | 文本集合,验证码值从此集合中获取 | abcde2345678gfynmnpwx |
| kaptcha.textproducer.char.length | 验证码长度 | 5 |
| kaptcha.textproducer.font.names | 字体 | Arial, Courier |
| kaptcha.textproducer.font.size | 字体大小 | 40px. |
| kaptcha.textproducer.font.color | 字体颜色,合法值: r,g,b 或者 white,black,blue. | black |
| kaptcha.textproducer.char.space | 文字间隔 | 2 |
| kaptcha.noise.impl | 干扰实现类 | com.google.code.kaptcha.impl.DefaultNoise |
| kaptcha.noise.color | 干扰 颜色,合法值: r,g,b 或者 white,black,blue. | black |
| kaptcha.background.impl | 背景实现类 | com.google.code.kaptcha.impl.DefaultBackground |
| kaptcha.background.clear.from | 背景颜色渐变,开始颜色 | light grey |
| kaptcha.background.clear.to | 背景颜色渐变, 结束颜色 | white |
| kaptcha.word.impl | 文字渲染器 | com.google.code.kaptcha.text.impl.DefaultWordRenderer |
| kaptcha.session.key | session key | KAPTCHA_SESSION_KEY |
| kaptcha.session.date | session date | KAPTCHA_SESSION_DATE |
| kaptcha.obscurificator.impl | 图片样式:<br />水纹 com.google.code.kaptcha.impl.WaterRipple <br /> 鱼眼 com.google.code.kaptcha.impl.FishEyeGimpy <br /> 阴影 com.google.code.kaptcha.impl.ShadowGimpy | com.google.code.kaptcha.impl.WaterRipple |


 329
329


 被折叠的 条评论
为什么被折叠?
被折叠的 条评论
为什么被折叠?
 到【灌水乐园】发言


