


背景
相信接触Android久一点的朋友对于LayoutInflater一定不会陌生,都会知道它主要是用于加载布局的。而刚接触Android的朋友可能对LayoutInflater不怎么熟悉,因为加载布局的任务通常都是在Activity中调用setContentView()方法来完成的。其实setContentView()方法的内部也是使用LayoutInflater来加载布局的,只不过这部分源码是internal的,不太容易查看到。那么今天我们就来把LayoutInflater的工作流程仔细地剖析一遍,也许还能解决掉某些困扰你心头多年的疑惑。
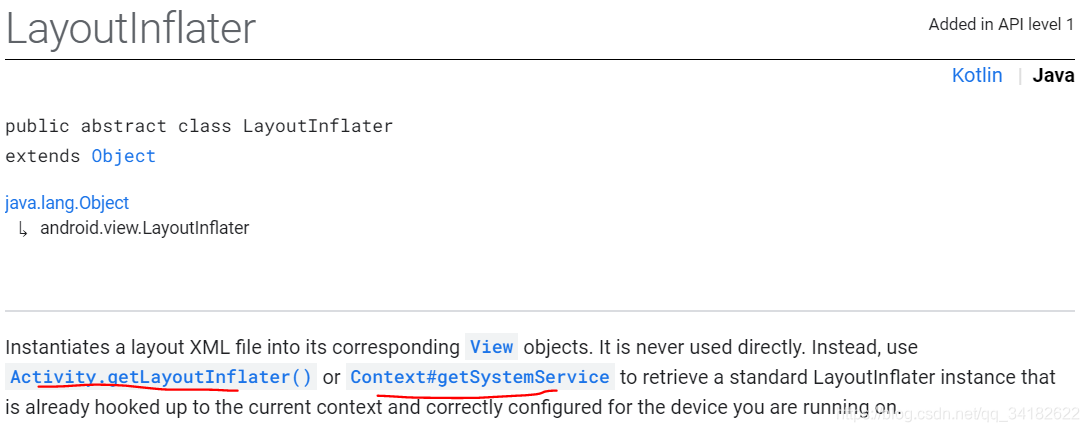
inflate是什么
首先我们可以看官网上的解释:

通俗点就是将xml文件加载为view,和findviewbyid返回相同的类型——view,但前者加载的是xml文件,后者是寻找特定id的控件view。
这时候可能就会有人问,如果我给xml文件的根layout也加上id,不就不需要inflate了吗?让我们来看看findviewbyid的文档:

划重点,这是view的方法!那么调用该方法的view从哪里来呢?寻找的view又是从哪里来的?inflate得来的,inflate加载xml时会将xml文件里控件转为view,即创建!现在恍然大悟了吧。可能又会有人问,activity里不是可以直接findviewbyid吗?这是因为setContentView源码中也是调用了inflate的,所以说,一切都要基于inflate。
inflate是创建view,findviewbyid是寻找view!
而且,文档中也说明,findviewbyid查找的是view的子view,这个树结构必须牢记在心!
怎么获取layoutinflator
这里我们可以看看文档:
这里我列了三种获取方式:
LayoutInflater layoutInflater = LayoutInflater.from(context);
LayoutInflater layoutInflater1 = (LayoutInflater) context.getSystemService(Context.LAYOUT_INFLATER_SERVICE);
LayoutInflater layoutInflater2 = activity.getLayoutInflater();
inflate使用参数解释
所有的inflate方法,最终都会调用到下面这个方法:
public View inflate(XmlPullParser parser, ViewGroup root, boolean attachToRoot)
所以理解该方法是关键!!
这里,我们先通过例子来理解参数,后面再对源码进行分析。
理论性解释:
首先,我们先看文档:
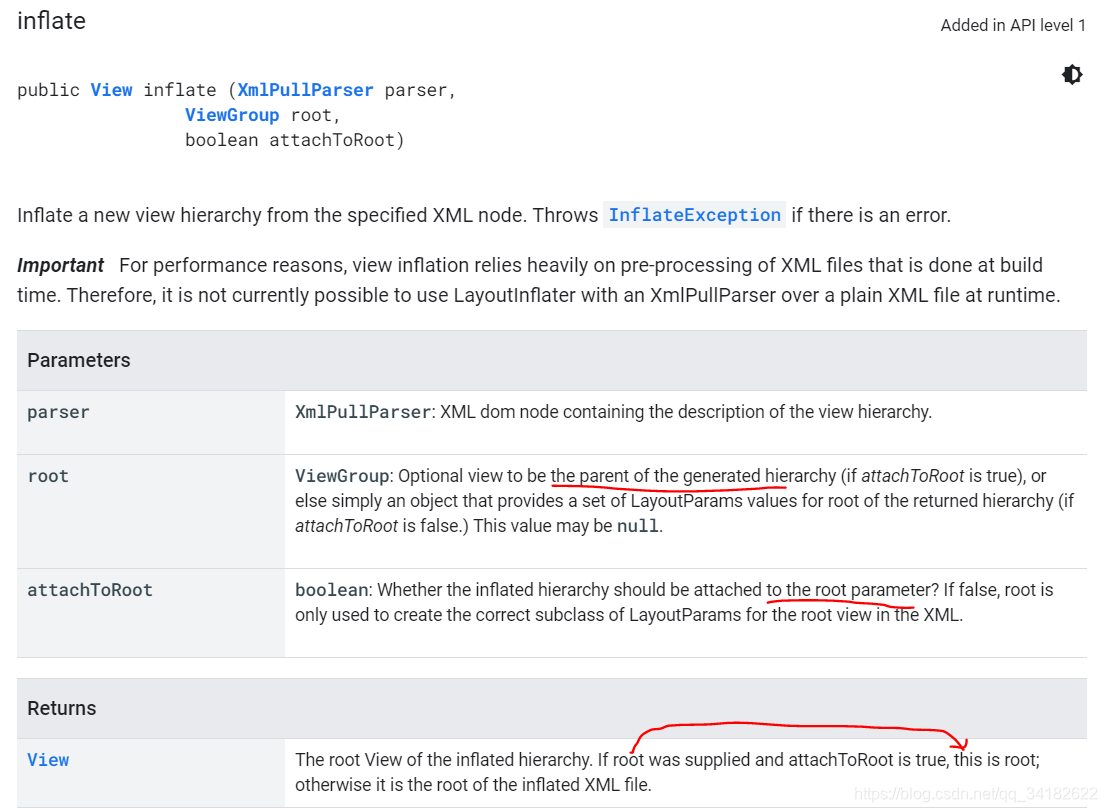
- XmlPullParser parser:我们传过来的resourceid被转化成XmlPullParser对象,用于解析布局。
- ViewGroup root:这个传进的是一个ViewGroup对象,当attachToRoot为true的时候,root就是当前inflate方法返回view的父view,当attachToRoot为false的时候,root就是一个普通的view,用来帮助设置inflate方法返回view(即加载的xml文件)的LayoutParams【后半段比较难理解,在后面的例子以及源码分析中会解释到】。
- boolean attachToRoot,这个就是上边说的,用来决定inflate返回的view跟root是否存在父子布局关系。true表示存在父子关系,系统会将inflate方法返回的view添加到root的子view里。false不添加。
- 返回值view,如果形成父子关系,则返回的是root,否则,返回的是parser形成的view**。
以下为大佬的总结:
- 如果root为null,attachToRoot将失去作用,设置任何值都没有意义。
- 如果root不为null,attachToRoot设为true,则会给加载的布局文件的指定一个父布局,即root。
- 如果root不为null,attachToRoot设为false,则会将布局文件(指parser)最外层的所有layout属性进行设置,当后来该view(指parser形成的view)被添加到父view当中时,这些layout属性会自动生效。
- 在不设置attachToRoot参数的情况下,如果root不为null,attachToRoot参数默认为true。
例子1:root为null
activity_main.xml:
<?xml version="1.0" encoding="utf-8"?>
<LinearLayout xmlns:android="http://schemas.android.com/apk/res/android"
    xmlns:app="http://schemas.android.com/apk/res-auto"
    android:id="@+id/main_layout"
    android:layout_width="match_parent"
    android:layout_height="match_parent"
    android:orientation="horizontal">

</LinearLayout>
空布局。
button_layout.xml:
<?xml version="1.0" encoding="utf-8"?>
<Button
    xmlns:android="http://schemas.android.com/apk/res/android"
    android:id="@+id/button"
    android:layout_width="200dp"
    android:layout_height="100dp"
    android:text="button">

</Button>
只有一个button按钮。
MainActivity.java:
protected void onCreate(Bundle savedInstanceState) {
        super.onCreate(savedInstanceState);
        setContentView(R.layout.activity_main2);
        LinearLayout linearLayout = (LinearLayout) findViewById(R.id.main_layout);
        View button_layout = findViewById(R.id.button);
        linearLayout.addView(button_layout);
    }
这里我们没有用inflate加载button布局文件,而是使用findviewbyid来获取(验证前面的疑问,即为何不用findviewbyid代替inflate),然后将button添加到linearLayout中。
疑惑1:竟然findviewbyid是view方法,那么这里为啥直接可以调用findviewbyid呢?【后面会解释】
运行,闪退!
查看后台显示:

button_layout为null?为什么?
因为根本就不存在id为R.id.button的view,根本就没有创建过!
将代码改为如下:
    protected void onCreate(Bundle savedInstanceState) {
        super.onCreate(savedInstanceState);
        setContentView(R.layout.activity_main2);
        LayoutInflater layoutInflater = LayoutInflater.from(this);
        View button_layout = layoutInflater.inflate(R.layout.button_layout, null);
        LinearLayout linearLayout = (LinearLayout) findViewById(R.id.main_layout);
        linearLayout.addView(button_layout);
    }
运行,正常!
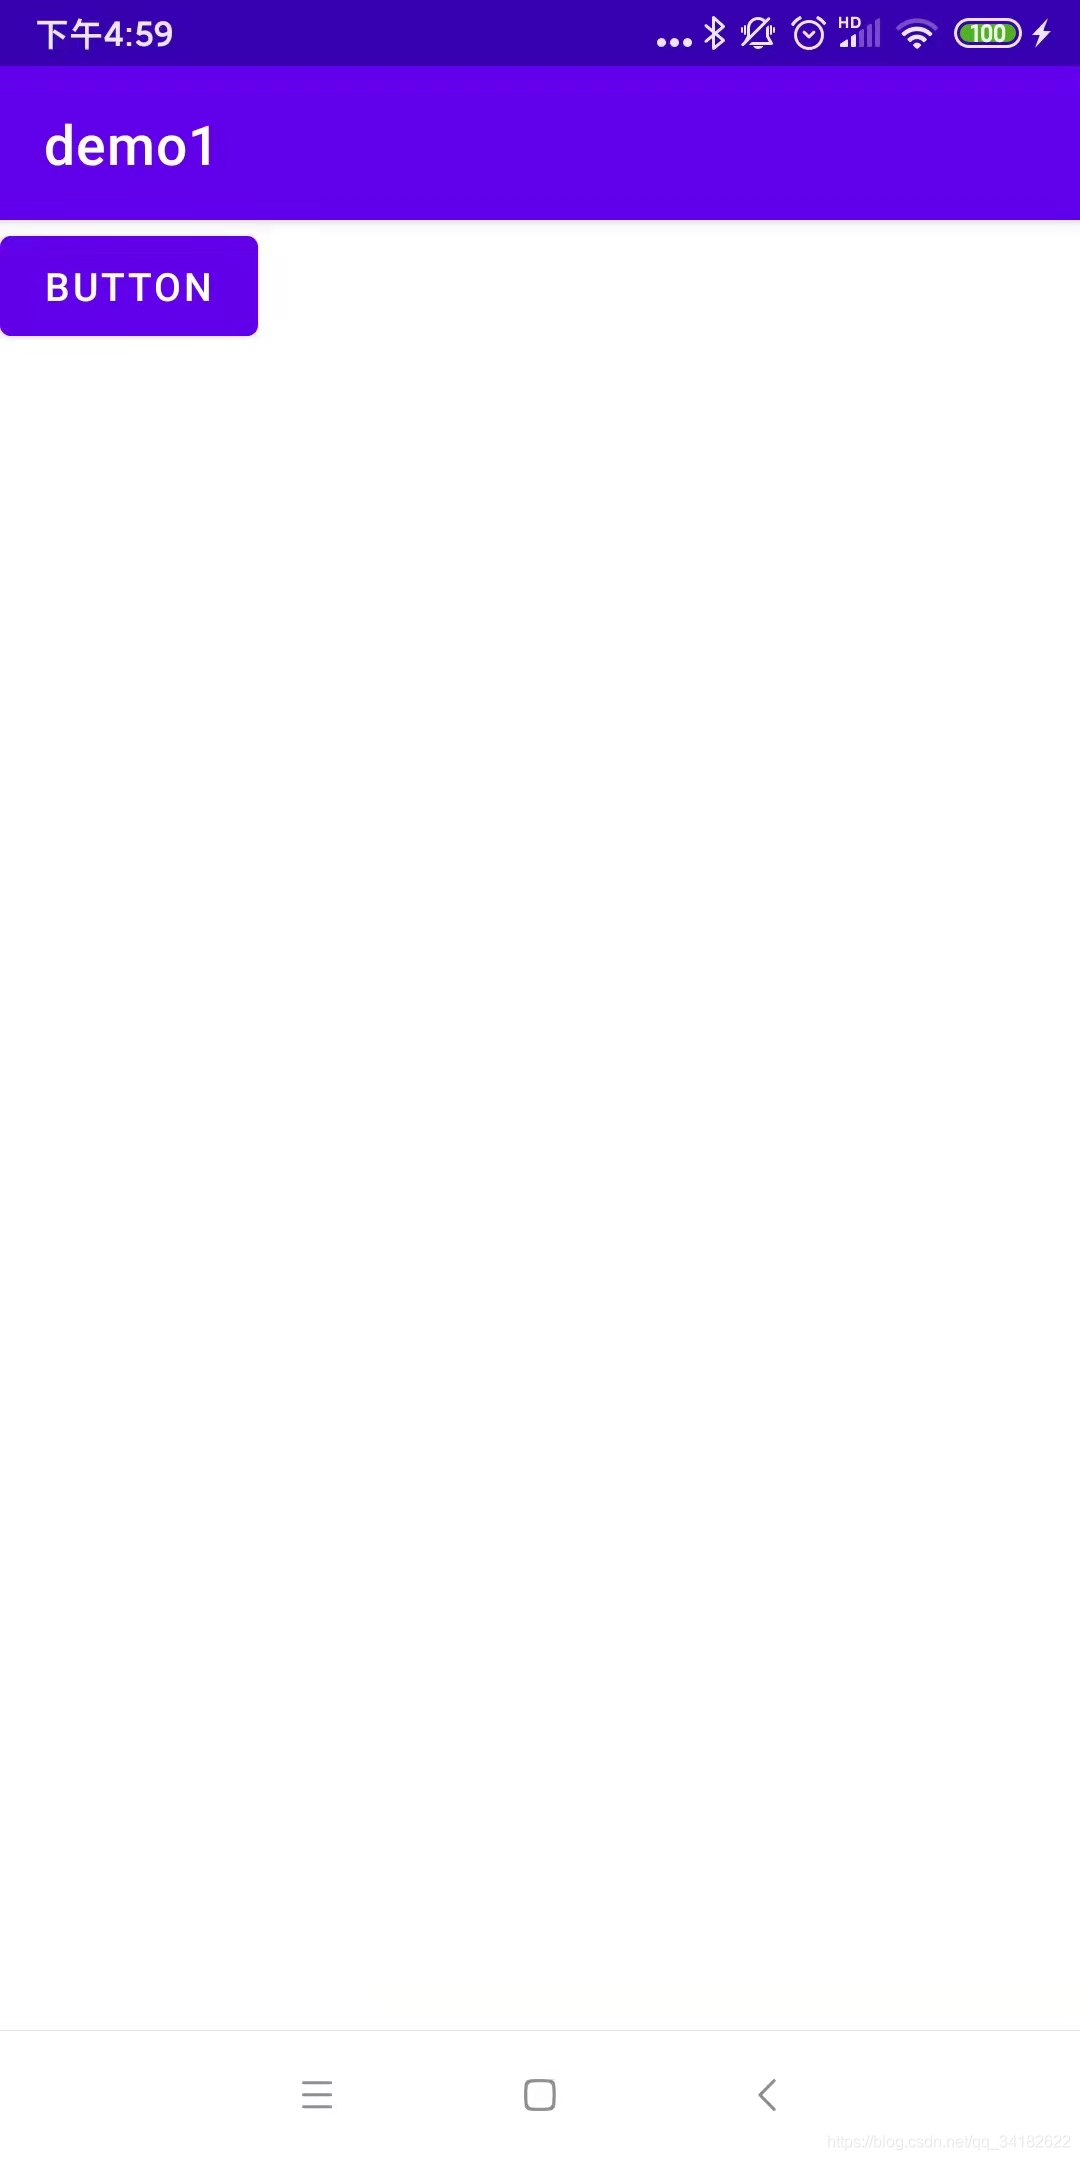
显示,不正常!!
可能就会有人问了,为什么说显示不正常呢?
因为button的大小,我们设置的不是这样!
android:layout_width="200dp"
android:layout_height="100dp"
噢~,是哦,那为什么呢?难道和inflate有关?
是的,就是和它有关。
其实这里不管你将Button的layout_width和layout_height的值修改成多少,都不会有任何效果的,因为这两个值现在已经完全失去了作用。平时我们经常使用layout_width和layout_height来设置View的大小,并且一直都能正常工作,就好像这两个属性确实是用于设置View的大小的。而实际上则不然,它们其实是用于设置View在布局中的大小的,也就是说,首先View必须存在于一个布局中,之后如果将layout_width设置成match_parent表示让View的宽度填充满布局,如果设置成wrap_content表示让View的宽度刚好可以包含其内容,如果设置成具体的数值则View的宽度会变成相应的数值。这也是为什么这两个属性叫作layout_width和layout_height,而不是width和height。
再来看一下我们的button_layout.xml吧,很明显Button这个控件目前不存在于任何布局当中!
为什么说Button不存在于任何布局中呢?它不是都放入到 linearLayout中了吗?
这得看Button这个view是几时创建的,它是在被加入到 linearLayout前就创建的,在创建时,它的layout属性就被丢弃了(即没有被设置)!
所以没作用。
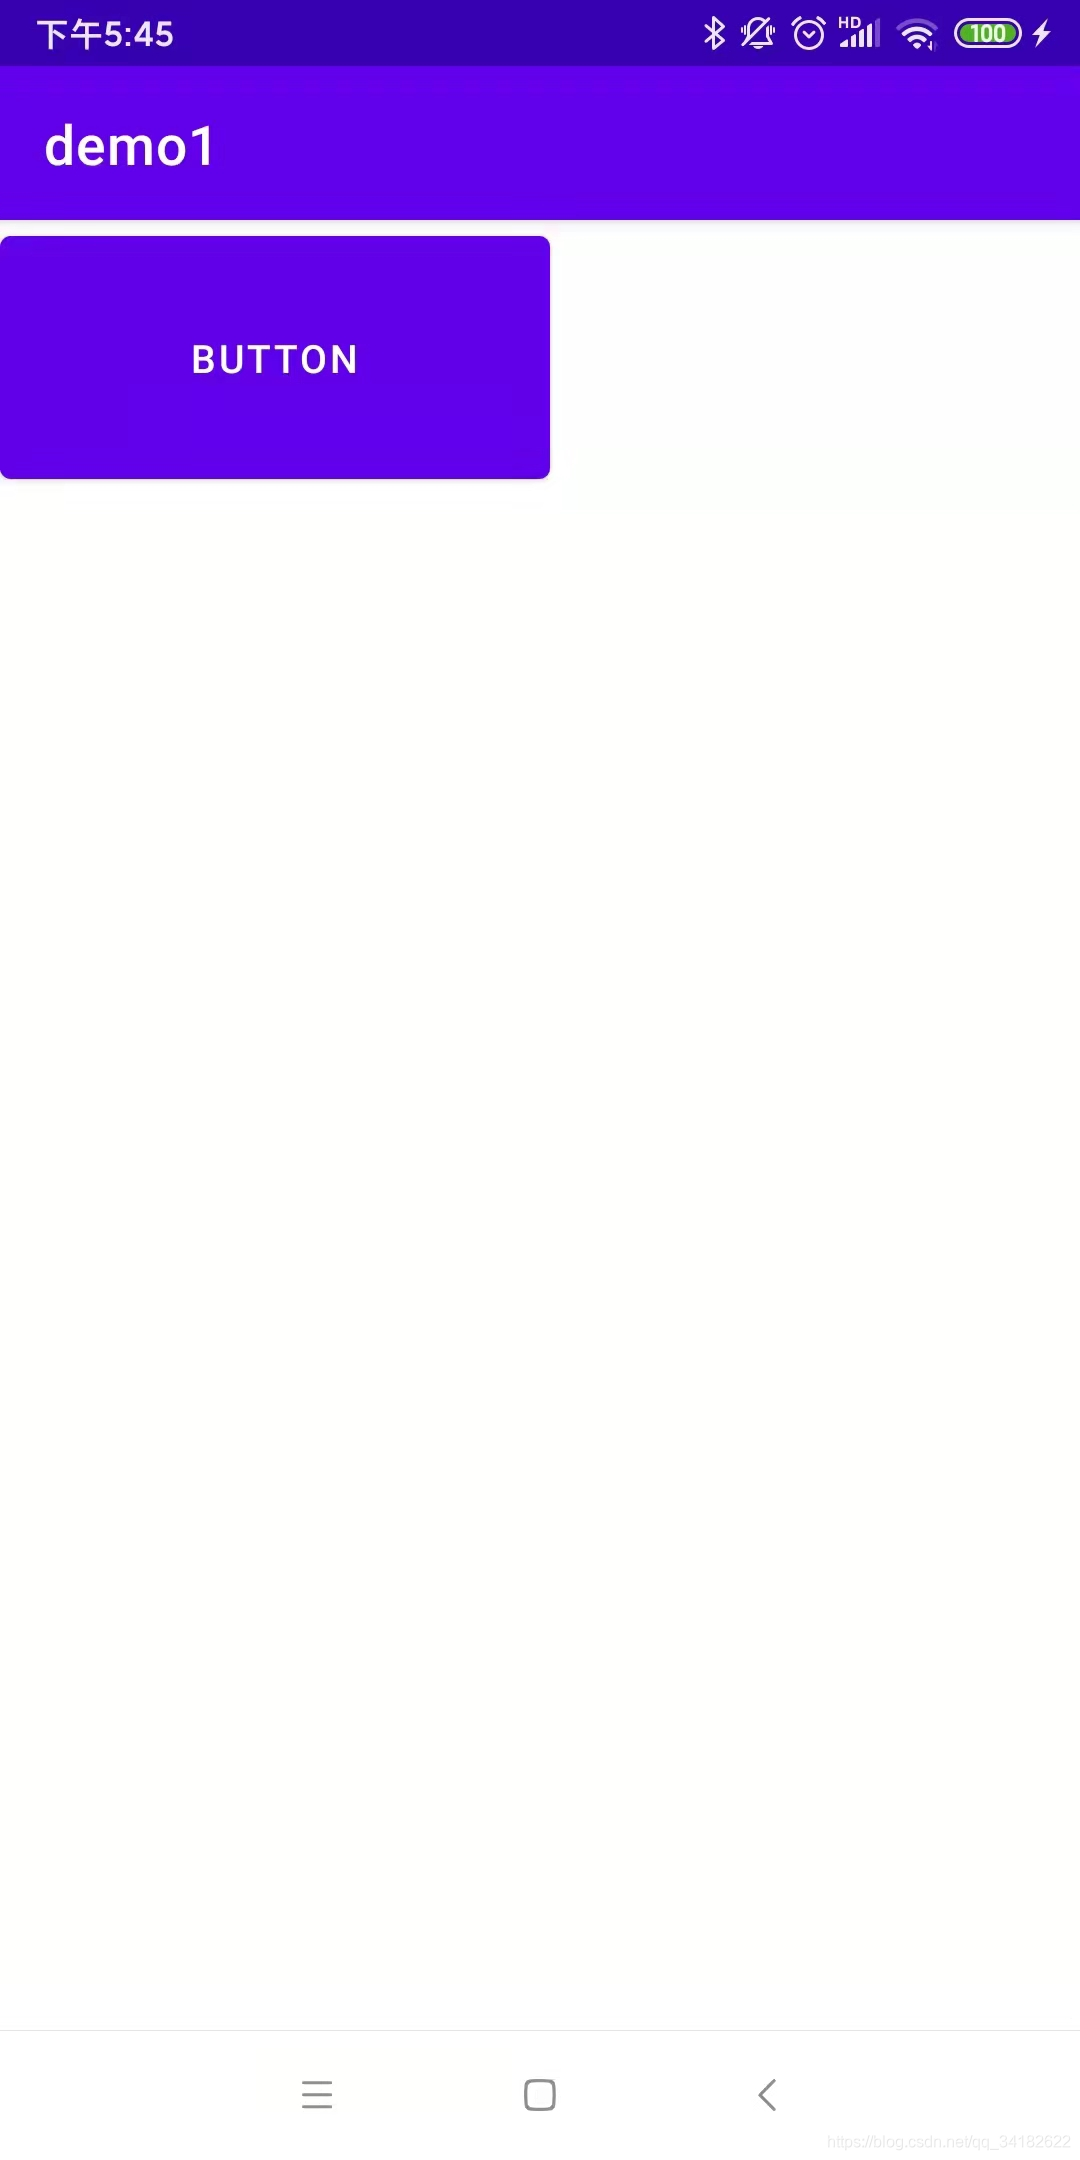
例子2:root不为null,attachToRoot为true
上面说的是button创建(inflate)时不存在于任何布局,导致layout属性没有被设置,结果大小没变化,那么,如果我们给它设置了父view呢?
把代码改为:
    protected void onCreate(Bundle savedInstanceState) {
        super.onCreate(savedInstanceState);
        setContentView(R.layout.activity_main2);
        LayoutInflater layoutInflater = LayoutInflater.from(this);
        LinearLayout linearLayout = (LinearLayout) findViewById(R.id.main_layout);
        View view = layoutInflater.inflate(R.layout.button_layout, linearLayout,true);
        System.out.println(view);
    }
打印返回值。
运行,正常!
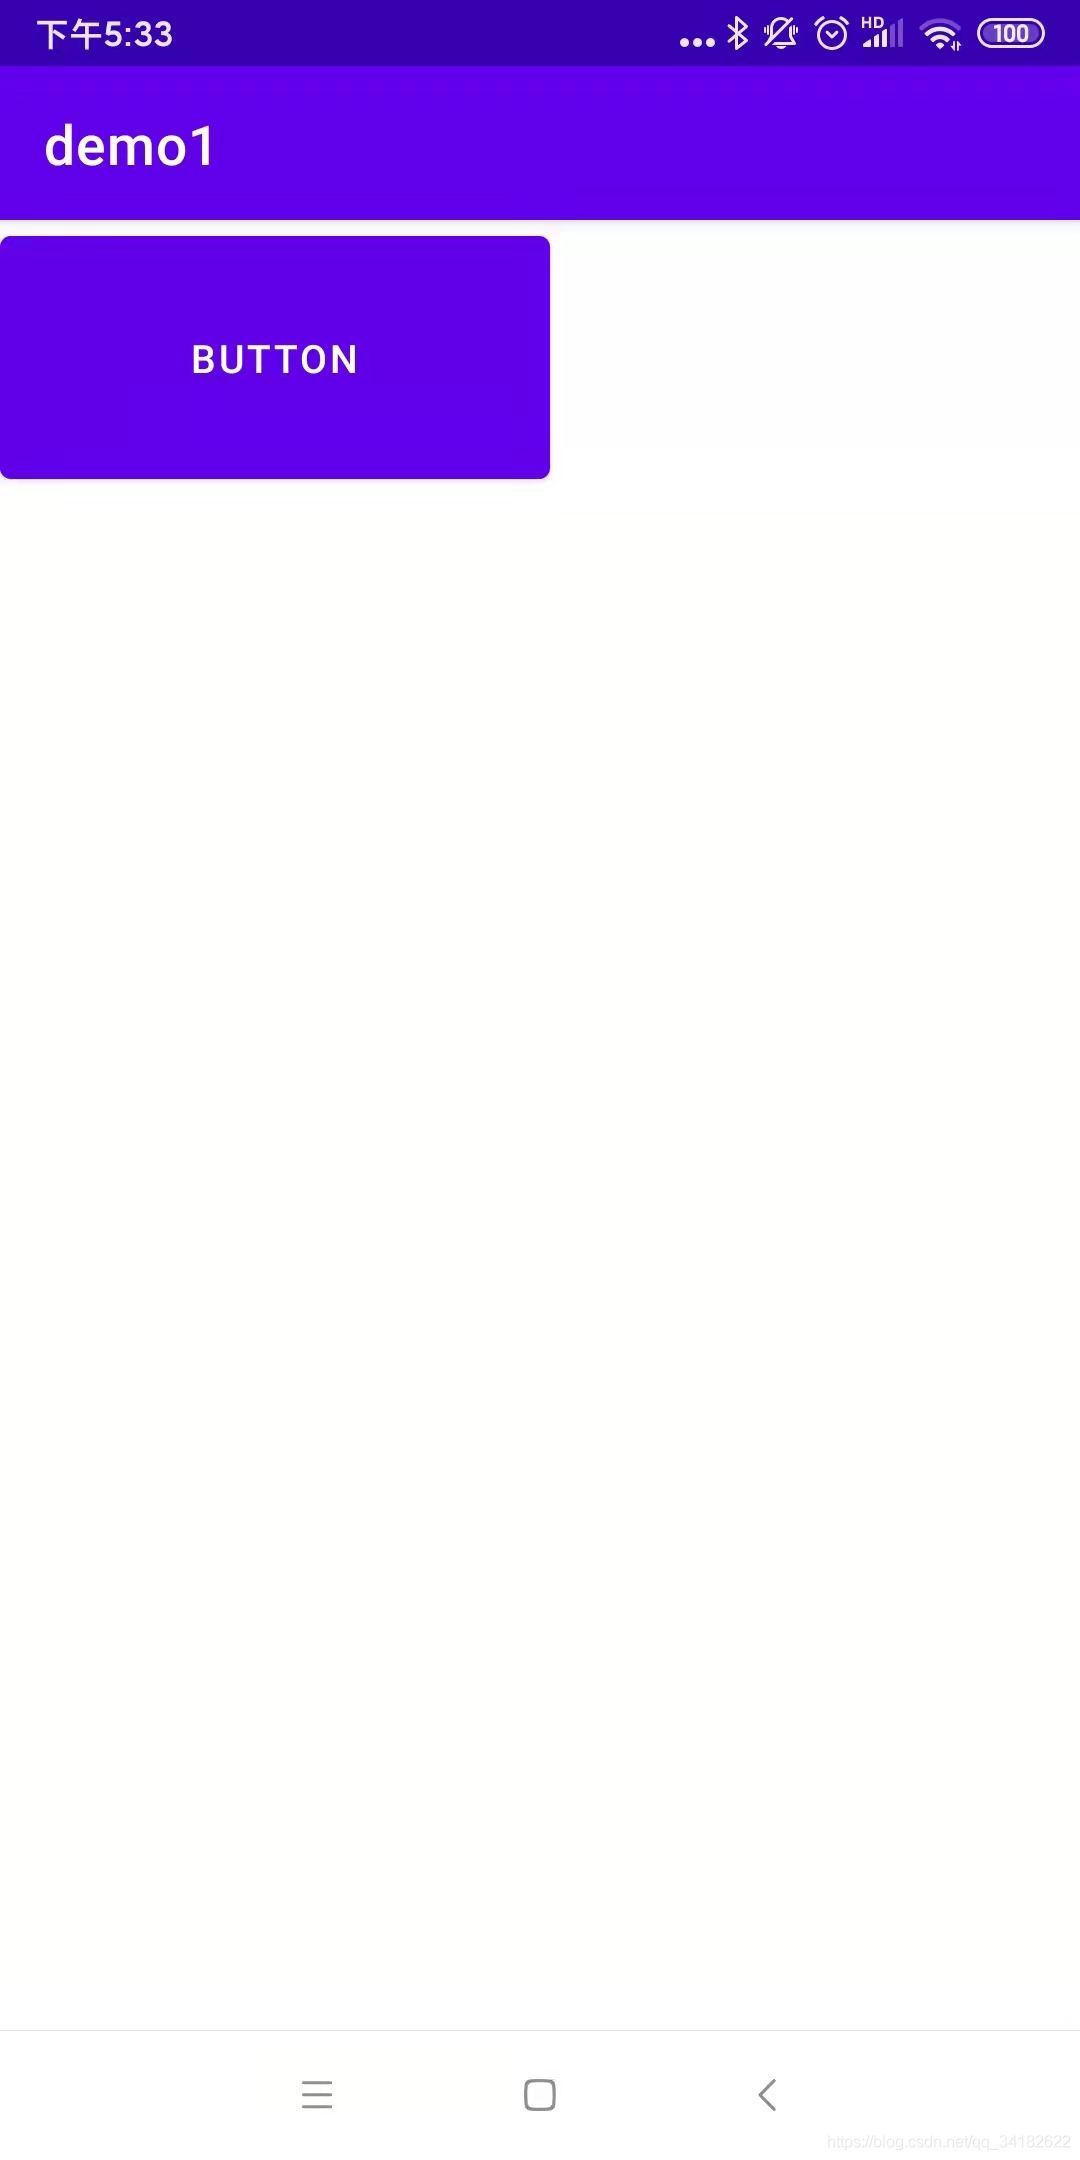
显示,正常!
system.out输出:

为 linearLayout!
现在,是不是有种便秘疏通了的感觉,舒服多了。
不急,我们还剩一种情况没尝试。
例子3:root不为null,attachToRoot为false
把代码改为:
    protected void onCreate(Bundle savedInstanceState) {
        super.onCreate(savedInstanceState);
        setContentView(R.layout.activity_main2);
        LayoutInflater layoutInflater = LayoutInflater.from(this);
        LinearLayout linearLayout = (LinearLayout) findViewById(R.id.main_layout);
        View view = layoutInflater.inflate(R.layout.button_layout, linearLayout,false);
        System.out.println(view);
    }
其实看到这个代码,肯定有同学发现了端倪,即:如果按照前面的理论解释,这个运行后会显示button吗?
咱们试试。
运行,正常!

显示,不正常!
system.out输出:

为 button!
对,没有显示,其实这个很好理解,首先没有设置父view,其次后面也没有加入到其他view中,那怎么会显示呢?
好,那么我们再把代码改为如下:
    protected void onCreate(Bundle savedInstanceState) {
        super.onCreate(savedInstanceState);
        setContentView(R.layout.activity_main2);
        LayoutInflater layoutInflater = LayoutInflater.from(this);
        LinearLayout linearLayout = (LinearLayout) findViewById(R.id.main_layout);
        View view = layoutInflater.inflate(R.layout.button_layout, linearLayout,false);
        linearLayout.addView(view);
    }
运行,正常!
显示,正常!
这下子,你的便秘是不是已经治好了啊,有种“一泻千里”的感觉。
Activity的“特殊之处”:
inflate方法我们已经说完了,小伙伴们可能有另外一个疑问,那为什么Activity布局的根节点的宽高属性会生效?其实原因很简单,大部分情况下我们一个Activity页面由两部分组成(Android的版本号和应用主题会影响到Activity页面组成,这里以常见页面为例),我们的页面中有一个顶级View叫做DecorView,DecorView中包含一个竖直方向的LinearLayout,LinearLayout由两部分组成,第一部分是标题栏,第二部分是内容栏,内容栏是一个FrameLayout,我们在Activity中调用setContentView就是将View添加到这个FrameLayout中,所以给大家一种错觉仿佛Activity的根布局很特殊,其实不然。
回到之前的问题,activity中为什么可以直接调用findviewbyid?
ctrl+click方法后,发现如下:

可以看到,getDelegate()返回的东西调用了findViewById,我猜这个就是view,或者和view有关,反正不是activity本身调用了,而是activity里面的某个成员变量调用的,可能就是根view。
源码分析
源码:
public View inflate(XmlPullParser parser, @Nullable ViewGroup root, boolean attachToRoot) {
        synchronized (mConstructorArgs) {
            Trace.traceBegin(Trace.TRACE_TAG_VIEW, "inflate");

            final Context inflaterContext = mContext;
            final AttributeSet attrs = Xml.asAttributeSet(parser);
            Context lastContext = (Context) mConstructorArgs[0];
            mConstructorArgs[0] = inflaterContext;
            View result = root;

            try {
                advanceToRootNode(parser);
                final String name = parser.getName();

                if (DEBUG) {
                    System.out.println("**************************");
                    System.out.println("Creating root view: "
                            + name);
                    System.out.println("**************************");
                }

                if (TAG_MERGE.equals(name)) {
                    if (root == null || !attachToRoot) {
                        throw new InflateException("<merge /> can be used only with a valid "
                                + "ViewGroup root and attachToRoot=true");
                    }

                    rInflate(parser, root, inflaterContext, attrs, false);
                } else {
                    // Temp is the root view that was found in the xml
                    final View temp = createViewFromTag(root, name, inflaterContext, attrs);

                    ViewGroup.LayoutParams params = null;

                    if (root != null) {
                        if (DEBUG) {
                            System.out.println("Creating params from root: " +
                                    root);
                        }
                        // Create layout params that match root, if supplied
                        params = root.generateLayoutParams(attrs);
                        if (!attachToRoot) {
                            // Set the layout params for temp if we are not
                            // attaching. (If we are, we use addView, below)
                            temp.setLayoutParams(params);
                        }
                    }

                    if (DEBUG) {
                        System.out.println("-----> start inflating children");
                    }

                    // Inflate all children under temp against its context.
                    rInflateChildren(parser, temp, attrs, true);

                    if (DEBUG) {
                        System.out.println("-----> done inflating children");
                    }

                    // We are supposed to attach all the views we found (int temp)
                    // to root. Do that now.
                    if (root != null && attachToRoot) {
                        root.addView(temp, params);
                    }

                    // Decide whether to return the root that was passed in or the
                    // top view found in xml.
                    if (root == null || !attachToRoot) {
                        result = temp;
                    }
                }

            } catch (XmlPullParserException e) {
                final InflateException ie = new InflateException(e.getMessage(), e);
                ie.setStackTrace(EMPTY_STACK_TRACE);
                throw ie;
            } catch (Exception e) {
                final InflateException ie = new InflateException(
                        getParserStateDescription(inflaterContext, attrs)
                        + ": " + e.getMessage(), e);
                ie.setStackTrace(EMPTY_STACK_TRACE);
                throw ie;
            } finally {
                // Don't retain static reference on context.
                mConstructorArgs[0] = lastContext;
                mConstructorArgs[1] = null;

                Trace.traceEnd(Trace.TRACE_TAG_VIEW);
            }

            return result;
        }
    }
代码很长,且很复杂的样子,刚看到就有种被劝退的感觉,但其实,去掉许多if判断以及异常处理的代码后,剩下的主要代码还是很清晰明了的。
首先从如下语句开始:
final AttributeSet attrs = Xml.asAttributeSet(parser);
这条语句应该是获取xml里面所有的属性集。
然后到:
// Temp is the root view that was found in the xml
final View temp = createViewFromTag(root, name, inflaterContext, attrs);
如注释所说,创建根view;内部是使用了反射机制创建的view。
if (root != null) {
    if (DEBUG) {
        System.out.println("Creating params from root: " +
                           root);
    }
    // Create layout params that match root, if supplied
    params = root.generateLayoutParams(attrs);
    if (!attachToRoot) {
        // Set the layout params for temp if we are not
        // attaching. (If we are, we use addView, below)
        temp.setLayoutParams(params);
    }
}
如果root不为null,进入该语句块。先获取适配于root的layout params,意思应该是,提取xml文件中根view的layout params,且是能适配于root这个viewgroup的,比如,LinearLayout和ConstraintLayout的layout 参数就不同。然后如果attachToRoot为false,则会给temp设置layoutparams【就如前面所说,帮助设置layout参数】。
// Inflate all children under temp against its context.
rInflateChildren(parser, temp, attrs, true);
通过递归的方式创建子view,具体内容就不细讲。
// We are supposed to attach all the views we found (int temp)
// to root. Do that now.
if (root != null && attachToRoot) {
    root.addView(temp, params);
}
如果root不为null,且attachToRoot为true,则给temp设置父view为root。
// Decide whether to return the root that was passed in or the
// top view found in xml.
if (root == null || !attachToRoot) {
    result = temp;
}
如果root为null,就将返回值设为temp,即xml文件根view本身。
参考链接:
先看:
Android LayoutInflater原理分析,带你一步步深入了解View(一):https://blog.csdn.net/guolin_blog/article/details/12921889
三个案例带你看懂LayoutInflater中inflate方法两个参数和三个参数的区别:https://blog.csdn.net/u012702547/article/details/52628453
源码看:
Android LayoutInflater原理分析,带你一步步深入了解View(一):https://blog.csdn.net/guolin_blog/article/details/12921889
从源码角度深入理解LayoutInflater:https://wangsong.blog.csdn.net/article/details/49314327
未看过:
Android 中LayoutInflater(布局加载器)系列博文说明:https://blog.csdn.net/l540675759/article/details/78080656
知识拓展
Android视图绘制流程完全解析,带你一步步深入了解View(二):https://blog.csdn.net/guolin_blog/article/details/16330267


 2537
2537

 被折叠的 条评论
为什么被折叠?
被折叠的 条评论
为什么被折叠?
 到【灌水乐园】发言


