


win10系统下载编译webrtc源码
一、下载安装VS2017
目前最新版本的webrtc已经可以用Vs2019,但是因为我们要使用的webrtc版本是以前的版本,旧版webrtc源码中vs_toolchain.py中指定了vs2017,所以不能用2019,否则编译是会出错。
1、官网下载vs2017
下载网址:[https://my.visualstudio.com/Downloads?q=visual%20studio%202017&wt.mc_id=omsftvscom~older-downloads](https://my.visualstudio.com/Downloads?q=visual studio 2017&wt.mc_id=omsftvscom~older-downloads)

2、安装vs2017
安装时,选择使用c++的桌面开发,一定要勾选MFC和ATL相关的组件

二、下载安装win10-SDK
下载Vs2017时会自动下载sdk,版本是10.0.17763.0,但是https://chromium.googlesource.com/chromium/src/+/master/docs/windows_build_instructions.md,中提到,必须安装10.0.19041或者更高版本的 Windows 10 SDK,所以我们还需要自定义安装win10-SDK

1、下载win10-SDK
下载网址:
https://developer.microsoft.com/en-us/windows/downloads/windows-10-sdk/
2、安装win10-SDK
注意一定要勾选Debugging Tools For Windows这一项

3、修改文件目录
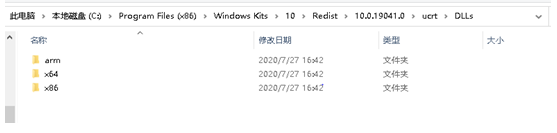
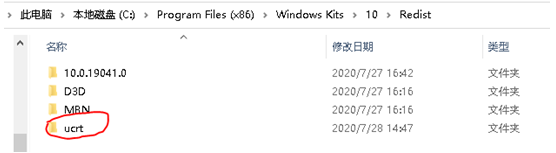
复制C:\Program Files (x86)\Windows Kits\10\Redist\10.0.19041.0\ucrt这个文件夹到C:\Program Files (x86)\Windows Kits\10\Redist目录下,因为默认安装的win10-SDK的DLLs路径为:C:\Program Files (x86)\Windows Kits\10\Redist\10.0.19041.0\ucrt\DLLs…但是webrtc的src\build\vs_toolchain.py文件中sdk-DLLs的导入目录为:C:\Program Files (x86)\Windows Kits\10\Redist\ucrt\DLLs,为了避免错误,将ucrt复制到Redist目录下

三、下载depot_tools
由于Chromium项目的代码量巨大,又依赖了很多第三方代码库,所以如何有效的管理这些代码是个难题。Chromium官方提供了一个depot_tools来管理Chromium源代码的工具,官方开发工作流也是基于depot_tools。
1、下载网址
https://commondatastorage.googleapis.com/chrome-infra-docs/flat/depot_tools/docs/html/depot_tools_tutorial.html#_setting_up
点击红圈地方下载depot_tools

2、解压depot_tools
下载后直接解压到指定路径,不要在其他地方解压再复制到你想放的目录,以免复制过程中丢失一些文件
四、设置环境变量
   1. 创建一个.boto文件,文件内容为:
       [Boto]
       proxy=192.168.21.208
       proxy_port=808
       添加NO_AUTH_BOTO_CONFIG环境变量,值为.boto文件路径
   2. 环境变量Path添加depot_tools的目录,并放在Path最前面
   3.添加DEPOT_TOOLS_WIN_TOOLCHAIN环境变量,值为0,表示使用本机vs版本
   4. 添加vs2017_install环境变量,值为vs安装路径
   5. 添加GYP_MSVS_VERSION环境变量,值为vs的版本
   6. 添加GYP_GENERATORS环境变量,值为编译工具: 	msvs-ninja,ninja
   7. 添加GYP_MSVS_OVERRIDE_PATH环境变量,值为vs安装路径
   8. 添加https_proxy、http_proxy环境变量,值为网络代理


五、执行gclient
1、终端执行指令
打开终端cmd,切换到depot_tools所在路径,执行gclient,下图表示执行成功

2、确认python.bat
输入where python 并确认python.bat位于python.exe的任何副本之前

3、 安装pywin32
因为现在python下载的时候不会自动下载pywin32,所以要手动给depot_tools中的python安装pywin32。
cmd在\depot_tools\bootstrap-3_8_0_chromium_8_bin\python\bin目录下执行
$ python -m pip install pywin32

六、下载webrtc
1、 新建文件夹webrtc
$ mkdir webrtc
$ cd webrtc
2、 获取webrtc源码
需要很久,比如我用了六个多小时
$ fetch --nohooks webrtc
3、更新源码对应的依赖库
$ gclient sync
到此已经能下载好了最新版webrtc,如果需要使用webrtc以前的版本则执行以下步骤
4、查看webrtc所有版本
$ git branch -a

5、checkout我们需要的旧版本
$ git checkout remotes/branch-heads/72
6、更新旧版本相对应的依赖库
$ gclient sync --with_branch_heads

七、编译webrtc
1、生成vs工程和ninja解决方案
$ gn gen ../debug --ide=vs --args="is_clang=false is_debug=true enable_iterator_debugging=true"//debug版本
$ gn gen ../release --ide=vs --args="is_clang=false is_debug=false"//release版本

执行成功可以在webrtc/debug目录下看到all.sln工程

2、编译ninja工程
$ ninja -C ../debug     //debug版本
$ ninja -C ../release    //release版本

八、编译过程中遇到的问题
1、checkout旧版本未更新依赖
在checkout到旧版本以后没有更新旧版本相对应的依赖库,使用gn生成工程文件的时候会报错 : Unsupported value in libs 或 Undefined identifier

解决方法:checkout后执行gclient sync --with_branch_heads
$ git checkout remotes/branch-heads/72
$ gclient sync --with_branch_heads
2、更新旧版本相对应的依赖库时,报错KeyError: ’2019’

这是因为我之前安装的时vs2019,但是我的checkout的webrtc旧版本还不能支持vs2019
解决方法:安装vs2017,注意安装完以后环境变量中与vs有关的要将vs2019改成vs2017
3、gn生成工程时报错:
Traceback (most recent call last):
File "C:/work/lib/webrtc/src/build/vs_toolchain.py", line 542, in <module>
sys.exit(main())
File "C:/work/lib/webrtc/src/build/vs_toolchain.py", line 538, in main
return commands[sys.argv[1]](*sys.argv[2:])
File "C:/work/lib/webrtc/src/build/vs_toolchain.py", line 358, in CopyDlls
_CopyRuntime(target_dir, runtime_dir, target_cpu, debug=False)
File "C:/work/lib/webrtc/src/build/vs_toolchain.py", line 333, in _CopyRuntime
suffix)
File "C:/work/lib/webrtc/src/build/vs_toolchain.py", line 221, in _CopyUCRTRuntime                                     assert len(ucrt_files) > 0
AssertionError
ERROR at //build/toolchain/win/BUILD.gn:50:3: Script returned non-zero exit code.                                         exec_script("../../vs_toolchain.py",
^----------
Current dir: C:/work/lib/webrtc/debug/
Command: C:/work/lib/depot_tools/bootstrap-3_8_0_chromium_8_bin/python/bin/python.exe C:/work/lib/webrtc/src/build/vs_toolchain.py copy_dlls C:/work/lib/webrtc/debug Debug x64
Returned 1 and printed out:
Copying C:\WINDOWS\System32\msvcp140.dll to C:/work/lib/webrtc/debug\msvcp140.dll...
Copying C:\WINDOWS\System32\vccorlib140.dll to C:/work/lib/webrtc/debug\vccorlib140.dll...
Copying C:\WINDOWS\System32\vcruntime140.dll to C:/work/lib/webrtc/debug\vcruntime140.dll...
See //BUILD.gn:29:3: which caused the file to be included.
  group("default") {
  ^-----------------

报错原因是,获取win10-SDK中的DLLs文件夹时路径不对,我们默认安装的win10-SDK的DLLs路径为:C:\Program Files (x86)\Windows Kits\10\Redist\10.0.19041.0\ucrt\DLLs…
但是webrtc的src\build\vs_toolchain.py文件中sdk-DLLs的导入目录为:
C:\Program Files (x86)\Windows Kits\10\Redist\ucrt\DLLs,所以编译时会报错
解决方法:将C:\Program Files (x86)\Windows Kits\10\Redist\10.0.19041.0\ucrt文件夹复制到C:\Program Files (x86)\Windows Kits\10\Redist目录下,如上面2.3
4、编译ninja工程时出错:
ninja: Entering directory `../debug'
[755/4236] COPY ../src/modules/audio_processing/test/py_quality_assessment/apm_configs/default.json py_quality_assessment/apm_configs/default.json
FAILED: py_quality_assessment/apm_configs/default.json                                                                                           C:/work/lib/depot_tools/bootstrap-3_8_0_chromium_8_bin/python/bin/python.exe ../src/build/toolchain/win/tool_wrapper.py recursive-mirror ../src/modules/audio_processing/test/py_quality_assessment/apm_configs/default.json py_quality_assessment/apm_configs/default.json
Traceback (most recent call last):
File "../src/build/toolchain/win/tool_wrapper.py", line 29, in <module>
import win32file    # pylint: disable=import-error
ImportError: No module named win32file                                                                                                                                            [757/4236] CXX obj/modules/audio_processing/test/conversational_speech/unittest/generator_unittest.obj                      ninja: build stopped: subcommand failed.

出错原因:现在python下载的时候不会自动下载pywin32,所以要手动给depot_tools中的python下载pywin32。
解决方法:
cmd在\depot_tools\bootstrap-3_8_0_chromium_8_bin\python\bin目录下执行,如上面5.3
$ python -m pip install pywin32
5、fetch –nohooks webrtc时报错

解决办法:设置DEPOT_TOOLS_UPDATE环境变量,值为0。(这个错误出现的原因可能时写代理时候写错了端口,是192.168.21.208:808,所以这个解决办法只是在下载webrtc源码时候不再更新depot_tools,不是根本的解决办法)
6、 gclient sync同步webrtc源码时候出错
Boto proxy host: “http://192.168.21.208” differs from https_proxy proxy host: “192.168.21.208”
You have PROXY values set in your environment, but gsutil in depot_tools does not (yet) obey them.

解决方法是在同步源码之前应该手动创建.boto文件,文件内容为
[Boto]
proxy=192.168.21.208
proxy_port=808
再设置环境变量:NO_AUTH_BOTO_CONFIG=.boto文件的路径
7、vs导入webrtc.lib出错
因为我的项目中需要使用webrtc.lib库,所以我在CMakeLists.txt文件中添加了这个库,用vs打开我的工程,显示导入webrtc.lib库错误:
导入C:\work\lib\webrtc\debug\obj\webrtc.lib无效或损坏的文件
解决办法:下载完webrtc源码使用gn生成工程时候,添加 is_clang=false
8、检测到“_ITERATOR_DEBUG_LEVEL”的不匹配项: 值“2”不匹配值“0”
vs编译项目时报错:检测到“_ITERATOR_DEBUG_LEVEL”的不匹配项: 值“2”不匹配值“0”
解决方法:
编译debug版本webrtc时还要加上参数:enable_iterator_debugging=true
$ gn gen ../debug-c --ide=vs --args="is_clang=false is_debug=true enable_iterator_debugging=true"
9、未知特性 “no_init_all”
vs项目编译时报错:未知特性 “no_init_all”
解决办法:修改C:\Program Files (x86)\Windows Kits\10\Include\10.0.19041.0\um\winnt文件
#if (_MSC_VER >= 1915)
#pragma warning(disable:4845)   // __declspec(no_init_all) used but d1initall not set
#endif
之后添加:
#if (_MSC_VER >= 1915)
#define no_init_all deprecated
#endif
10、vs编译webrtc的protocol模块出错

点击中止后

解决办法:我使用的是webrtc-72版本,该版本源码中protobuf模块用vs编译出错,最新版本的webrtc里面protobuf模块已经该过了,为了成功编译webrtc-72版,需要修改以下源码中protobuf模块,参考
https://github.com/acozzette/protobuf/commit/a9abc7831e45257d334cfa682746b6cadf9e95d9
20210511修改:
添加我的webrtc源码下载目录:
https://download.csdn.net/download/qq_34214088/18581073?spm=1001.2014.3001.5503
20210629更新
protobuf模块除了上面链接中的更改,还有一个地方需要更改
E:\zhx\lib\webrtc\src\third_party\protobuf\src\google\protobuf\message_lite.cc文件中将GetEmptyString函数注释掉,如下
/* const ::std::string& GetEmptyString() {
  ::google::protobuf::GoogleOnceInit(&empty_string_once_init_, &InitEmptyString);
  return GetEmptyStringAlreadyInited();
} */


 被折叠的 条评论
为什么被折叠?
被折叠的 条评论
为什么被折叠?
 到【灌水乐园】发言


