


一、前言
平时学习比较松散,凌乱,现在趁着9102最后的几天,整理一下这些基础知识。
1.Mybatis 是什么?
MyBatis 是一个可以自定义SQL、存储过程和高级映射的持久层框架。
MyBatis 摒除了大部分的JDBC代码、手工设置参数和结果集重获。
2.使用Mybatis 的原因
MyBatis可以使用简单的XML或注解用于配置和原始映射,将接口和Java的POJO(Plain Old Java Objects,普通的Java对象)映射成数据库中的记录。
相对Hibernate和Apache OJB等“一站式”ORM解决方案而言,Mybatis 是一种“半自动化”的ORM实现。
3.为什么要学
即使使用MP,那也是要基于mybatis的,因为毕竟是叠加版。如果你用JPA,Hibernate,也行。只要精通一样,其他也是触类旁通。 毕竟,mybatis能使用xml的方式混入整个sql,就让人很爽,因为可以给DBA检查sql~
二、正文
码云地址:
https://gitee.com/chenscript/mybatis_learning.git
1.原理篇
有几个关键的主键:Executor、StatementHandler、ParameterHandler、ResultSetHandler、TypeHandler。
根据原生访问数据库的语句,也是存在statement、parameter、resultset这几个关键字,所以可以大胆暂时把它们联系在一起。带着疑问,走进源码。(虽然我不解析源码,但可以大概聊一下)

(参考2.1 helloworld )根据初始化读取xml文件获取到的SessionFactoryBuilder.build()生成SessionFactory,利用sessionFactory.openSession()建立起 一个会话实例,也就是创建了一个DefaultSqlSession对象。

上图展示了查询的过程,提到的几大主件的作用。

根据mapper中的方法,生成一个代理类对象MapperProxy,这个代理了EmployeeMapper.class。


获取了代理对象之后,该代理对象就会代理对应接口的所有方法。
当你调用里面的某一个方法的时候,调用栈是这样的。

也就是说,你访问的方法已经被代理对象拦截,并加上了一些操作。本次查询进入了MapperMethod.execute()中,进入DefaultSqlSession的查询方法中。

往下调试,就会遇上了第一个组件,Executor。

这里会先进入CacheExecutor查询缓存(所谓的一级二级缓存),如果缓存没有,就会走查询数据库DB的道路。

当前方法调用链:

再往后边,第二个组件要出现了:StatementHandler
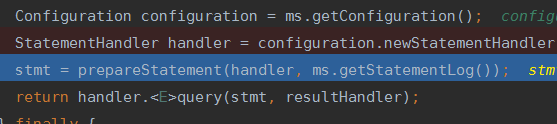
很熟悉吧,就是用来整理出prepareStatement或者Statement的。
继续进入prepareStatement()中,根据方法名字可以知道是预处理sql的。
获取连接,处理初始化Statement实例(混入boundsql,transaction等等),参数化处理。
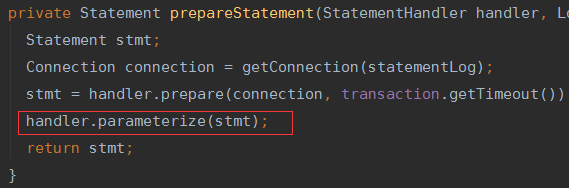
进入parameterize(),第三个组件:parameterHandler出现。

想到设置参数,那必须要和数据格式打交道,所以,接下来应该是要到TypeHandler出场了。我们需要把#{id}的值映射,对吧?也就是要把Java中的值的类型,映射到jdbc的值的类型。
尝试寻找Java类型的值与jdbc对应的值的类型,但好像没找到。于是进入了try阶段。
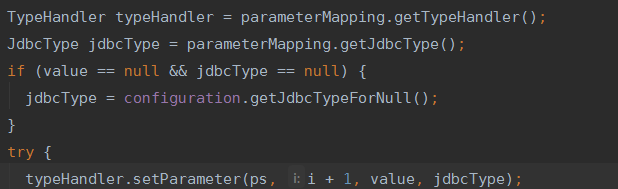
一路跳进方法中,找到了Integer的TypeHandler。然后把 Integer值映射到int i中 加入到sql语句中。
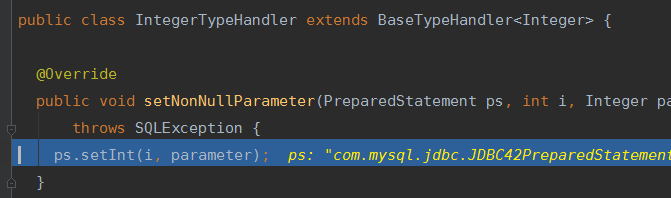
从这里可以看到一个TypeHandler的实现形式。
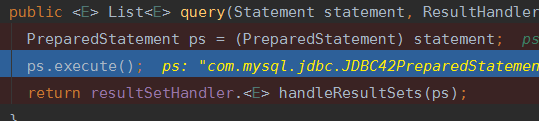
参数映射完之后,prepareStatement()就运行结束了。于是返回了stmt,开始jdbc查询了。

查询完之后,就要到我们的ResultSetHandler出场了!(友情提示:关于ResultSetHandler和parameterHandler是在StatementHandler的构造器中实现初始化的。。)
处理结果时,获取到的结果会被包装成ResultSetWrapper的对象,对象包含着准备要解析的数据以及typeHandlers

然后会根据mapper.xml中的接口对应的resultMap进行解析,返回需要的字段
找到applyAutomaticMappings方法,这里就是映射值的地方。

解析上图,
- 1.分析createAutomaticMappings()方法。

这行代码就是进行column类型匹配,与对应的TypeHandler,构成Map。
autoMapping.add(new UnMappedColumnAutoMapping(columnName, property, typeHandler, propertyType.isPrimitive()));

根据对应的handler获取Java的类型值。
然后装入到metaObject中。

最后,返回DefaultResultSetHandler中,判断是否还需要再次补充结果集(可能存在分步查询的方式),如果没有就直接返回查询结果了。当然,还会存入缓存中,这就让读者自己去看吧。在这里实现的queryFromDatabase();

2.实用篇(JDK1.8,mybatis3.4.1,mysql 5.7)
本文主要是实现mybatis相关的内容,与spring无关,只有在最后搭建SSM的时候需要spring。
1)hello world
只需要依赖日志,方便打印mysql语句。另外还要mysql驱动包以及mybatis依赖
        <dependency>
            <groupId>org.mybatis</groupId>
            <artifactId>mybatis</artifactId>
            <version>3.4.1</version>
        </dependency>
        <!-- https://mvnrepository.com/artifact/log4j/log4j -->
        <dependency>
            <groupId>log4j</groupId>
            <artifactId>log4j</artifactId>
            <version>1.2.17</version>
        </dependency>

        <!-- https://mvnrepository.com/artifact/mysql/mysql-connector-java -->
        <dependency>
            <groupId>mysql</groupId>
            <artifactId>mysql-connector-java</artifactId>
            <version>5.1.38</version>
        </dependency>
2.引入mybatis-config.xml
mybatis-config的文件内容可以有很多,但最基本的就可以只放mappers配置、environment中的transactionManager、dataSource这些元素就行了,还可以不需要transactionManager,但保持一致性还是要的。有了这个配置文件,还需要找到mapper映射的xml文件,所以接下来是EmployeeMapper.xml文件的配置
<?xml version="1.0" encoding="UTF-8" ?>
<!DOCTYPE configuration
        PUBLIC "-//mybatis.org//DTD Config 3.0//EN"
        "http://mybatis.org/dtd/mybatis-3-config.dtd">
<configuration>
    <environments default="development">
        <environment id="development">
            <transactionManager type="JDBC"/>
            <dataSource type="POOLED">
                <property name="driver" value="com.mysql.jdbc.Driver"/>
                <property name="url" value="jdbc:mysql://localhost:3306/mybatis"/>
                <property name="username" value="root"/>
                <property name="password" value="root"/>
            </dataSource>
        </environment>
    </environments>
    <mappers>
        <mapper resource="EmployeeMapper.xml"/>
    </mappers>
</configuration>
3.EmployeeMapper.xml
mapper文件中以<mapper>包含住所有内容,作为mapper属性的namespace需要映射到对应的接口中,由此代理对象根据子标签的id与接口中的方法映射,定位到标签中的sql语句,进而执行数据库的操作。
<?xml version="1.0" encoding="UTF-8" ?>
<!DOCTYPE mapper
        PUBLIC "-//mybatis.org//DTD Mapper 3.0//EN"
        "http://mybatis.org/dtd/mybatis-3-mapper.dtd">
<mapper namespace="com.mybatis.EmployeeMapper">
    <select id="selectEmployee" resultType="com.mybatis.Employee">
        select id,last_name as lastName,email,gender from tbl_employee where id = #{id}
    </select>
</mapper>
4.EmployeeMapper
public interface EmployeeMapper {
	Employee selectEmployee(int i);
}
5.实体操作
@Data
public class Employee {
	private Integer id;
	private String lastName;
	private String email;
	private String gender;
}
6.最后就是启动mybatis配置文件,调用接口了。
主入口主要有三步:
- 1、根据xml配置文件(全局配置文件)创建一个SqlSessionFactory对象,有数据源一些运行环境信息
- 2、sql映射文件;配置了每一个sql,以及sql的封装规则等
- 3、将sql映射文件注册在全局配置中
 public static void main(String... args) throws IOException {
        String resource = "mybatis-config.xml";
        InputStream inputStream = Resources.getResourceAsStream(resource);
        SqlSessionFactory sqlSessionFactory = new SqlSessionFactoryBuilder().build(inputStream);
        //2.获取sqlSession实例,能直接执行已经映射的sql语句
        SqlSession sqlSession = sqlSessionFactory.openSession();
        try{
            EmployeeMapper mapper = sqlSession.getMapper(EmployeeMapper.class);
            Employee employee = mapper.selectEmployee(1);
            System.out.println(employee.toString());
        }finally {
            sqlSession.close();
        }
    }
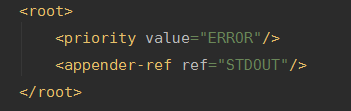
7.关于log4j的配置,就不列出来了。放在码云上。
https://gitee.com/chenscript/mybatis_learning/tree/master/helloworld
把这个值改成DEBUG,就能调试打印sql了
2)CRUD 简单版
这里只写select,并且基于前面例子配置,不累赘。
3)CRUD 动态sql实现
mybatis的动态sql是基于OGNL实现的。再具体一点就是被这个类的这个方法解析的。
(org.apache.ibatis.ognl;)

在这个类所在的包下,被转化后的动态语句的运算符等等。
4)动态sql之if、choose|when|otherwise、trim、foreach、<sql>|<include>、<where>、<set>、bind
例子主要以select标签引入其他子标签。
1.<where> + <if> + <bind>
 <!--bind:可以将OGNL表达式的值绑定到一个变量中,方便后来引用这个变量的值-->
    <select id="getEmpsByConditionIf" resultType="com.mybatis.Employee">
        select  * from tbl_employee
        <where>
        <if test="id != null">
           and  id=#{id}
        </if>
        <if test="lastName != null and lastName.trim() != ''">
            <bind value="'%' + lastName+'%'" name="_lastName"/>
            and last_name like #{_lastName}
        </if>
        <if test="email != null and email.trim() != ''">
            and email =#{email}
        </if>
        <if test="gender == 0 or gender == 1">
            and gender =#{gender}
        </if>
        </where>
    </select>
2. <where> + <choose> +<when>+<otherwise>
<!--如果带了id就用id查,如果带了其他,就带其他的查,只会选择一个-->
    <select id="getEmpsByConditionChoose" resultType="com.mybatis.Employee">
        select *  from tbl_employee
        <where>
            <choose>
                <when test="id != null">
                    id = #{id}
                </when>
                <when test="lastName != null">
                    last_name like #{lastName}
                </when>
                <when test="email != null">
                    email = #{email}
                </when>
                <otherwise>
                     gender = 0
                </otherwise>
            </choose>
        </where>
    </select>
3.<foreach> 批量插入数据
<insert id="addEmpsByForeach" >
            insert into tbl_employee (last_name,gender,email,d_id)
            values
            <foreach collection="emps" separator=","  item="emp">
                (#{emp.lastName},#{emp.gender},#{emp.email},#{emp.dept.id})
            </foreach>
    </insert>
4.<set>
<update id="updateEmps" >
        update tbl_employee
        <set>
            <if test="lastName != null">
                last_name = #{lastName} ,
            </if>
            <if test="gender != null">
                gender = #{gender} ,
            </if>
            <if test="email != null">
                email = #{email}
            </if>
        </set>
        where id = #{id}
    </update>
5.<trim> 与4的操作相同的不同书写形式
<update id="updateEmps" >
        update tbl_employee
        <trim prefix="set" suffixOverrides=",">
            <if test="lastName != null">
            last_name = #{lastName} ,
            </if>
            <if test="gender != null">
            gender = #{gender} ,
            </if>
            <if test="email != null">
            email = #{email}
            </if>
        </trim>
        where id = #{id}
    </update>
6.<sql>
    <sql id="selectColumn">
        <if test="_databaseId == 'mysql'">
          id,last_name lastName
        </if>
    </sql>
    <select id="getEmpsBySection" resultType="com.mybatis.Employee">
        select
        <include refid="selectColumn"></include>
        from tbl_employee where id = #{id}
    </select>
5)动态sql之关联查询、分步查询、延迟加载、鉴别器
5.1关联查询(全sql大法)
关联查询主要的操作是在****标签中处理。sql语句和平时写的关联查询差不多,也可以差很多。
用一个例子讲解这一小节的所有内容:
场景:
Employee ===查出员工信息、所属部门
一个员工有对应的部门
 <select id="getEmpAndDept" resultMap="MydifEmp">
          SELECT
                a.id id,
                a.last_name last_name,
                a.gender gender,
                a.email email,
                a.d_id d_id,
                b.id did,
                b.dept_name dept_name
            FROM
                tbl_employee a,
                tbl_dept b
            WHERE
                a.d_id = b.id
            AND a.id = #{id};
    </select>
查询是这样select,倒是没有争议的。问题就在于怎么把结果映射出来,特别是Department实体属性? 结果是要放在一个实体Employee中的。
public class Employee {
	private Integer id;
	private String lastName;
	private String email;
	private String gender;
	private Department dept;
这里介绍两种方法:
一种是在resultMap中使用级联的方式
  <!--方法一.一:级联属性的方式关联-->
    <resultMap id="MydifEmp" type="com.mybatis.Employee">
        <id column="id" property="id"/>
        <result column="last_name" property="lastName"/>
        <result column="gender" property="gender"/>
        <result column="email" property="email"/>
        <result column="did" property="dept.id"/>
        <result column="dept_name" property="dept.departmentName"/>
    </resultMap>
另一种方法则是使用<association>标签
  <resultMap id="MydifEmp1" type="Employee">
        <id column="id" property="id"/>
        <result column="last_name" property="lastName"/>
        <result column="gender" property="gender"/>
        <result column="email" property="email"/>
        <!--association 指定哪个属性是联合对象的属性-->
        <association property="dept" javaType="com.mybatis.Department">
            <id column="did" property="id" />
            <result column="dept_name" property="departmentName" />
        </association>
    </resultMap>
第三种方法就有点复杂了。连sql语句也不一样了。 是通过两个查询,使用<association>实现分步查询的方式,并且可以按照需求使用延迟加载的手段,控制查询速度。延迟加载,也就是,当你访问这个方法的时候,如果没使用到另一个查询,也就是<association>里面的查询的字段,那么这个查询就是没有被加载进去。可以通过DEBUG模式,打印日志看到打印出来的sql的差异。从源码上看,也是存在检查是否需要二次查询的操作。
使用association分步查询
1.按照员工id查询员工信息
2.根据查询员工信息中的d_id值去部门表查询部门信息
3.部门设置到员工中
    <resultMap id="MyEmpByStep" type="com.mybatis.Employee">
        <id column="id" property="id" />
        <result column="last_name" property="lastName"/>
        <result column="email" property="email"/>
        <result column="gender" property="gender"/>
        <!--association 定义关联对象的封装规则
                select:表明当前属性是调用select指定的方法查出的结果 (dao层接口方法)
                column:指定将哪一列的值传给这个方法
        -->
        <association
        	property="dept" select="com.mybatis.DepartmentMapper.getDeptById" column="d_id">
        </association>
    </resultMap>
    <select id="getEmpByIdStep" resultMap="MyEmpDiscr">
        select * from tbl_employee where id=#{id}
    </select>
如果要使用延迟加载的话,还需要在mybatis-config.xml文件中的<setting>标签下配置两个属性:
        <!--延迟加载的全局开关。-->
        <setting name="lazyLoadingEnabled" value="true"/>
        <!--当开启时,任何方法的调用都会加载该对象的所有属性。 否则,每个属性会按需加载-->
        <setting name="aggressiveLazyLoading" value="false"/>
最后介绍一下,鉴别器。鉴别器的作用,个人理解就是个"when"。。。
以下鉴别器的作用:
鉴别器:mybatis可以使用discriminator 判断某列的值,然后根据某列的值改变封装行为
封装Employee:
如果查出的是女生(gender==0):就把部门信息查出来,否则不查询
如果是男生(gender ==1):把last_name这列的值赋值给email
   <select id="getEmpByIdStep" resultMap="MyEmpDiscr">
        select * from tbl_employee where id=#{id}
    </select>
    <resultMap id="MyEmpDiscr" type="com.mybatis.Employee">
        <id column="id" property="id" />
        <result column="last_name" property="lastName"/>
        <result column="email" property="email"/>
        <result column="gender" property="gender"/>
        <discriminator javaType="string" column="gender">
            <!--女生 resultType:指定封装的结果类型-->
            <case value="0" resultType="com.mybatis.Employee">
                <association
	                property="dept" select="com.mybatis.DepartmentMapper.getDeptById"
	                column="d_id">
                </association>
            </case>
            <!--男生-->
            <case value="1" resultType="com.mybatis.Employee">
                <id column="id" property="id" />
                <result column="last_name" property="lastName"/>
                <result column="last_name" property="email"/>
                <result column="gender" property="gender"/>
            </case>
        </discriminator>
    </resultMap>
6)一级缓存、二级缓存(使用第三方缓存)
一级缓存:(本地缓存): 与数据库同一次会话期间查询到的数据会放在本地缓存中。以后如果需要获取相同的数据,直接从缓存中拿,没必要再去查数据库
二级缓存:(全局缓存):基于namespace级别的缓存,一个namespace对应一个二级缓存
1、使用一级缓存:
在mapper.xml中配置:
<cache eviction="FIFO" flushInterval="60000" readOnly="false" size="1024"/>
然后使用相同的会话并执行相同的sql:
private static void queryCache(EmployeeMapper mapper, EmployeeMapper mapper2,Integer id1,Integer id2) {
		Map<String, Object> maps = mapper.selectMap(id1);
		System.out.println(maps);
		Map<String, Object> maps2 = mapper2.selectMap(id2);
		System.out.println(maps2);
		System.out.println(maps==maps2);
	}
结果:在第二次查询时就会在缓存中获取
2019-12-26 23:05:24,976 DEBUG com.mybatis.EmployeeMapper.getObject:62 - Cache Hit Ratio [com.mybatis.EmployeeMapper]: 0.0
2019-12-26 23:05:24,987 DEBUG com.mybatis.EmployeeMapper.selectMap.debug:145 - ==> Preparing: select * from tbl_employee where id = ?
2019-12-26 23:05:25,017 DEBUG com.mybatis.EmployeeMapper.selectMap.debug:145 - > Parameters: 1(Integer)
2019-12-26 23:05:25,055 DEBUG com.mybatis.EmployeeMapper.selectMap.debug:145 - < Total: 1
{gender=0, d_id=1, last_name=tom, id=1, email=kkk@qq.com}
2019-12-26 23:05:25,055 DEBUG com.mybatis.EmployeeMapper.getObject:62 - Cache Hit Ratio [com.mybatis.EmployeeMapper]: 0.0
{gender=0, d_id=1, last_name=tom, id=1, email=kkk@qq.com}
true
关于一级缓存失效的情况,有如下几种情形
1.sqlsession不同
2.sqlsession相同,查询条件不同
3.sqlsession相同,两次查询之间执行了增删改操作
4.sqlsession相同,手动清除了一级缓存(缓存清空)
2、二级缓存
 工作机制:
       1、一个会话,查询一个数据,这个数据就会被放在当前会话的一级缓存中
       2、如果会话关闭;一级缓存中的数据会被保存到二级缓存中;新的会话查询信息,就可以参照二级缓存中
       3、sqlSession === EmployeeMapper ==>Employee
                          DepartmentMapper ===>Department
             不同namespace查出的数据会放在自己对应的缓存中(map)
             效果:数据会从二级缓存中获取
             查出的数据都会默认放在一级缓存中。
             只有会话提交或者关闭后,一级缓存中的数据才会转移到二级缓存中
使用二级缓存:
1.开启全局二级缓存配置

2.在mapper.xml中配置使用二级缓存

这里使用了ehcache缓存,所以需要依赖包和相关的xml配置。这里就不展开了。在文章头部介绍的码云地址中:cachedemo模块中的ehcache.xml和关于ehcache的maven依赖。
3.POJO需要实现序列化接口
public class Employee implements Serializable
7)代码生成器
generator模块中
8)插件开发
myfirstplugins中
 * 插件编写:
 *  1.编写Interceptor的实现类
 *  2.使用@Intercepts()注解完成插件签名
 *  3.将写好的插件注册到全局配置文件中
@Intercepts({
		@Signature(type= StatementHandler.class,
		method="parameterize",args = Statement.class)
})
关于插件开发,要知道插件是在哪里被调用的。可以看下源码:

前面提到的主件中,parameterHandler、resultSetHandler、statementHandler主件都会在创建之后使用上插件。所以,你注册上的插件也会在这上面调用。而@Signature 是具体指定到哪个类型的哪个方法需要添加插件的附加功能的。
9)分页插件
分页插件是基于8)的原理进行的。这里就只是展示使用方法。
        <dependency>
            <groupId>com.github.pagehelper</groupId>
            <artifactId>pagehelper</artifactId>
            <version>5.0.0</version>
        </dependency>

10)自定义类型转换器

public class MyEnumEmpStatusTypeHandler implements TypeHandler<EmpStatus>{

	/**
	 * 定义当前数据如何保存到数据库中
	 * @param ps
	 * @param i
	 * @param parameter
	 * @param jdbcType
	 * @throws SQLException
	 */
	@Override
	public void setParameter(PreparedStatement ps, int i, EmpStatus parameter, JdbcType jdbcType) throws SQLException {
		ps.setString(i,parameter.getCode().toString());
	}

	@Override
	public EmpStatus getResult(ResultSet rs, String columnName) throws SQLException {
		//需要根据从数据库中拿到的状态码返回对应的枚举类型
		int anInt = rs.getInt(columnName);
		return EmpStatus.getEmpStatusByCode(anInt);
	}

	@Override
	public EmpStatus getResult(ResultSet rs, int columnIndex) throws SQLException {
		//需要根据从数据库中拿到的状态码返回对应的枚举类型
		int anInt = rs.getInt(columnIndex);
		return EmpStatus.getEmpStatusByCode(anInt);
	}

	@Override
	public EmpStatus getResult(CallableStatement cs, int columnIndex) throws SQLException {
		int anInt = cs.getInt(columnIndex);
		return EmpStatus.getEmpStatusByCode(anInt);
	}
}
/**
 * 希望数据库保存的是100,200 等状态码
 */
public enum EmpStatus {
	LOGIN(100,"用户登录"),LOGOUT(200,"用户登出"),REMOVE(300,"用户不存在");

	private Integer code;
	private String msg;

	private EmpStatus(Integer code,String msg){
		this.code = code;
		this.msg = msg;
	}

	public Integer getCode() {
		return code;
	}

	public String getMsg() {
		return msg;
	}

	//按照状态码返回枚举对象
	public static EmpStatus getEmpStatusByCode(Integer code){
		switch(code){
			case 100:
				return LOGIN;
			case 200:
				return LOGOUT;
			case 300:
				return REMOVE;
			default:
				return LOGOUT;
		}
	}
	}


 4066
4066


 被折叠的 条评论
为什么被折叠?
被折叠的 条评论
为什么被折叠?
 到【灌水乐园】发言


