


自Spring 3.1版本以来,Spring框架支持低侵入的方式向已有Spring应用加入缓存特性。与
声明式事务类似,声明式缓存Spring Cache抽象允许一致的API来已支持多种不同的缓存解
决方案,同时将对代码的影响减少到最小。
从Spring 4.1开始,Spring已完整支持JSR-107注解和更多的定制选项。
JSR-107与Spring 自带注解对比
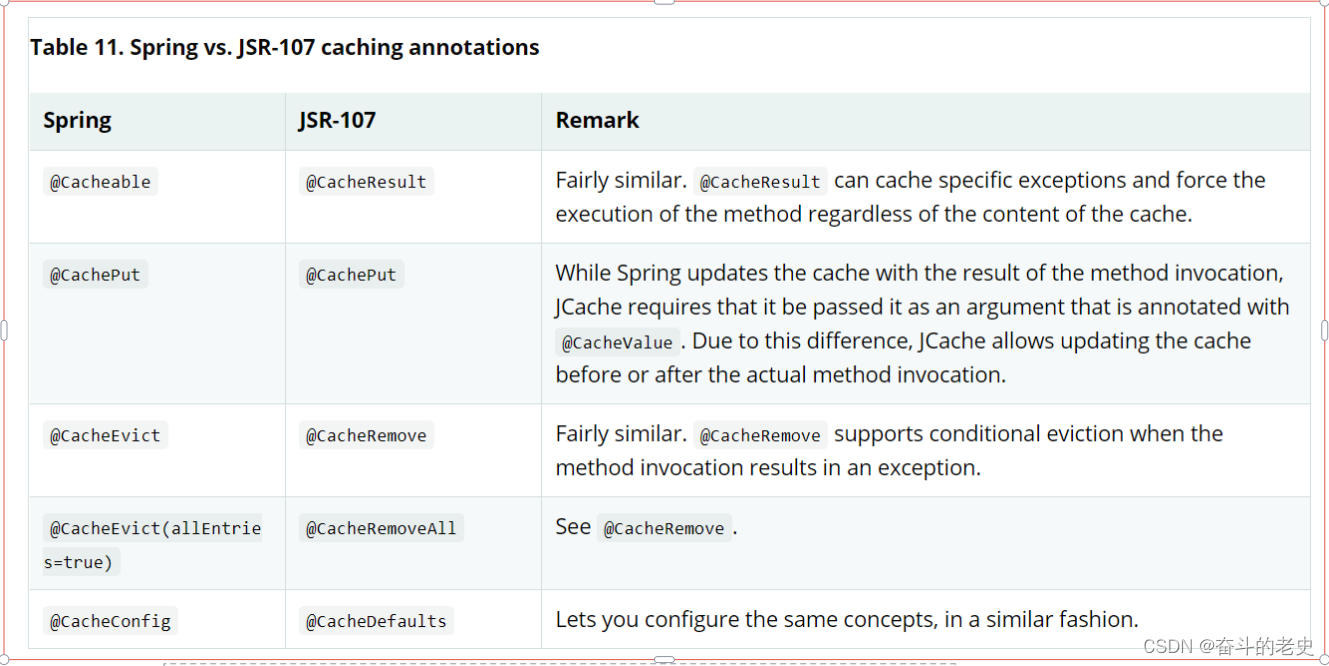
- @Cacheable /
- @CacheResult 用于读取/设置缓存
- @CachePut 添加/更新缓存
- @CacheEvict /
- @CacheRemove 移除缓存
区分Cache与Buffer
很多情况下,Buffer(缓冲)与Cache(缓存)是类似的。然而在表现形式与应用场景上两个的差别还是
比较明显的。传统意义上,Buffer作为快速实体与慢速实体之间的桥梁。比如:硬盘上的文件数据会先到
内存,再被CPU加载,内存作为Buffer可以减少等待时间,同时利用Buffer可将原本小块数据攒成整块一
次性交给处理者,可以有效减少IO。此外,通常至少有一个对象对其可见。
而Cache缓存,相对来说是隐藏的,对于访问者与被访问者来说应该是隐藏的,好的程序设
计可以让使用者对缓存无感知,同时它还可以提高性能,允许应用多次、快速的读取缓存数
据。
如何使用Spring Cache
第一步,开启Spring Cache
@SpringBootApplication
@EnableCaching
public class SpbRedisApplication {
public static void main(String[] args) {
SpringApplication.run(SpbRedisApplication.class, args);
}
}
第二步,在Service方法层面使用@Cacheable等注解声明式的控制缓存
@Service
public class EmpService {
@Resource
EmpDAO empDao;
//对于默认情况下, Redis对象的序列化使用的是JDK序列化.必须要求实体类实现Serili..接
口
//Cacheable会将方法的返回值序列化后存储到redis中,key就是参数执行的字符串
//Cacheable的用途就是在执行方法前检查对应的key是否存在,存在则直接从redis中取出
不执行方法中的代码
//没有对应的key则执行方法代码,并将返回值序列化保存到redis中
//condition代表条件成立的时候才执行缓存的数据 , 反之有一个unless ,代表条件不成立
的时候才获取缓存
@Cacheable(value = "emp" , key = "#empId" , condition = "#empId !=
1000",cacheManager = "cacheManager1m")
public Emp findById(Integer empId) {
return empDao.findById(empId);
}
//冒号分割
@Cacheable(value = "emp:rank:salary")
public List<Emp> getEmpRank() {
return empDao.selectByParams();
}
//@CachePut 作用是不管redis是否存在key, 都对数据进行更新
@CachePut(value="emp" , key = "#emp.empno")
public Emp create(Emp emp){
return empDao.insert(emp);
}
//@CachePut 作用是不管redis是否存在key, 都对数据进行更新
//Update也是用CachePut
@CachePut(value="emp" , key = "#emp.empno")
public Emp update(Emp emp){
return empDao.update(emp);
}
@CacheEvict(value="emp" , key = "#empno")
public void delete(Integer empno){
empDao.delete(empno);
}
}
第三步,做一个测试用例,验证缓存是否生效
package com.itlaoqi.spbredis;
import com.itlaoqi.spbredis.entity.Emp;
import com.itlaoqi.spbredis.service.EmpService;
import org.junit.jupiter.api.Test;
import org.springframework.boot.test.context.SpringBootTest;
import javax.annotation.Resource;
import java.util.Date;
import java.util.List;
@SpringBootTest
public class SpringCacheTestor {
@Resource
private EmpService empService;
@Test
public void testFindById(){
Emp emp = empService.findById(1001);
emp = empService.findById(1001);
emp = empService.findById(1001);
emp = empService.findById(1001);
emp = empService.findById(1001);
emp = empService.findById(1001);
System.out.println(emp.getName());
emp = empService.findById(1000);
emp = empService.findById(1000);
emp = empService.findById(1000);
System.out.println(emp.getName());
}
@Test
public void testEmpRank() {
List<Emp> list = empService.getEmpRank();
list = empService.getEmpRank();
for(Emp emp:list){
System.out.println(emp);
}
}
@Test
public void testCreate(){
empService.create(new Emp(1002 , "emp" + new Date().getTime() , new Date() ,
1234f , "MARKET"));
empService.create(new Emp(1002 , "emp" + new Date().getTime() , new Date() ,
1234f , "MARKET"));
empService.create(new Emp(1002 , "emp" + new Date().getTime() , new Date() ,
1234f , "MARKET"));
Emp emp = empService.findById(1002);
System.out.println(emp);
}
@Test
public void testUpdate(){
empService.update(new Emp(1002 , "u-emp" + new Date().getTime() , new
Date() , 1234f , "MARKET"));
empService.update(new Emp(1002 , "u-emp" + new Date().getTime() , new
Date() , 1234f , "MARKET"));
empService.update(new Emp(1002 , "u-emp" + new Date().getTime() , new
Date() , 1234f , "MARKET"));
Emp emp = empService.findById(1002);
System.out.println(emp);
}
@Test
public void testDelete(){
empService.delete(1002);
Emp emp = empService.findById(1002);
System.out.println(emp);
}
}
在使用Spring Cache的时候有有三点困扰
1. 默认Spring Cache采用 :: 分割数据,并不是约定俗称的 冒号 分割
2. 默认使用JDK序列化,JDK序列化的问题之前我们也提到了,应该为JSON序列化
3. 默认Spring Cache注解是不支持Expire过期的,但这是日常开发中必然会用到的特性, 该如何处理呢?
通过自定义CacheManager解决上述问题
@Configuration
public class SpringCacheConfgiration {
@Bean
@Primary //设置默认的CacheManager
public CacheManager cacheManager(LettuceConnectionFactory factory){
//加载默认Spring Cache配置信息
RedisCacheConfiguration config =
RedisCacheConfiguration.defaultCacheConfig();
//设置有效期为1小时
config = config.entryTtl(Duration.ofHours(1));
//说明缓存Key使用单冒号进行分割
config = config.computePrefixWith(cacheName -> cacheName + ":");
//Redis Key采用String直接存储
config =
config.serializeKeysWith(RedisSerializationContext.SerializationPair.fromSerializer(new
StringRedisSerializer()));
//Redis Value则将对象采用JSON形式存储
config =
config.serializeValuesWith(RedisSerializationContext.SerializationPair.fromSerializer(new
GenericJackson2JsonRedisSerializer()));
//不缓存Null值对象
config = config.disableCachingNullValues();
//实例化CacheManger缓存管理器
RedisCacheManager cacheManager =
RedisCacheManager.RedisCacheManagerBuilder
//绑定REDIS连接工厂
.fromConnectionFactory(factory)
//绑定配置对象
.cacheDefaults(config)
//与声明式事务注解@Transactional进行兼容
.transactionAware()
//完成对象构建
.build();
return cacheManager;
}
//为不同的TTL创建不同的CacheManager
@Bean
public CacheManager cacheManager1m(LettuceConnectionFactory factory){
//加载默认Spring Cache配置信息
RedisCacheConfiguration config =
RedisCacheConfiguration.defaultCacheConfig();
//设置有效期为1小时
config = config.entryTtl(Duration.ofMinutes(1));
//说明缓存Key使用单冒号进行分割
config = config.computePrefixWith(cacheName -> cacheName + ":");
//Redis Key采用String直接存储
config =
config.serializeKeysWith(RedisSerializationContext.SerializationPair.fromSerializer(new
StringRedisSerializer()));
//Redis Value则将对象采用JSON形式存储
config =
config.serializeValuesWith(RedisSerializationContext.SerializationPair.fromSerializer(new
GenericJackson2JsonRedisSerializer()));
//不缓存Null值对象
config = config.disableCachingNullValues();
//实例化CacheManger缓存管理器
RedisCacheManager cacheManager =
RedisCacheManager.RedisCacheManagerBuilder
//绑定REDIS连接工厂
.fromConnectionFactory(factory)
//绑定配置对象
.cacheDefaults(config)
//与声明式事务注解@Transactional进行兼容
.transactionAware()
//完成对象构建
.build();
return cacheManager;
}
}
在Service使用时,如果需要特别的过期时间,需要在@Cacheable增加cacheManager属性
@Service
public class EmpService {
@Resource
EmpDAO empDao;
@Cacheable(value = "emp" , key = "#empId" ,condition = "#empId != 1000"
,cacheManager = "cacheManager1m")
public Emp findById(Integer empId) {
return empDao.findById(empId);
}
}


 2513
2513


 被折叠的 条评论
为什么被折叠?
被折叠的 条评论
为什么被折叠?
 到【灌水乐园】发言


