freemarker使用完整案例

  • Freemarker完整使用步骤:

  • 1.创建SpringBoot项目

  • 2.添加freemarker依赖,对其进行相关的配置

  • 3.创建Index类添加.html或者.ftl文件

----------------------------------------------------------------------------------------------------------------------------------------------------------------------------

  •  1.创建SpringBoot项目

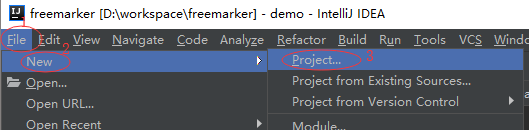
                          我这里使用的是IDEA,打开IDEA,具体操作如下:

                          第一步:

                         第二步:

                           第三步:

                           第四步:

                        第五步 :

到现在为止SpringBoot已经创建完成了。 

  • 2.添加freemarker依赖,对其进行相关的配置

2.1在项目中的pom.xml中添加freemarker依赖,依赖如下:

<dependency>
    <groupId>org.springframework.boot</groupId>
    <artifactId>spring-boot-starter-freemarker</artifactId>
</dependency>

2.2在application.properties配置文件中对freemarker进行配置,配置如下;

## Freemarker 配置
##模版存放路径(默认为 classpath:/templates/)
spring.freemarker.template-loader-path=classpath:/templates/
##是否生成缓存,生成环境建议开启(默认为true)
spring.freemarker.cache=false
##编码
spring.freemarker.charset=UTF-8
spring.freemarker.check-template-location=true
##content-type类型(默认为test/html)
spring.freemarker.content-type=text/html
## 设定所有request的属性在merge到模板的时候,是否要都添加到model中(默认为false)
spring.freemarker.expose-request-attributes=false
##设定所有HttpSession的属性在merge到模板的时候,是否要都添加到model中.(默认为false)
spring.freemarker.expose-session-attributes=false
##RequestContext属性的名称(默认为-)
spring.freemarker.request-context-attribute=request
##模板后缀(默认为.ftl)
spring.freemarker.suffix=.html

3.创建Index类添加.html或者.ftl文件 

3.1创建Iindex类,内容如下:

import org.springframework.stereotype.Controller;
import org.springframework.web.bind.annotation.RequestMapping;
import org.springframework.web.servlet.ModelAndView;

@Controller
@RequestMapping("/")
public class IndexController {
    @RequestMapping("/")
    public ModelAndView test(){
          ModelAndView modelAndView=new ModelAndView("/test");
          modelAndView.addObject("name","老铁");
        return modelAndView;
    }
}

3.2添加.html文件(添加的.html后缀必须在配置中配好,放置的路径一定也要是配置中的路径下,否则会出错

<!DOCTYPE html>
<html lang="en">
<head>
    <meta charset="UTF-8">
    <title>Title</title>
</head>
<body>
<div>
    Hello,${name}
</div>
</body>
</html>


  • 6
    点赞
  • 41
    收藏
    觉得还不错? 一键收藏
  • 3
    评论
好的,以下是一个使用freemarker导出Word文档的例子,供您参考: 1. 首先需要在pom.xml文件中引入以下依赖: ``` <dependency> <groupId>org.freemarker</groupId> <artifactId>freemarker</artifactId> <version>2.3.31</version> </dependency> <dependency> <groupId>org.apache.poi</groupId> <artifactId>poi-ooxml</artifactId> <version>4.1.2</version> </dependency> ``` 2. 编写一个freemarker模板,例如sample.ftl: ``` <html> <head> <title>${title}</title> </head> <body> <h1>${title}</h1> <table> <#list data as item> <tr> <td>${item.id}</td> <td>${item.name}</td> <td>${item.age}</td> </tr> </#list> </table> </body> </html> ``` 3. 编写Java代码: ``` import java.io.File; import java.io.FileOutputStream; import java.io.OutputStreamWriter; import java.util.ArrayList; import java.util.HashMap; import java.util.List; import java.util.Map; import freemarker.template.Configuration; import freemarker.template.Template; import org.apache.poi.xwpf.usermodel.XWPFDocument; import org.apache.poi.xwpf.usermodel.XWPFParagraph; import org.apache.poi.xwpf.usermodel.XWPFRun; public class WordExportDemo { public static void main(String[] args) throws Exception { //创建一个Freemarker模板解释器 Configuration cfg = new Configuration(Configuration.VERSION_2_3_31); //设置模板文件路径 cfg.setClassForTemplateLoading(WordExportDemo.class, "/"); cfg.setDefaultEncoding("UTF-8"); //获取模板文件 Template template = cfg.getTemplate("sample.ftl"); //构造数据 Map<String, Object> data = new HashMap<>(); data.put("title", "员工信息表"); List<Map<String, Object>> empList = new ArrayList<>(); empList.add(createEmp("001", "John", 25)); empList.add(createEmp("002", "Mike", 32)); empList.add(createEmp("003", "Lucy", 28)); data.put("data", empList); //将数据写入到Word文档 XWPFDocument doc = new XWPFDocument(); XWPFParagraph para = doc.createParagraph(); XWPFRun run = para.createRun(); //将模板文件和数据合并,输出到流中 template.process(data, new OutputStreamWriter(run::addCarriageReturn)); //将文档输出到文件 File outputFile = new File("employee.docx"); FileOutputStream outputStream = new FileOutputStream(outputFile); doc.write(outputStream); outputStream.close(); } private static Map<String, Object> createEmp(String id, String name, int age) { Map<String, Object> emp = new HashMap<>(); emp.put("id", id); emp.put("name", name); emp.put("age", age); return emp; } } ``` 以上代码实现了将freemarker模板和数据合并,并将结果输出到Word文档中。在此例子中,我们使用了基于Apache POI的XWPFDocument类来创建Word文档。

“相关推荐”对你有帮助么?

  • 非常没帮助
  • 没帮助
  • 一般
  • 有帮助
  • 非常有帮助
提交
评论 3
添加红包

请填写红包祝福语或标题

红包个数最小为10个

红包金额最低5元

当前余额3.43前往充值 >
需支付:10.00
成就一亿技术人!
领取后你会自动成为博主和红包主的粉丝 规则
hope_wisdom
发出的红包
实付
使用余额支付
点击重新获取
扫码支付
钱包余额 0

抵扣说明:

1.余额是钱包充值的虚拟货币,按照1:1的比例进行支付金额的抵扣。
2.余额无法直接购买下载,可以购买VIP、付费专栏及课程。

余额充值