


效果

布局文件
<?xml version="1.0" encoding="utf-8"?>
<LinearLayout xmlns:android="http://schemas.android.com/apk/res/android"
    xmlns:tools="http://schemas.android.com/tools"
    android:layout_width="match_parent"
    android:layout_height="match_parent"
    android:orientation="vertical"
    tools:context="com.example.lenovo.twocodewriter.MainActivity">

    <Button
        android:id="@+id/btn"
        android:layout_width="wrap_content"
        android:layout_height="wrap_content"
        android:text="生成二维码" />

    <EditText
        android:id="@+id/code_et"
        android:layout_width="200dp"
        android:layout_height="wrap_content"
        android:hint="请输入二维码内容"
        android:singleLine="true" />

    <ImageView
        android:id="@+id/code_iv"
        android:layout_width="300dp"
        android:layout_height="300dp"
        android:layout_gravity="center_horizontal" />

</LinearLayout>
代码
代码里面加入了 AndroidAnnotations 注解开发框架
添加AndroidAnnotations注解框架需要 3 步
< 1.引入AndroidAnnotations,配置project的gradle文件和module的build.gradle文件
< 2.使用EActivity注解来为Activity注入一个布局文件
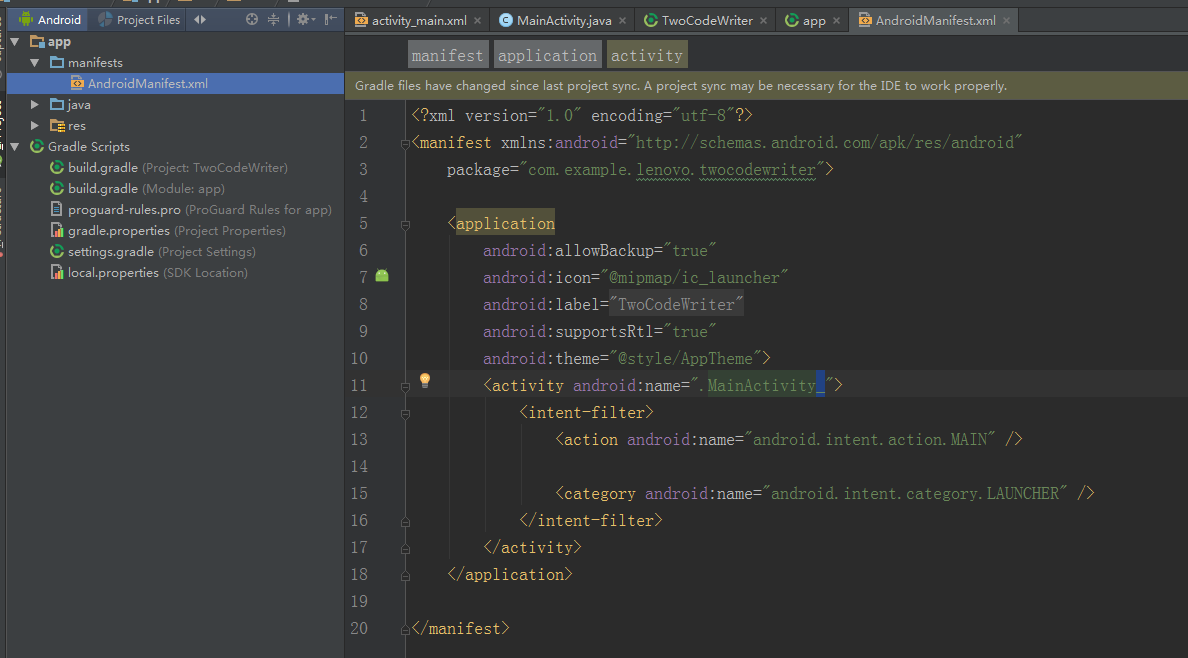
< 3.修改清单文件,给MainActivity添加下划线_
第一步如图如字
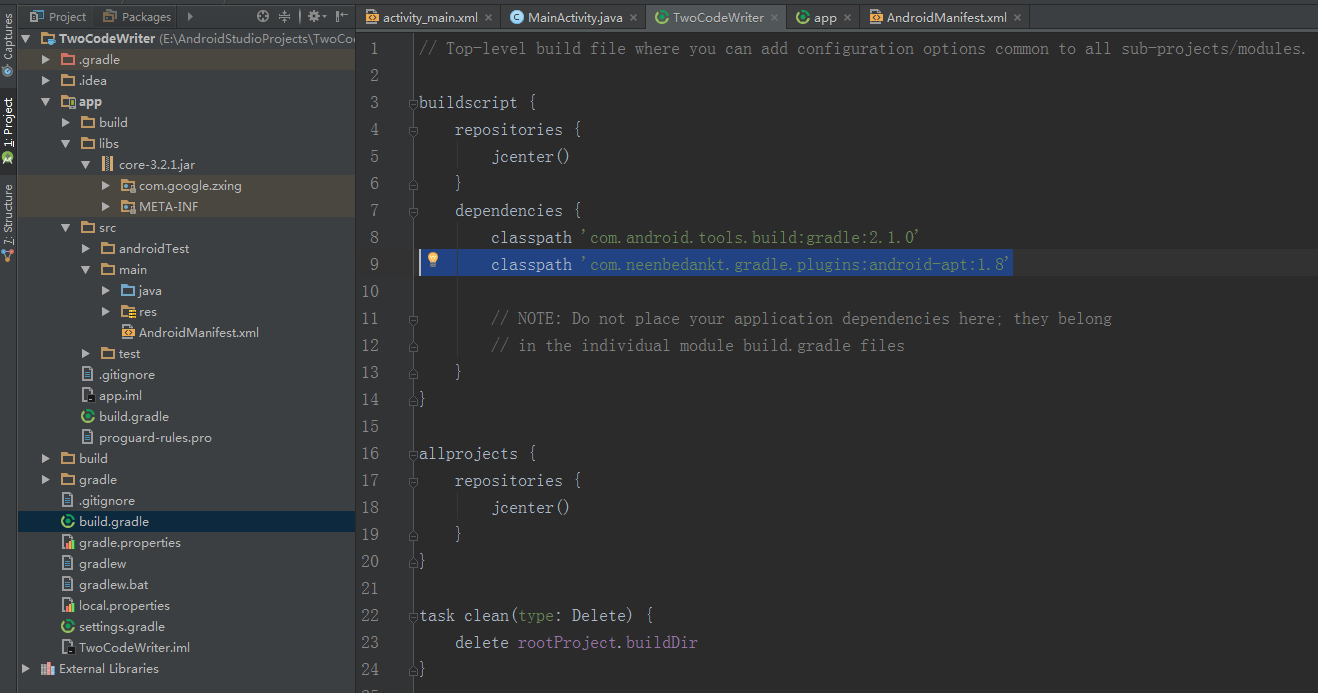
引入AndroidAnnotations,配置project的gradle文件和module的build.gradle文件
在外包build.gradle里(dependencies{添加})
添加依赖:classpath 'com.neenbedankt.gradle.plugins:android-apt:1.8'
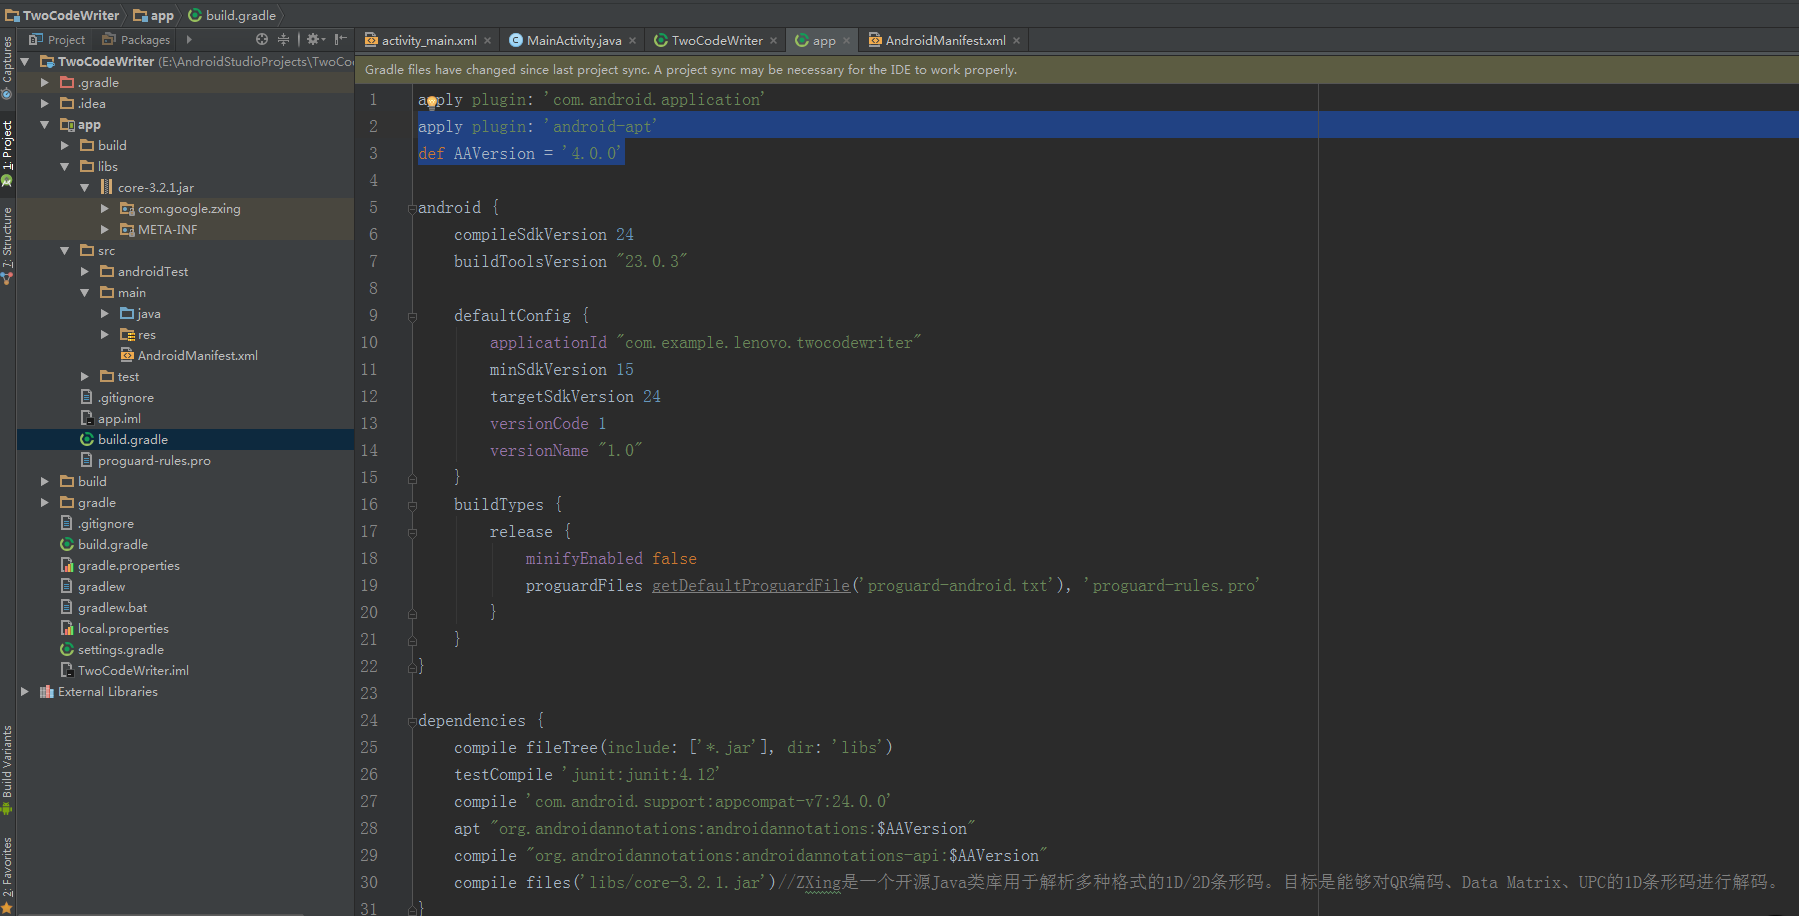
添加插件及版本号
apply plugin: 'android-apt'
def AAVersion = '4.0.0'
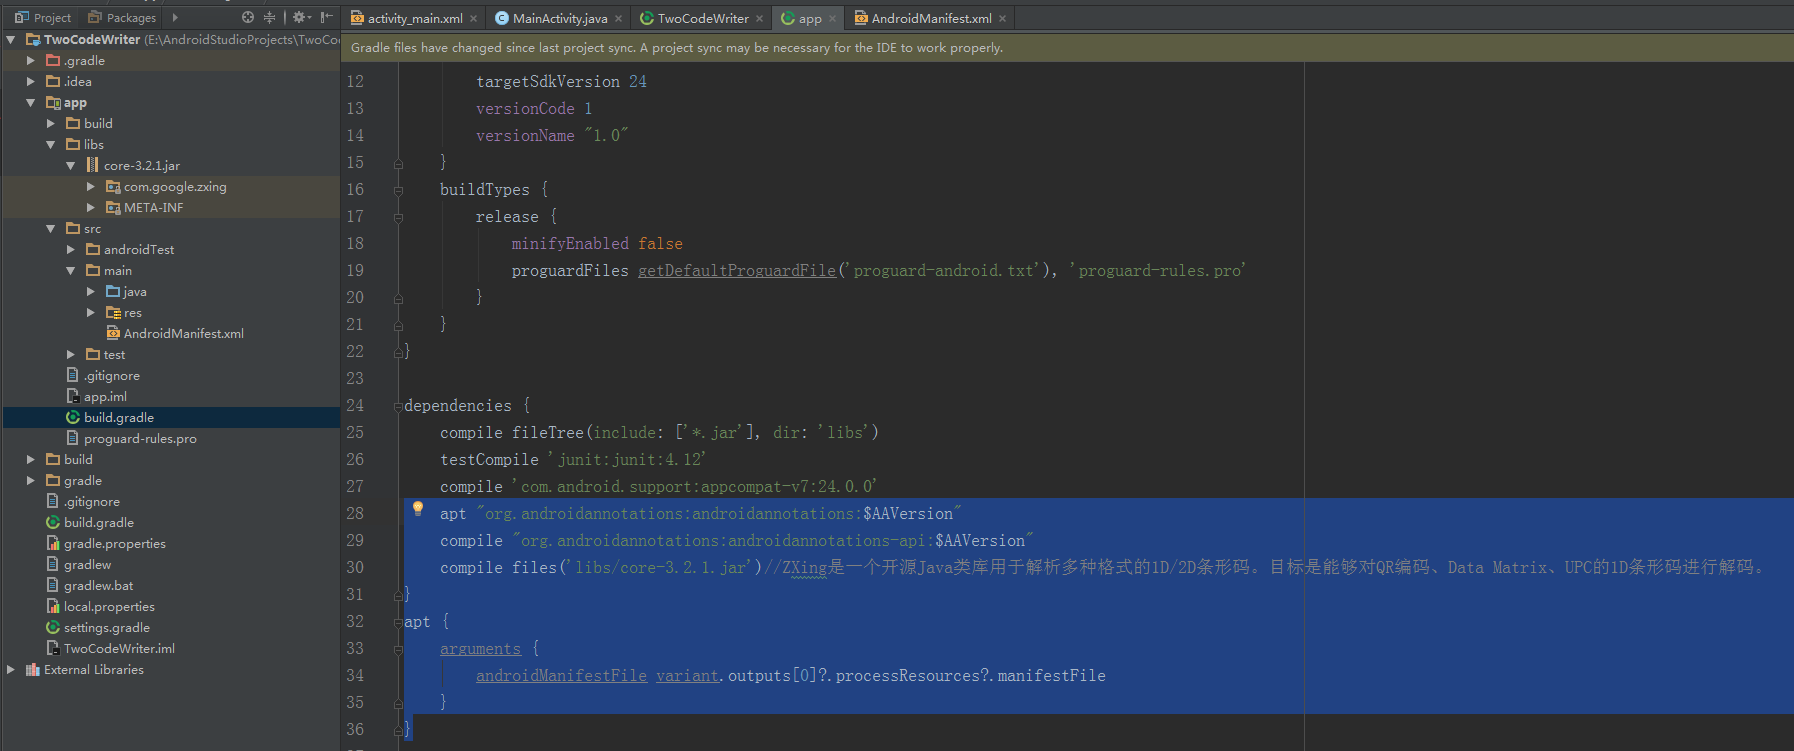
添加依赖及增加一段参数:
apt "org.androidannotations:androidannotations:$AAVersion"
compile "org.androidannotations:androidannotations-api:$AAVersion"
}
apt {
arguments {
androidManifestFile variant.outputs[0]?.processResources?.manifestFile
}
}外包build.gradle添加
app的build.gradle添加
第三步如图
修改清单文件,给MainActivity添加下划线_
package com.example.lenovo.twocodewriter;

import android.graphics.Bitmap;
import android.graphics.Canvas;
import android.os.Bundle;
import android.support.v7.app.AppCompatActivity;
import android.widget.EditText;
import android.widget.ImageView;

import com.google.zxing.BarcodeFormat;
import com.google.zxing.EncodeHintType;
import com.google.zxing.WriterException;
import com.google.zxing.common.BitMatrix;
import com.google.zxing.qrcode.QRCodeWriter;
import com.google.zxing.qrcode.decoder.ErrorCorrectionLevel;

import org.androidannotations.annotations.Click;
import org.androidannotations.annotations.EActivity;
import org.androidannotations.annotations.ViewById;

import java.util.HashMap;
import java.util.Map;

@EActivity(R.layout.activity_main)  // 第二步  用EActivity绑定布局
//  第三步  记得修改清单文件,给MainActivity添加下划线_
public class MainActivity extends AppCompatActivity {

    // 初始化
    @ViewById(R.id.code_iv)
    ImageView iv;
    @ViewById(R.id.code_et)
    EditText et;

    @Override
    protected void onCreate(Bundle savedInstanceState) {
        super.onCreate(savedInstanceState);
    }

    @Click(R.id.btn)
    public void code() {
        // 输入内容时,生成宽高的二维码
        Bitmap qrCodeBitmap = getQRCodeBitmap(300, 300, et.getText().toString());
        // logo图片
//        Bitmap logoBitmap = BitmapFactory.decodeResource(getResources(), R.mipmap.ic_launcher);
//        Bitmap bitmap = addLogo(qrCodeBitmap, logoBitmap);
        Bitmap bitmap = addLogo(qrCodeBitmap);
        iv.setImageBitmap(bitmap);
    }

    //    private Bitmap addLogo(Bitmap qrCodeBitmap, Bitmap logoBitmap) {
    private Bitmap addLogo(Bitmap qrCodeBitmap) {
        // 二维码 宽、高
        int qrCodeBitmapWidth = qrCodeBitmap.getWidth();
        int qrCodeBitmapHeight = qrCodeBitmap.getHeight();
        // logo 宽、高
//        int logoBitmapWidth = logoBitmap.getWidth();
//        int logoBitmapHeight = logoBitmap.getHeight();

        //创建一个空白的Bitmap,该Bitmap的大小和二维码所对应的Bitmap的大小一致
        Bitmap blankBitmap = Bitmap.createBitmap(qrCodeBitmapWidth, qrCodeBitmapHeight, Bitmap.Config.ARGB_8888);
        // 创建一个Canvas对象,使用空白Bitmap作为参数,这样在Canvas上所绘制的所有东西都可以通过Bitmap显示出来
        Canvas canvas = new Canvas(blankBitmap);
        // 二维码绘制在 canvas 上
        canvas.drawBitmap(qrCodeBitmap, 0, 0, null);
        // 绘制Logo,如果Logo过大,通过Bitmap二次采样来处理
//        canvas.drawBitmap(logoBitmap, (qrCodeBitmapWidth - logoBitmapWidth) / 2, (qrCodeBitmapHeight - logoBitmapHeight) / 2, null);
        return blankBitmap;
    }

    private Bitmap getQRCodeBitmap(int width, int height, String content) {
        // 第三方Core生成的类
        QRCodeWriter writer = new QRCodeWriter();
        // 存储文本编码格式和容错率
        Map<EncodeHintType, Object> hints = new HashMap<>();
        // 存储文本编码格式
        hints.put(EncodeHintType.CHARACTER_SET, "UTF-8");
        //设置容错级别,共分为4级
        //容错率越高,生成的二维码越复杂,识别时的速度越慢
//        L,容错率7%
//        M,容错率15%
//        Q,容错率25%
//        H,容错率30%
        hints.put(EncodeHintType.ERROR_CORRECTION, ErrorCorrectionLevel.M);
        try {
            // 二维码形状
            BitMatrix bitMatrix = writer.encode(content, BarcodeFormat.QR_CODE, width, height, hints);
            // 形状的 斑点格子生成
            int[] colors = new int[width * height];
            for (int i = 0; i < height; i++) {
                for (int j = 0; j < width; j++) {
                    if (bitMatrix.get(j, i)) {
                        //有数据 黑色表示
                        colors[i * width + j] = 0x000000;
                    } else {
                        //没有数据 白色表示
                        colors[i * width + j] = 0xffffff;
                    }
                }
            }
            //1.创建Bitmap的像素点
            //2.创建Bitmap的像素数组的偏移量
            //3.每行有多少个像素点
            //4.5生成的Bitmap的宽高
            //6.生成Bitmap的色彩模式
            Bitmap bitmap = Bitmap.createBitmap(colors, 0, width, width, height, Bitmap.Config.RGB_565);
            return bitmap;
        } catch (WriterException e) {
            e.printStackTrace();
        }
        return null;
    }
}
注释都有细说
import com.google.zxing类需要添加core-3.2.1.jar资源包才能使用里面的方法 生成二维码
如图
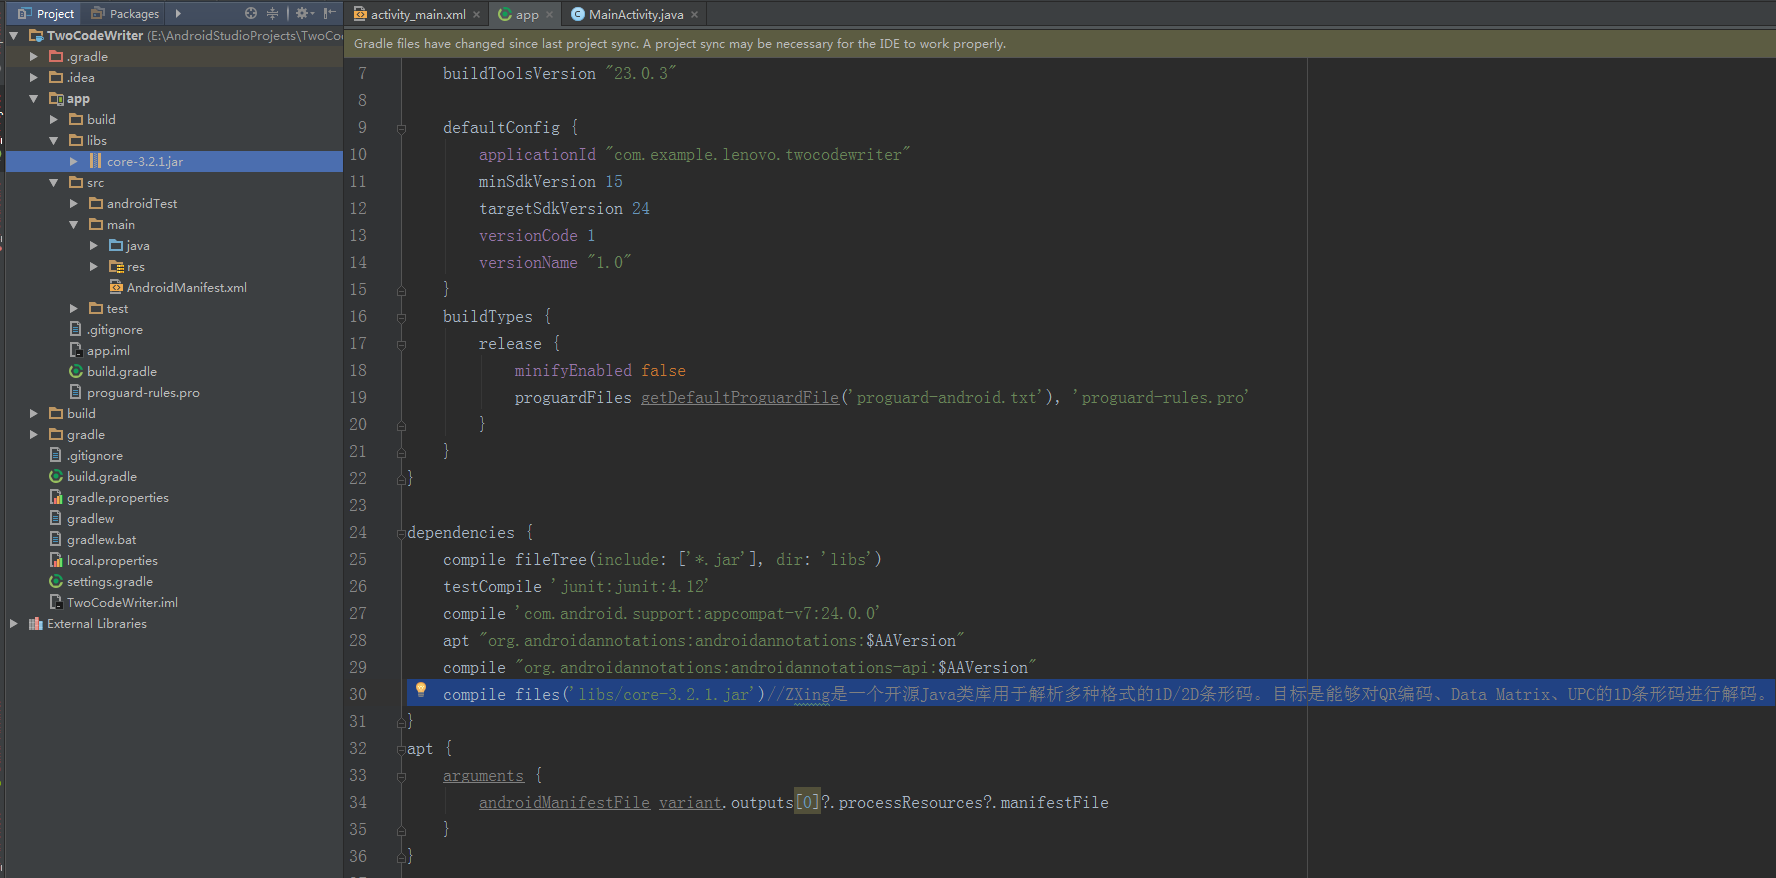
core-3.2.1.jar资源包链接:http://download.csdn.net/detail/qq_34263321/9630891


 7185
7185


 被折叠的 条评论
为什么被折叠?
被折叠的 条评论
为什么被折叠?
 到【灌水乐园】发言


