


CDN:
概念:
CDN的全称是Content Delivery Network,即内容分发网络。其基本思路是尽可能避开互联网上有可能影响数据传输速度和稳定性的瓶颈和环节,使内容传输的更快、更稳定。通过在网络各处放置节点服务器所构成的在现有的互联网基础之上的一层智能虚拟网络,CDN系统能够实时地根据网络流量和各节点的连接、负载状况以及到用户的距离和响应时间等综合信息将用户的请求重新导向离用户最近的服务节点上。其目的是使用户可就近取得所需内容,解决 Internet网络拥挤的状况,提高用户访问网站的响应速度。
varnish服务
实验环境:三台虚拟机(一个为varish服务器,其余为服务器), 一台真机(客户端),系统为rhel6.5
实验原理:client --- varnish --- server,用户通过varnish主机取访问server,如果varnish上有客户所需的资源,返回到客户,如果没有,取server获取资源,然后存入varnish,这样提高了访问速度,降低了server的压力
实验步骤:
一 varnish服务器(172.25.33.1)
1)yum install gcc varnish-3.0.5-1.el6.x86_64.rpm varnish-libs-3.0.5-1.el6.x86_64.rpm -y #安装软件
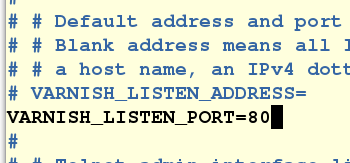
2)vim /etc/sysconfig/varnish
66 VARNISH_LISTEN_PORT=80 #更改默认端口
95 VARNISH_TTL=120 #缓存保留时间
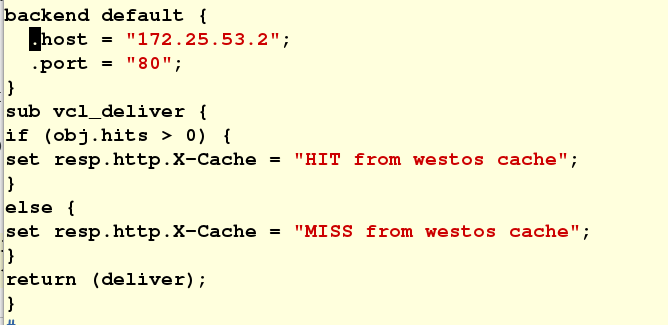
3)vim /etc/varnish/default.vcl
backend default { #配置后端服务器
.host = "172.25.33.2"; #设置为虚拟机2的ip地址
.port = "80";
}
sub vcl_deliver { #查看缓存命中情况
if (obj.hits > 0) {
set resp.http.X-Cache = "HIT from westos cache";
}
else {
set resp.http.X-Cache = "MISS from westos cache";
}
return (deliver);
}
4)/etc/init.d/varnish restart #重启服务

二 server2(172.25.33.2)
1)yum install httpd -y
2)写个html文件并发布

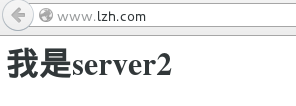
三 client测试
真机:(解析地址)

(1)ping www.lzh.com #会显示虚拟机1的IP

(2)curl -I www.lzh.com
在varnish服务器可以通过varnishadm 手动清除缓存
varnishadm ban.url .*$ 清除所有
varnishadm ban.url /index.html 清除 index.html 页面缓存
varnishadm ban.url /admin/$ 清除 admin 目录缓存
三 冗余备份与对用多台不同服务器:
varnish服务器(172.25.53.1):
1) vim /etc/varinsh/default.vcl
backend web1 {
.host = "172.25.34.2";
.port = "80";
}
backend web2 {
.host = "172.25.34.3";
.port = "80";
}
director lb round-robin{ #轮转调度算法
{.backend = web1;}
{.backend = web2;}
}
sub vcl_recv { #控制接收
if (req.http.host ~ "^(www.)?lzh.com") {
set req.http.host = "www.lzh.com";
set req.backend = lb;
return (pass); #不做缓存,正式不会这么做,此处方便测试
} elsif (req.http.host ~ "^bbs.xinhao.com") {
set req.backend = web2;
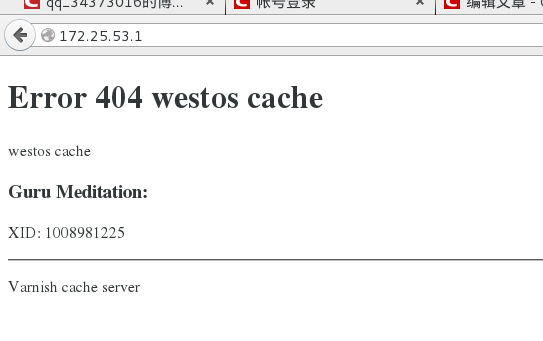
} else {error 404 "westos cache";
}
}

2、/etc/init.d/varnish restart
虚拟机3:
1、安装http服务
2、修改配置文件:
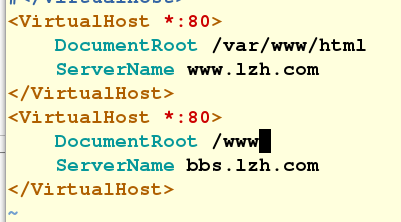
vim /etc/httpd/conf/httpd.conf
<VirtualHost *:80>
DocumentRoot /var/www/html
ServerName www.lzh.com
</VirtualHost>
<VirtualHost *:80>
DocumentRoot /www
ServerName bbs.lzh.com
</VirtualHost>
3)mkdir /www
4)vim /www/index.html

5)/etc/init.d/httpd restart
clients测试:

varnish推送服务
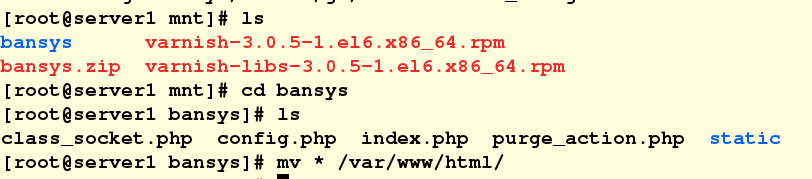
varnish服务器(172.25.53.1):
1)yum install -y httpd php unzip
2)vim /etc/http/conf/httpd.conf
Listen 8080
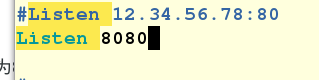
varnish 已经占用了80端口,故设置http为8080端口
3、/etc/init.d/httpd start
4、解压bansys并放到http发布目录
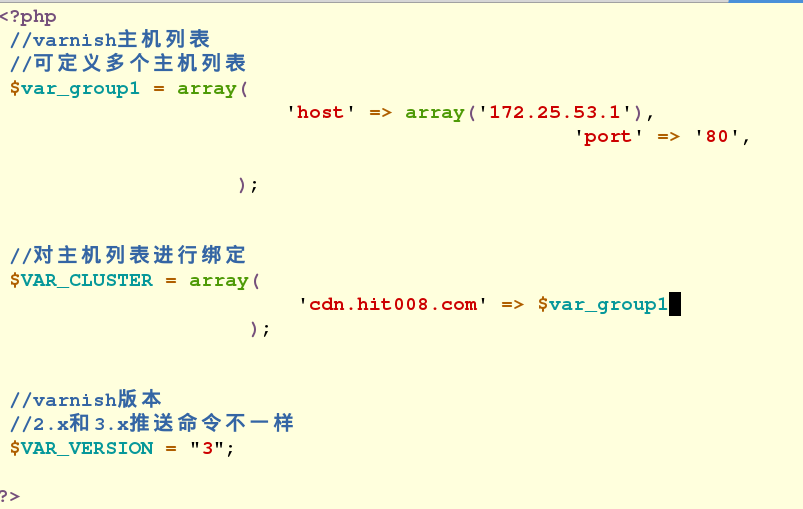
5、vim /var/www/html/config.php
<?php
//可定义多个主机列表
$var_group1 = array(
'host' => array('172.25.34.1'), #设定推送的主机信息
'port' => '80',
);
//varnish群组定义
//对主机列表进行绑定
$VAR_CLUSTER = array(
'www.xinhao.com' => $var_group1,
);
//varnish版本
//2.x和3.x推送命令不一样
$VAR_VERSION = "3";
?>
6)/etc/init.d/httpd restart
7
>vim /etc/varnish/default.vcl
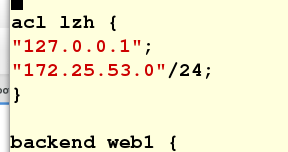
acl xinhao{ #设置规则,设定可以推送的人和推送对象
"127.0.0.1";
"172.25.34.0"/24;
}
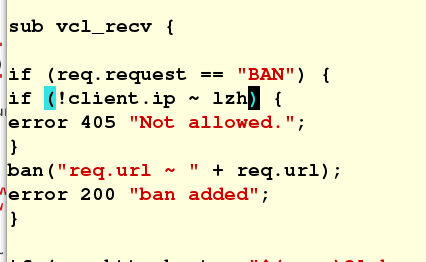
sub vcl_recv {
if (req.request == "BAN") { #判断访问对象
if (!client.ip ~ lzh) {
error 405 "Not allowed.";
}
ban("req.url ~ " + req.url);
error 200 "ban added";
}
if (req.http.host ~ "^(www.)?lzh.com") {
set req.http.host = "www.lzh.com";
set req.backend = lb;
#return (pass);
} elsif (req.http.host ~ "^bbs.lzh.com") {
set req.backend = web2;
} else {error 404 "westos cache";
}
}
8、/etc/init.d/varnish reload
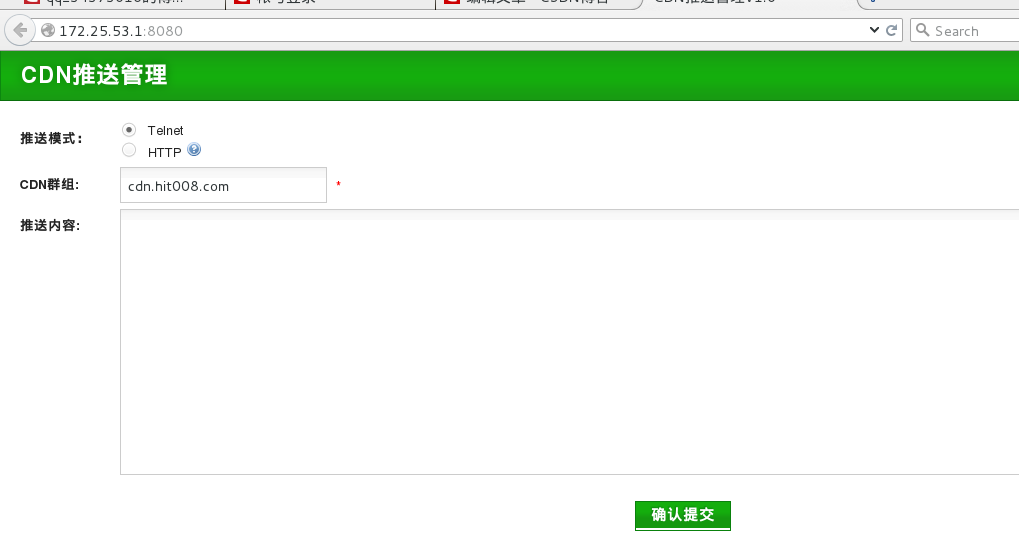
>client测试:
172.25.53.1:8080
进入推送页面 选http服务即可推送成功
/index.html
www.lzh.com/index.html
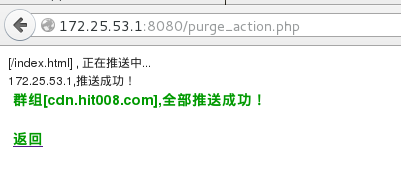
每推送一次,varnish服务器会去后台服务器拿一次数据,因为设置的是轮转调度算法,可以看出明显不同

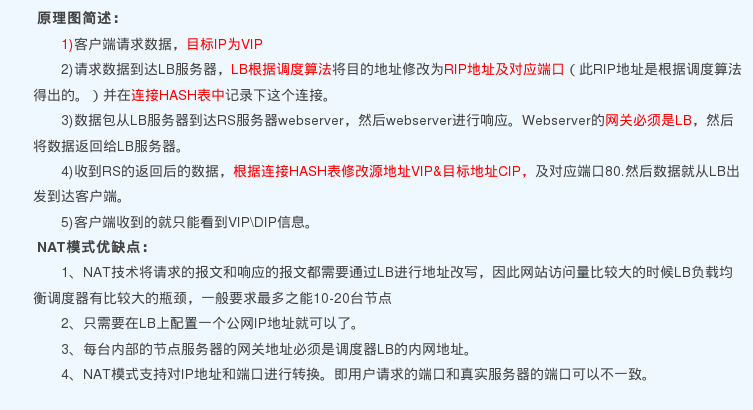
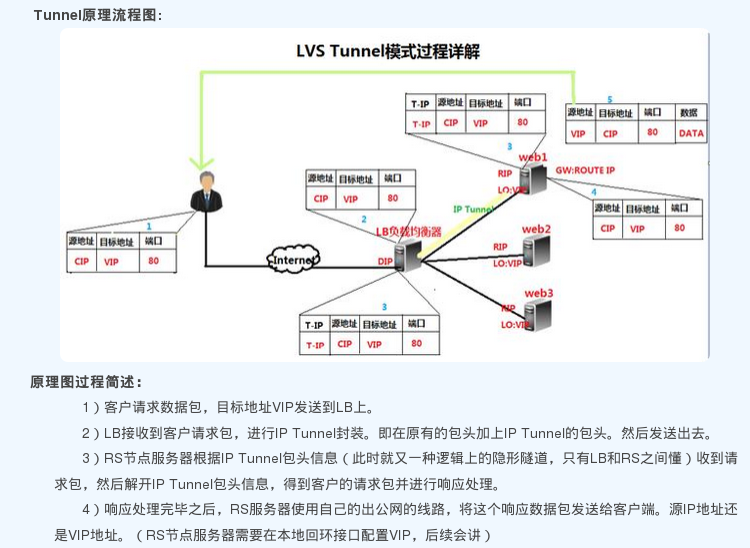
实际生活中,我们会在varnish服务器设置负载均衡策略(TUN/NAT/DR)
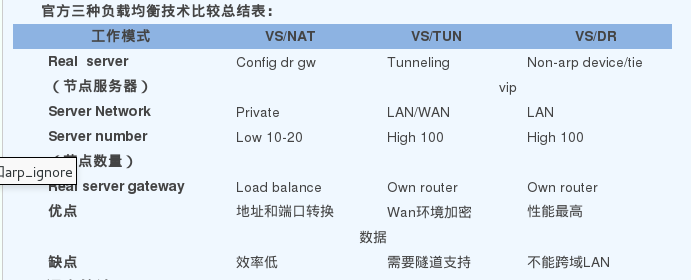
DR:
NAT:
TUN:
具体内容可以查看这篇博客点击打开链接
网络模型实质:4层模型的实质是转发,7层模型的实质是代理
DR-lvs 基于4层模型 适用于CDN节点
常用:lvs : linux virtual server
varnish服务器(172.25.53.1):
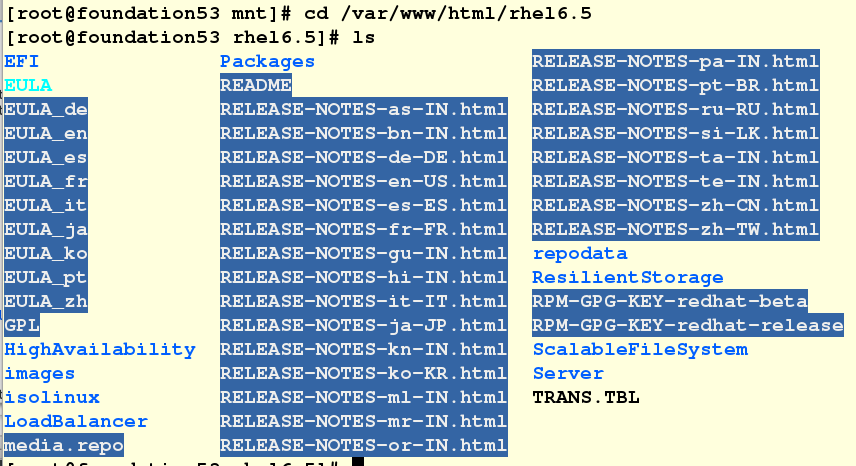
一 配置yum仓库:默认的yum仓库包为镜像中的server镜像,所以需要手动添加
[server]
name=server
gpgcheck=0
baseurl=http://172.25.34.250/rhel6.5
enable=1
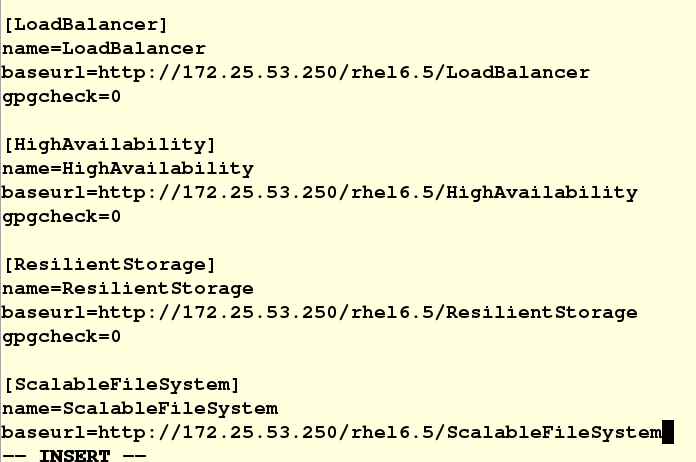
[LoadBalancer]
name=LoadBalancer
baseurl=http://172.25.34.250/rhel6.5/LoadBalancer
gpgcheck=0
[HighAvailability]
name=HighAvailability
baseurl=http://172.25.34.250/rhel6.5/HighAvailability
gpgcheck=0
[ResilientStorage]
name=ResilientStorage
baseurl=http://172.25.34.250/rhel6.5/ResilientStorage
gpgcheck=0
[ScalableFileSystem]
name=ScalableFileSystem
baseurl=http://172.25.34.250/rhel6.5/ScalableFileSystem
gpgcheck=0
2、yum install ipvsadm -y #内核层面生效的策略
Load Balancer:
kernel 2.6.x 已內建 LVS 模组
kernel 2.4.x 或之前的内核版本需打补丁
rhel5 /rhel6 自带 LVS 软件包 安装 ipvsadm 软件包即可使用
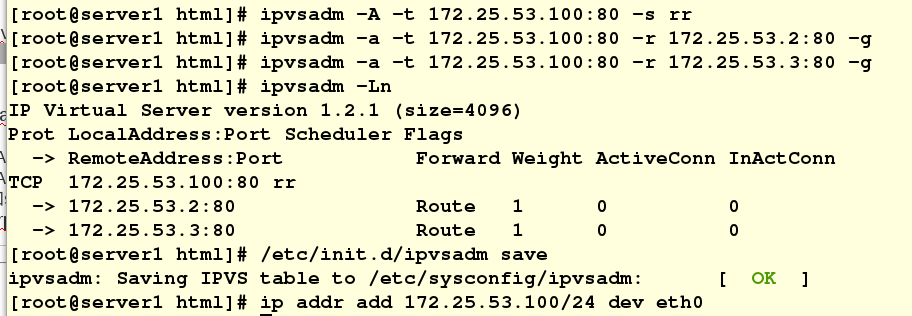
3、ipvsadm -A -t 172.25.53.100:80 -s rr #添加虚拟服务,并设置轮转调度算法-A:添加一个虚拟服务; -t:tcp 服务
4、ipvsadm -a -t 172.25.53.100:80 -r 172.25.53.2:80 -g
5、ipvsadm -a -t 172.25.53.100:80 -r 172.25.53.3:80 -g
6、/etc/init.d/ipvsadm save #保存策略
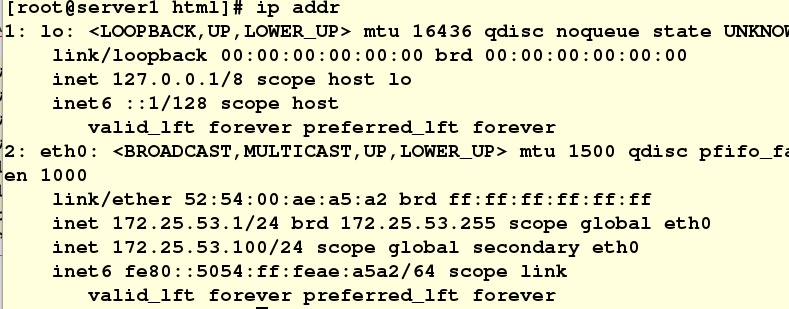
7、ip addr add 172.25.53.100/24 dev eth0 #添加虚拟ip
#server2---rs1:
1、yum install arptables_jf -y #安装arp防火墙
2、ip addr add 172.25.53.100/32 dev eth0 #添加虚拟ip
3、arptables -A IN -d 172.25.53.100 -j DROP #接收虚拟ip的数据
4、arptables -A OUT -s 172.25.53.100 -j mangle --mangle-ip-s 172.25.53.2 #不广播本机的虚拟ip,只广播真实ip,因为vs的虚拟ip和server的虚拟ip是一样的,所以只能让vs响应arp应答
5、/etc/init.d/arptables_jf save
#server3----rs2:
1、yum install arptables_jf -y
2、ip addr add 172.25.53.100/32 dev eth0
3、arptables -A IN -d 172.25.53.100 -j DROP
4、arptables -A OUT -s 172.25.53.100 -j mangle --mangle-ip-s 172.25.53.3
5、/etc/init.d/arptables_jf save
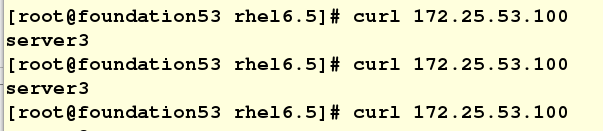
#client测试:
curl 172.25.34.100 #或者添加解析后curl www.lzh.com
arptables -L #查看策略
arptables -C #清空策略


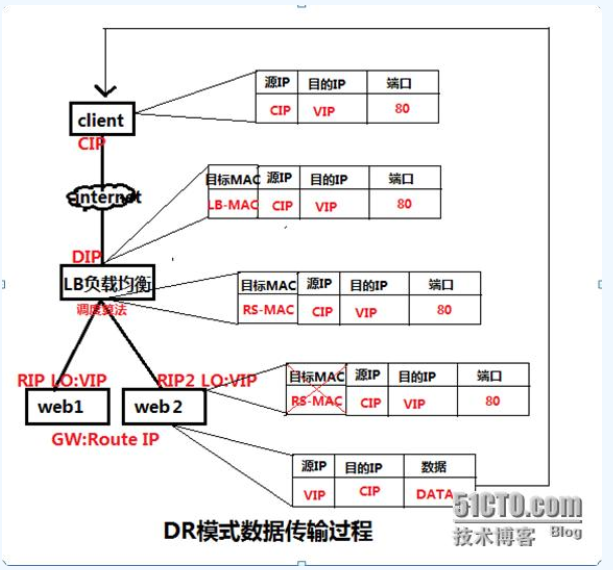
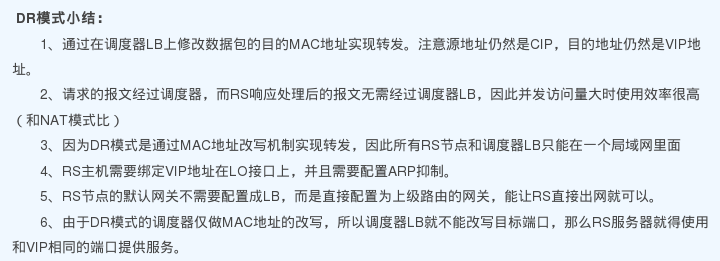
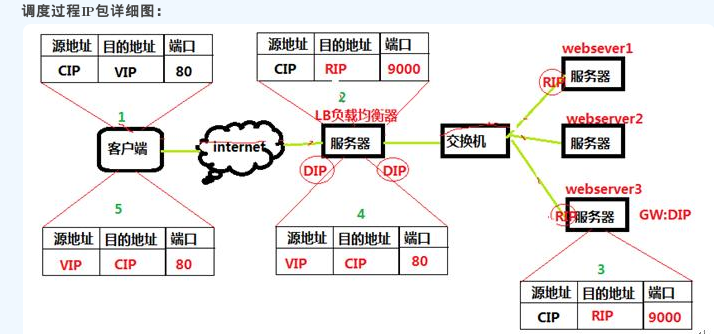
基于DR:对后端健康检查
实际应用中,如果一台服务器出现故障,则varnish服务器不再去这台服务器拿数据,而是取备份服务器拿数据
自动化DR:对后端健康检查
#server1(172.25.53.1)---vs:
1、yum install perl ldirectord-3.9.5-3.1.x86_64.rpm -y
2、cp /usr/share/doc/ldirectord-3.9.5/ldirectord.cf /etc/ha.d/
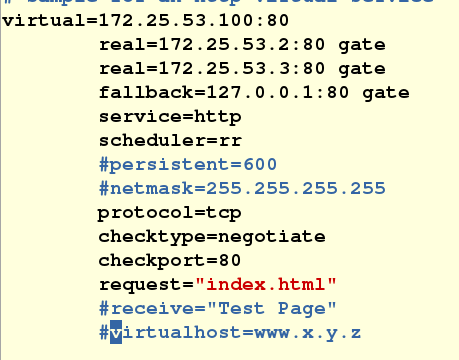
3、vim /etc/ha.d/ldirectord.cf #自动创建Lvs策略
virtual=172.25.34.100:80
real=172.25.34.2:80 gate
real=172.25.34.3:80 gatevim
fallback=127.0.0.1:80 gate
service=http
scheduler=rr
#persistent=600
#netmask=255.255.255.255
protocol=tcp
checktype=negotiate
checkport=80
request="index.html"
#receive="Test Page"
#virtualhost=www.x.y.z
4、/etc/init.d/ipvsadm stop
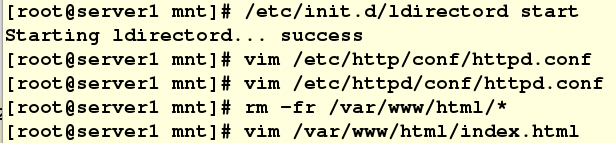
5、/etc/init.d/ldirectord start
6、vim /etc/httpd/conf/httpd.conf
Listen 8080
7、rm -rf /var/www/html/*
8、创建新的html文件
9、/etc/init.d/httpd restart
#测试:关闭server2或server3 http 服务
#client测试:
curl 172.25.53.100 #或者添加解析后curl www.lzh.com
server2,server3 http服务都关闭:


 401
401

 被折叠的 条评论
为什么被折叠?
被折叠的 条评论
为什么被折叠?
 到【灌水乐园】发言


