


开发中我们经常会用到列表项,一般的列表项的话用ArrayAdapter就好,但是当我们需要用到更复杂的列表项时,我们就可以考虑用到SimpleAdapter,下面是一个简单的案例。
package com.test.simpleadapter;
import java.util.ArrayList;
import java.util.HashMap;
import java.util.List;
import java.util.Map;
import android.app.Activity;
import android.os.Bundle;
import android.view.MotionEvent;
import android.view.View;
import android.view.View.OnTouchListener;
import android.widget.AdapterView;
import android.widget.AdapterView.OnItemClickListener;
import android.widget.AdapterView.OnItemSelectedListener;
import android.widget.ListView;
import android.widget.SimpleAdapter;
public class MainActivity extends Activity {
/*private String [] names = {"冲30","冲50","冲100","冲200"};
private String[] descs = {"折合1毛钱/分钟,有效期三个月","折合7分钱/分钟,有效期6个月",
"折合6分钱/分钟,有效期一年","折合5分钱/分钟,有效期两年"};*/
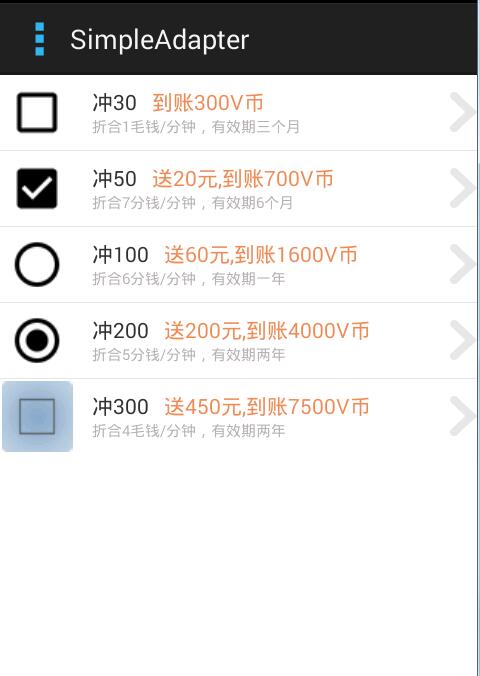
private String [][] data = new String[][]{
{"冲30","到账300V币","折合1毛钱/分钟,有效期三个月","30"},
{"冲50","送20元,到账700V币","折合7分钱/分钟,有效期6个月","50"},
{"冲100","送60元,到账1600V币","折合6分钱/分钟,有效期一年","100"},
{"冲200","送200元,到账4000V币","折合5分钱/分钟,有效期两年","200"},
{"冲300","送450元,到账7500V币","折合4毛钱/分钟,有效期两年","300"}
};
private int[] imageIds = new int[]{
R.drawable.abc_btn_check_to_on_mtrl_000,
R.drawable.abc_btn_check_to_on_mtrl_015,
R.drawable.abc_btn_radio_to_on_mtrl_000,
R.drawable.abc_btn_radio_to_on_mtrl_015,
R.drawable.umeng_update_btn_check_off_pressed_holo_light
};
@Override
protected void onCreate(Bundle savedInstanceState) {
super.onCreate(savedInstanceState);
setContentView(R.layout.activity_main);
//创建一个List集合,List集合的元素是map
//注意,首先要理解集合类的概念,具体的可以看http://blog.csdn.net/qq_34487977/article/details/51073122
//创建一个List集合,List集合的元素是map
List<Map<String,Object>> listItems = new ArrayList<Map<String,Object>>();
//利用循环将键和值一一对应放入集合内。
for (int i = 0;i < data.length;i++){
Map<String, Object> listItem = new HashMap<String,Object>();
listItem.put("header",imageIds[i]);//这里图片数组
listItem.put("money", data[i][0]);
listItem.put("amount", data[i][1]);
listItem.put("desc", data[i][2]);
listItem.put("end", data[i][3]);
listItems.add(listItem);
}
/*
*创建一个SimpleAdapter,其中第一个参数为上下文,也就是Activity.this
* 第二个参数:为需要加入的集合对象,该集合中每一个Map<String, Object>生成一个列表项
* 第三个参数:则指定了一个界面布局Layout的布局ID,这个布局文件可以作为列表项的组件。
* 第四个参数:该参数是一个String[](存放集合中的键KEY)类型放入参数,决定提取那些Map<String, Object>对象中key的Value的数据
* 来作为生成列表项
* 第五个参数:该参数是一个int[]数组,(存放布局文件ID)用于决定上面的那些列表项的布局文件样式,需一一对应好。
*/
SimpleAdapter simpleadapter = new SimpleAdapter(this, listItems,
R.layout.simple_item, new String[]{"header","money","amount","desc","money2"},
new int[]{R.id.hander,R.id.money,R.id.amount,R.id.desc,R.id.end,});
ListView list = (ListView) findViewById(R.id.mylist);
//为ListView设置Adapter
list.setAdapter(simpleadapter);
/*
* 下面是简单的为ListView的列表项的 点击事件 绑定事件监听起
* setOnItemClickListener中 click是点击的意思,顾名思义
* 所以这个监听器一般再android中触摸屏中点击使用,
*/
list.setOnItemClickListener(new OnItemClickListener() {
@Override
public void onItemClick(AdapterView<?> parent, View view,
int position, long id) {
/*Intent intent = new Intent;
intent.setClass(MainActivity.this, null);
startActivity(intent);*/
System.out.println(data[position]+"被点击了");
}
});
/*
* 为ListView的列表项目的 选中事件 绑定事件监听器
* setOnItemSelectedListener中 Selected是选择的意思,
* 所以这个监听器一般不再android中触摸屏中使用,android触摸屏测试无用
*
* 比如在android的电视设备中,使用遥控器选择Item与点击Item的时候,可以使用。
*/
list.setOnItemSelectedListener(new OnItemSelectedListener() {
@Override
public void onItemSelected(AdapterView<?> parent, View view,
int position, long id) {
System.out.println(data[position]+"被选择了2");
}
@Override
public void onNothingSelected(AdapterView<?> parent) {
}
});
/*
* 为ListView的列表项目的 触摸事件 绑定事件监听器
* setOnItemTouchListener中 Touch是触摸的意思,
* 所以这个监听器一般再android中触摸屏中使用,android触摸屏
*
* 注意:此监听器最好限定区域,不能和上面两个监听器同用。
*/
list.setOnTouchListener(new OnTouchListener() {
@Override
public boolean onTouch(View v, MotionEvent event) {
String sInfo= "X"+String.valueOf(event.getX())+
" Y="+String.valueOf(event.getY());
System.out.println(sInfo+"触摸了3");
return true;
}
});
}
}然后是界面的布局文件 我们单定义一个ListView为其提供列表项
<LinearLayout xmlns:android="http://schemas.android.com/apk/res/android"
    xmlns:tools="http://schemas.android.com/tools"
    android:layout_width="match_parent"
    android:layout_height="match_parent"
    android:orientation="vertical"
    tools:context="${relativePackage}.${activityClass}" >

<ListView android:id="@+id/mylist"
    android:layout_width="fill_parent"
    android:layout_height="wrap_content">
</ListView>

</LinearLayout>
然后是列表项的布局文件,另外定义一个布局文件来存放,如下
<?xml version="1.0" encoding="utf-8"?>
<LinearLayout xmlns:android="http://schemas.android.com/apk/res/android"
    android:layout_width="match_parent"
    android:layout_height="match_parent"
    android:orientation="horizontal" >
    <ImageView
        android:id="@+id/hander"
        android:minHeight="50dp"
        android:layout_weight="2"
        android:layout_width="0dp"
        android:layout_height="wrap_content"
        android:padding="1dp"/>


    <LinearLayout android:orientation="vertical"
        android:layout_width="0dp"
        android:layout_weight="8"
        android:layout_height="wrap_content"
        android:layout_gravity="center_vertical">

        <LinearLayout android:orientation="horizontal"
            android:layout_width="fill_parent"
            android:layout_height="wrap_content">

        <TextView android:id="@+id/money"
            android:layout_width="wrap_content"
            android:layout_height="wrap_content"
            android:textSize="14sp"
            android:paddingLeft="10dp"/>

        <TextView  android:id="@+id/amount"
            android:layout_width="wrap_content"
            android:layout_height="wrap_content"
            android:textSize="14sp"
            android:paddingLeft="10dp"
            android:textColor="#EC8B57"/>
        </LinearLayout>

        <TextView  android:id="@+id/desc"
            android:layout_width="wrap_content"
            android:layout_height="wrap_content"
            android:textSize="10sp"
            android:textColor="#B4B1B1"
            android:paddingLeft="10dp"/>
    </LinearLayout>
    <TextView android:id="@+id/end"
        android:layout_width="0dp"
        android:layout_height="wrap_content"
        android:layout_weight="2"
        android:layout_gravity="center_vertical"
        android:drawableEnd="@drawable/icon_arrow_right"
        android:textSize="5sp" />
</LinearLayout>
运行效果如下,我们可以通过改变上面布局文件的来改变界面布局,文字大小,颜色,位置等等。


 793
793

 被折叠的 条评论
为什么被折叠?
被折叠的 条评论
为什么被折叠?
 到【灌水乐园】发言


