


IOC
xml配置bean
xml文件:
<?xml version="1.0" encoding="UTF-8"?>
<beans xmlns="http://www.springframework.org/schema/beans"
xmlns:xsi="http://www.w3.org/2001/XMLSchema-instance"
xmlns:context="http://www.springframework.org/schema/context"
xmlns:util="http://www.springframework.org/schema/util"
xmlns:p="http://www.springframework.org/schema/p"
xsi:schemaLocation="http://www.springframework.org/schema/beans
http://www.springframework.org/schema/beans/spring-beans.xsd
http://www.springframework.org/schema/util
http://www.springframework.org/schema/util/spring-util-4.0.xsd
http://www.springframework.org/schema/context
http://www.springframework.org/schema/context/spring-context-3.0.xsd">
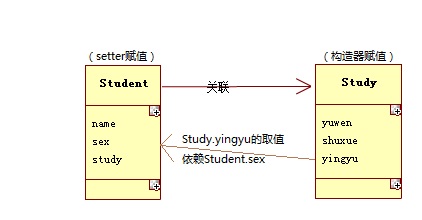
<!-- 配置一个 bean。这里自动装配了Study,autowire可以是byName(id名与属性名对应)或者byType -->
<bean id="student" class="com.diyun.beans.Student"
autowire="byName" init-method="init" destroy-method="destory">
<!-- 为属性赋值 ,通过调用无参构造器和setter-->
<property name="name" value="张三"></property>
<property name="sex" value="1"></property>
<!-- 如果不自动装配:关联id为study的bean,传递引用型变量
<property name="study" ref="study" >
<list><map><set>标签放在这里可以给集合赋值,
也可以用与<bean>同级的<util:*>标签把集合赋值提出来以供 复用 (通过id属性供ref调用)
</property>
-->
</bean>
<!-- 另一种配置方式 ,这里设置abstract="true",使得该bean无法被实例化(抽象bean),仅可作为模板供其他bean继承
如果一个bean没有class属性,则必须为抽象bean
-->
<bean id="student2"
p:name="李四"
p:study-ref="study" abstract="true">
</bean>
<!-- 继承复用study的配置,autowire装配的属性不会被继承
scope属性指明bean的作用域,取值有singleton(单例,每次返回同一个实例,在容器创建时就生成),prototype(每次创建新实例)
-->
<bean id="student3" parent="student" p:study-ref="study" scope="prototype"></bean>
<bean id="study" class="com.diyun.beans.Study" init-method="init" destroy-method="destory"
depends-on="student"><!--depends-on属性设置依赖关系,实际上是指定Bean加载顺序(student先加载) -->
<!-- 通过构造器赋值 -->
<constructor-arg name="yuwen" value="92"></constructor-arg>
<!-- 使用sqEL表达式,T()表示引用类的静态属性 -->
<constructor-arg name="shuxue" value="#{T(java.lang.Math).PI*4}"></constructor-arg>
<constructor-arg name="yingyu" value="#{student.sex==0?100:99}"></constructor-arg>
</bean>
<!-- 配置bean的后置处理器,该处理器实现了BeanPostProcessor接口 -->
<bean class="com.diyun.beans.MyBeanPostProcessor" ></bean>
<!-- 导入属性文件 -->
<context:property-placeholder location="classpath:db.properties"/>
<!-- 连接数据库 -->
<bean id="dataSource" class="com.mchange.v2.c3p0.ComboPooledDataSource">
<property name="driverClass" value="${driverClass}" />
<property name="jdbcUrl" value="${jdbcUrl}" />
<property name="user" value="${user}" />
<property name="password" value="${password}" />
</bean>
</beans>
BeanPostProcessor接口对bean进行预处理(会处理所有bean):
package com.diyun.beans;

import org.springframework.beans.BeansException;
import org.springframework.beans.factory.config.BeanPostProcessor;

public class MyBeanPostProcessor implements BeanPostProcessor {

    @Override
    public Object postProcessAfterInitialization(Object bean, String beanName) throws BeansException {
        System.out.println("after:"+bean+","+beanName);
        return bean;
    }

    @Override
    public Object postProcessBeforeInitialization(Object bean, String beanName) throws BeansException {
        System.out.println("before:"+bean+","+beanName);
        if(bean instanceof Student){
            ((Student) bean).setName("王二麻子");//在bean的 init执行前替换属性
        }
        return bean;
    }

}
调用:
ClassPathXmlApplicationContext ctx=new ClassPathXmlApplicationContext("applictionContext.xml");
System.out.println("容器创建完毕");
Student bean = (Student)ctx.getBean("student"); //对应配置文件中bean的ID
//Student bean = ctx.getBean(Student.class);//另一种方式有限制,必须为唯一的bean
System.out.println(bean.toString());
//DataSource ds=(DataSource)ctx.getBean("dataSource");连接数据库
//Connection c = ds.getConnection();
//System.out.println(c);
ctx.close();
关于执行顺序,看一下我demo的结构(不算是UML图):
执行结果:
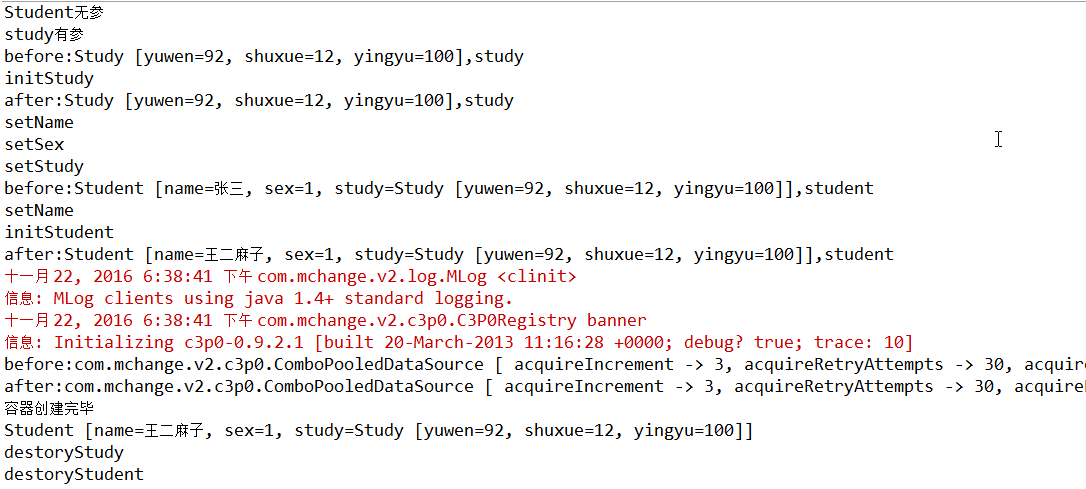
分析:
执行所有bean的构造函数(实例化)
->②(对第一个bean){ BeanPostProcessor接口的beforeInit
->xml里配置的init-method方法
->afterInit
->setter方法赋值(如果需要的话) }
->装配下一个bean(从②处开始)
- · · ->ApplicationContext加载完毕
- -> · · ·
- ->destory方法
其中,Student先于Study初始化并赋值,因为首先配置时设置了id为study的bean中有depends-on=”student”这一条属性(没有这条属性会报错),其次没有student.sex值的话,study.yingyu无法确定值为多少
注解配置bean
xml配置spring扫描组件的区域:
<context:component-scan base-package="com.diyun.annotation"
        resource-pattern="/*" use-default-filters="true"><!-- 去除默认过滤器(设为false)的话,只扫描include-filter指定的包 -->
        <!--<context:include-filter type="assignable" expression=""/> assignable表示expression指定的类(或接口)的所有扩展和实现
        <context:exclude-filter type="annotation" expression=""/> annotation就是一个萝卜一个坑~ -->
    </context:component-scan>
demo:
@Component("a")////作用于类,作为spring扫描时的标识
public class A {
    @Autowired //自动装配,B类也有@Component注解
    @Qualifier("b") //装配冲突时进行选择
    private B b;
    public void say() {
        System.out.println("A");
        b.say();
    }
}
spring支持泛型依赖注入,即为子类注入子类所需的依赖。首先要知道 @Autowired可以被继承到子类,看简易demo:
 class A<T>{@Autowired B b;}
 class B<T>{}
 @Component class Ason extends A<User>{}
 @Component class Bson extends B<User>{}
获取A的子类Ason,发现里面的成员变量是B的子类Bson。这有以下条件:
1. 两个父类不被spring扫描,而两个子类被扫描
2. 两个子类泛型相同(demo中同为User)
3. @Autowired写在父类,并继承到了子类
其他:
@Service用于标注业务层组件
@Controller用于标注控制层组件(如struts中的action)
@Repository用于标注数据访问组件,即DAO组件
@Component泛指组件,当组件不好归类的时候,我们可以使用这个注解进行标注。
AOP
其实这玩意就是动态代理的简化版本
xml配置:
 <context:component-scan base-package="com.diyun.*"></context:component-scan>
    <aop:aspectj-autoproxy></aop:aspectj-autoproxy><!--配置自动为匹配 aspectJ注解的 Java 类 生成代理对象-->

    <!--
        以下为xml配置aop:

    <bean id="arithmeticCalculator"
        class="com.diyun.aop.xml.ArithmeticCalculatorImpl"></bean>

    //配置切面的 bean
    <bean id="loggingAspect"
        class="com.diyun.spring.aop.xml.LoggingAspect"></bean>

    <bean id="vlidationAspect"
        class="com.diyun.spring.aop.xml.VlidationAspect"></bean>

      // 配置 AOP
    <aop:config>
         //配置切点表达式
        <aop:pointcut expression="execution(* com.diyun.spring.aop.xml.ArithmeticCalculator.*(int, int))"
            id="pointcut"/>
         //配置切面及通知
        <aop:aspect ref="loggingAspect" order="2">
            <aop:before method="beforeMethod" pointcut-ref="pointcut"/>
            <aop:after method="afterMethod" pointcut-ref="pointcut"/>
            <aop:after-throwing method="afterThrowing" pointcut-ref="pointcut" throwing="e"/>
            <aop:after-returning method="afterReturning" pointcut-ref="pointcut" returning="result"/>
            <aop:around method="aroundMethod" pointcut-ref="pointcut"/>
        </aop:aspect>
        <aop:aspect ref="vlidationAspect" order="1">
            <aop:before method="validateArgs" pointcut-ref="pointcut"/>
        </aop:aspect>
    </aop:config>
     -->
注解配置:
//@order(int)指定切面优先级
@Aspect
@Component
public class MyAspect {

    //定义一个切点
    @Pointcut("execution(public int com.diyun.aop.Jisuan.divide(int,int))")
    public void pointcutExpression(){}

    /*@Before("execution(public * com.diyun.aop.Jisuan.*(..))")
        匹配com.diyun.aop.Jisuan类里任意返回值,任意方法名,任意参数列表*/
    @Before("execution(public int com.diyun.aop.Jisuan.divide(int,int))")
    public void before(JoinPoint joinPoint){//JoinPoint能获取方法信息
        String methodName=joinPoint.getSignature().getName();
        Object[] args=joinPoint.getArgs();
        System.out.println(methodName+"("+args[0]+"/"+args[1]+")");
    }


    //@After 后置通知无论方法是否抛出异常;无法获取方法执行结果
    //@AfterRunning 返回通知

    //使用表达式代替了重复书写方法信息,不同包之间可以通过添加包名来传递
    @AfterThrowing(value="pointcutExpression()",throwing="e")
    public void afterThrowing(JoinPoint joinPoint,NullPointerException e){//只执行指定异常
        System.out.println(e.getMessage());
    }
    /*
     * 环绕通知类似于动态代理全过程
     */
    @Around("pointcutExpression()")
    public Object around(ProceedingJoinPoint pjp){
        Object result=null;
        try {

            //前置通知
            result=pjp.proceed();//执行目标方法

        } catch (Throwable e) {
            //异常通知
        }finally{
            //后置通知
        }
        //返回通知
        return result;
    }
通过aop为类动态引入新方法
@Aspect
@Component
public class DoAspect {
    //通过切面引入新方法(实际上就是通过切面添加新的接口,并绑定一个该接口的实现类,从而实现添加新方法)
    @DeclareParents(value="com.diyun.*"/*需要添加新方法的类*/,defaultImpl=TestClass.class/*方法实现类,该类肯定要实现Extra的接口*/)
    public static Extra extra;/*接口名*/
}
Spring事务处理
Spring jdbc有点简洁过头
配置:
<bean id="dataSource" class="com.mchange.v2.c3p0.ComboPooledDataSource">
    <property name="user" value="${jdbc.user}"></property>
    <property name="password" value="${jdbc.password}"></property>
    <property name="jdbcUrl" value="${jdbc.jdbcUrl}"></property>
    <property name="driverClass" value="${jdbc.driverClass}"></property>
    <property name="initialPoolSize" value="${jdbc.initialPoolSize}"></property>
    <property name="maxPoolSize" value="${jdbc.maxPoolSize}"></property>
</bean>
<bean id="JdbcTemplate" class="org.springframework.jdbc.core.JdbcTemplate">
    <property name="dataSource" ref="dataSource"></property>
</bean>
调用:
DataSource dataSource=(DataSource)ctx.getBean("dataSource");
//JdbcTemplate template=new JdbcTemplate(dataSource);
//RowMapper rowMapper=new BeanPropertyRowMapper(UserInfo.class);
//列的别名实现从列名到属性名的映射
//UserInfo user=template.queryForObject("select id,username,password pwd from user_info where id=?",rowMapper,6);
//template.update(sql); 执行insert,delete,update
//template.batchUpdate(sql, batchArgs); 批量执行insert,delete,update
//NamedParameterJdbcTemplate支持具名参数,通过在sql中使用":变量名"来对应相应的变量(就是占位符对应的序号换成变量名,这样不容易出错)
启用事务
加入配置:
<!-- 事务管理器 -->
<bean id="transactionManager" class="org.springframework.jdbc.datasource.DataSourceTransactionManager">
    <property name="dataSource" ref="dataSource"></property>
</bean>
<!-- 启用事务注解 -->
<tx:annotation-driven transaction-manager="transactionManager" />
·使用:
/* @Transactional属性:
 *  1.propagation:涉及到事务传播行为时(一个事务包含另外一个事务时),
 *   REQUIRES_NEW是部分回滚(能买多少是多少);REQUIRED是整体回滚(都买不成)
 *  2.isolation:事务的隔离级别,一般是READ_COMMITTED
 *  3.noRollbackFor/noRollbackForClassName:设定不回滚的选项
 *  4.readOnly:只读事务时设置该属性为true,便于spring自动调优
 */

@Transactional(propagation=Propagation.REQUIRES_NEW)
public void py(int cost) throws Exception{
    updateSell(cost);
    updateBuy(cost);
}
xml配置事务:
<!-- 配置事务属性 -->
<tx:advice id="txAdvice" transaction-manager="transactionManager">
    <tx:attributes>
        <!-- name属性写方法名 -->
        <tx:method name="*" propagation="REQUIRED" read-only="false"/>
        <!-- 支持通配符,如get*代表所有get开头的方法 -->
        <tx:method="get*"
    </tx:attributes>
</tx:advice>
<!-- 配置事务切入点,并关联事务属性 -->
<aop:config>
    <aop:pointcut expression="execution(* com.diyun.dao.DemoDao.py(..))" id="ex"/>
    <aop:advisor advice-ref="txAdvice" pointcut-ref="ex"/>
</aop:config>
Spring应用于web
对于IOC容器,非web应用直接在main方法里创建了,那web应用呢?应该在web应用被服务器加载时创建。
为此,我们可以在ServletContextListener#contextInitialized方法中创建IOC容器,并把它放在ServletContext(即application域)中。
当然,这些代码其实spring帮我们写好了,直接在web.xml中引入:
 <listener>
    <listener-class>org.springframework.web.context.ContextLoaderListener</listener-class>
 </listener>
然后在servlet中:
ApplicationContext ctx = WebApplicationContextUtils.getWebApplicationContext(context);其他
1.profile:控制bean的开闭,通过@profile(“name”)或beans的profile属性设置;有很多方式可以激活,如:
(ps:spring.profiles.active优于spring.profiles.default)
<context-param>
    <param-name>spring.profiles.default</param-name>
    <param-value>name1,name2</param-value>
</context-param>
方式:
- 作为SpringMVC中的DispatcherServlet的初始化参数
- 作为Web 应用上下文中的初始化参数
- 作为JNDI的入口
- 作为环境变量
- 作为虚拟机的系统参数
- 使用@AtivceProfile()来进行激活(作为JUnit测试时使用)
2.SpEL(如果使用注解配置,可以在@Value中使用)
- “ .?”:对集合进行过滤,生成新的子集,如#{songs.?[singer eq ‘周杰伦’]};
- “?.”:防止级联时出现null,会有一个检查,如#{songs?.singer}
- “.^”/ “.$”:查询集合中第一个/最后一个匹配项,如#{songs.^[singer eq ‘周杰伦’]},返回周杰伦的第一首歌曲
- “.!”:将集合属性投影到另一个集合,如#{songs.![singer]},返回歌手集合
- “T()”:调用api,如#{T(java.util.Math).random()}
3.AspectJ切点表达式:除了execution,还有
- args() 限制连接点匹配参数为执行类型的执行方法
- @args() 限制连接点匹配参数由执行注解标注的执行方法
- execution() 匹配连接点的执行方法
- this() 限制连接点匹配AOP代理的Bean引用类型为指定类型的Bean
- target() 限制连接点匹配目标对象为指定类型的类
- @target() 限制连接点匹配目标对象被指定的注解标注的类
- within() 限制连接点匹配匹配指定的类型
- @within() 限制连接点匹配指定注解标注的类型
- @annotation 限制匹配带有指定注解的连接点
操作符:“||/or”,“&&/and”,“!/not”
用法举例:
- execution("* *.*(..)"):匹配所有
- execution("* *.set*(..)):匹配所有以set开头的方法
- execution("* com.david.biz.service.impl.*(..)):匹配指定包下所有的方法
- execution("* com.david..*(..)"):匹配指定包以及其子包下的所有方法
- execution("* com.david..*(java.lang.String)):匹配指定包以及其子包下参数类型为String 的方法
- execution("* com.diyun.*(..) && within(com.diyun.*))":用within限制匹配,该句限制必须在com.diyun包下


 524
524

 被折叠的 条评论
为什么被折叠?
被折叠的 条评论
为什么被折叠?
 到【灌水乐园】发言


