


1.下载ActiveMQ
去官方网站下载:http://activemq.apache.org/
2.运行ActiveMQ
解压缩apache-activemq-5.14.0-bin.zip,然后双击apache-activemq-5.14.0\bin\activemq.bat运行ActiveMQ程序。
启动ActiveMQ以后,登陆:http://localhost:8161/admin/ ,账户和密码都是admin,然后可以自己添加一个Queue,这次项目
我们通过代码创建一个Queue.
好了,activeMQ就已经完成了部署,那么怎么把他运用到我们项目中呢,下面我就给大家介绍一下。
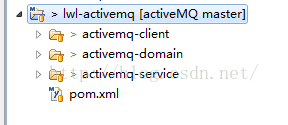
首先来看下我这个项目的整个目录结构,总共分为3个子项目,domain项目用于存放公共的实体类和工具类,打包成jar包供
其他2个包使用。Service项目则是activeMQ的提供者或者说是生产者,这里主要是配置activeMQ的生成方式和创建Queue,
那么剩下来的client项目当然就是MQ的使用者或者说是消费者了,那边产生消息,这边消费消息。那我们来看看具体的代码
吧。
首先介绍domain的项目,这个项目里面主要定义了三种实体类,User.java Client.java News.java 只是用于测试而已,
那就随便看其中一个就好了,User.java
- package com.lwl.activemq.domain;
- import java.io.Serializable;
- /**
- * 用户测试类
- * @author Administrator
- *
- */
- public class User implements Serializable{
- private static final long serialVersionUID = 1L;
- private long id;
- private String username;
- private String password;
- private String sex;
- private int age;
- public long getId() {
- return id;
- }
- public void setId(long id) {
- this.id = id;
- }
- public String getUsername() {
- return username;
- }
- public void setUsername(String username) {
- this.username = username;
- }
- public String getPassword() {
- return password;
- }
- public void setPassword(String password) {
- this.password = password;
- }
- public String getSex() {
- return sex;
- }
- public void setSex(String sex) {
- this.sex = sex;
- }
- public int getAge() {
- return age;
- }
- public void setAge(int age) {
- this.age = age;
- }
- @Override
- public String toString() {
- return “User [id=” + id + “, username=” + username + “, password=”
- + password + ”, sex=” + sex + “, age=” + age + “]”;
- }
- }
package com.lwl.activemq.domain;

import java.io.Serializable;
/**
 * 用户测试类
 * @author Administrator
 *
 */
public class User implements Serializable{

    private static final long serialVersionUID = 1L;

    private long id;

    private String username;

    private String password;

    private String sex;

    private int age;

    public long getId() {
        return id;
    }

    public void setId(long id) {
        this.id = id;
    }

    public String getUsername() {
        return username;
    }

    public void setUsername(String username) {
        this.username = username;
    }

    public String getPassword() {
        return password;
    }

    public void setPassword(String password) {
        this.password = password;
    }

    public String getSex() {
        return sex;
    }

    public void setSex(String sex) {
        this.sex = sex;
    }

    public int getAge() {
        return age;
    }

    public void setAge(int age) {
        this.age = age;
    }

    @Override
    public String toString() {
        return "User [id=" + id + ", username=" + username + ", password="
                + password + ", sex=" + sex + ", age=" + age + "]";
    }
}
domain项目添加好这3个实体类,就把这个项目通过maven打包成jar供其他2个项目使用即可。那接下来我们来看下service项目的代码结构吧:
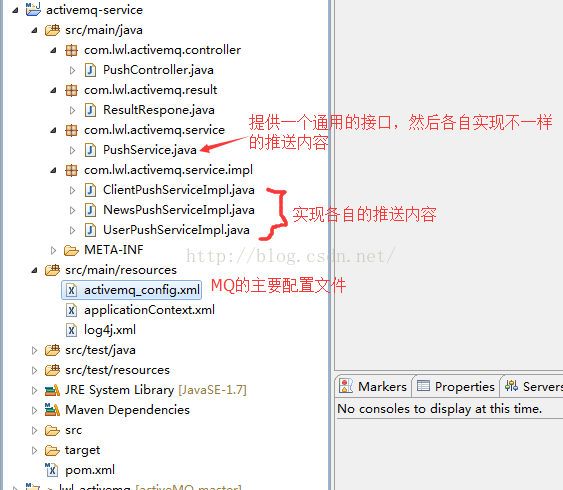
首先我们来看一下最主要的MQ的配置文件:
- <?xml version=“1.0” encoding=“UTF-8”?>
- <beans xmlns=“http://www.springframework.org/schema/beans”
- xmlns:xsi=“http://www.w3.org/2001/XMLSchema-instance” xmlns:context=“http://www.springframework.org/schema/context”
- xmlns:jms=“http://www.springframework.org/schema/jms”
- xsi:schemaLocation=”http://www.springframework.org/schema/beans
- http://www.springframework.org/schema/beans/spring-beans-3.0.xsd
- http://www.springframework.org/schema/context
- http://www.springframework.org/schema/context/spring-context-3.0.xsd
- http://www.springframework.org/schema/beans http://www.springframework.org/schema/beans/spring-beans-3.0.xsd
- http://www.springframework.org/schema/jms http://www.springframework.org/schema/jms/spring-jms-3.0.xsd”>
- <!– 这里暴露内部统一使用的MQ地址 –>
- <bean id=“internalTargetConnectionFactory” class=“org.apache.activemq.ActiveMQConnectionFactory”>
- <property name=“brokerURL” value=“tcp://localhost:61616” />
- </bean>
- <bean id=“internalConnectionFactory” class=“org.apache.activemq.pool.PooledConnectionFactory”
- destroy-method=“stop”>
- <property name=“connectionFactory” ref=“internalTargetConnectionFactory” />
- <property name=“maxConnections” value=“20” />
- </bean>
- <!– Spring提供的JMS工具类,它可以进行消息发送、接收等 –>
- <bean id=“internalJmsTemplate” class=“org.springframework.jms.core.JmsTemplate”>
- <property name=“connectionFactory” ref=“internalConnectionFactory” />
- </bean>
- <!– 推送给用户信息 创建一个Queue–>
- <bean id=“userServiceQueue” class=“org.apache.activemq.command.ActiveMQQueue”>
- <constructor-arg>
- <value>user.service.queue</value>
- </constructor-arg>
- </bean>
- <!– 推送给新闻信息 创建一个Queue–>
- <bean id=“newsServiceQueue” class=“org.apache.activemq.command.ActiveMQQueue”>
- <constructor-arg>
- <value>news.service.queue</value>
- </constructor-arg>
- </bean>
- <!– 推送给客户信息 创建一个Queue–>
- <bean id=“clientServiceQueue” class=“org.apache.activemq.command.ActiveMQQueue”>
- <constructor-arg>
- <value>client.service.queue</value>
- </constructor-arg>
- </bean>
- </beans>
<?xml version="1.0" encoding="UTF-8"?>
<beans xmlns="http://www.springframework.org/schema/beans"
    xmlns:xsi="http://www.w3.org/2001/XMLSchema-instance" xmlns:context="http://www.springframework.org/schema/context"
    xmlns:jms="http://www.springframework.org/schema/jms"
    xsi:schemaLocation="http://www.springframework.org/schema/beans
     http://www.springframework.org/schema/beans/spring-beans-3.0.xsd
     http://www.springframework.org/schema/context
     http://www.springframework.org/schema/context/spring-context-3.0.xsd
    http://www.springframework.org/schema/beans http://www.springframework.org/schema/beans/spring-beans-3.0.xsd
    http://www.springframework.org/schema/jms http://www.springframework.org/schema/jms/spring-jms-3.0.xsd">

    <!-- 这里暴露内部统一使用的MQ地址 -->
    <bean id="internalTargetConnectionFactory" class="org.apache.activemq.ActiveMQConnectionFactory">
        <property name="brokerURL" value="tcp://localhost:61616" />
    </bean>
    <bean id="internalConnectionFactory" class="org.apache.activemq.pool.PooledConnectionFactory"
        destroy-method="stop">
        <property name="connectionFactory" ref="internalTargetConnectionFactory" />
        <property name="maxConnections" value="20" />
    </bean>
    <!-- Spring提供的JMS工具类,它可以进行消息发送、接收等 -->
    <bean id="internalJmsTemplate" class="org.springframework.jms.core.JmsTemplate">
        <property name="connectionFactory" ref="internalConnectionFactory" />
    </bean>

    <!-- 推送给用户信息  创建一个Queue-->
    <bean id="userServiceQueue" class="org.apache.activemq.command.ActiveMQQueue">
        <constructor-arg>
            <value>user.service.queue</value>
        </constructor-arg>
    </bean>
    <!-- 推送给新闻信息   创建一个Queue-->
    <bean id="newsServiceQueue" class="org.apache.activemq.command.ActiveMQQueue">
        <constructor-arg>
            <value>news.service.queue</value>
        </constructor-arg>
    </bean>
    <!-- 推送给客户信息   创建一个Queue-->
    <bean id="clientServiceQueue" class="org.apache.activemq.command.ActiveMQQueue">
        <constructor-arg>
            <value>client.service.queue</value>
        </constructor-arg>
    </bean>


</beans>
那我们看下怎么运用定义的这个配置文件呢?
首先我们定义一个通用的推送接口PushService.Java
- package com.lwl.activemq.service;
- import java.util.concurrent.ExecutorService;
- import java.util.concurrent.Executors;
- /**
- * 推送的接口
- * @author Administrator
- * @create 2016-8-10 下午3:41:03
- * @version 1.0
- */
- public interface PushService {
- public final ExecutorService pushExecutor = Executors.newFixedThreadPool(10);
- public void push(Object info);
- }
package com.lwl.activemq.service;

import java.util.concurrent.ExecutorService;
import java.util.concurrent.Executors;

/**
 * 推送的接口
 * @author Administrator
 * @create 2016-8-10 下午3:41:03
 * @version 1.0
 */
public interface PushService {

    public final ExecutorService pushExecutor = Executors.newFixedThreadPool(10);

    public void push(Object info);

}
然后又实现了3中不同的推送内容:ClientPushServiceImpl.java NewsPushServiceImpl.java UserPushServiceImpl.java就拿其中的一个来举例,其他2个模式是一样的
- package com.lwl.activemq.service.impl;
- import javax.jms.Destination;
- import javax.jms.JMSException;
- import javax.jms.Message;
- import javax.jms.Session;
- import org.springframework.beans.factory.annotation.Autowired;
- import org.springframework.beans.factory.annotation.Qualifier;
- import org.springframework.stereotype.Service;
- import org.springframework.jms.core.JmsTemplate;
- import org.springframework.jms.core.MessageCreator;
- import com.alibaba.fastjson.JSON;
- import com.lwl.activemq.domain.User;
- import com.lwl.activemq.service.PushService;
- @Service(“userPushService”)
- public class UserPushServiceImpl implements PushService {
- @Autowired
- private JmsTemplate jmsTemplate;
- /**
- * 这里是根据MQ配置文件定义的queue来注入的,也就是这里将会把不同的内容推送到不同的queue中
- */
- @Autowired
- @Qualifier(“userServiceQueue”)
- private Destination destination;
- @Override
- public void push(final Object info) {
- pushExecutor.execute(new Runnable() {
- @Override
- public void run() {
- jmsTemplate.send(destination, new MessageCreator() {
- public Message createMessage(Session session) throws JMSException {
- User p = (User) info;
- return session.createTextMessage(JSON.toJSONString(p));
- }
- });
- }
- });
- }
- }
package com.lwl.activemq.service.impl;

import javax.jms.Destination;
import javax.jms.JMSException;
import javax.jms.Message;
import javax.jms.Session;

import org.springframework.beans.factory.annotation.Autowired;
import org.springframework.beans.factory.annotation.Qualifier;
import org.springframework.stereotype.Service;
import org.springframework.jms.core.JmsTemplate;
import org.springframework.jms.core.MessageCreator;

import com.alibaba.fastjson.JSON;
import com.lwl.activemq.domain.User;
import com.lwl.activemq.service.PushService;


@Service("userPushService")
public class UserPushServiceImpl implements PushService {


    @Autowired
    private JmsTemplate jmsTemplate;

    /**
     * 这里是根据MQ配置文件定义的queue来注入的,也就是这里将会把不同的内容推送到不同的queue中
     */
    @Autowired
    @Qualifier("userServiceQueue")
    private Destination destination;

    @Override
    public void push(final Object info) {
        pushExecutor.execute(new Runnable() {
            @Override
            public void run() {
                jmsTemplate.send(destination, new MessageCreator() {
                    public Message createMessage(Session session) throws JMSException {
                         User p = (User) info;
                        return session.createTextMessage(JSON.toJSONString(p));
                    }
                });
            }
        });
    }

}
接口也已经实现好了,剩下的就是看我们怎么调用它了,那我们看看控制器吧:
- package com.lwl.activemq.controller;
- import javax.annotation.Resource;
- import org.springframework.stereotype.Controller;
- import org.springframework.web.bind.annotation.RequestMapping;
- import org.springframework.web.bind.annotation.RequestMethod;
- import org.springframework.web.bind.annotation.ResponseBody;
- import com.lwl.activemq.domain.Client;
- import com.lwl.activemq.domain.News;
- import com.lwl.activemq.domain.User;
- import com.lwl.activemq.result.ResultRespone;
- import com.lwl.activemq.service.PushService;
- @Controller
- @RequestMapping(“/push”)
- public class PushController {
- @Resource(name=“userPushService”)
- private PushService userPushService;
- @Resource(name=“newsPushService”)
- private PushService newsPushService;
- @Resource(name=“clientPushService”)
- private PushService clientPushService;
- /**
- * 用户推送
- * @param info
- * @return
- * @author Administrator
- * @create 2016-8-10 下午4:22:28
- */
- @RequestMapping(value=“/user”,method=RequestMethod.POST)
- @ResponseBody
- public ResultRespone userPush(User info){
- ResultRespone respone = new ResultRespone();
- try {
- userPushService.push(info);
- respone.setData(info);
- } catch (Exception e) {
- e.printStackTrace();
- respone = new ResultRespone(false, e.getMessage());
- }
- return respone;
- }
- /**
- * 新闻推送
- * @param info
- * @return
- * @author Administrator
- * @create 2016-8-10 下午4:22:38
- */
- @RequestMapping(value=“/news”,method=RequestMethod.POST)
- @ResponseBody
- public ResultRespone newsPush(News info){
- ResultRespone respone = new ResultRespone();
- try {
- newsPushService.push(info);
- respone.setData(info);
- } catch (Exception e) {
- e.printStackTrace();
- respone = new ResultRespone(false, e.getMessage());
- }
- return respone;
- }
- /**
- * 客户推送
- * @param info
- * @return
- * @author Administrator
- * @create 2016-8-10 下午4:22:48
- */
- @RequestMapping(value=“/client”,method=RequestMethod.POST)
- @ResponseBody
- public ResultRespone clientPush(Client info){
- ResultRespone respone = new ResultRespone();
- try {
- clientPushService.push(info);
- respone.setData(info);
- } catch (Exception e) {
- e.printStackTrace();
- respone = new ResultRespone(false, e.getMessage());
- }
- return respone;
- }
- }
package com.lwl.activemq.controller;

import javax.annotation.Resource;

import org.springframework.stereotype.Controller;
import org.springframework.web.bind.annotation.RequestMapping;
import org.springframework.web.bind.annotation.RequestMethod;
import org.springframework.web.bind.annotation.ResponseBody;

import com.lwl.activemq.domain.Client;
import com.lwl.activemq.domain.News;
import com.lwl.activemq.domain.User;
import com.lwl.activemq.result.ResultRespone;
import com.lwl.activemq.service.PushService;

@Controller
@RequestMapping("/push")
public class PushController {

    @Resource(name="userPushService")
    private PushService userPushService;

    @Resource(name="newsPushService")
    private PushService newsPushService;

    @Resource(name="clientPushService")
    private PushService clientPushService;

    /**
     * 用户推送
     * @param info
     * @return
     * @author Administrator
     * @create 2016-8-10 下午4:22:28
     */
    @RequestMapping(value="/user",method=RequestMethod.POST)
    @ResponseBody
    public ResultRespone userPush(User info){
        ResultRespone respone = new ResultRespone();
        try {
            userPushService.push(info);
            respone.setData(info);
        } catch (Exception e) {
            e.printStackTrace();
            respone = new ResultRespone(false, e.getMessage());
        }
        return respone;
    }

    /**
     * 新闻推送
     * @param info
     * @return
     * @author Administrator
     * @create 2016-8-10 下午4:22:38
     */
    @RequestMapping(value="/news",method=RequestMethod.POST)
    @ResponseBody
    public ResultRespone newsPush(News info){
        ResultRespone respone = new ResultRespone();
        try {
            newsPushService.push(info);
            respone.setData(info);
        } catch (Exception e) {
            e.printStackTrace();
            respone = new ResultRespone(false, e.getMessage());
        }
        return respone;
    }
    /**
     * 客户推送
     * @param info
     * @return
     * @author Administrator
     * @create 2016-8-10 下午4:22:48
     */
    @RequestMapping(value="/client",method=RequestMethod.POST)
    @ResponseBody
    public ResultRespone clientPush(Client info){
        ResultRespone respone = new ResultRespone();
        try {
            clientPushService.push(info);
            respone.setData(info);
        } catch (Exception e) {
            e.printStackTrace();
            respone = new ResultRespone(false, e.getMessage());
        }
        return respone;
    }
}
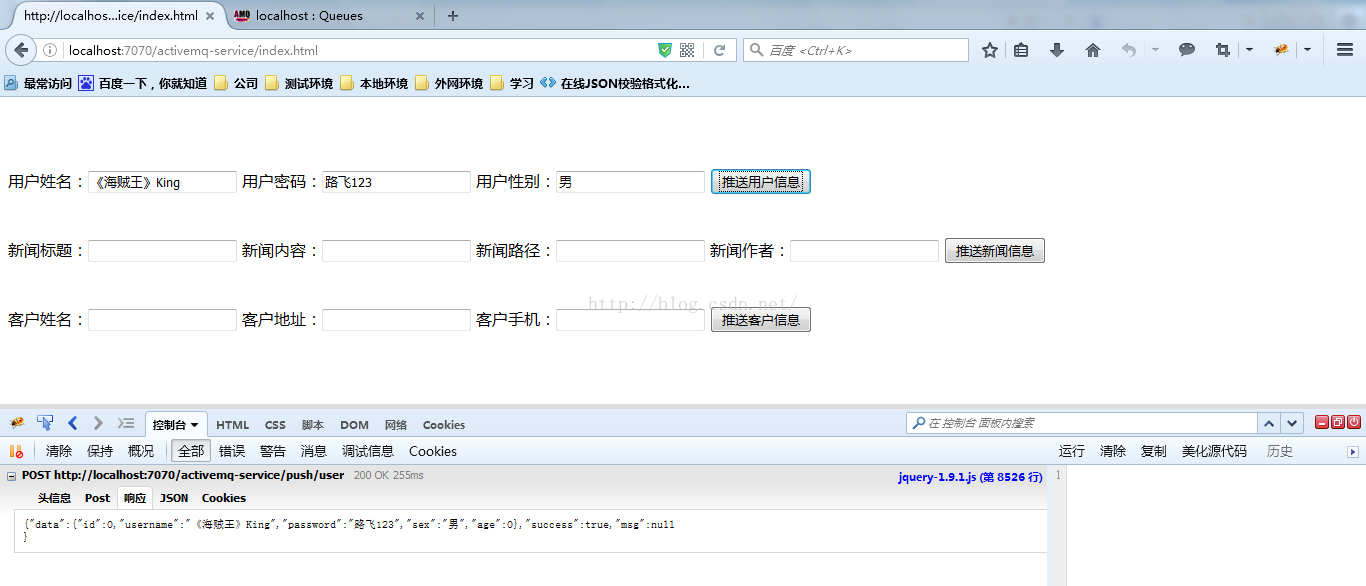
控制器也写好了,剩下的就是前段页面的调用了,那就快来看看吧index.html
- <!DOCTYPE HTML PUBLIC ”-//W3C//DTD HTML 4.01 Transitional//EN” “http://www.w3.org/TR/html4/loose.dtd”>
- <html>
- <head>
- <meta http-equiv=“Content-Type” content=“text/html; charset=UTF-8”>
- <meta http-equiv=“X-UA-Compatible” content=“IE=edge”>
- <meta name=“viewport” content=“width=device-width, initial-scale=1”>
- <script type=“text/javascript” src=“resources/jquery-1.9.1.js”></script>
- </head>
- <body>
- <br/><br/><br/>
- 用户姓名:<input type=“text” id=“username” />
- 用户密码:<input type=“text” id=“password” />
- 用户性别:<input type=“text” id=“sex” />
- <input type=“button” value=“推送用户信息” id=“pushUser” />
- <br/><br/><br/>
- 新闻标题:<input type=“text” id=“title” />
- 新闻内容:<input type=“text” id=“content” />
- 新闻路径:<input type=“text” id=“url” />
- 新闻作者:<input type=“text” id=“author” />
- <input type=“button” value=“推送新闻信息” id=“pushNews” />
- <br/><br/><br/>
- 客户姓名:<input type=“text” id=“name” />
- 客户地址:<input type=“text” id=“address” />
- 客户手机:<input type=“text” id=“mobile” />
- <input type=“button” value=“推送客户信息” id=“pushClient” />
- <script type=“text/javascript”>
- ("#pushUser").click(function(){ </span></li><li class="alt"><span> var <span class="attribute">data</span><span> = { </span></span></li><li class=""><span> username : $("#username").val(), </span></li><li class="alt"><span> password : $("#password").val(), </span></li><li class=""><span> sex : $("#sex").val() </span></li><li class="alt"><span> }; </span></li><li class=""><span> ajaxDo("/activemq-service/push/user",data); </span></li><li class="alt"><span> }); </span></li><li class=""><span> (“#pushNews”).click(function(){
- var data = {
- title : ("#title").val(), </span></li><li class="alt"><span> content : (“#content”).val(),
- author : ("#author").val(), </span></li><li class="alt"><span> url : (“#url”).val()
- };
- ajaxDo(“/activemq-service/push/news”,data);
- });
- ("#pushClient").click(function(){ </span></li><li class=""><span> var <span class="attribute">data</span><span> = { </span></span></li><li class="alt"><span> name : ("#name").val(), </span></li><li class=""><span> address : ("#address").val(), </span></li><li class="alt"><span> mobile : ("#mobile").val() </span></li><li class=""><span> }; </span></li><li class="alt"><span> ajaxDo("/activemq-service/push/client",data); </span></li><li class=""><span> }); </span></li><li class="alt"><span> </span></li><li class=""><span>function ajaxDo(url,data){ </span></li><li class="alt"><span> $.ajax({
- url:url ,
- type: “post”,
- dataType: “json”,
- data: data,
- success:function(result){
- if(result.success){
- var obj = JSON.stringify(result.data);
- alert(obj);
- }else{
- alert(result.msg);
- }
- }
- });
- }
- </script>
- </body>
- </html>
<!DOCTYPE HTML PUBLIC "-//W3C//DTD HTML 4.01 Transitional//EN" "http://www.w3.org/TR/html4/loose.dtd">
<html>
    <head>
        <meta http-equiv="Content-Type" content="text/html; charset=UTF-8">
        <meta http-equiv="X-UA-Compatible" content="IE=edge">
        <meta name="viewport" content="width=device-width, initial-scale=1">
          <script type="text/javascript" src="resources/jquery-1.9.1.js"></script>
     </head>
<body>
<br/><br/><br/>
用户姓名:<input type="text" id="username" />
用户密码:<input type="text" id="password" />
用户性别:<input type="text" id="sex" />
 <input type="button" value="推送用户信息" id="pushUser" />

<br/><br/><br/>
新闻标题:<input type="text" id="title" />
新闻内容:<input type="text" id="content" />
新闻路径:<input type="text" id="url" />
新闻作者:<input type="text" id="author" />
 <input type="button" value="推送新闻信息" id="pushNews" />


<br/><br/><br/>
客户姓名:<input type="text" id="name" />
客户地址:<input type="text" id="address" />
客户手机:<input type="text" id="mobile" />
 <input type="button" value="推送客户信息" id="pushClient" />


<script type="text/javascript">
    $("#pushUser").click(function(){
        var data = {
                username : $("#username").val(),
                password : $("#password").val(),
                sex      : $("#sex").val()
        };
        ajaxDo("/activemq-service/push/user",data);
    });
    $("#pushNews").click(function(){
        var data = {
                title    : $("#title").val(),
                content  : $("#content").val(),
                author   : $("#author").val(),
                url      : $("#url").val()
        };
        ajaxDo("/activemq-service/push/news",data);
    });
    $("#pushClient").click(function(){
        var data = {
                name     : $("#name").val(),
                address  : $("#address").val(),
                mobile   : $("#mobile").val()
        };
        ajaxDo("/activemq-service/push/client",data);
    });

function ajaxDo(url,data){
     $.ajax({
            url:url ,
            type: "post",
            dataType: "json",
            data: data,
            success:function(result){
               if(result.success){
                   var obj = JSON.stringify(result.data);
                   alert(obj);
               }else{
                   alert(result.msg);
               }
            }
        });
}

</script>

</body>
</html>
现在代码都已经完成了,那就可以启动项目了,启动项目之前首先要启动activeMQ,然后再启动activemq-service项目,打开浏览器我们就可以模拟推送内容了:
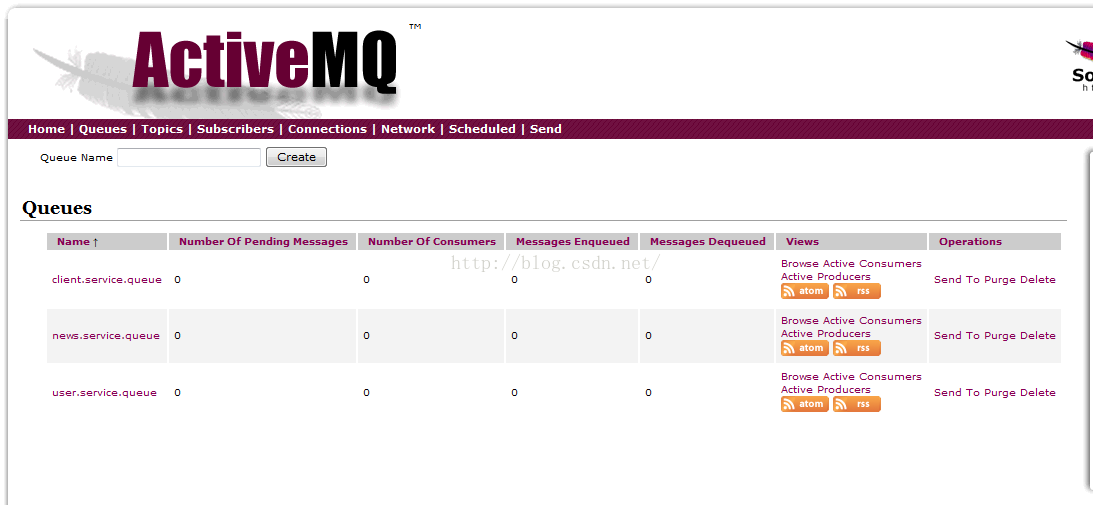
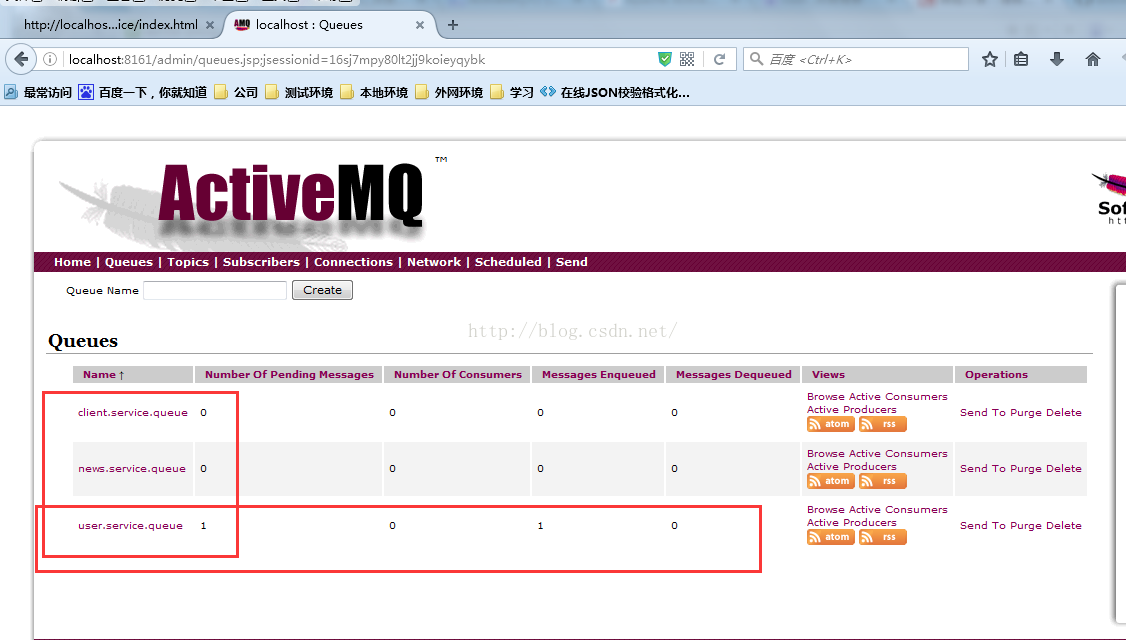
此时在刷新我们的MQ页面你就会发现自动创建好了Queue,而且在User那个里面会有1个消息未被消费掉:
发送端的代码就这样已经完成了,明天将会继续把接收端的代码写出来,并且通过websocket推送到前端显示出来


 2880
2880

 被折叠的 条评论
为什么被折叠?
被折叠的 条评论
为什么被折叠?
 到【灌水乐园】发言


