


一.简介
shiro是Java的一个安全框架,主要为开发提供认证,授权,加密以及会话管理的解决方案。
二.传统的认证与shiro
1.传统的认证
2.shiro认证

三.应用程序如何使用shiro
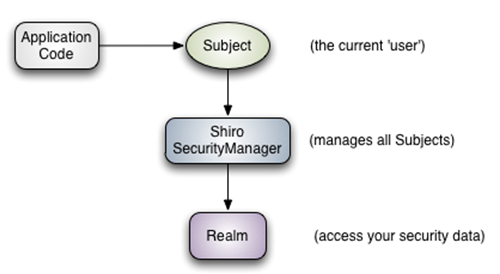
因此,开发只需要关注两部分:
如何获得subject; 如何把subject交给Realm域。
1.应用shiro需要配置相关过滤器
| 过滤器简称 | 对应Java类 |
| anon | org.apache.shiro.web.filter.authc.AnonymousFilter |
| authc | org.apache.shiro.web.filter.authc.FormAuthenticationFilter |
| authcBasic | org.apache.shiro.web.filter.authc.BasicHttpAuthenticationFilter |
| perms | org.apache.shiro.web.filter.authz.PermissionsAuthorizationFilter |
| port | org.apache.shiro.web.filter.authz.PortFilter |
| rest | org.apache.shiro.web.filter.authz.HttpMethodPermissionFilter |
| roles | org.apache.shiro.web.filter.authz.RolesAuthorizationFilter |
| ssl | org.apache.shiro.web.filter.authz.SslFilter |
| user | org.apache.shiro.web.filter.authc.UserFilter |
| logout | org.apache.shiro.web.filter.authc.LogoutFilter |
四.具体使用步骤
1.导入jar包,此次是一个maven项目,直接在pom.xm文件中添加
<dependency>
    <groupId>org.apache.shiro</groupId>
    <artifactId>shiro-all</artifactId>
    <version>1.2.3</version>
</dependency>
<dependency>
    <groupId>net.sf.ehcache</groupId>
    <artifactId>ehcache-core</artifactId>
    <version>2.6.6</version>
</dependency>
2.web.xml文件中配置过滤器(在配合struts2框架使用时,应该放在struts2过滤器前面)
<filter>
        <filter-name>shiroFilter</filter-name>
        <filter-class>org.springframework.web.filter.DelegatingFilterProxy</filter-class>
        <init-param>
            <param-name>targetFilterLifecycle</param-name>
            <param-value>true</param-value>
        </init-param>
    </filter>
    <filter-mapping>
        <filter-name>shiroFilter</filter-name>
        <url-pattern>/*</url-pattern>
    </filter-mapping>
3.导入shiro配置文件
<?xml version="1.0" encoding="UTF-8"?>
<beans xmlns="http://www.springframework.org/schema/beans"
	xmlns:xsi="http://www.w3.org/2001/XMLSchema-instance"
	xmlns:p="http://www.springframework.org/schema/p"
	xmlns:context="http://www.springframework.org/schema/context"
	xmlns:tx="http://www.springframework.org/schema/tx"
	xmlns:aop="http://www.springframework.org/schema/aop"
	xsi:schemaLocation="http://www.springframework.org/schema/beans
	http://www.springframework.org/schema/beans/spring-beans.xsd
	http://www.springframework.org/schema/aop
	http://www.springframework.org/schema/aop/spring-aop.xsd
	http://www.springframework.org/schema/tx
	http://www.springframework.org/schema/tx/spring-tx.xsd
	http://www.springframework.org/schema/context
	http://www.springframework.org/schema/context/spring-context.xsd">

	<description>Shiro的配置</description>

	<!-- SecurityManager配置 -->
	<!-- 配置Realm域 -->
	<!-- 密码比较器 -->
	<!-- 代理如何生成? 用工厂来生成Shiro的相关过滤器-->
	<!-- 配置缓存:ehcache缓存 -->
	<!-- 安全管理 -->
    <bean id="securityManager" class="org.apache.shiro.web.mgt.DefaultWebSecurityManager">
        <!-- Single realm app.  If you have multiple realms, use the 'realms' property instead. -->
        <property name="realm" ref="authRealm"/><!-- 引用自定义的realm -->
        <!-- 缓存 -->
        <property name="cacheManager" ref="shiroEhcacheManager"/>
    </bean>

    <!-- 自定义权限认证 -->
    <bean id="authRealm" class="com.yaorange.ssh.shiro.AuthRealm">
		<!--<property name="userService" ref="userService"/>-->
		<!-- 自定义密码加密算法  -->
		<property name="credentialsMatcher" ref="passwordMatcher"/>
	</bean>

	<!-- 设置密码加密策略 md5hash -->
	<bean id="passwordMatcher" class="com.yaorange.ssh.shiro.CustomCredentialsMatcher"/>

    <!-- filter-name这个名字的值来自于web.xml中filter的名字 -->
    <bean id="shiroFilter" class="org.apache.shiro.spring.web.ShiroFilterFactoryBean">
        <property name="securityManager" ref="securityManager"/>
        <!--登录页面  -->
        <property name="loginUrl" value="/index.jsp"></property>
        <!-- 登录成功后 -->
        <property name="successUrl" value="/home.action"></property>
        <property name="filterChainDefinitions">
            <!-- /**代表下面的多级目录也过滤 -->
            <value>
				/index.jsp* = anon
				/home* = anon
				/sysadmin/login/login.jsp* = anon
				/sysadmin/login/logout.jsp* = anon
				/login* = anon
				/logout* = anon
				/components/** = anon
				/css/** = anon
				/images/** = anon
				/js/** = anon
				/make/** = anon
				/skin/** = anon
				/stat/** = anon
				/ufiles/** = anon
				/validator/** = anon
				/resource/** = anon
				/** = authc
				/*.* = authc
            </value>
        </property>
    </bean>

    <!-- 用户授权/认证信息Cache, 采用EhCache  缓存 -->
    <bean id="shiroEhcacheManager" class="org.apache.shiro.cache.ehcache.EhCacheManager">
        <property name="cacheManagerConfigFile" value="classpath:ehcache-shiro.xml"/>
    </bean>

    <!-- 保证实现了Shiro内部lifecycle函数的bean执行 -->
    <bean id="lifecycleBeanPostProcessor" class="org.apache.shiro.spring.LifecycleBeanPostProcessor"/>

    <!-- 生成代理,通过代理进行控制 -->
    <bean class="org.springframework.aop.framework.autoproxy.DefaultAdvisorAutoProxyCreator"
          depends-on="lifecycleBeanPostProcessor">
        <property name="proxyTargetClass" value="true"/>
    </bean>

    <!-- 安全管理器 -->
    <bean class="org.apache.shiro.spring.security.interceptor.AuthorizationAttributeSourceAdvisor">
        <property name="securityManager" ref="securityManager"/>
    </bean>

</beans>
4.导入ehcache-shiro.xml文件
<?xml version="1.0" encoding="UTF-8"?>
<ehcache updateCheck="false" name="shiroCache">

    <defaultCache
            maxElementsInMemory="10000"
            eternal="false"
            timeToIdleSeconds="120"
            timeToLiveSeconds="120"
            overflowToDisk="false"
            diskPersistent="false"
            diskExpiryThreadIntervalSeconds="120"
            />
</ehcache>
5.在spring配置文件中引入shiro.xml
<!--引入安全框架配置文件-->
    <import resource="shiro.xml"/>
到此,环境已经搭建完毕。


 3724
3724

 被折叠的 条评论
为什么被折叠?
被折叠的 条评论
为什么被折叠?
 到【灌水乐园】发言


