


一、Mixin 混入的基本语法
- Mixin 提供了一种非常灵活的方式,来分发 Vue 组件中的可复用功能。
- 一个 mixin 对象可以包含任意组件选项。
- 当组件使用 mixin 对象时,所有 mixin 对象的选项将被“混合”进入该组件本身的选项。
1. 选项合并
注意:
- 组件 data、methods 优先级高于mixin data、methods 优先级。
- 生命周期函数,先执行 mixin 里面的,再执行组件里面的。
const myMixin = {
    data(){
        return {
            number: 2
        }
    },
    methods: {
        handleClick() {
            console.log('mixin methods');
        }
    },
    mounted(){
        console.log('mixin mounted');
    }
}
const app = Vue.createApp({
    data() {
        return {
            number: 1
        }
    },
    mixins: [myMixin],
    methods: {
        handleClick() {
            console.log('app methods');
        }
    },
    mounted(){
        console.log('app mounted');
    },
    template: `
        <div>{{number}}</div>
        <button @click='handleClick'>增加</button>
    `
});

2. 全局 mixin
- Mixin 也可以进行全局注册,注册之后组件不需要再通过 mixins 属性引入。
const app = Vue.createApp({
    data() {
        return {
            number: 1
        }
    },
    template: `
        <div>{{number}}-{{count}}</div>
        <child />
    `
});
app.mixin({
    data() {
        return {
            number: 2,
            count: 666
        }
    }
});
app.component('child', {
    template: `
        <div>{{number}}-{{count}}</div>
    `
})

3. 自定义选项及其合并策略
- 自定义选项在合并时,组件中的自定义选项优先级要高于mixin自定义选项的优先级。
- 更改自定义选项合并的优先级,可以在
app.config.optionMergeStrategies中添加一个函数。- 第一个参数是 mixin 中选项的值,第二个参数是 app 中选项的值。
const app = Vue.createApp({
    number: 1,
    template: `
        <div>{{this.$options.number}}</div>
    `
});
app.mixin({
    number: 2
});
app.config.optionMergeStrategies.number = (mixinVal, appVal) => {
    return mixinVal || appVal;
}
二、开发实现 Vue 中的自定义指令
1. 简介
- 除了核心功能默认内置的指令 (例如
v-model和v-show),Vue 也允许注册自定义指令。- 全局自定义指令可以直接使用,而局部指令在使用前需要通过 directives 选项去接受一个局部指令的对象。
示例自定义指令,当页面加载时,该元素将获得焦点 :
const app = Vue.createApp({
    template: `
        <input v-focus1 />
    `
});
// 全局的自定义指令
app.directive('focus1', {
    mounted(el) {
        el.focus();
    }
})
// 局部的自定义指令 const directives = { focus2: { mounted(el) { el.focus(); } } } const app = Vue.createApp({ directives: directives, template: ` <input v-focus2 /> ` });
2. 动态指令参数
- 指令的参数可以是动态的。
- 例如,在
v-mydirective:[argument]="value"中,argument参数和value 参数都可以根据组件实例数据进行更新。- mouted(el, binding) 这里第一个参数表示dom元素,第二个参数表示绑定的一些选项,其中常用的有 arg 选项对应上面的
argument 参数,value 选项对应上面的 value 参数。const app = Vue.createApp({ data() { return { direction: 'top', distance: 100, demo: { position: 'absolute' } } }, template: ` <input :style='demo' v-position:[direction]='distance'/> ` }); // 全局的自定义指令 app.directive('position', { mounted(el, binding) { console.log(binding); el.style[binding.arg] = binding.value + 'px'; }, updated(el, binding) { console.log(binding); el.style[binding.arg] = binding.value + 'px'; } })
3. 函数简写
- 在只使用
mounted和updated时触发相同行为,而不关心其他的钩子函数时,可以通过将这个回调函数传递给指令来实现。// 简写 app.directive('position', (el, binding)=>{ console.log(binding); el.style[binding.arg] = binding.value + 'px'; });
三、Teleport 传送门功能
- 通过 teleport 可以有选择的控制在 DOM 中哪个父节点下渲染 teleport 中的DOM元素。
- to 属性用来指定父节点,内容通常是 body 或 id选择器 的形式。
/* css */
.area {
    position: absolute;
    width: 300px;
    height: 400px;
    top: 50%;
    left: 50%;
    transform: translate(-50%, -50%);
    background-color: cyan;
}
.mask {
    position: absolute;
    top: 0;
    bottom: 0;
    left: 0;
    right: 0;
    background-color: rgba(0, 0, 0, 0.5);
}
// js const app = Vue.createApp({ data() { return { show: false } }, methods: { handleClick(){ this.show = !this.show; } }, template: ` <div class='area'> <button @click='handleClick'>弹出mask</button> <teleport to='body'> <div class='mask' v-show='show'></div> </teleport> </div> ` });
- 没有使用teleport的效果:
- 使用teleport后的效果:


四、更加底层的 render 函数
- render 函数可以替代 template 模板的书写。
- template 执行的流程:
- render函数示例:
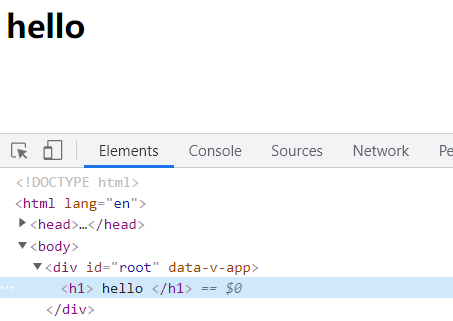
const app = Vue.createApp({
    template: `
        <my-title :level='1'>
           hello
        </my-title>
    `
});
app.component('my-title', {
    props: ['level'],
    render(){
        const { h } = Vue;
        return h(
            'h' + this.level,  // 标签名
            {},  // prop 或 attribute
            this.$slots.default() // 包含其子节点的数组
        )
    }
});
五、插件的定义和使用
- plugin 插件,也是把通用性的功能封装起来。
// 定义插件
const myPlugin = {
    // app是vue实例,options是传入的参数
    install(app, options) {
        console.log(options);
        app.provide('name', options.name)
    }
}
const app = Vue.createApp({
    template: `
        <my-title/>
    `
});
app.component('my-title', {
    inject: ['name'],
    template: `
        <div>name: {{name}}</div>
    `
});
// 使用插件
app.use(myPlugin, { name: 'hy' });

六、数据校验插件开发实例
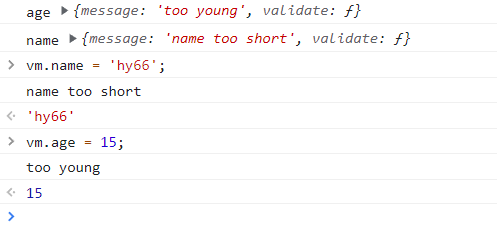
- 通过自定义的 rules 选项 ,对 name 和 age 这两个属性进行校验。
- 注意:这里的插件是直接通过箭头函数的方式定义的。
const app = Vue.createApp({
    data() {
        return { name: 'hy', age: 25 }
    },
    rules: {
        age: {
            validate: age => age > 18,
            message: 'too young'
        },
        name: {
            validate: name => name.length > 4,
            message: 'name too short'
        }
    },
    template: `
        <div>name: {{name}}, age: {{age}}.</div>
    `
});

// 直接使用箭头函数定义插件
const validatorPlugin = (app, options) => {
    app.mixin({
        created() {
            for (let key in this.$options.rules) {
                const item = this.$options.rules[key];
                this.$watch(key, (value) => {
                    const result = item.validate(value);
                    if (!result) console.log(item.message);
                })
                console.log(key, item);
            }
        }
    })
};

// 使用插件
app.use(validatorPlugin);


 973
973


 被折叠的 条评论
为什么被折叠?
被折叠的 条评论
为什么被折叠?
 到【灌水乐园】发言


