


前面基本上都是安装软件,安装软件都是一样的步骤
搜索镜像
拉取镜像
挂载数据
挂载配置
启动
说实话在介绍安装,都快把我拉黑了,那么本篇将讲下如何部署项目
一. 先设置远程连接Docker
开启Docker远程连接后,在开发和学习时都能带来便利,但请不要将此方式用在外部网络环境,以免带来安全问题,下图是官方警告:

1.1 编辑此文件:/lib/systemd/system/docker.service
vim /lib/systemd/system/docker.service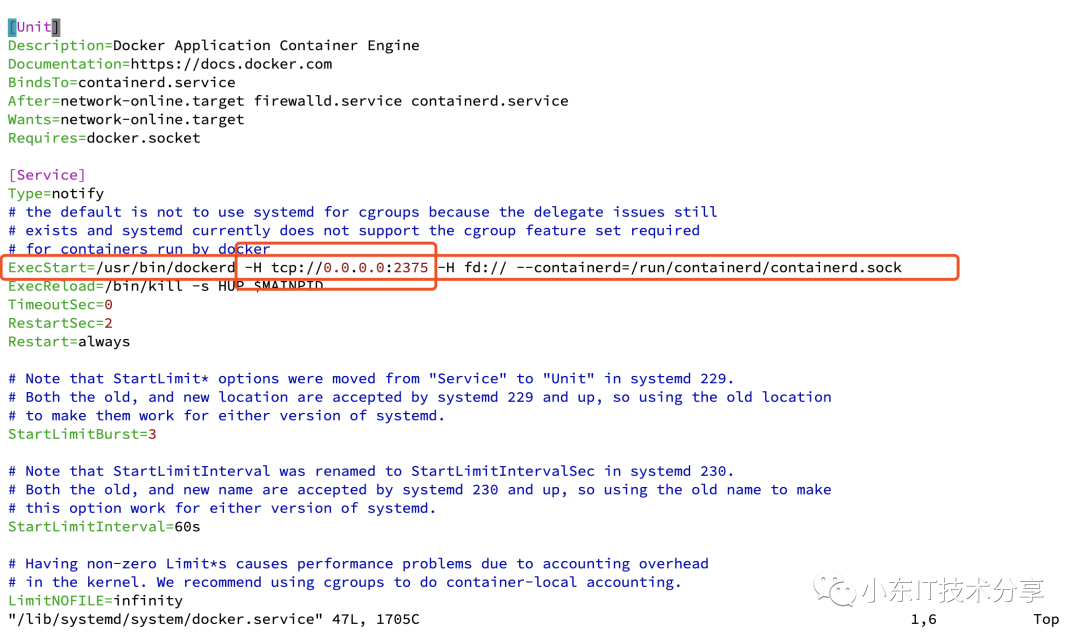
如图所示加上
-H tcp://0.0.0.0:2375修改完毕后保存退出
1.2 重新加载配并重启docker
systemctl daemon-reload && systemctl restart docker1.3 验证设置
本级访问docke服务是否正常,如下,本机访问一切正常:
docker images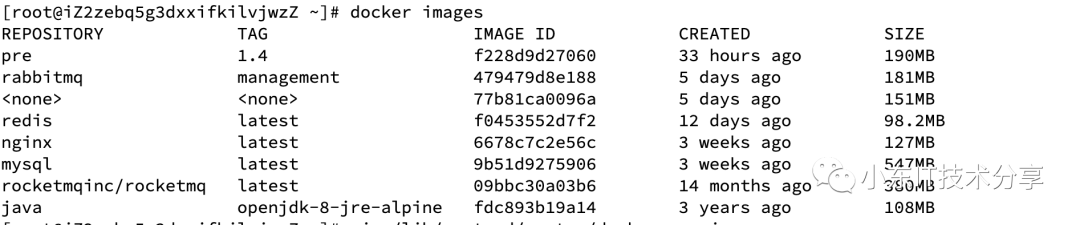
1.4 远程访问
现在尝试从另一台装有docker的机器上测试远程访问本机,命令是docker -H tcp://xxx:2375 images,如下所示:
docker -H tcp://xxx:2375 images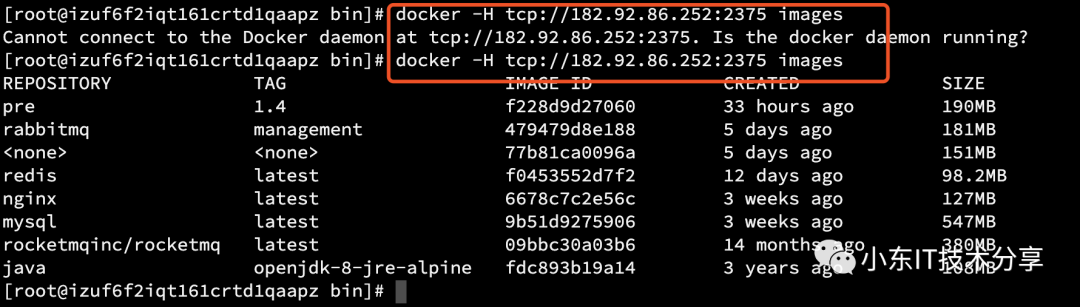
大家可以看到,第一居然失败了,第一时间想到就是端口没放开,要修改安全组或者防火墙
目前为止,Docker远程设置完毕!
二. 准备web项目
我这里以Spring Boot项目进行演示
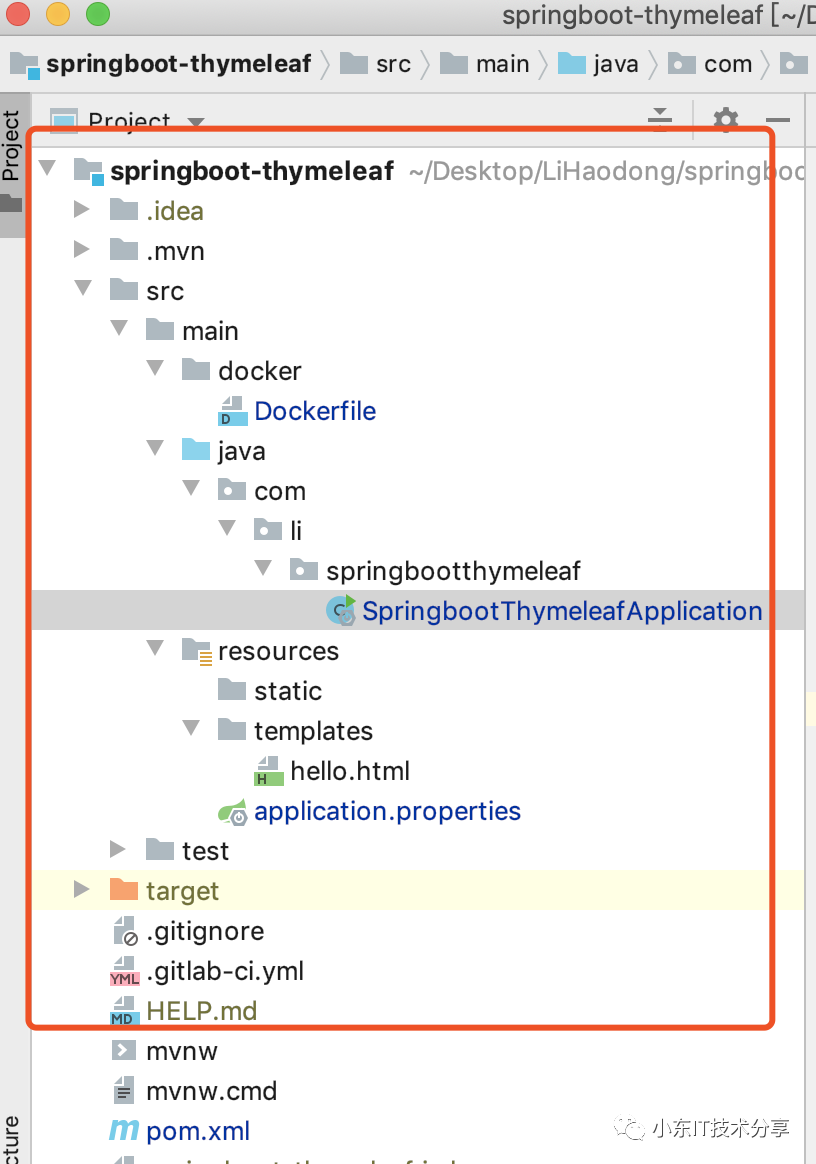
项目结构目录:Dockerfile文件在src/main/docker下
application.properties
# 默认路径
spring.thymeleaf.prefix=classpath:/templates/
# 后缀
spring.thymeleaf.suffix=.html
# 模板格式
spring.thymeleaf.mode=HTML5
# 字符编码
spring.thymeleaf.encoding=UTF-8
# 内容格式
spring.thymeleaf.servlet.content-type=text/html
# 是否打开缓存 一般在开发过程中不建议打开
spring.thymeleaf.cache=false


server.port=8005
Dockerfile
#  基础镜像
FROM java:openjdk-8-jre-alpine
# 维护者信息
MAINTAINER im.lihaodong@gmail.com
#Default to UTF-8 file.encoding
ENV LANG C.UTF-8
#设置alpine时区
ENV TIMEZONE Asia/Shanghai
#alpine自带的包含dl-cdn的域名非常慢,需要修改后才能下载数据。
RUN apk add -U tzdata && ln -snf /usr/share/zoneinfo/${TIMEZONE} /etc/localtime && echo "${TIMEZONE}" > /etc/timezone
RUN sed -i -e 's/dl-cdn/dl-4/g' /etc/apk/repositories && apk add -U tzdata && ln -snf /usr/share/zoneinfo/${TIMEZONE} /etc/localtime && echo "${TIMEZONE}" > /etc/timezone
#添加应用
ADD springboot-thymeleaf-0.0.1-SNAPSHOT.jar springboot-thymeleaf-0.0.1-SNAPSHOT.jar
#参数
#ENV PARAMS=""
#执行操作
ENTRYPOINT [ "sh", "-c", "java -Xmx50m -Djava.security.egd=file:/dev/./urandom -jar springboot-thymeleaf-0.0.1-SNAPSHOT.jar" ]
Dockfile配置文件详解:
FROM: 指定基础镜像,要在哪个镜像建立
MAINTAINER: 指定维护者信息
ENV LANG C.UTF-8: 解决中文乱码
#设置alpine时区
ENV TIMEZONE Asia/Shanghai
#alpine自带的包含dl-cdn的域名非常慢,需要修改后才能下载数据。
RUN apk add -U tzdata && ln -snf /usr/share/zoneinfo/${TIMEZONE} /etc/localtime && echo "${TIMEZONE}" > /etc/timezone
RUN sed -i -e 's/dl-cdn/dl-4/g' /etc/apk/repositories && apk add -U tzdata && ln -snf /usr/share/zoneinfo/${TIMEZONE} /etc/localtime && echo "${TIMEZONE}" > /etc/timezone Docker容器时区设置及时间同步


ADD springboot-thymeleaf-0.0.1-SNAPSHOT.jar springboot-thymeleaf-0.0.1-SNAPSHOT.jar 项目的 jar 文件作为 "springboot-thymeleaf-0.0.1-SNAPSHOT.jar" 添加到容器的


ENTRYPOINT 执行项目 springboot-thymeleaf-0.0.1-SNAPSHOT.jar,"/dev/urandom" 缩短 Tomcat 启动时间
三. 开始Docker部署项目
常用的两种构建方式
Dockerfile和jar 在服务器上进行构建
利用Maven的Docker打包工具进行应用构建同时推送到远程仓库
3.1 本地生成jar传到服务器进行部署
主要配置在pom.xml,运用maven插件,大概意思是打包时在target下创建lpine-test文件夹并把Dockerfile文件,打包好的jar包copy到lpine-test目录下
<build>
        <plugins>
            <plugin>
                <groupId>org.springframework.boot</groupId>
                <artifactId>spring-boot-maven-plugin</artifactId>
            </plugin>


            <plugin>
                <artifactId>maven-resources-plugin</artifactId>
                <executions>
                    <execution>
                        <id>copy-resources</id>
                        <phase>validate</phase>
                        <goals>
                            <goal>copy-resources</goal>
                        </goals>
                        <configuration>
                            <outputDirectory>${project.build.directory}/alpine-test</outputDirectory>
                            <resources>
                                <resource>
                                    <directory>src/main/docker</directory>
                                    <filtering>true</filtering>
                                </resource>
                            </resources>
                        </configuration>


                    </execution>
                </executions>
            </plugin>
            <!-- copy文件 -->
            <plugin>
                <groupId>org.apache.maven.plugins</groupId>
                <artifactId>maven-antrun-plugin</artifactId>
                <executions>
                    <execution>
                        <phase>package</phase>
                        <goals>
                            <goal>run</goal>
                        </goals>
                        <configuration>
                            <tasks> <!-- 你将要拷贝的位置 -->
                                <copy todir="${project.build.directory}/alpine-test">
                                    <!-- 从哪里拷贝 -->
                                    <fileset dir="${project.build.directory}">
                                        <!-- 拷贝内容 -->
                                        <include name="*.jar"/>
                                    </fileset>
                                </copy>
                            </tasks>
                        </configuration>
                    </execution>
                </executions>
            </plugin>
        </plugins>
    </build>


</project>
3.1.1 执行maven命令
mvn clean && mvn package

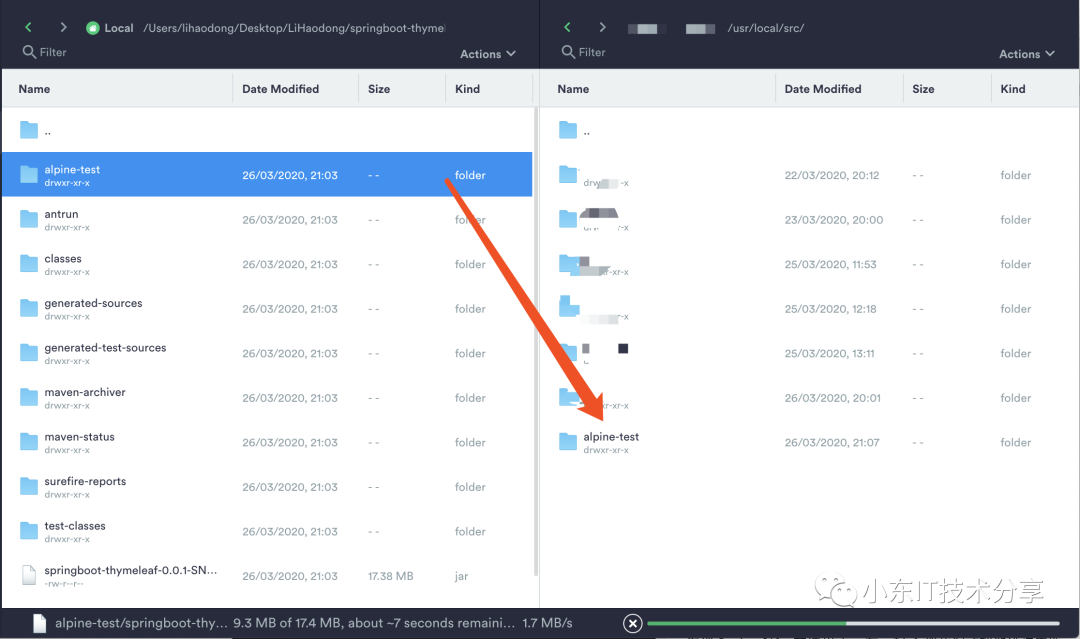
3.1.2 查看target下alpine-test

发现Dockerfile文件和jar在一起了,那我们就把他俩送去新家吧
3.1.3 传到服务器
使用SFTP即可
我这里是放到/usr/local/src下
3.1.4 进行构建镜像
来到项目存放路径
cd /usr/local/src/alpine-test/
3.1.5 执行构建命令
在该docker文件下 指令:docker build -t xxx .
执行docker build命令,docker就会根据Dockerfile里你定义好的命令进行构建新的镜像。
-t代表要构建的镜像,
.代表当前目录
xxx代表镜像名称以及标签
docker build -t test:1.0 .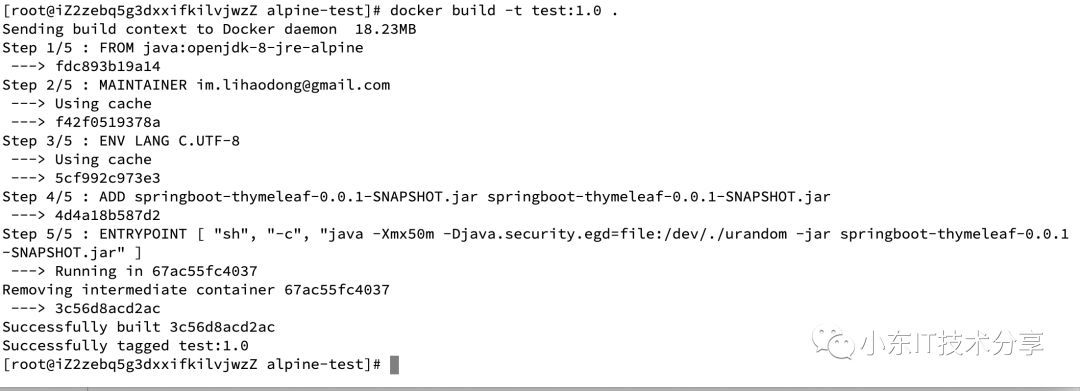
注: 大家如果构建太慢,可以把同步时间配置去掉
构建完成后,执行启动命令并查询日志
docker run -it -d --name test -p 8005:8005 test:1.0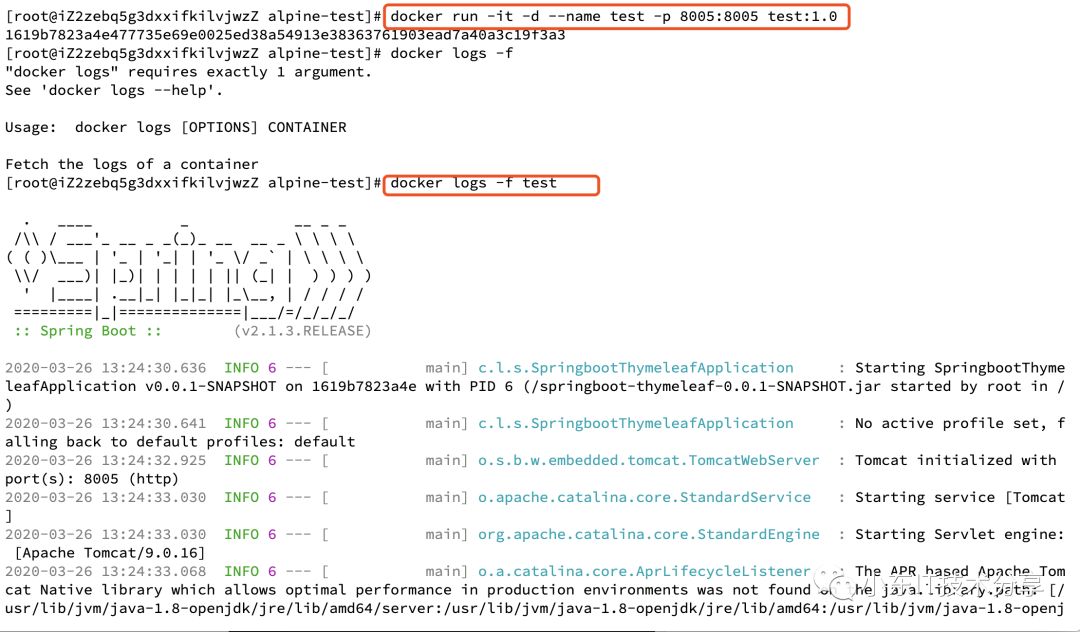
3.1.6 测试
访问之前要注意端口开放情况
打开浏览器访问: ip:8005/index即可
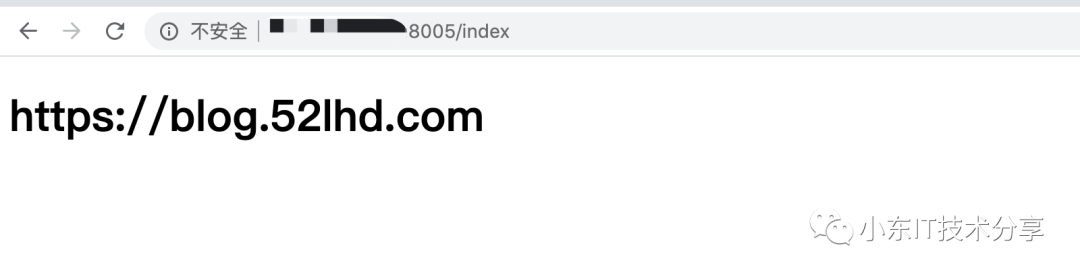
说明成功!
3.2 远程部署
3.2.1 加入打包插件docker maven的pom依赖
<plugin>
                <groupId>com.spotify</groupId>
                <artifactId>docker-maven-plugin</artifactId>
                <version>1.2.0</version>
                <configuration>
                    <!-- 镜像名称  -->
                    <imageName>test-1</imageName>
                    <!-- docker远程服务器地址 -->
                    <dockerHost>http://IP:2375</dockerHost>
                    <!-- Dockerfile文件存放目录 -->
                    <dockerDirectory>src/main/docker</dockerDirectory>
                    <resources>
                        <resource>
                            <directory>${project.build.directory}</directory>
                            <include>${project.build.finalName}.jar</include>
                        </resource>
                    </resources>
                </configuration>
            </plugin>
3.2.2 执行命令
mvn clean package docker:build -Dmaven.test.skip=true

3.2.3 查看远程镜像
docker images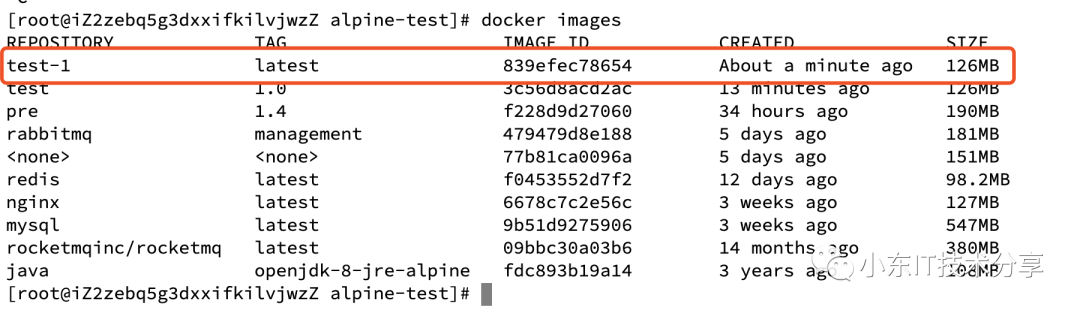
3.2.3 运行镜像
运行之前把之前的先停掉
docker stop test
执行刚刚构建的
docker run -it -d --name test -p 8005:8005 test-1:latest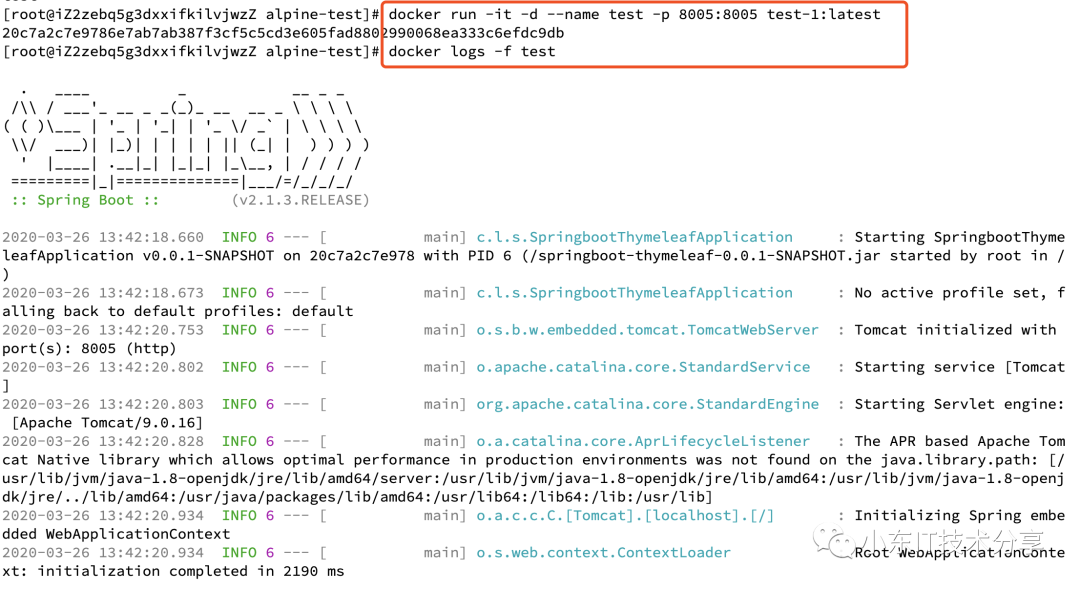
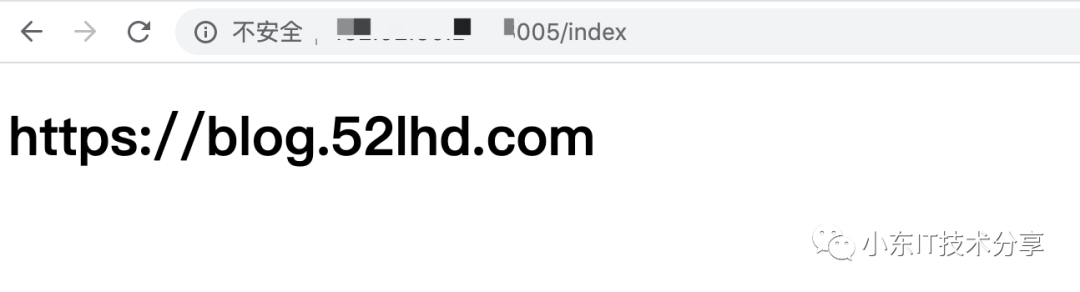
3.2.4 测试
打开浏览器访问:http:服务器地址:8005/index,即可
四. 总结
本文一共讲解了两种构建方式
Dockerfile和jar 在服务器上进行构建
利用Maven的Docker打包工具进行应用构建同时推送到远程仓库
第一种方式适合已有的jar包,然后编写Dockerfile文件进行构建即可
其实原理都是一样的,都是把jar放入到容器中,然后利用java命令进行运行应用
本文测试SpringBoot项目源码: https://github.com/LiHaodong888/dockerexample
往期推荐
🔗


 2312
2312

 被折叠的 条评论
为什么被折叠?
被折叠的 条评论
为什么被折叠?
 到【灌水乐园】发言


