


一、git安装完成后的标志查看和基本配置(自报家门配置)
在桌面右击会看到两个图标:Git GUI Here(图形工具,一般不用)和Git Bash Here(命令行工具,一般使用)

在开始菜单处,输入git——点击Git Bash Here,如下:

点击Git Bash,进入命令行工具,如下:

安装完成git后,使用git前先报家门(两个配置:你是谁和怎么联系到你),否则代码不能提交,抱一个自己的名号:
在命令行窗口输入:
lenovo@LAPTOP-PNM73HBA MINGW64 ~
$ git config --global user.name shi #你是谁
lenovo@LAPTOP-PNM73HBA MINGW64 ~
$ git config --global user.email 1441107787@qq.com #怎么联系到你
lenovo@LAPTOP-PNM73HBA MINGW64 ~
如图:

二、git代码管理:(本地的代码开发、依步骤提交到暂存区和本地仓库)
1)创建版本库(将指定目录初始化成本地版本仓库):(先到F盘下创建一个test,然后进入空目录test,将test初始化成本地仓库)
F盘建立仓库前状态:

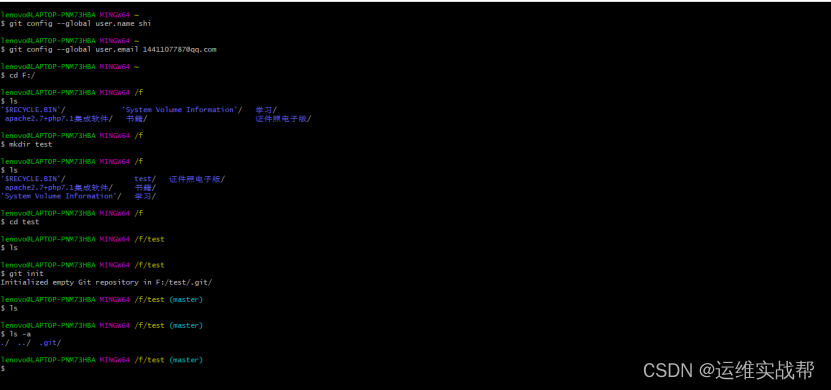
现在在F盘创建一个空目录,然后进空目录将该空目录初始化成本地仓库:
lenovo@LAPTOP-PNM73HBA MINGW64 ~
$ git config --global user.name shi
lenovo@LAPTOP-PNM73HBA MINGW64 ~
$ git config --global user.email 1441107787@qq.com
lenovo@LAPTOP-PNM73HBA MINGW64 ~
$ cd F:/
lenovo@LAPTOP-PNM73HBA MINGW64 /f
$ ls
'$RECYCLE.BIN'/ 'System Volume Information'/ 学习/
apache2.7+php7.1集成软件/ 书籍/ 证件照电子版/
lenovo@LAPTOP-PNM73HBA MINGW64 /f
$ mkdir test #创建一个空目录
lenovo@LAPTOP-PNM73HBA MINGW64 /f
$ ls
'$RECYCLE.BIN'/ test/ 证件照电子版/
apache2.7+php7.1集成软件/ 书籍/
'System Volume Information'/ 学习/
lenovo@LAPTOP-PNM73HBA MINGW64 /f
$ cd test #进入空目录
lenovo@LAPTOP-PNM73HBA MINGW64 /f/test
$ ls
lenovo@LAPTOP-PNM73HBA MINGW64 /f/test
$ git init #将空目录初始化成本地仓库
Initialized empty Git repository in F:/test/.git/
lenovo@LAPTOP-PNM73HBA MINGW64 /f/test (master)
$ ls
lenovo@LAPTOP-PNM73HBA MINGW64 /f/test (master)
$ ls -a
./ ../ .git/
lenovo@LAPTOP-PNM73HBA MINGW64 /f/test (master)
如图:
2)在上面初始化的仓库test中进行开发代码,如下:

双击打开test,如下:

创建一个index.txt文档,相当于开发代码,如下:

3)打开git命令行,对仓库中的代码文件进行管理(追踪、添加到暂存区、提交到版本库和修改或删除文件等操作,注意进入命令行后,需要cd到相应代码仓库目录下才能操作有效)
3个区域的增加文件、修改文件、删除文件
a)增加文件:
重新从开始菜单打开命令行进行操作:(开始处输入git——点击Git Bash Here,如下:) #也可不重新进入,此处是为了独立分开写
lenovo@LAPTOP-PNM73HBA MINGW64 ~
$ cd F:/test #进到相应本地仓库
lenovo@LAPTOP-PNM73HBA MINGW64 /f/test (master)
$ ls
index.txt
lenovo@LAPTOP-PNM73HBA MINGW64 /f/test (master)
$ git status #查看文件状态
On branch master
Initial commit
Untracked files: #最开始时未跟踪,未加到版本控制里状态
(use "git add <file>..." to include in what will be committed)
index.txt
nothing added to commit but untracked files present (use "git add" to track)
lenovo@LAPTOP-PNM73HBA MINGW64 /f/test (master)
$ git add . #从工作区添加文件到暂存区,加到版本控制里去,可以git add 指定文件名,也可git add . 表示当前仓库所有文件
lenovo@LAPTOP-PNM73HBA MINGW64 /f/test (master)
$ git status
On branch master
Initial commit
Changes to be committed:
(use "git rm --cached <file>..." to unstage)
new file: index.txt
lenovo@LAPTOP-PNM73HBA MINGW64 /f/test (master)
$ git commit -m "tijiao to banbenku" #将文件从暂存区提交到版本库
[master (root-commit) 6ece32d] tijiao to banbenku
1 file changed, 1 insertion(+)
create mode 100644 index.txt
lenovo@LAPTOP-PNM73HBA MINGW64 /f/test (master)
$ git status
On branch master
nothing to commit, working tree clean #工作区是干净的,表示工作所有文件都已经提交到版本库了
lenovo@LAPTOP-PNM73HBA MINGW64 /f/test (master)
b)修改文件:
工作区先修改文件:

重新从开始进入命令行:
lenovo@LAPTOP-PNM73HBA MINGW64 ~
$ cd F:/test #进到相应本地仓库
lenovo@LAPTOP-PNM73HBA MINGW64 /f/test (master)
$ git status
On branch master
Changes not staged for commit:
(use "git add <file>..." to update what will be committed)
(use "git checkout -- <file>..." to discard changes in working directory)
modified: index.txt
no changes added to commit (use "git add" and/or "git commit -a")
lenovo@LAPTOP-PNM73HBA MINGW64 /f/test (master)
$ git add index.txt #将指定文件添加到暂存区,git add . 表示添加所有文件
lenovo@LAPTOP-PNM73HBA MINGW64 /f/test (master)
$ git status
On branch master
Changes to be committed:
(use "git reset HEAD <file>..." to unstage)
modified: index.txt
lenovo@LAPTOP-PNM73HBA MINGW64 /f/test (master)
$ git commit -m "modify index.txt" #提交到版本库
[master c8f9fee] modify index.txt
1 file changed, 2 insertions(+), 1 deletion(-)
lenovo@LAPTOP-PNM73HBA MINGW64 /f/test (master)
$ git status
On branch master
nothing to commit, working tree clean
lenovo@LAPTOP-PNM73HBA MINGW64 /f/test (master)
c)删除文件:
重新从开始进入命令行:
lenovo@LAPTOP-PNM73HBA MINGW64 ~
$ cd F:/test #进到相应本地仓库
lenovo@LAPTOP-PNM73HBA MINGW64 /f/test (master)
$ ls
index.txt
lenovo@LAPTOP-PNM73HBA MINGW64 /f/test (master)
$ git status
On branch master
nothing to commit, working tree clean #删前,工作区是干净的,表示都已提交到版本库
lenovo@LAPTOP-PNM73HBA MINGW64 /f/test (master)
$ git rm index.txt #删除工作区文件并提交到暂存区(若手动删除工作区文件,先手动删除,然后需要再add一下到暂存区)
rm 'index.txt'
lenovo@LAPTOP-PNM73HBA MINGW64 /f/test (master)
$ git status
On branch master
Changes to be committed:
(use "git reset HEAD <file>..." to unstage)
deleted: index.txt
lenovo@LAPTOP-PNM73HBA MINGW64 /f/test (master)
$ git commit -m "del index.txt" #删除文件提交到暂存区后,从暂存区再提交到版本库
[master ff03894] del index.txt
1 file changed, 2 deletions(-)
delete mode 100644 index.txt
lenovo@LAPTOP-PNM73HBA MINGW64 /f/test (master)
$ git status
On branch master
nothing to commit, working tree clean
lenovo@LAPTOP-PNM73HBA MINGW64 /f/test (master)
删除后,到F:/test中查看,如下:

git的常用3个区域:
工作区:就是开放代码的区域,此时文件没有纳入版本管理控制,文件名为红色。
暂存区:git add 指定文件名或.(当前仓库所有文件) #add后会将文件添加的暂存区,文件名为绿色。
版本库: 暂存区文件可通过git commit -m “提交说明信息” 命令,将文件提交到版本库,所有都提交后工作区就是空的了
三、git代码管理:(本地代码开发提交暂存区和本地仓库后,再把代码推到远程仓库(coding代码托管的地址仓库))
1.在coding上(coding地址:DevOps_DevOps 解决方案_一站式 DevOps_开发者工具 | 腾讯云 CODING DevOps )注册一个账号Sshi/xxQQ2011并创建一个远程仓库lianshou并获得远程仓库地址:
coding账号密码:Sshi/xxQQ2011 远程地址:https://git.coding.net/Sshi/lianshou.git 远程仓库名:lianshou
注册coding账号Sshi/xxQQ2011并登陆coding后,如下:


点击创建新项目,如下:

输入项目名称、项目描述、公开类型,点击创建项目,如下:

此时是一个空的远程仓库lianshou,从右上角,将远程仓库地址复制出来,如下:https://git.coding.net/Sshi/lianshou.git ,之后git客户端就可以通过该地址和用户名Sshi/xxQQ2011来推送到该远程仓库。
注意:地址有两种:HTTPS的和SSH的
推送到远程仓库使用用户名和密码时候: 可以使用HTTPS的地址类型 https://git.coding.net/Sshi/lianshou.git
配置密钥对,无需用户名和密码推送到远程参考时候: 可以使用SSH的地址类型 git@git.coding.net:Sshi/lianshou.git

2.安装git后,工作区创建代码,添加到暂存区,提交到本地仓库,然后将本地master分支(最初默认)推送到coding远程地址的仓库
coding账号密码:Sshi/xxQQ2011 远程地址:https://git.coding.net/Sshi/lianshou.git 远程仓库名:lianshou #注意下面本地仓库名是test
1)现在在F盘创建一个空目录,然后进空目录将该空目录初始化成本地仓库:
lenovo@LAPTOP-PNM73HBA MINGW64 ~
$ git config --global user.name shi
lenovo@LAPTOP-PNM73HBA MINGW64 ~
$ git config --global user.email 1441107787@qq.com
lenovo@LAPTOP-PNM73HBA MINGW64 ~
$ cd F:/
lenovo@LAPTOP-PNM73HBA MINGW64 /f
$ ls
'$RECYCLE.BIN'/ 'System Volume Information'/ 学习/
apache2.7+php7.1集成软件/ 书籍/ 证件照电子版/
lenovo@LAPTOP-PNM73HBA MINGW64 /f
$ mkdir test #创建一个空目录
lenovo@LAPTOP-PNM73HBA MINGW64 /f
$ ls
'$RECYCLE.BIN'/ test/ 证件照电子版/
apache2.7+php7.1集成软件/ 书籍/
'System Volume Information'/ 学习/
lenovo@LAPTOP-PNM73HBA MINGW64 /f
$ cd test #进入空目录
lenovo@LAPTOP-PNM73HBA MINGW64 /f/test
$ ls
lenovo@LAPTOP-PNM73HBA MINGW64 /f/test
$ git init #将空目录初始化成本地仓库
Initialized empty Git repository in F:/test/.git/
lenovo@LAPTOP-PNM73HBA MINGW64 /f/test (master)
$ ls
lenovo@LAPTOP-PNM73HBA MINGW64 /f/test (master)
$ ls -a
./ ../ .git/
lenovo@LAPTOP-PNM73HBA MINGW64 /f/test (master)
2) 工作区创建代码,添加到暂存区,提交到本地仓库

双击打开test,如下:

工作区创建一个lianshou1.txt和lianshou2.txt文档,相当于开发代码,如下:

将工作区代码依照步骤添加的暂存区和本地仓库
重新从开始菜单打开命令行进行操作:(开始处输入git——点击Git Bash Here,如下:) #也可不重新进入,此处是为了独立分开写
lenovo@LAPTOP-PNM73HBA MINGW64 ~
$ cd F:/test #进到相应本地仓库
lenovo@LAPTOP-PNM73HBA MINGW64 /f/test (master)
$ ls
lianshou1.txt lianshou2.txt
lenovo@LAPTOP-PNM73HBA MINGW64 /f/test (master)
$ git status #查看文件状态
On branch master
Untracked files:
(use "git add <file>..." to include in what will be committed)
lianshou1.txt
lianshou2.txt
nothing added to commit but untracked files present (use "git add" to track)
lenovo@LAPTOP-PNM73HBA MINGW64 /f/test (master)
$ git add . #从工作区添加文件到暂存区,加到版本控制里去,可以git add 指定文件名,也可git add . 表示当前仓库所有文件
lenovo@LAPTOP-PNM73HBA MINGW64 /f/test (master)
$ git status
On branch master
Changes to be committed:
(use "git reset HEAD <file>..." to unstage)
new file: lianshou1.txt
new file: lianshou2.txt
lenovo@LAPTOP-PNM73HBA MINGW64 /f/test (master)
$ git commit -m "commit to banbenku" #将文件从暂存区提交到版本库
[master d4ddca8] commit to banbenku
2 files changed, 4 insertions(+)
create mode 100644 lianshou1.txt
create mode 100644 lianshou2.txt
lenovo@LAPTOP-PNM73HBA MINGW64 /f/test (master)
$ git status
On branch master
nothing to commit, working tree clean
lenovo@LAPTOP-PNM73HBA MINGW64 /f/test (master)
3) 将本地仓库的代码推送到coding远程地址的仓库:lianshou (使用方式1,直接使用远程地址推送)
coding账号密码:Sshi/xxQQ2011 远程地址:https://git.coding.net/Sshi/lianshou.git 远程仓库名:lianshou
重新从开始菜单打开命令行进行操作:(开始处输入git——点击Git Bash Here,如下:) #也可不重新进入,此处是为了独立分开写
lenovo@LAPTOP-PNM73HBA MINGW64 ~
$ cd F:/test #进到相应本地仓库
lenovo@LAPTOP-PNM73HBA MINGW64 /f/test (master)
$ ls
lianshou1.txt lianshou2.txt
lenovo@LAPTOP-PNM73HBA MINGW64 /f/test (master)
$ git status
On branch master
nothing to commit, working tree clean
lenovo@LAPTOP-PNM73HBA MINGW64 /f/test (master)
方式一推送:
$ git push https://git.coding.net/Sshi/lianshou.git master #将本地仓库的master分支推送到远程仓库(默认一个分支时就是master)
username for ‘https://git.coding.net’: Sshi
Password for ‘https://git.coding.net’: 输入xxQQ2011,但是不显示
Counting objects: 14, done.
Delta compression using up to 4 threads.
Compressing objects: 100% (7/7), done.
Writing objects: 100% (14/14), 1.06 KiB | 0 bytes/s, done.
Total 14 (delta 1), reused 0 (delta 0)
To https://git.coding.net/Sshi/lianshou.git
* [new branch] master -> master
lenovo@LAPTOP-PNM73HBA MINGW64 /f/test (master)
$
方式二推送: 注意推送远程地址时也可将远程地址设置成一个别名,然后利用别名推送:(方式一和二本质一样,只是给远程地址起了个别名)
$ git remote add orgin https://git.coding.net/Sshi/lianshou.git #给远程地址设置一个别名为:orgin,也可是其他的
lenovo@LAPTOP-PNM73HBA MINGW64 /f/test (master)
$ git push orgin master #使用别名推送master分支到远程仓库
username for ‘https://git.coding.net’: Sshi
Password for ‘https://git.coding.net’: 输入xxQQ2011,但是不显示
Counting objects: 14, done.
Delta compression using up to 4 threads.
Compressing objects: 100% (7/7), done.
Writing objects: 100% (14/14), 1.06 KiB | 0 bytes/s, done.
Total 14 (delta 1), reused 0 (delta 0)
To https://git.coding.net/Sshi/lianshou.git
* [new branch] master -> master
lenovo@LAPTOP-PNM73HBA MINGW64 /f/test (master)
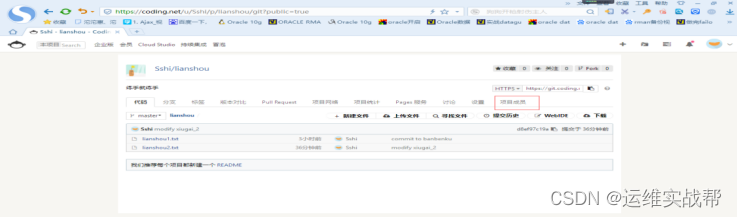
到coding地址远程仓库lianshou里查看,看是否上传上来代码:

两个代码文件各自点击进去可以查看各自代码,如下:


3) 将本地代码修改后重新提交到本地仓库,然后再推送到coding远程地址的仓库:lianshou (使用方式2,使用远程地址别名推送)
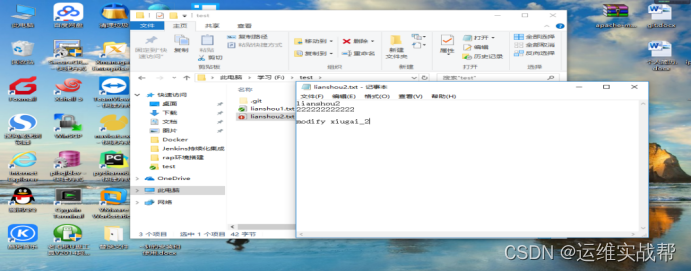
工作区代码修改
重新从开始菜单打开命令行进行操作:(开始处输入git——点击Git Bash Here,如下:) #也可不重新进入,此处是为了独立分开写
lenovo@LAPTOP-PNM73HBA MINGW64 ~
$ cd F:/test #进到相应本地仓库
lenovo@LAPTOP-PNM73HBA MINGW64 /f/test (master)
$ ls
lianshou1.txt lianshou2.txt
lenovo@LAPTOP-PNM73HBA MINGW64 /f/test (master)
$ git status
On branch master
Changes not staged for commit:
(use "git add <file>..." to update what will be committed)
(use "git checkout -- <file>..." to discard changes in working directory)
modified: lianshou2.txt
no changes added to commit (use "git add" and/or "git commit -a")
lenovo@LAPTOP-PNM73HBA MINGW64 /f/test (master)
$ git add .
lenovo@LAPTOP-PNM73HBA MINGW64 /f/test (master)
$ git status
On branch master
Changes to be committed:
(use "git reset HEAD <file>..." to unstage)
modified: lianshou2.txt
lenovo@LAPTOP-PNM73HBA MINGW64 /f/test (master)
$ git commit -m "modify xiugai_2"
[master d8ef97c] modify xiugai_2
1 file changed, 3 insertions(+), 1 deletion(-)
lenovo@LAPTOP-PNM73HBA MINGW64 /f/test (master)
$ git status
On branch master
nothing to commit, working tree clean
lenovo@LAPTOP-PNM73HBA MINGW64 /f/test (master)
$
$ git remote add orgin https://git.coding.net/Sshi/lianshou.git #给远程地址设置一个别名为:orgin,也可是其他的
lenovo@LAPTOP-PNM73HBA MINGW64 /f/test (master)
$ git push orgin master #使用别名推送master分支到远程仓库
username for ‘https://git.coding.net’: Sshi
Password for ‘https://git.coding.net’: 输入xxQQ2011,但是不显示
Counting objects: 3, done.
Delta compression using up to 4 threads.
Compressing objects: 100% (2/2), done.
Writing objects: 100% (3/3), 300 bytes | 0 bytes/s, done.
Total 3 (delta 0), reused 0 (delta 0)
To https://git.coding.net/Sshi/lianshou.git
d4ddca8..d8ef97c master -> master
lenovo@LAPTOP-PNM73HBA MINGW64 /f/test (master)
到coding地址远程仓库lianshou里查看,看是否代码已修改:

点击进去,查看,代码已修改,如下:

四、git代码管理:(团队合作,coding账号1和2同时对同一个远程仓库代码修改和提交)
coding账号Sshi/xxQQ2011创建的远程仓库添加账号Sshi1/xQ2011,使得有管理该仓库权限,使得两个账号能够互相对远程仓库代码进行修改和提交
1.再注册一个coding账号Sshi2/xQ2011
2.在前面基础上,使用账号1Sshi/xxQQ2011登录coding,进入自己的远程仓库并将该仓库添加成员(账号2),使得账号2对该仓库有管理权限
在上面基础上使用账号1:Sshi/xxQQ2011登录coding,如下:

点击进去要共同管理的远程仓库,如下:
点击项目成员,如下:

点击+号,如下:
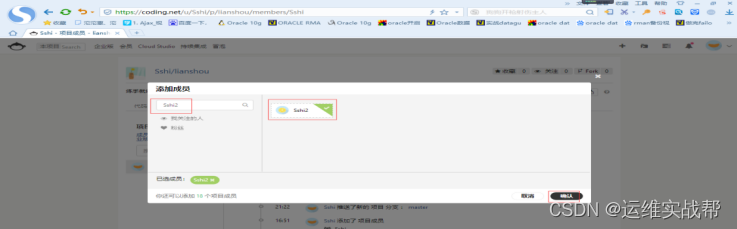
搜索账号2——选中账号2——点击确认,即可看到已经添加了账号2成员。,如下:
 3.在前面基础上,在另一台电脑上,使用账号2克隆该共有仓库lianshou的代码,然后在本地修改代码,然后重新提交到远程仓库
1)另一电脑上安装git:

双击Git-...,如下:

点击next,如下:

点击next,如下:

点击next,如下:

点击next,如下:

点击next,如下:

点击next,如下:

点next,如下:

点击next,如下:

点击Install,如下:
 安装完成后,如下:

点击finishi即可,在桌面上右击,如下:

看到git已经安装完成。
2)另一台点的使用账号2:Sshi2/Xq2011克隆账号1的远程仓库到本地仓库:
账号2进入E:盘
开始——Git Bash——如下:
yuanww@yuanww-PC MINGW64 ~
$ git config --global user.name shi2 #你是谁
yuanww@yuanww-PC MINGW64 ~
$ git config --global user.email 1036981484@qq.com #怎么联系到你
yuanww@yuanww-PC MINGW64 ~
$ cd e:/
yuanww@yuanww-PC MINGW64 /e
yuanww@yuanww-PC MINGW64 /e
$ git clone https://git.coding.net/Sshi/lianshou.git #克隆远程仓库地址,后远程仓库名带内容就会克隆到本地仓库
Cloning into 'lianshou'... #注意此处没让输入用户名和密码,若让输就输入:Sshi2/Xq2011即可
remote: Counting objects: 17, done.
remote: Compressing objects: 100% (9/9), done.
remote: Total 17 (delta 1), reused 0 (delta 0)
Unpacking objects: 100% (17/17), done.
yuanww@yuanww-PC MINGW64 /e
$ ls
'$RECYCLE.BIN'/ QMDownload/ 安装后虚拟机/ 未安装软件/
KuGou/ qqpcmgr_docpro/ 光盘/ 重要笔记/
lianshou/ 'System Volume Information'/ 计划任务相关/
yuanww@yuanww-PC MINGW64 /e
3)另一台电脑的账号2:Sshi2/xQ2011上进入刚才克隆下来的本地仓库中开发代码(增加一个新代码)
到刚才克隆下来的仓库中,如下:

双击打开lianshou,如下:

工作区增加开发文件,如下:

4)用命令行将工作区新增加的代码文件依照步骤添加到暂存区和本地仓库,并将本地仓库代码推送到远程仓库:
yuanww@yuanww-PC MINGW64 ~
$ cd E:/lianshou
yuanww@yuanww-PC MINGW64 /e/lianshou (master)
$ ls
count2_add.txt lianshou1.txt lianshou2.txt
yuanww@yuanww-PC MINGW64 /e/lianshou (master)
$ git status
On branch master
Your branch is up-to-date with 'origin/master'.
Untracked files:
(use "git add <file>..." to include in what will be committed)
count2_add.txt
nothing added to commit but untracked files present (use "git add" to track)
yuanww@yuanww-PC MINGW64 /e/lianshou (master)
$ git add . #工作区文件添加到暂存区
yuanww@yuanww-PC MINGW64 /e/lianshou (master)
$ git status
On branch master
Your branch is up-to-date with 'origin/master'.
Changes to be committed:
(use "git reset HEAD <file>..." to unstage)
new file: count2_add.txt
yuanww@yuanww-PC MINGW64 /e/lianshou (master)
$ git commit -m "add file" #暂存区文件提交到本地仓库
[master 6b05524] add file
1 file changed, 1 insertion(+)
create mode 100644 count2_add.txt
yuanww@yuanww-PC MINGW64 /e/lianshou (master)
$ git status
On branch master
Your branch is ahead of 'origin/master' by 1 commit.
(use "git push" to publish your local commits)
nothing to commit, working tree clean
yuanww@yuanww-PC MINGW64 /e/lianshou (master)
$
yuanww@yuanww-PC MINGW64 /e/lianshou (master)
$ git push https://git.coding.net/Sshi/lianshou.git master #本地仓库代码推送到远程仓库lianshou,接地址即可
Username for 'https://git.coding.net': Sshi2 和密码xQ2011(根据提示输入密码)
Counting objects: 3, done.
Delta compression using up to 4 threads.
Compressing objects: 100% (2/2), done.
Writing objects: 100% (3/3), 315 bytes | 0 bytes/s, done.
Total 3 (delta 0), reused 0 (delta 0)
To https://git.coding.net/Sshi/lianshou.git
d8ef97c..6b05524 master -> master
yuanww@yuanww-PC MINGW64 /e/lianshou (master)
5)到远程地址仓库:lianshou中查看,是否已经有了账号2提交过了的新代码:

点击进去查看内容,如下:

查看没有问题,账号2已经将本地克隆远程仓库的代码进行了更新,并再次提交到远程仓库.
3.在前面基础上,在第一台电脑上,使用账号1拉取该共有仓库lianshou的最新代码到本地仓库,然后依次类推,修改代码,重新提交到远程仓库
lenovo@LAPTOP-PNM73HBA MINGW64 ~
$ cd F:/test
lenovo@LAPTOP-PNM73HBA MINGW64 ~
$ cd F:/test
lenovo@LAPTOP-PNM73HBA MINGW64 /f/test (master)
$ ls
lianshou1.txt lianshou2.txt
lenovo@LAPTOP-PNM73HBA MINGW64 /f/test (master)
$ git pull https://git.coding.net/Sshi/lianshou.git master #使用账号1拉取coding上账号2已经提交的仓库中的新代码
remote: Counting objects: 3, done.
remote: Compressing objects: 100% (2/2), done.
remote: Total 3 (delta 0), reused 0 (delta 0)
Unpacking objects: 100% (3/3), done.
From https://git.coding.net/Sshi/lianshou
* branch master -> FETCH_HEAD
Updating d8ef97c..6b05524
Fast-forward
count2_add.txt | 1 +
1 file changed, 1 insertion(+)
create mode 100644 count2_add.txt
lenovo@LAPTOP-PNM73HBA MINGW64 /f/test (master)
$ ls
count2_add.txt lianshou1.txt lianshou2.txt
lenovo@LAPTOP-PNM73HBA MINGW64 /f/test (master)
$
到第一台电脑的工作区查看拉取情况:

此后账号1的人可以继续开发,然后提交到本地仓库和远程仓库。
4.git的日志查看和版本切换:
1)在前面基础上:git的日志查看:
lenovo@LAPTOP-PNM73HBA MINGW64 ~
$ cd F:/test
lenovo@LAPTOP-PNM73HBA MINGW64 /f/test (master)
$ git log --pretty=oneline #git log看的有点乱,可以用这行该命令查看
6b05524d368a79cd63a62c105caa8fe5c02df772 (HEAD -> master) add file
d8ef97c19a9c9662e450df4e937e739f9305fc9c (orgin/master) modify xiugai_2
d4ddca8abfb5d57a1ea27b09bf617ffb4c6b85c4 commit to banbenku
b323d9f6b2b7101cfde90410c0d5813c3e420ddc sss
a5b7b0f897f445f90af4d793eac622070fed3d2c lianshou
ff0389456a02f41e1d60b7bdfc2131aa8f3ed2ba del index.txt
c8f9feeb8294367a573ebc98ff4e604ef41e99a2 modify index.txt
6ece32d03268c04b8bdc8697f01d6fde1d27bc2c tijiao to banbenku
lenovo@LAPTOP-PNM73HBA MINGW64 /f/test (master)
2)在前面基础上:git的版本切换 (可使用版本号来切换版本,版本号没必要写全,写一部分能保证不重复即可)
前面基础上导现在最新的版本代码内容如下:

现在将版本切换到最初的一次提交的本地仓库的那个版本,并查看内容,如下:
lenovo@LAPTOP-PNM73HBA MINGW64 /f/test (master)
$ git log --pretty=oneline #查看版本号和简要日志(前面为版本号)
6b05524d368a79cd63a62c105caa8fe5c02df772 (HEAD -> master) add file
d8ef97c19a9c9662e450df4e937e739f9305fc9c (orgin/master) modify xiugai_2
d4ddca8abfb5d57a1ea27b09bf617ffb4c6b85c4 commit to banbenku
b323d9f6b2b7101cfde90410c0d5813c3e420ddc sss
a5b7b0f897f445f90af4d793eac622070fed3d2c lianshou
ff0389456a02f41e1d60b7bdfc2131aa8f3ed2ba del index.txt
c8f9feeb8294367a573ebc98ff4e604ef41e99a2 modify index.txt
6ece32d03268c04b8bdc8697f01d6fde1d27bc2c tijiao to banbenku
lenovo@LAPTOP-PNM73HBA MINGW64 /f/test (master)
$ git reset --hard 6ece32d03268 #切到:tijiao to banbenku时候的版本,该版本及内容如下图:
HEAD is now at 6ece32d tijiao to banbenku
lenovo@LAPTOP-PNM73HBA MINGW64 /f/test (master)
$

因为回退到最初的那个版本了,所以日志也没那么多了,要想找出后面的日志和版本号,可以使用命令:git reflo查看每次操作的动静
再切回到后面的某一个版本(modify xiugai_2时候那个版本),如下:
lenovo@LAPTOP-PNM73HBA MINGW64 /f/test (master)
$ git reflog #查看每次操作的动静
6ece32d (HEAD -> master) HEAD@{0}: reset: moving to 6ece32d03268
6b05524 HEAD@{1}: pull https://git.coding.net/Sshi/lianshou.git master: Fast-forward
d8ef97c (orgin/master) HEAD@{2}: commit: modify xiugai_2
d4ddca8 HEAD@{3}: commit: commit to banbenku
b323d9f HEAD@{4}: commit: sss
a5b7b0f HEAD@{5}: commit: lianshou
ff03894 HEAD@{6}: commit: del index.txt
c8f9fee HEAD@{7}: commit: modify index.txt
6ece32d (HEAD -> master) HEAD@{8}: commit (initial): tijiao to banbenku
lenovo@LAPTOP-PNM73HBA MINGW64 /f/test (master)
$ git reset --hard d8ef9 #切到modify xiugai_2时候的版本,该版本及内容如下图:
HEAD is now at d8ef97c modify xiugai_2
lenovo@LAPTOP-PNM73HBA MINGW64 /f/test (master)

五、分支
1.分支的概念理解示意图:
svn创建分支比较笨:一份数据多大,创建时候就是多大,所以创建分支很慢。
git创建分支很快:不管一份数据多大,只记录变化的数据,创建分支都是秒级别的。

2.分支管理:(在前面基础上,查看分支、创建分支,切换分支、合并分支)
模拟新功能分支做了一半,遇到其他bug急需修复,先暂时保存新功能分支,然后再创建一个新分支2修复bug,修改新分支2的bug代码后,将新分支2的代码合并到主分支master,然后再切换分支到新功能分支上继续开发新功能
在前面基础上查看分支:
lenovo@LAPTOP-PNM73HBA MINGW64 ~
$ cd F:/test
lenovo@LAPTOP-PNM73HBA MINGW64 /f/test (master)
$ ls
lianshou1.txt lianshou2.txt
$ git reflog
d8ef97c (HEAD -> master, orgin/master) HEAD@{0}: reset: moving to d8ef9
6ece32d HEAD@{1}: reset: moving to 6ece32d03268
6b05524 HEAD@{2}: pull https://git.coding.net/Sshi/lianshou.git master: Fast-forward
d8ef97c (HEAD -> master, orgin/master) HEAD@{3}: commit: modify xiugai_2
d4ddca8 HEAD@{4}: commit: commit to banbenku
b323d9f HEAD@{5}: commit: sss
a5b7b0f HEAD@{6}: commit: lianshou
ff03894 HEAD@{7}: commit: del index.txt
c8f9fee HEAD@{8}: commit: modify index.txt
6ece32d HEAD@{9}: commit (initial): tijiao to banbenku
lenovo@LAPTOP-PNM73HBA MINGW64 /f/test (master)
$ git reset --hard 6b05524 #切换版本到最新的代码处(从远程仓库拉取账号2提交时的最新代码状态)
HEAD is now at 6b05524 add file
lenovo@LAPTOP-PNM73HBA MINGW64 /f/test (master)
$ ls
count2_add.txt lianshou1.txt lianshou2.txt
lenovo@LAPTOP-PNM73HBA MINGW64 /f/test (master)
$ git branch #查看分支,默认只有一个分支时,就是master
* master
lenovo@LAPTOP-PNM73HBA MINGW64 /f/test (master)
$ git branch wechat #创建分支,创建一个分支wechat
lenovo@LAPTOP-PNM73HBA MINGW64 /f/test (master)
$ git branch
* master #*在哪表示在当前分支
lenovo@LAPTOP-PNM73HBA MINGW64 /f/test (master)
$ git checkout wechat #切换分支,切换到wechat分支上
Switched to branch 'wechat'
lenovo@LAPTOP-PNM73HBA MINGW64 /f/test (wechat)
$ git branch
master
lenovo@LAPTOP-PNM73HBA MINGW64 /f/test (wechat)
在wechat分支上工作区修改代码,并提交到wechat分支的本地仓库:

将wechat分支上工作区修改的代码依步骤提交的wechat分支的本地仓库(模拟出现ali支付功能bug急需修改,此时wechat还没完成,先将wechat代码暂时保存到该wechat分支)
lenovo@LAPTOP-PNM73HBA MINGW64 ~
$ cd F:/test
lenovo@LAPTOP-PNM73HBA MINGW64 /f/test (wechat)
$ ls
count2_add.txt lianshou1.txt lianshou2.txt
lenovo@LAPTOP-PNM73HBA MINGW64 /f/test (wechat)
$ git branch
master
lenovo@LAPTOP-PNM73HBA MINGW64 /f/test (wechat)
$ git status
On branch wechat
Changes not staged for commit:
(use "git add <file>..." to update what will be committed)
(use "git checkout -- <file>..." to discard changes in working directory)
modified: lianshou1.txt
no changes added to commit (use "git add" and/or "git commit -a")
lenovo@LAPTOP-PNM73HBA MINGW64 /f/test (wechat)
$ git add .
lenovo@LAPTOP-PNM73HBA MINGW64 /f/test (wechat)
$ git status
On branch wechat
Changes to be committed:
(use "git reset HEAD <file>..." to unstage)
modified: lianshou1.txt
lenovo@LAPTOP-PNM73HBA MINGW64 /f/test (wechat)
$ git commit -m "tijiao dao wechat" #模拟wechat功能开发了一半,其他功能急需修复,暂时保存wechat代码到wechat分支
[wechat 76e0342] tijiao dao wechat
1 file changed, 3 insertions(+), 1 deletion(-)
lenovo@LAPTOP-PNM73HBA MINGW64 /f/test (wechat)
$ git status
On branch wechat
nothing to commit, working tree clean
lenovo@LAPTOP-PNM73HBA MINGW64 /f/test (wechat)
$ git branch
master
lenovo@LAPTOP-PNM73HBA MINGW64 /f/test (wechat)
$ git checkout master #切回到maste分支
Switched to branch 'master'
lenovo@LAPTOP-PNM73HBA MINGW64 /f/test (master)
$ git branch
* master
lenovo@LAPTOP-PNM73HBA MINGW64 /f/test (master)
$ git branch ali #创建一个新分支2,准备修改bug代码
lenovo@LAPTOP-PNM73HBA MINGW64 /f/test (master)
$ git branch
ali
* master
lenovo@LAPTOP-PNM73HBA MINGW64 /f/test (master)
$ git checkout ali #切换到新分支2上
Switched to branch 'ali'
lenovo@LAPTOP-PNM73HBA MINGW64 /f/test (ali)
$ git branch
* ali
master
lenovo@LAPTOP-PNM73HBA MINGW64 /f/test (ali)
在新分支2上修补bug代码(在工作区修改代码后,依照步骤提交到本分支ali的本地仓库,然后合并到master分支)

$ cd F:/test
lenovo@LAPTOP-PNM73HBA MINGW64 /f/test (ali)
$ ls
count2_add.txt fix_ali.txt lianshou1.txt lianshou2.txt
lenovo@LAPTOP-PNM73HBA MINGW64 /f/test (ali)
$ git status
On branch ali
Untracked files:
(use "git add <file>..." to include in what will be committed)
fix_ali.txt
nothing added to commit but untracked files present (use "git add" to track)
lenovo@LAPTOP-PNM73HBA MINGW64 /f/test (ali)
$ git branch
* ali
master
lenovo@LAPTOP-PNM73HBA MINGW64 /f/test (ali)
$ git add .
lenovo@LAPTOP-PNM73HBA MINGW64 /f/test (ali)
$ git status
On branch ali
Changes to be committed:
(use "git reset HEAD <file>..." to unstage)
new file: fix_ali.txt
lenovo@LAPTOP-PNM73HBA MINGW64 /f/test (ali)
$ git commit -m "fix ali bug done"
[ali c351aeb] fix ali bug done
1 file changed, 1 insertion(+)
create mode 100644 fix_ali.txt
lenovo@LAPTOP-PNM73HBA MINGW64 /f/test (ali)
$ git status
On branch ali
nothing to commit, working tree clean
lenovo@LAPTOP-PNM73HBA MINGW64 /f/test (ali)
$ git checkout master
Switched to branch 'master'
lenovo@LAPTOP-PNM73HBA MINGW64 /f/test (master)
$ git branch
ali
* master
lenovo@LAPTOP-PNM73HBA MINGW64 /f/test (master)
$ ls
count2_add.txt lianshou1.txt lianshou2.txt #ali分支合并到master分支前状态
lenovo@LAPTOP-PNM73HBA MINGW64 /f/test (master)
$ git merge ali #将ali分支合并到master分支(应先切换到master分支再合并)
Updating 6b05524..864d7e1
Fast-forward
fix_ali.txt | 1 +
1 file changed, 1 insertion(+)
create mode 100644 fix_ali.txt
lenovo@LAPTOP-PNM73HBA MINGW64 /f/test (master)
$ ls
count2_add.txt fix_ali.txt lianshou1.txt lianshou2.txt #ali分支合并到master分支后状态
lenovo@LAPTOP-PNM73HBA MINGW64 /f/test (master)
此时master分支上查看代码:

修复紧急bug后再切换到新功能wechat分支,继续开发新功能代码:
lenovo@LAPTOP-PNM73HBA MINGW64 ~
$ cd F:/test
lenovo@LAPTOP-PNM73HBA MINGW64 /f/test (master)
$ ls
count2_add.txt fix_ali.txt lianshou1.txt lianshou2.txt
lenovo@LAPTOP-PNM73HBA MINGW64 /f/test (master)
$ git branch
ali
* master
lenovo@LAPTOP-PNM73HBA MINGW64 /f/test (master)
$ git checkout wechat #切换到新功能代码分支wechat
Switched to branch 'wechat'
lenovo@LAPTOP-PNM73HBA MINGW64 /f/test (wechat)
$ git branch
ali
master
lenovo@LAPTOP-PNM73HBA MINGW64 /f/test (wechat)
$ ls
count2_add.txt lianshou1.txt lianshou2.txt
lenovo@LAPTOP-PNM73HBA MINGW64 /f/test (wechat)
到新功能代码分支查看自己之前提交的代码,看是否还保存着,经查看,还保存着,如下图,然后就可以继续开发新功能代码了,开发完成后,还是类似上面,先提交到本分支wechat分支的本地仓库,然后切换到master分支,然后将wechat分支合并到master分支即可。

删除分支:(只是提到用法,不做真的删除)
格式: git branch -d 分支名 如删除ali分支: git branch -d ali即可
七、远程仓库地址别名配置、公钥配置和实现无需用户名和密码实现远程推送到远程仓库:
1.查看远程仓库地址和对应别名、删除远程仓库地址和对应别名、添加远程仓库地址和对应别名:
lenovo@LAPTOP-PNM73HBA MINGW64 ~
$ cd F:/test
lenovo@LAPTOP-PNM73HBA MINGW64 /f/test (wechat)
$ ls
count2_add.txt lianshou1.txt lianshou2.txt
lenovo@LAPTOP-PNM73HBA MINGW64 /f/test (wechat)
$ git branch
ali
master
lenovo@LAPTOP-PNM73HBA MINGW64 /f/test (wechat)
$ git remote -v #查看远程仓库地址和对应别名
orgin https://git.coding.net/Sshi/lianshou.git (fetch)
orgin https://git.coding.net/Sshi/lianshou.git (push)
lenovo@LAPTOP-PNM73HBA MINGW64 /f/test (wechat)
$ git remote remove orgin #删除远程仓库地址和对应别名
lenovo@LAPTOP-PNM73HBA MINGW64 /f/test (wechat)
$ git remote -v
lenovo@LAPTOP-PNM73HBA MINGW64 /f/test (wechat)
$ git remote add orgin https://git.coding.net/Sshi/lianshou.git #添加远程仓库地址和对应别名
lenovo@LAPTOP-PNM73HBA MINGW64 /f/test (wechat)
$ git remote -v
orgin https://git.coding.net/Sshi/lianshou.git (fetch)
orgin https://git.coding.net/Sshi/lianshou.git (push)
lenovo@LAPTOP-PNM73HBA MINGW64 /f/test (wechat)
2.配置公钥免密登录到远程仓库:
每次将本地分支代码提交到远程仓库时,都让输入用户名和密码,很不方便,所以在本地上创建秘钥对,将公钥内容粘贴到coding远程仓库的配置公钥处,这样配置后,再从本地仓库提交到远程仓库时候就不需要输入用户名和密码了。
在前面基础上,将wechat分支上本地仓库代码提交到账号2:Sshi2/xQ2011的远程仓库test2中,且不需输入用户名和密码的配置:
1)使用账号2登录coding,建立远程空仓库test2,并获得远程仓库地址,方式二的地址SSH地址,如下:
远程仓库名:test2 远程仓库地址:git@git.coding.net:Sshi2/test.git

2)在wechat分支上重新配置远程仓库地址和别名:(删掉原来https的地址别名,配置ssh的地址别名)、创建秘钥对
重新配置远程仓库地址和别名:
lenovo@LAPTOP-PNM73HBA MINGW64 ~
$ cd F:/test
lenovo@LAPTOP-PNM73HBA MINGW64 /f/test (wechat)
$ ls
count2_add.txt lianshou1.txt lianshou2.txt
lenovo@LAPTOP-PNM73HBA MINGW64 /f/test (wechat)
$ git status
On branch wechat
nothing to commit, working tree clean
lenovo@LAPTOP-PNM73HBA MINGW64 /f/test (wechat)
$ git branch
ali
master
lenovo@LAPTOP-PNM73HBA MINGW64 /f/test (wechat)
$ git remote -v
orgin https://git.coding.net/Sshi/lianshou.git (fetch)
orgin https://git.coding.net/Sshi/lianshou.git (push)
lenovo@LAPTOP-PNM73HBA MINGW64 /f/test (wechat)
$ git remote remove orgin #删掉原来https的地址别名
lenovo@LAPTOP-PNM73HBA MINGW64 /f/test (wechat)
$ git remote -v
lenovo@LAPTOP-PNM73HBA MINGW64 /f/test (wechat)
$ git remote add orgin git@git.coding.net:Sshi2/test.git #配置ssh的地址别名
lenovo@LAPTOP-PNM73HBA MINGW64 /f/test (wechat)
$ git remote -v
orgin git@git.coding.net:Sshi2/test.git (fetch)
orgin git@git.coding.net:Sshi2/test.git (push)
lenovo@LAPTOP-PNM73HBA MINGW64 /f/test (wechat)
3)创建秘钥对并在远程仓库配置公钥:
$ ssh-keygen -t rsa -C "1441107787@qq.com" #邮箱地址,就是那个配置时,怎么联系到你的邮箱地址,下面是一路回车即可。
Generating public/private rsa key pair.
Enter file in which to save the key (/c/Users/lenovo/.ssh/id_rsa):
Created directory '/c/Users/lenovo/.ssh'.
Enter passphrase (empty for no passphrase):
Enter same passphrase again:
Your identification has been saved in /c/Users/lenovo/.ssh/id_rsa.
Your public key has been saved in /c/Users/lenovo/.ssh/id_rsa.pub.
The key fingerprint is:
SHA256:TMmj0eMYcPd0hXQyALS3hC7wotCK4AEVKU1fTPD4Fzo 1441107787@qq.com
The key's randomart image is:
+---[RSA 2048]----+
| o+oo++.+.oo=oo |
|..o. *.+ * ..+ |
|.. + + @ + |
|.. + @ * . |
|o.. . E S . |
|+o.. . + |
|o.. |
| |
| |
+----[SHA256]-----+
lenovo@LAPTOP-PNM73HBA MINGW64 /f/test (wechat)
查看/c/Users/lenovo/.ssh/id_rsa.pub路径下的公钥内容,并复制后,粘贴到远程仓库配置公钥处:
复制后内容如下:
ssh-rsa AAAAB3NzaC1yc2EAAAADAQABAAABAQCbKXZWwtiH3gdidlreV8XiNHQjUus3WvaHTwkBrUWu7KA2q6f8YU0DS7t/hMpwPEKgCgl9qStFq8uVxcUVUEBphEv4RvqWna816TtWvi/uMsvayGyIRHTnOV3k/7b5WSc+kYUKGrGd99cLqTNelQER1txYgf+gFj2ign6iAugxR4AxbRMVBzcRgsks+udt0bCJ6YOBHlZi6tt8zyWJkZdsgGLMep58E/m1h/FmLo9p01+NOGzLBDqIIjxwMSseCu9mExFkMIl3MWU7UXurg5+iSKBEzpapisCb9XiiHW6GvB7MJ6ws3MwG5BmDVfgmoBjqKTtPbeMRBdmsSWdY72Sh 1441107787@qq.com
登录coding:Sshi2/Xq2011,将公钥粘贴到远程仓库test的配置公钥处:

点击部署公钥,如下:

点击新建部署公钥,如下:

输入Sshi2的密码:xQ2011,点击确认,如下:

4)wechat分支修改代码,先提交到本地分支仓库,然后将wechat分支推送到远程仓库(且不需输入用户名和密码方式)
wechat分支工作区修改一些wechat分支代码内容:

先提交到本地分支wechat本地仓库,再将wechat分支推送到远程仓库test:
$ cd F:/test
lenovo@LAPTOP-PNM73HBA MINGW64 /f/test (wechat)
$ ls
count2_add.txt gonyao.txt lianshou1.txt lianshou2.txt
lenovo@LAPTOP-PNM73HBA MINGW64 /f/test (wechat)
$ git branch
ali
master
lenovo@LAPTOP-PNM73HBA MINGW64 /f/test (wechat)
$ git status
On branch wechat
Untracked files:
(use "git add <file>..." to include in what will be committed)
gonyao.txt
nothing added to commit but untracked files present (use "git add" to track)
lenovo@LAPTOP-PNM73HBA MINGW64 /f/test (wechat)
$ git add .
lenovo@LAPTOP-PNM73HBA MINGW64 /f/test (wechat)
$ git commit -m "测试公钥"
[wechat 66939f0] 测试公钥
1 file changed, 1 insertion(+)
create mode 100644 gonyao.txt
lenovo@LAPTOP-PNM73HBA MINGW64 /f/test (wechat)
$ git remote -v
orgin git@git.coding.net:Sshi2/test.git (fetch)
orgin git@git.coding.net:Sshi2/test.git (push)
lenovo@LAPTOP-PNM73HBA MINGW64 /f/test (wechat)
$ git push orgin wechat #第一次需要输yes,此后不需要,但即使让输yes,也没让输用户名和密码
The authenticity of host 'git.coding.net (123.59.85.91)' can't be established.
RSA key fingerprint is SHA256:jok3FH7q5LJ6qvE7iPNehBgXRw51ErE77S0Dn+Vg/Ik.
Are you sure you want to continue connecting (yes/no)? yes #第一需要输yes
Warning: Permanently added 'git.coding.net,123.59.85.91' (RSA) to the list of known hosts.
Counting objects: 26, done.
Delta compression using up to 4 threads.
Compressing objects: 100% (16/16), done.
Writing objects: 100% (26/26), 2.16 KiB | 0 bytes/s, done.
Total 26 (delta 2), reused 0 (delta 0)
To git.coding.net:Sshi2/test.git
* [new branch] wechat -> wechat
lenovo@LAPTOP-PNM73HBA MINGW64 /f/test (wechat)
到远程仓库test中查看推送过来的代码,发现成功。Ssh2/xQ2011 远程仓库:test


 6400
6400


 被折叠的 条评论
为什么被折叠?
被折叠的 条评论
为什么被折叠?
 到【灌水乐园】发言


