云开发Web端自定义登录授权

1.获取私钥文件

在云开发控制台(腾讯云控制台),在【环境】-【环境设置】-【登录方式】,单击私钥下载。

2. 获取ticket编写服务端(这里使用云函数)

也可以在自己的服务器编写
// 编写云函数并上传

cloud.init()
const tcb = require('tcb-admin-node');
const app = tcb.init({
  env: '环境ID',
  credentials: require('私钥文件地址')
});
const customUserId = '自定义唯一ID';
const ticket = app.auth().createTicket(customUserId, {
  refresh: 10 * 60 * 1000 // 每十分钟刷新一次登录态, 默认为一小时
});

module.exports.main = function() {
  return ticket
}

在云开发(腾讯云控制台)的云函数中找到上传的函数,编辑触发路径

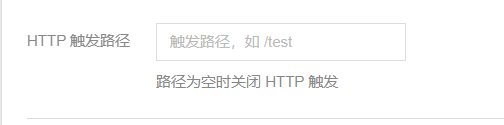
这时在浏览器中直接就可以获取到ticket了。

https://环境ID.service.tcloudbase.com/getTicket
3. web端使用
<script src="https://imgcache.qq.com/qcloud/tcbjs/1.3.5/tcb.js"></script>
<script>
const app = tcb.init({
			  env: '环境ID'
			});
			const auth = app.auth();
			async function login(){
			  const loginState = await auth.getLoginState();
			  if(!loginState){
				await fetch('https://环境ID.service.tcloudbase.com/getTicket').then(res=>{
					res.text().then(res =>{
						auth.signInWithTicket(res).then(res =>{
							console.log('登录成功')
						});
					})	
				});
			  }
			}
			login();
</script>

直接通过下面的请求是无法返回相应的内容的,打印出来仅仅是一个原始的response对象

fetch('云函数触发路径').then(res => console.log(res))  

所以在收到response对象后,使用 .text() 来转换成我们想要的内容,如果您返回的是json格式也可以使用 .json()

fetch('云函数触发路径').then(res=>{
					res.text().then(res =>{
						auth.signInWithTicket(res).then(res =>{
							console.log('登录成功')
						});
					})	
				});
这样自定义登录授权就成功了
  • 1
    点赞
  • 2
    收藏
    觉得还不错? 一键收藏
  • 1
    评论
ASP.NET是一种基于Microsoft .NET Framework的Web应用程序开发框架,支持多种编程语言,比如C#和VB.NET。下面是ASP.NET自定义开发Web程序的基本步骤和示例代码: 1. 创建ASP.NET Web应用程序 在Visual Studio中创建一个新的ASP.NET Web应用程序项目,选择Web应用程序模板,并选择C#或VB.NET作为编程语言。 2. 定义路由规则 在Global.asax文件中定义路由规则,用于将URL请求映射到相应的处理器上。 ```csharp void Application_Start(object sender, EventArgs e) { RouteTable.Routes.MapPageRoute("Default", "{controller}/{action}/{id}", new { controller = "Home", action = "Index", id = UrlParameter.Optional }); } ``` 3. 实现请求处理器 在Controllers文件夹中实现各种请求处理器,比如HomeController、AboutController等,用于处理各种请求并返回响应结果。 ```csharp public class HomeController : Controller { public ActionResult Index() { ViewBag.Message = "Welcome to ASP.NET MVC!"; return View(); } public ActionResult About() { ViewBag.Message = "Your application description page."; return View(); } public ActionResult Contact() { ViewBag.Message = "Your contact page."; return View(); } } ``` 4. 定义中间件 在App_Start文件夹中定义各种中间件,比如日志、权限、缓存等,用于处理请求前、请求后的逻辑。 ```csharp public class LoggingFilter : ActionFilterAttribute { public override void OnActionExecuting(ActionExecutingContext filterContext) { Log("Action start"); } public override void OnActionExecuted(ActionExecutedContext filterContext) { Log("Action end"); } private void Log(string message) { // log the message to a file or database } } ``` 5. 实现视图 在Views文件夹中实现各种视图,比如Home文件夹中的Index.cshtml、About.cshtml等,用于生成HTML响应内容。 ```html @{ ViewBag.Title = "Home Page"; } <h2>@ViewBag.Message</h2> ``` 6. 设计数据库访问层 在Models文件夹中设计数据库访问层,实现ORM框架或直接使用数据库驱动程序,用于和数据库进行交互。 ```csharp public class Product { public int Id { get; set; } public string Name { get; set; } public decimal Price { get; set; } } public class ProductRepository { public List<Product> GetAll() { // retrieve all products from database } public Product GetById(int id) { // retrieve product by id from database } public void Add(Product product) { // add product to database } public void Update(Product product) { // update product in database } public void Delete(int id) { // delete product by id from database } } ``` 7. 实现会话管理 在Controllers文件夹中实现会话管理,处理用户认证和授权,管理用户的会话状态。 ```csharp public class AccountController : Controller { public ActionResult Login(string returnUrl) { ViewBag.ReturnUrl = returnUrl; return View(); } [HttpPost] public ActionResult Login(LoginViewModel model, string returnUrl) { if (ModelState.IsValid) { if (Membership.ValidateUser(model.UserName, model.Password)) { FormsAuthentication.SetAuthCookie(model.UserName, model.RememberMe); return Redirect(returnUrl ?? Url.Action("Index", "Home")); } else { ModelState.AddModelError("", "Invalid username or password"); } } return View(model); } public ActionResult Logout() { FormsAuthentication.SignOut(); return RedirectToAction("Login", "Account"); } } ``` 以上是ASP.NET自定义开发Web程序的基本步骤和示例代码,具体实现细节还需要结合具体的技术和框架进行考虑。

“相关推荐”对你有帮助么?

  • 非常没帮助
  • 没帮助
  • 一般
  • 有帮助
  • 非常有帮助
提交
评论 1
添加红包

请填写红包祝福语或标题

红包个数最小为10个

红包金额最低5元

当前余额3.43前往充值 >
需支付:10.00
成就一亿技术人!
领取后你会自动成为博主和红包主的粉丝 规则
hope_wisdom
发出的红包
实付
使用余额支付
点击重新获取
扫码支付
钱包余额 0

抵扣说明:

1.余额是钱包充值的虚拟货币,按照1:1的比例进行支付金额的抵扣。
2.余额无法直接购买下载,可以购买VIP、付费专栏及课程。

余额充值