


直到上一篇https://blog.csdn.net/qq_35387940/article/details/94562280,咱们已经把Eureka Server注册中心搭建完毕,也把微服务成功注册到了注册中心里去了。
接下来,我们整合的是,非常核心实用的组件-Feign,
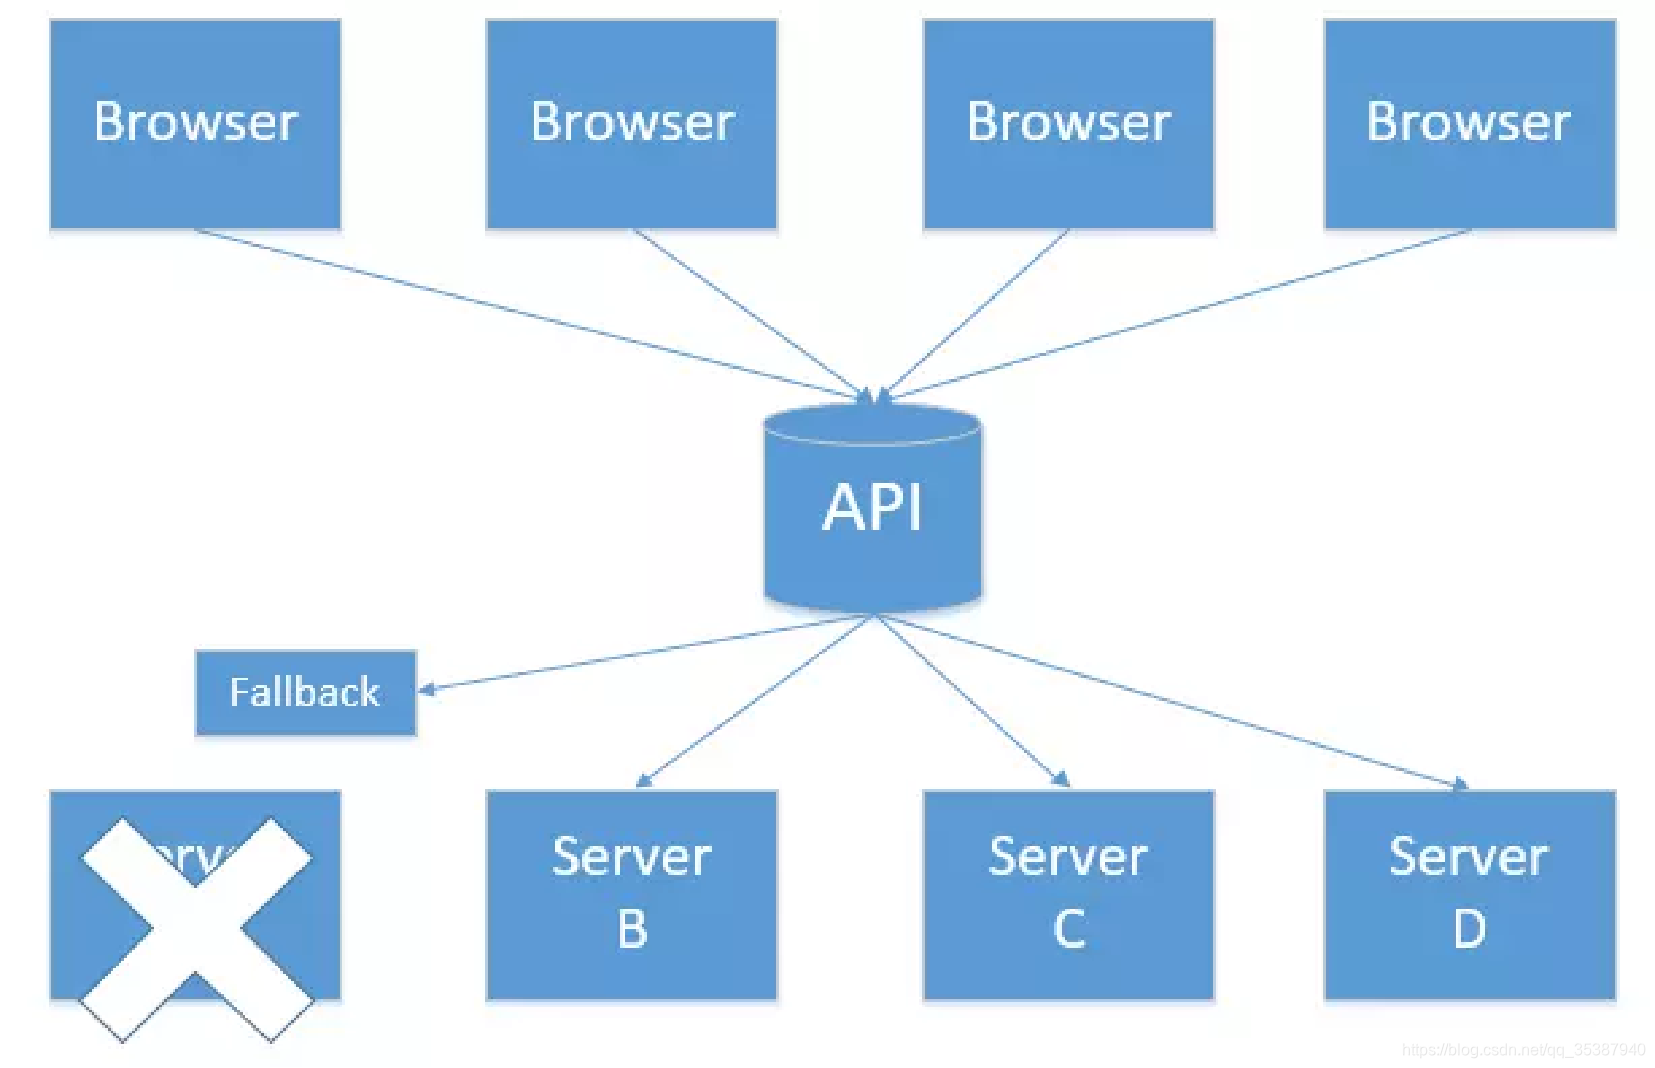
Feign除了解决了微服务之间调用,里面还囊括了 Ribbon负载均衡以及Hystrix 熔断降级。
Ribbon 负载均衡:

Hystrix 熔断降级:
同样,创建一个springboot项目,起名feign作为一个微服务:

(同样,我们这里选用的springcloud版本是:Finchley.RELEASE)
既然作为一个微服务,那自然也是需要注册到注册中心去的,所以pom.xml里核心的依赖包为:
	<dependency>
			<groupId>org.springframework.cloud</groupId>
			<artifactId>spring-cloud-starter-netflix-eureka-client</artifactId>
		</dependency>
		<dependency>
			<groupId>org.springframework.boot</groupId>
			<artifactId>spring-boot-starter-web</artifactId>
		</dependency>
		<dependency>
			<groupId>org.springframework.cloud</groupId>
			<artifactId>spring-cloud-starter-openfeign</artifactId>
		</dependency>
		<dependency>
			<groupId>org.springframework.cloud</groupId>
			<artifactId>spring-cloud-starter-netflix-hystrix</artifactId>
		</dependency>
		<dependency>
			<groupId>org.springframework.cloud</groupId>
			<artifactId>spring-cloud-starter-netflix-hystrix-dashboard</artifactId>
		</dependency>
application.yml:
eureka:
  instance:
    preferIpAddress: true
    instance-id: ${spring.cloud.client.ip-address}:${server.port}
  client:
    serviceUrl:
      defaultZone: http://localhost:8761/eureka/
server:
  port: 8765

spring:
  application:
    name: feign
feign:
  hystrix:
    enabled: true
(fegin: hystrix : enabled : true 这个配置项是指,开启熔断机制,也许在yml里显示没有相关依赖,但是不用慌,也许是因为版本问题,这个设置项加上就行,是起作用的)
然后我们在启动类上加上各种注解:
import org.springframework.boot.SpringApplication;
import org.springframework.boot.autoconfigure.SpringBootApplication;
import org.springframework.cloud.client.discovery.EnableDiscoveryClient;
import org.springframework.cloud.netflix.eureka.EnableEurekaClient;
import org.springframework.cloud.netflix.hystrix.EnableHystrix;
import org.springframework.cloud.netflix.hystrix.dashboard.EnableHystrixDashboard;
import org.springframework.cloud.openfeign.EnableFeignClients;

@SpringBootApplication
@EnableEurekaClient
@EnableDiscoveryClient
@EnableHystrix
@EnableHystrixDashboard
@EnableFeignClients
public class FeignApplication {

	public static void main(String[] args) {
		SpringApplication.run(FeignApplication.class, args);
	}

}
OK,基本的条条框框,我们已经做完了,接下来进行 使用Feign去调用我们之前创建的微服务client-test。
我们来看看,我们准备调用的client-test里面的接口:
  @Value("${server.port}")
    String port;
    @RequestMapping("/haveatry")
    public String home(@RequestParam(value = "name", defaultValue = "forezp") String name) {

        return "微服务 client-test被调用, " + "name为:"+name + " ,被调用的服务端口 port:" + port;
    }
那么我们在feign服务里,要这么写,才能成功调用:
先创建一个interface ,SchedualServiceHi.java:
import com.cloud.feign.service.impl.SchedualServiceHiHystric;
import org.springframework.cloud.openfeign.FeignClient;
import org.springframework.stereotype.Component;
import org.springframework.web.bind.annotation.RequestMapping;
import org.springframework.web.bind.annotation.RequestMethod;
import org.springframework.web.bind.annotation.RequestParam;

/**
 * @Author:JCccc
 * @Description:
 * @Date: created in 14:42 2019/2/3
 */

@FeignClient(value = "client-test",fallback = SchedualServiceHiHystric.class)
@Component
public interface SchedualServiceHi {
    @RequestMapping(value = "/haveatry",method = RequestMethod.GET)
    String sayHiFromClientOne(@RequestParam(value = "name") String name);
}
可以看到,
1. 需要保证@FeignClient 里面,value的值是 调用的接口所属微服务名称;
2.需要保证请求的Url是一致的;
3.需要保证接口请求方式是一致的;
4.需要保证接口传参是一致的;
5.需要使用@RequestMapping这种方式(避免使用GetMapping/PostMapping)
6.额外提醒,只要是传参,请都加上@RequestParam("XXXX");如果传对象就加上@RequestBody; 这样你就不用踩Feign的传参的坑了,不管是使用Feign的服务还是提供接口的client服务,请都加上这些传参注解保持一致;
看的仔细地人已经看到了fallback后面的类,这个类就是用于熔断降级的,SchedualServiceHiHystric.java:
import com.cloud.feign.service.SchedualServiceHi;
import org.springframework.stereotype.Component;

/**
 * @Author:JCccc
 * @Description:
 * @Date: created in 14:48 2018/2/3
 */
@Component
public class SchedualServiceHiHystric implements SchedualServiceHi {
    @Override
    public String sayHiFromClientOne(String name) {

        return "sorry! 网络异常,服务暂时无法访问。 请求的name为:"+name;
    }
}
OK,到这里,我们其实已经打通了跨服务直接的接口调用,那么我们写一个属于feign服务的接口(因为feign也是一个微服务已经注册到了注册中心,跨服务调用接口直接因为我们分布式架构按照业务把服务拆分了,业务需求需要从feign服务这里的接口调用到client-test服务接口,所以就需要用到了Feign组件):
HiController.java:
import com.cloud.feign.service.SchedualServiceHi;
import org.springframework.beans.factory.annotation.Autowired;
import org.springframework.web.bind.annotation.GetMapping;
import org.springframework.web.bind.annotation.RequestParam;
import org.springframework.web.bind.annotation.RestController;

/**
 * @Author:JCccc
 * @Description:
 * @Date: created in 14:44 2019/2/3
 */
@RestController
public class HiController {


    @Autowired
    SchedualServiceHi schedualServiceHi;

    @GetMapping(value = "/feignTest")
    public String sayHi(@RequestParam String name) {

        return schedualServiceHi.sayHiFromClientOne(name);
    }

}
好,现在我们先将项目跑起来(前提注册中心以及client-test也是正在运行的),看看跨服务调用效果(熔断和负载均衡一会略详细讲讲,不慌):

我们调下feign的接口 http://localhost:8765/feignTest?name=1323 :
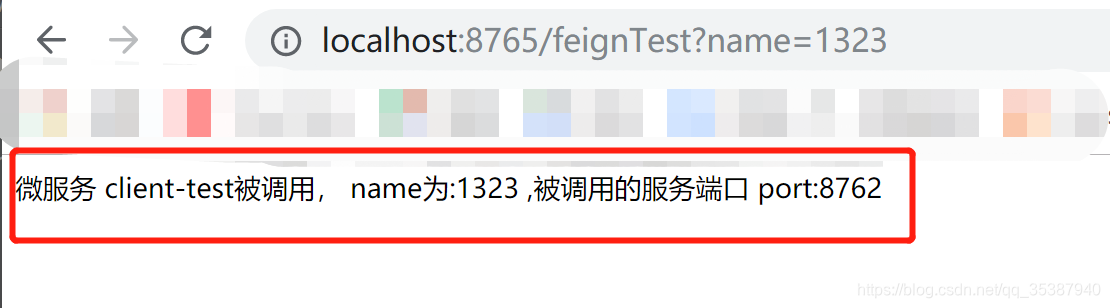
可以看到,跨服务间调用已经成功。
然后,下面我们直接把 client-test服务关掉(狠心),feign的接口 http://localhost:8765/feignTest?name=1323 :
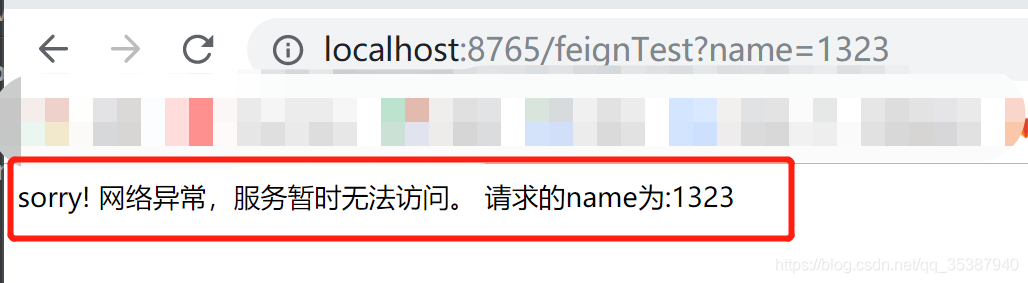
看到返回值,显示的内容, 没错就是我们刚刚配置的fallback类:

这里可以根据使用场景,扩展做数据存储、降级调用等等。
到这里,基本feign的使用也七七八八, 就剩一个负载均衡的使用:
那么我们继续, 既然是负载均衡,那么也先得有东西均衡,所以我们直接再创建一个微服务,这个微服务跟上一篇的client-test微服务一模一样,依赖、配置全都保持一样, 唯一的改变是 端口!
上一篇的client-test微服务端口是8762, 我们这个是8763(注意,服务名保持一样 client-test,因为负载均衡是通过获取注册中心的服务注册信息,根据服务名去匹配的):
server:
  port: 8763

spring:
  application:
    name: client-test

  zipkin:
    base-url: http://localhost:9411
    sender:
      type: web
  sleuth:
    sampler:
      probability: 1.0

eureka:
#以IP地址方式显示在注册中心
  instance:
    preferIpAddress: true
    instance-id: ${spring.cloud.client.ip-address}:${server.port}

  client:
    serviceUrl:
      defaultZone: http://localhost:8761/eureka/
然后也将这个新的client-test微服务跑起来,先访问注册中心看看情况 http://localhost:8761/:

OK,负载均衡的准备已经完成,那么我们连续调下feign的接口 http://localhost:8765/feignTest?name=1323 :

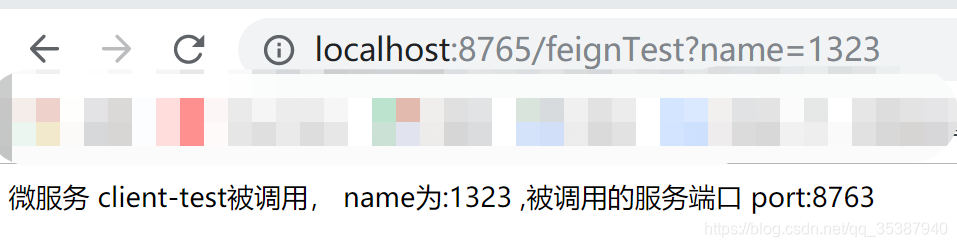
从调用的返回值我们可以得知,已经负载均衡了,默认的负载机制是轮换地调用,我们只需横向扩展需要实现负载均衡的服务实例。
到了这里,讲道理是已经整合完毕了,但是,也许细心思考的人会有以下的想法:
又熔断降级、又负载均衡,那么如果现在有3个client-test服务实例, 其中有一个挂掉或者访问响应比较慢,那么负载和均衡直接是怎么样的处理结果呢?
接下来我们用client-test服务实例 来简单模拟下场景,
首先我们刚刚试过,2个client-test服务实例 都正常访问,响应都是正常的时候, 不可能出现熔断降级,然后负载均衡是,轮流一次次地访问到了这两个实例;
OK,我们在8762这个服务实例的接口上,加上一个sleep(5000):

然后连续调下feign的接口 http://localhost:8765/feignTest?name=1323 :
结果是优先负载均衡轮流调用实例,调用到正常运行的服务则正常调用;若调用到时间久的,就会出现熔断降级。
那么这种情况,其实我们是可以设置feign调用服务的连接超时时间的,
我们创建一个FeignConfiugure.java:
import feign.Request;
import feign.Retryer;
import org.springframework.context.annotation.Bean;
import org.springframework.context.annotation.Configuration;

/**
 * @Author:JCccc
 * @Description:
 * @Date: created in 10:56 2019/2/3
 */
@Configuration
public class FeignConfigure {
    public static int connectTimeOutMillis = 7000;//超时时间
    public static int readTimeOutMillis =7000;
    @Bean
    public Request.Options options() {
        return new Request.Options(connectTimeOutMillis, readTimeOutMillis);
    }

    @Bean
    public Retryer feignRetryer() {
        return new Retryer.Default();
    }

}
注意这里设置的其实是负载均衡的连接超时时间,熔断默认是1000ms,也就是说连接超过1000ms都直接熔断了,根本不会负载均衡。 所以在这里建议,负载均衡的超时时间设置最好是不要大于熔断超时时间, 这样才是符合逻辑的。
那么熔断时间怎么设置呢,
我们可以直接在yml设置(下面的设置项也许在yml文件里面也会显示不存在,但是其实是有效的):
### Hystrix 配置
hystrix:
  # 这样将会自动配置一个 Hystrix 并发策略插件的 hook,这个 hook 会将 SecurityContext 从主线程传输到 Hystrix 的命令。
  # 因为 Hystrix 不允许注册多个 Hystrix 策略,所以可以声明 HystrixConcurrencyStrategy
  # 为一个 Spring bean 来实现扩展。Spring Cloud 会在 Spring 的上下文中查找你的实现,并将其包装在自己的插件中。
  shareSecurityContext: true
  command:
    default:
      circuitBreaker:
        # 当在配置时间窗口内达到此数量的失败后,进行短路。默认20个
        requestVolumeThreshold: 1
        # 触发短路的时间值,当该值设为5000时,则当触发 circuit break 后的5000毫秒内都会拒绝request
        # 也就是5000毫秒后才会关闭circuit。默认5000
        sleepWindowInMilliseconds: 15000
        # 强制打开熔断器,如果打开这个开关,那么拒绝所有request,默认false
        forceOpen: false
        # 强制关闭熔断器 如果这个开关打开,circuit将一直关闭且忽略,默认false
        forceClosed: false
      execution:
        isolation:
          thread:
            # 熔断器超时时间,默认:1000/毫秒
            timeoutInMilliseconds: 10000
我这边是故意设置熔断时间为10s,负载均衡时间为7秒, 然后接口sleep是5s,然后调用接口访问,就可以明显观察,不会存在熔断返回值只是访问特别久才有返回结果,因为sleep是5秒;
OK,两个时间咱们都可以设置,具体就根据业务需求去设置吧。
Springboot整合SpringCloud -Feign的详细介绍就到此。
以下是我自己设置各个时间后,调用接口的简述(可以无视,自己亲自去试试时间的设置搭配):
我们可以再把熔断时间改为4秒,负载均衡时间为7秒,然后接口sleep是5s,调用接口访问,可以看到直接触发了熔断效果;
我们可以再把熔断时间改为7秒,负载均衡时间为3秒,然后接口sleep是5s,调用接口访问,
可以看到当调用到超过负载时间的接口时,并没直接返回熔断结果(因为还没到熔断的7s),而是返回了正常没有设置sleep的另一个实例的接口返回值(因为这时候超过了负载的3秒,所以组件帮我们去正常的服务了)。
其实这种情况才是最符合我们使用场景的,也就是设置的熔断时间比负载均衡时间长就行了,
当服务调用进行负载,发现如果有的服务连接不上或者时间太久,就会去寻找能正常在负载均衡连接时间范围内访问的服务,去调用接口,然后如果一直都找不到能符合条件的,那么就是熔断场景。


 579
579


 被折叠的 条评论
为什么被折叠?
被折叠的 条评论
为什么被折叠?
 到【灌水乐园】发言


