


1.定义一个方法注解
/**
* 自定义注解
* @LMJ
* DATE:2023/11/17
*/
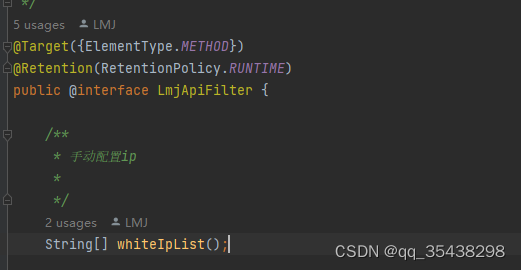
@Target({ElementType.METHOD}) //在方法上运行
@Retention(RetentionPolicy.RUNTIME)
public @interface LmjApiFilter{
String[] whiteIpList();
}
@interface:是指声明一个注解,方法名对应参数名,返回值类型对应参数类型。
@Target: 是指自定义注解的使用位置
@Retention:是指于自定义注解的生命周期
RetentionPolicy:的取值包含以下三种:
-
SOURCE:源码级别保留,编译后即丢弃。
-
CLASS:编译级别保留,编译后的class文件中存在,在jvm运行时丢弃,这是默认值。
-
RUNTIME:运行级别保留,编译后的class文件中存在,在jvm运行时保留,可以被反射调用。
我们需要使用到AOP,所以选择最后一个!
2.编写拦截器
import com.sz.annotate.LmjApiFilter;
import org.json.JSONObject;
import org.springframework.core.annotation.AnnotationUtils;
import org.springframework.http.MediaType;
import org.springframework.stereotype.Component;
import org.springframework.web.method.HandlerMethod;
import org.springframework.web.servlet.HandlerInterceptor;
import javax.servlet.http.HttpServletRequest;
import javax.servlet.http.HttpServletResponse;
import java.io.IOException;
import java.io.PrintWriter;
import java.util.HashMap;
import java.util.Map;
/**
* 拦截器[API白名单]
* @LMJ
* DATE:2023/11/17
*/
@Component
public class IpInterceptor implements HandlerInterceptor {
private static final org.apache.logging.log4j.Logger log = org.apache.logging.log4j.LogManager.getLogger(IpInterceptor.class);
@Override
public boolean preHandle(HttpServletRequest request, HttpServletResponse response, Object handler) throws Exception {
// 1.获取自定义注解
HandlerMethod handlerMethod = (HandlerMethod) handler;
//注:验证注解是否正确
LmjApiFilter ipWhiteList = AnnotationUtils.findAnnotation(handlerMethod.getMethod(),LmjApiFilter);
if (ipWhiteList == null) {
return true;
}
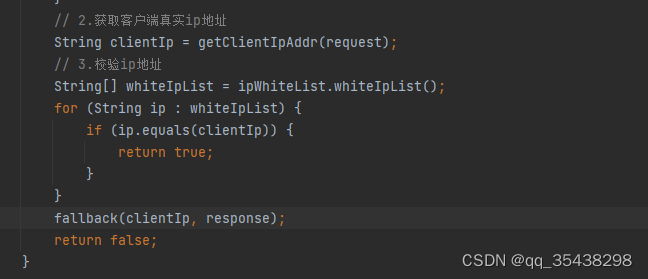
// 2.获取客户端真实ip地址
String clientIp = getClientIpAddr(request);
// 3.校验ip地址
String[] whiteIpList = ipWhiteList.whiteIpList();
for (String ip : whiteIpList) {
if (ip.equals(clientIp)) {
return true;
}
}
fallback(clientIp, response);
return false;
}
private void fallback(String clientIp, HttpServletResponse response) {
response.setCharacterEncoding("UTF-8");
response.setContentType(MediaType.APPLICATION_JSON_VALUE);
PrintWriter writer = null;
try {
String message = String.format("您的IP地址为[%s],已被系统禁止访问,请联系管理员处理!", clientIp);
Map<String,String> map = new HashMap();
map.put("403",message);
JSONObject json = new JSONObject(map);
writer = response.getWriter();
writer.append(json.toString());
} catch (IOException e) {
log.error(e);
} finally {
if (writer != null) {
writer.close();
}
}
}
private String getClientIpAddr(HttpServletRequest request) {
String ip = request.getHeader("X-Forwarded-For");
if (ip == null || ip.length() == 0 || "unknown".equalsIgnoreCase(ip)) {
ip = request.getHeader("Proxy-Client-IP");
}
if (ip == null || ip.length() == 0 || "unknown".equalsIgnoreCase(ip)) {
ip = request.getHeader("WL-Proxy-Client-IP");
}
if (ip == null || ip.length() == 0 || "unknown".equalsIgnoreCase(ip)) {
ip = request.getHeader("HTTP_CLIENT_IP");
}
if (ip == null || ip.length() == 0 || "unknown".equalsIgnoreCase(ip)) {
ip = request.getHeader("HTTP_X_FORWARDED_FOR");
}
if (ip == null || ip.length() == 0 || "unknown".equalsIgnoreCase(ip)) {
ip = request.getRemoteAddr();
}
// 对于通过多个代理的情况,第一个IP为客户端真实IP,多个IP按照','分割
if (ip != null && ip.length() > 15) { // "***.***.***.***".length() = 15
if (ip.indexOf(",") > 0) {
ip = ip.substring(0, ip.indexOf(","));
}
}
return ip;
}
}
拦截器重点:
验证请求中注解是否存在我们定义的注解,如果发现有我们定义的注解才走下面的逻辑。

拦截ip的逻辑也很简单
我们只需要判断访问主机的ip是不是我们拉入黑名单/白名单的ip。
黑名单的ip如何获取?
2.1.数据库中【redis/mysql】

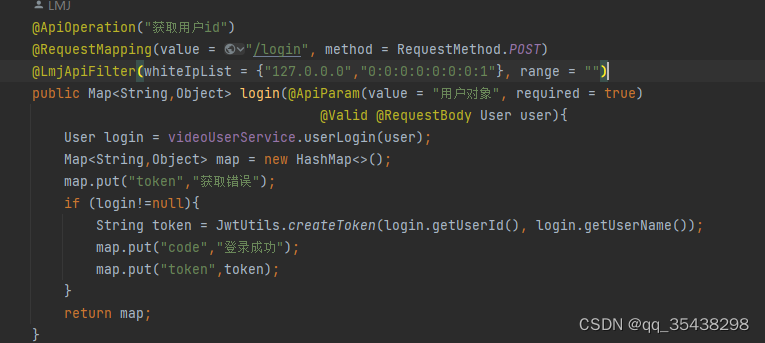
2.2.【LmjApiFilter】定义一个属性
3:注解的使用
4:最后注册拦截器
package com.sz.config.ip;
import com.sz.interceptor.whiteIp.IpInterceptor;
import org.springframework.context.annotation.Configuration;
import org.springframework.stereotype.Component;
import org.springframework.web.servlet.config.annotation.InterceptorRegistry;
import org.springframework.web.servlet.config.annotation.WebMvcConfigurer;
@Configuration
public class IPWebMvcConfiguration implements WebMvcConfigurer {
@Override
public void addInterceptors(InterceptorRegistry registry) {
// registry 拦截器注册中心
registry.addInterceptor(new IpInterceptor());
}
}
逻辑解析
简单的来说,该方法目的就是实现黑名单功能,例如我把你拉入黑名单你就无法访问我们系统的接口了,只是加上注解后可以更灵活使用了,可以将某个接口单独提供给某个ip访问,或则不让某个ip访问!


 4408
4408


 被折叠的 条评论
为什么被折叠?
被折叠的 条评论
为什么被折叠?
 到【灌水乐园】发言


