


前言
之前文章有了Spring(5.3.10)的基础组件与简单流程的介绍,那么这一篇就来简单过一下很重要的Bean的生命周期,在开始之前我们先看一下生命周期图:
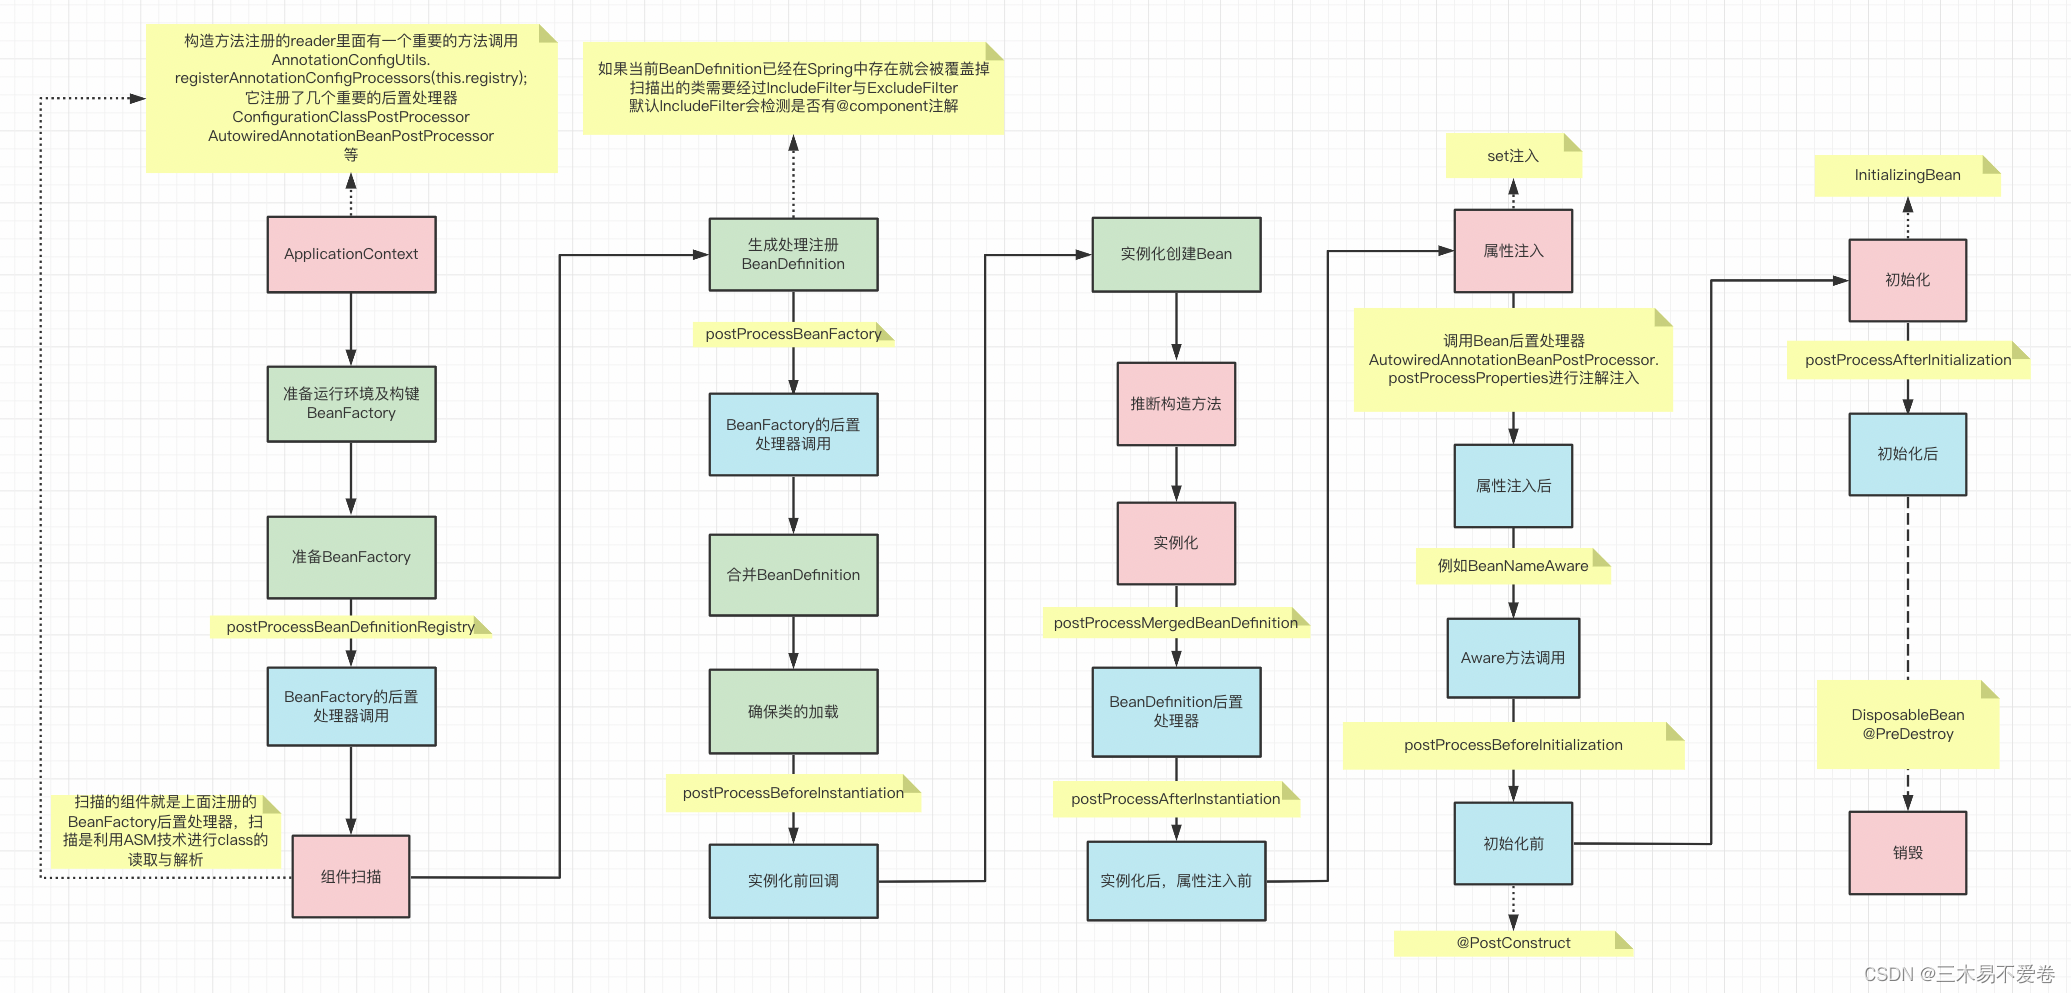
这张图粗略的描述了Spring启动会经历的流程,但是不完整,其中红色块是一些重要的流程块,蓝色是一些平常常用的扩展点,绿色是组成链中必要过程。一些黄色的标签是一些补充描述点。
步骤有点复杂,所以这一章不会对里面的内容全部详解,其中一些内容详解会放到后面的文章一一补上。这一章流程图链接🔗。这里我们默认大家都有Spring框架的基础知识了。再给大家补一个Spring全流程图🔗,很乱需要搜素。
ApplicationContext
我们直接按平时开发中用到的AnnotationConfigApplicationContext来讲解。
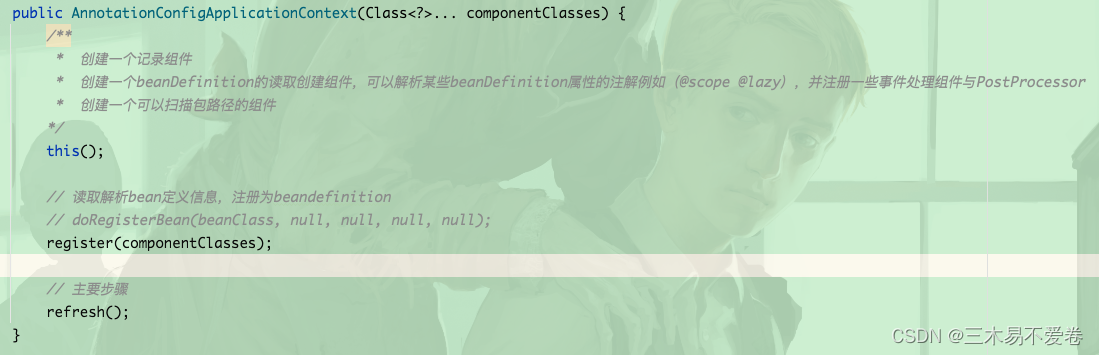
其中有三个方法调用,图中已标注其主要作用,但可能会比较抽象我们来逐个说一下吧。
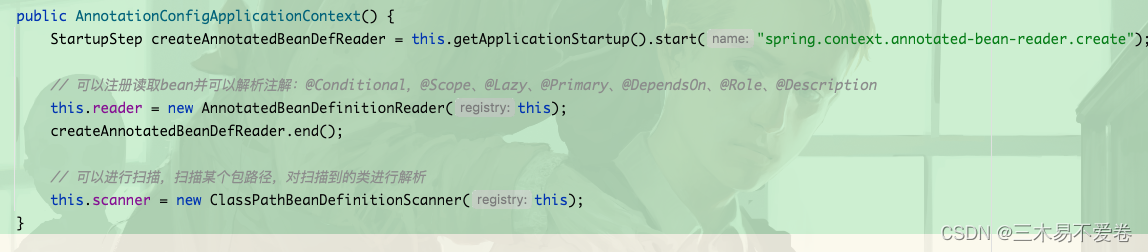
this()
这里注释标注的是两个比较重要的东西,reader与scanner。
scanner就是路径扫描器,我们之前手写过简单的实现。
reader在这里会比较重要,它注册一些后置处理器由spring进行调用,例如事件处理器,注解(@AutoWired等)注入器,配置类处理器等等。
我们后面讲到会再详细讲解,这里有一个印象就可以了,不必给自己太大压力。
register(componentClasses) 这里我们看名字就知道是将这些配置类注册到Spring中,当然肯定会进行解析。
refresh() 生命周期图中ApplicationContext后面所有的流程都在这个方法里面,所有非常重要。
组件扫描
这是一个很重要的步骤,我们根据生命周期图可以看到在调用BeanFactoryPostProcessors中调用到了组件扫描,它帮我们根据配置扫描出了所有的组件,再通过生命周期创建后供我们使用,我们就先看一下它的简单流程描述图吧: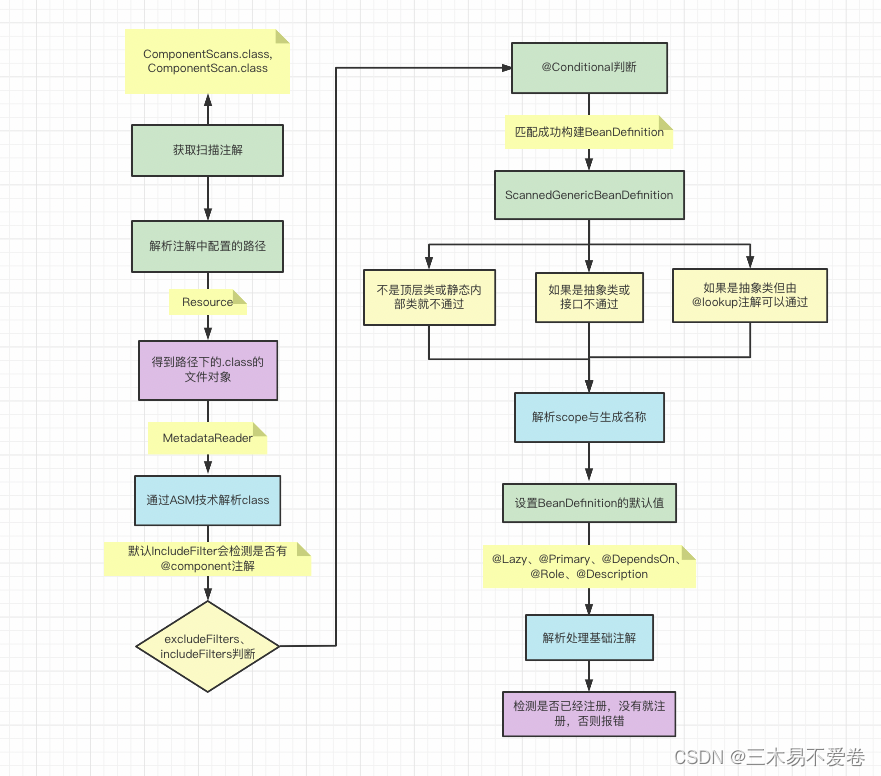
这个扫描方法是在BeanFactory的后置处理器中执行的,而后置处理器是在AnnotationConfigApplicationContext的构造方法中添加的,我们上面有讲到this.reader赋值时有创建几个后置处理器到Spring中,其中ConfigurationClassPostProcessor负责配置类的解析与扫描。我们知道AnnotationConfigApplicationContext(Class<?>... componentClasses) 构造方法传入的类是一个配置类,需要解析上面的@ComponentScan注解再进行解析,当然这个配置类也可能会import其他的类,这个后面会讲。我们根据流程图进入源码的学习:
上面我们分析到了是通过
ConfigurationClassPostProcessor这个后置处理器进行扫描的,那么Spring是怎么调到这里的呢?
AnnotationConfigApplicationContext(Class<?>… componentClasses) ->
refresh() ->
invokeBeanFactoryPostProcessors(beanFactory) ->
PostProcessorRegistrationDelegate.invokeBeanFactoryPostProcessors(beanFactory, getBeanFactoryPostProcessors()) ->
registryProcessor.postProcessBeanDefinitionRegistry(registry)
其中就会有一个实现了postProcessBeanDefinitionRegistry方法的ConfigurationClassPostProcessor,大家可以根据这个路线去源码看一下是否能自己找到呢?
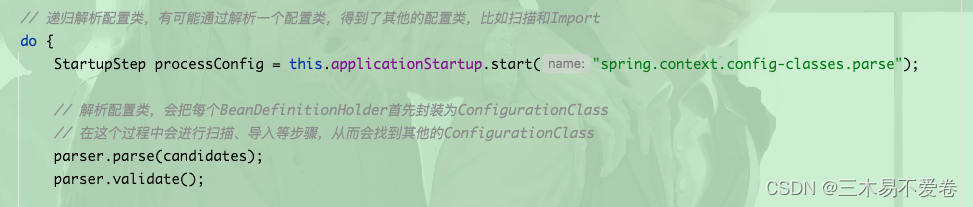
在ConfigurationClassPostProcessor 的 processConfigBeanDefinitions方法中存在这样一段
parser.parse(candidates);
会开始解析配置类,存在@ComponentScan等注解就会进行扫描了,这里我们是AnnotatedBeanDefinition的类型。
跳过其他逻辑,我们直接看主线逻辑(扫描),直接进入doProcessConfigurationClass这个方法中。
注解解析
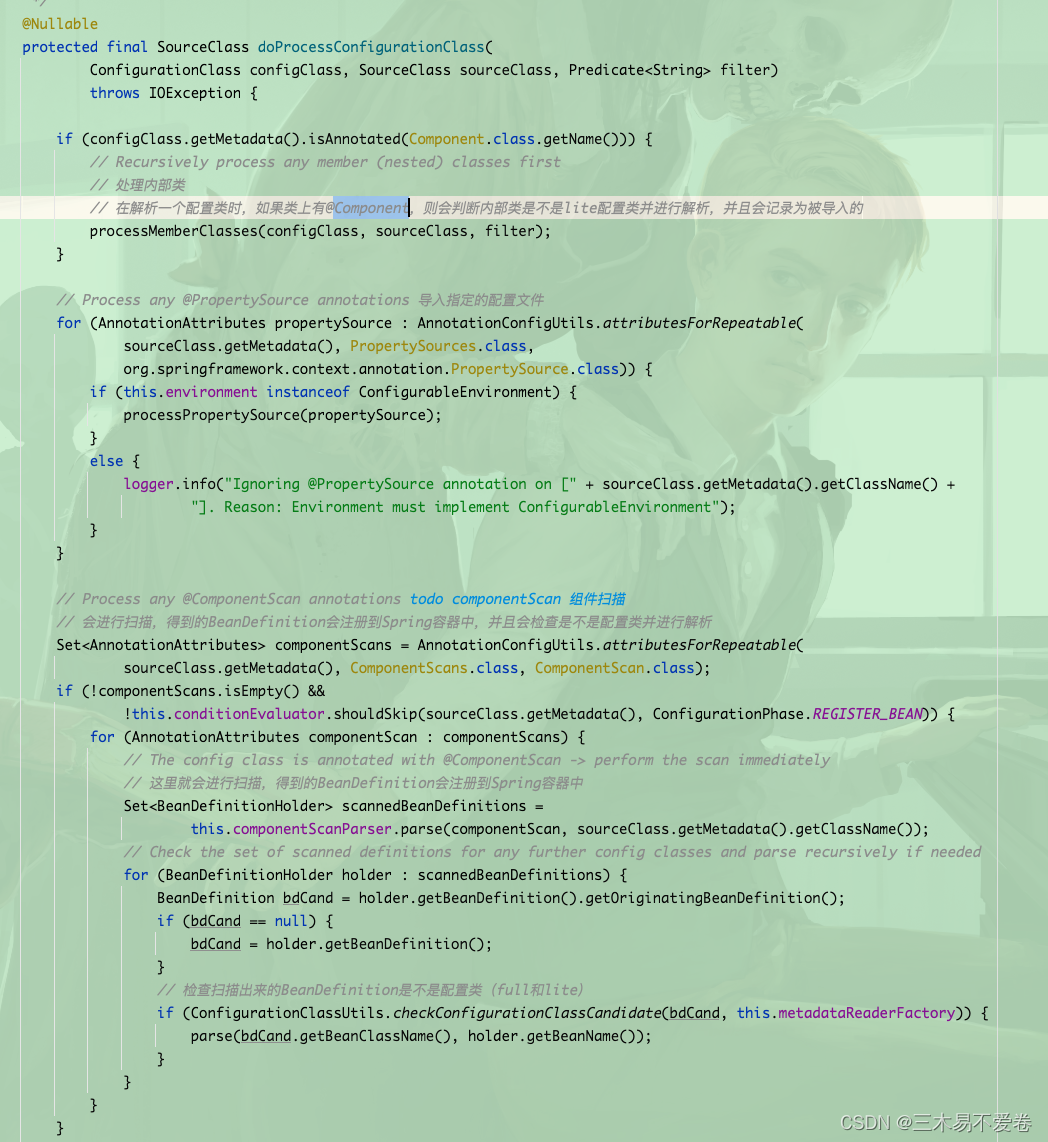
直接从主线逻辑这一段开始:
componentScans = AnnotationConfigUtils.attributesForRepeatable(
sourceClass.getMetadata(), ComponentScans.class, ComponentScan.class);
获取这个配置类的扫描注解配置。
!componentScans.isEmpty() &&
!this.conditionEvaluator.shouldSkip(sourceClass.getMetadata(),
 ConfigurationPhase.REGISTER_BEAN)
有扫描注解,并且这个配置类符合@Conditional就继续解析。
Set<BeanDefinitionHolder> scannedBeanDefinitions =
this.componentScanParser.parse(componentScan,
 sourceClass.getMetadata().getClassName());
从调用componentScanParser.parse,我们可以猜到这里要开始解析注解里面的内容了,然后从Set<BeanDefinitionHolder>这个返回值我们可以猜到在上面的解析注解内容后肯定有进行其他操作才可能返回BeanDefinition,set说明返回了多个BeanDefinition: 扫描了路径的类,解析了多个Class才有可能多个。
泛型为BeanDefintionHolder说明解析了Class的内容。
进入componentScanParser.parse方法中:
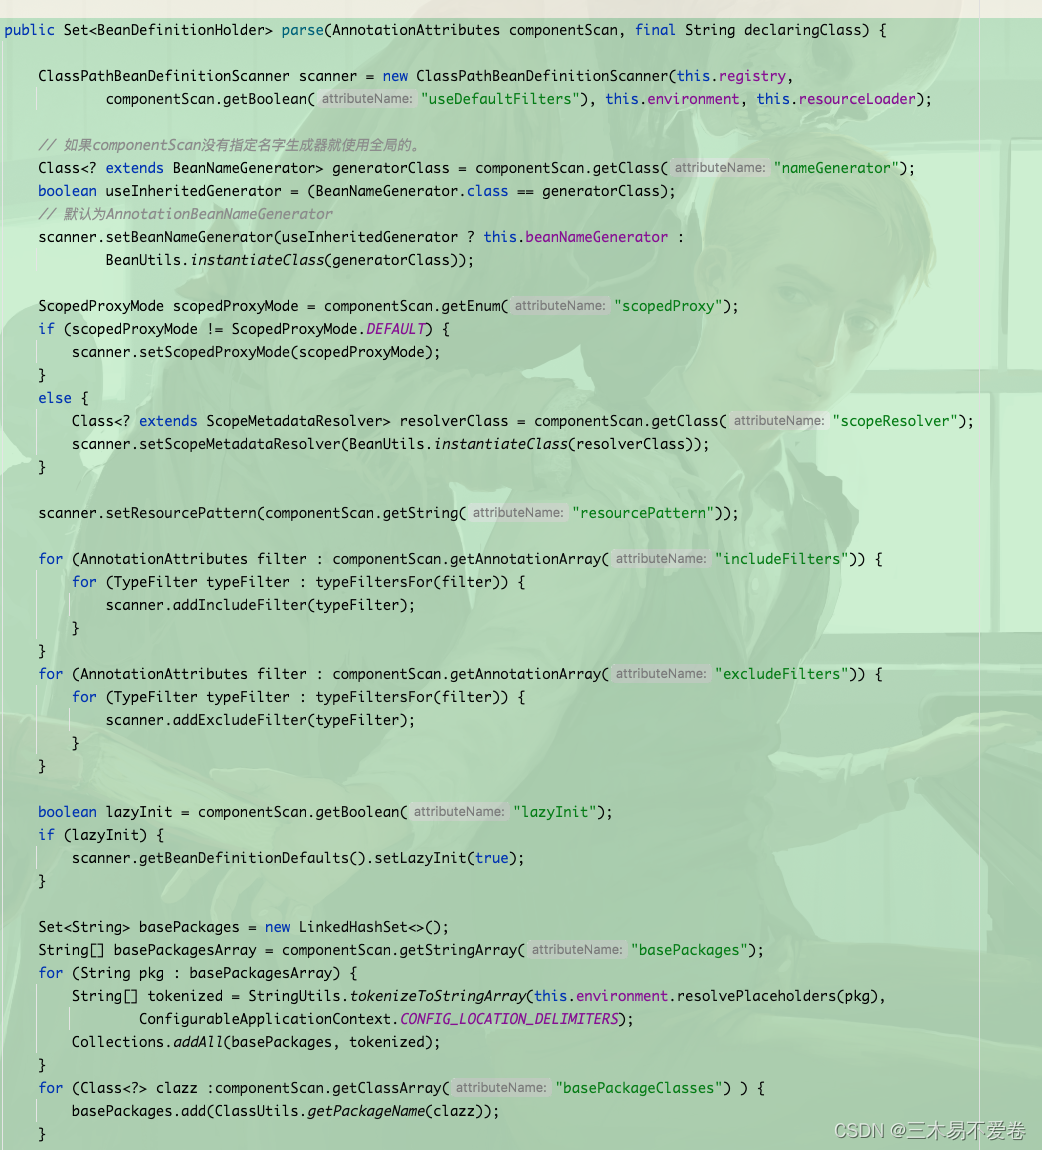
ClassPathBeanDefinitionScanner scanner = new ClassPathBeanDefinitionScanner(this.registry,
componentScan.getBoolean("useDefaultFilters"), this.environment, this.resourceLoader);
这一段new了一个扫描器,如果设置使用默认过滤器(Filters),会默认添加一个includeFIlter,然后开始解析注解配置字段的内容。
ClassPathBeanDefinitionScanner 内如果配置使用默认过滤器:
this.includeFilters.add(new AnnotationTypeFilter(Component.class));
然后往下一看有一堆代码还被注解标识着名字生成器,这个的作用是如果你@Component注解没有自定义给Bean配置名称,那么Spring就会帮你自动配置。
// 如果componentScan没有指定名字生成器就使用全局的。
Class<? extends BeanNameGenerator> generatorClass = componentScan.getClass("nameGenerator");
boolean useInheritedGenerator = (BeanNameGenerator.class == generatorClass);

// 默认为AnnotationBeanNameGenerator
scanner.setBeanNameGenerator(useInheritedGenerator ? this.beanNameGenerator :
		BeanUtils.instantiateClass(generatorClass));
这个大方法的最后一段就是处理完配置后准备开始扫描了:
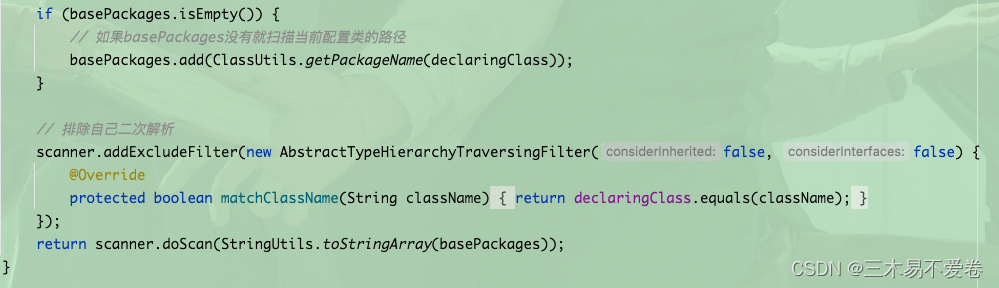
如果没有设置扫描包路径会直接以当前配置类的包为路径进行扫描。
scanner.doScan(StringUtils.toStringArray(basePackages)); 这一段开始正式扫描类路径了。
扫描开始
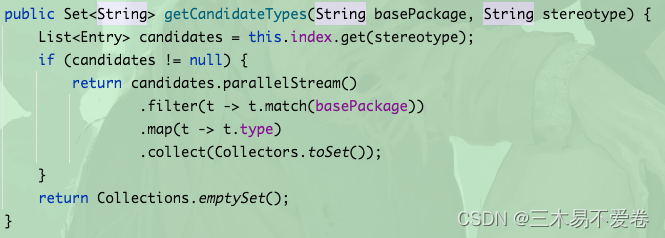
findCandidateComponents(basePackage):

判断有没有compnentsIndex,没有就会走扫描逻辑了。这里都是直接进入扫描的逻辑,那么compnentsIndex是怎么进入的呢?我们在这里插入一下(正常看源码流程应该直接看主流程,而不是直接看这些边角逻辑,所以这里大家可以自行斟酌是否查看)。
CompnentsIndex
开始前先讲一下为什么要有这个技术,因为在Spring扫描的过程中可能会有很多扫描的路径需要扫描,并且扫描路径下有多少的类需要扫描加载也是未知数,所以如果要提升性能,就可以使用index技术。index翻译过来就是索引的意思,所以这个功能就类似于索引的功能,我只需要加载这个索引文件就可以一次性加载所有组件,减少了扫描类路径遍历解析的开销。
在AnnotationConfigApplicationContext初始化的时候有赋一个值给scanner,那段代码是这样写的this.scanner = new ClassPathBeanDefinitionScanner(this);在ClassPathBeanDefinitionScanner的初始化时会加载一个文件,我们看一下源码。

我们判断的this.componentsIndex就是在这时候进行了赋值,那么它加载的是什么文件路径呢?我们进去看一下。
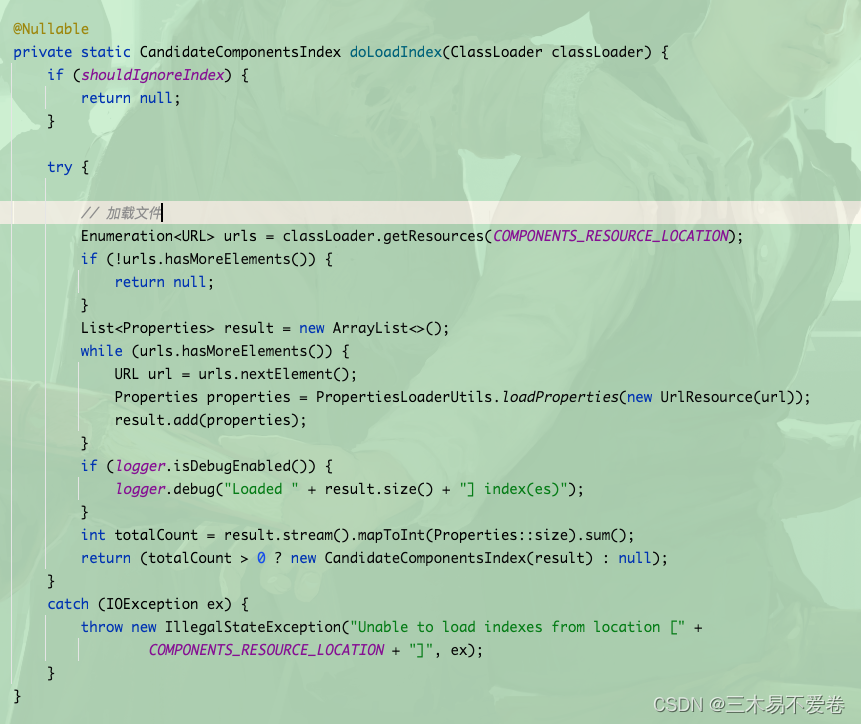
可以发现我们要加载的路径就是COMPONENTS_RESOURCE_LOCATION这个常量,也就是根路径下的META-INF/spring.components这个文件,这个文件定义是key:value的结构。
key 是需要加载的组件全限定类名。
value 是注解或类的全限定名。这个value的是includeFilter的作用,只能根据ANNOTATION或ASSIGNABLE_TYPE两种类型判断,其它都不支持会报错(例如自定义过滤器),value可以用","(逗号)隔开定义多个。
通过判断后会进入addCandidateComponentsFromIndex(this.componentsIndex, basePackage);
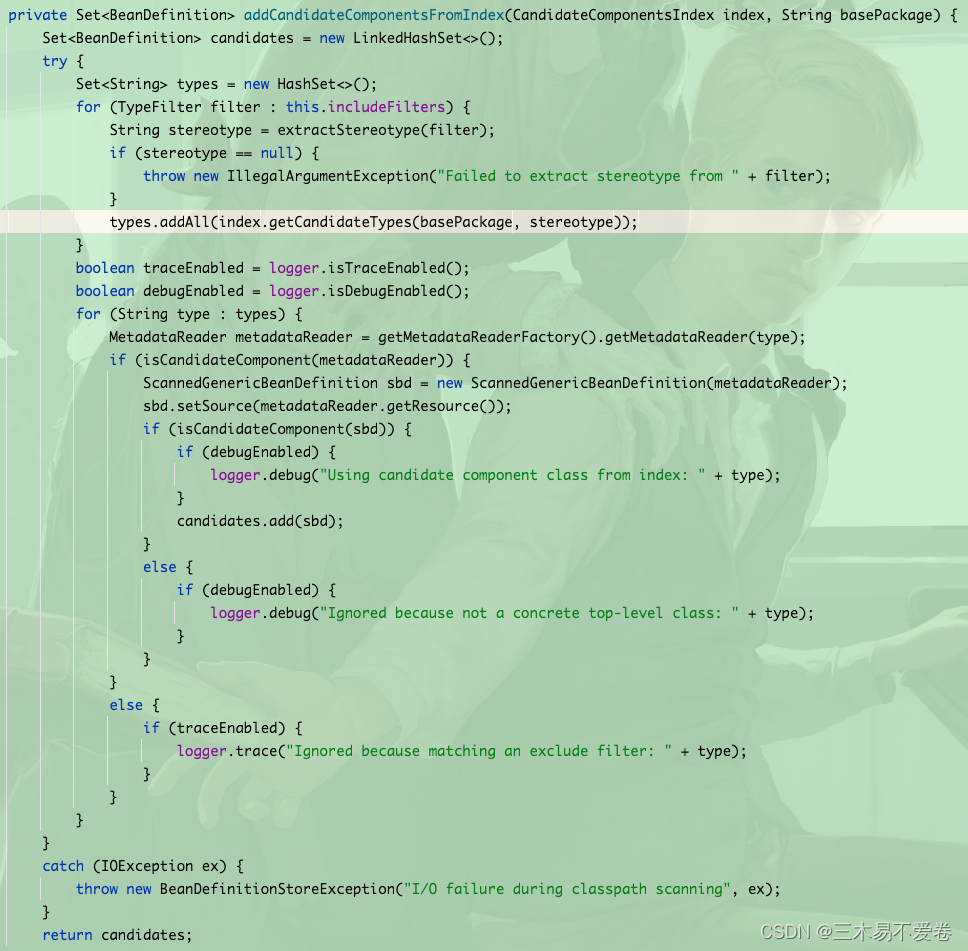
通过源码图可以看到我们拿到spring.components文件的内容还会根据配置的includeFIiter进行过滤。
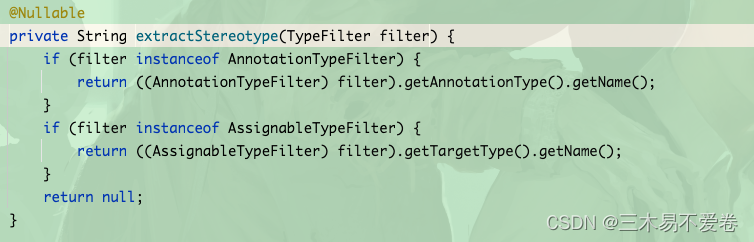
进行类过滤的时候会过滤掉一些不合法的includeFIiter,只支持两种类型的过滤器,我们默认过滤器是要带有@Component注解。
然后根据包路径与filter过滤出需要加载的组件。
剩下的逻辑与扫描类路径的方式类似,我们放到下面一起看。
扫描类路径
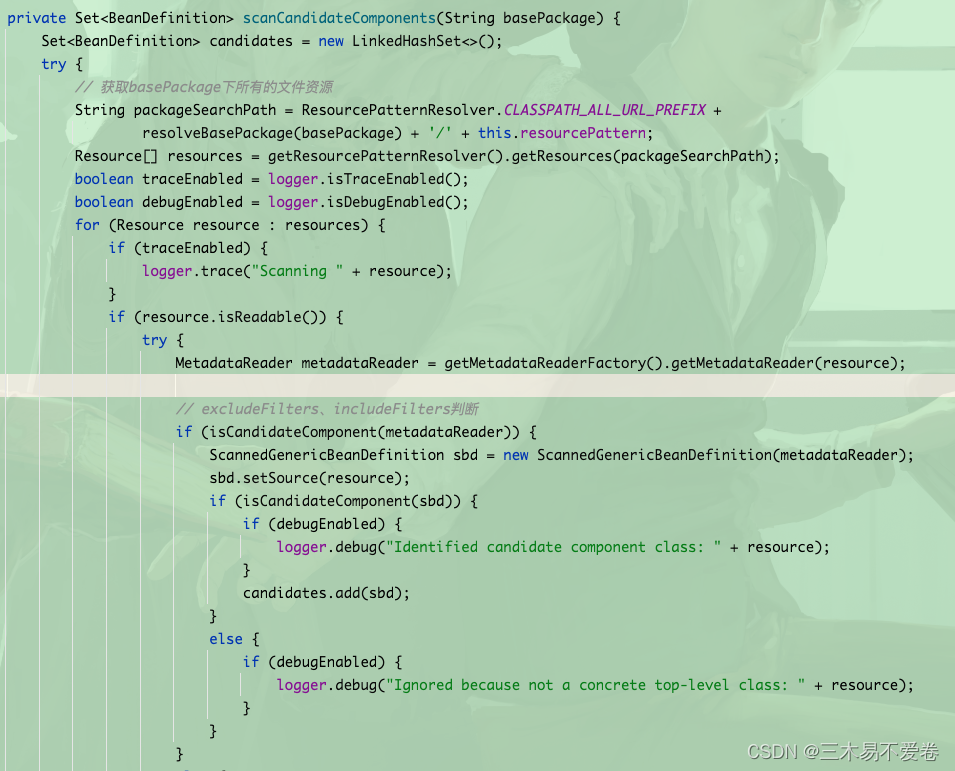
变量packageSearchPath拼接了扫描路径: classpath*:basePackage/**/*.class。即扫描包路径下所有.class文件。
MetadataReader metadataReader = getMetadataReaderFactory().getMetadataReader(resource);
使用ASM技术去读取,不用实际加载整个class对象到JVM。
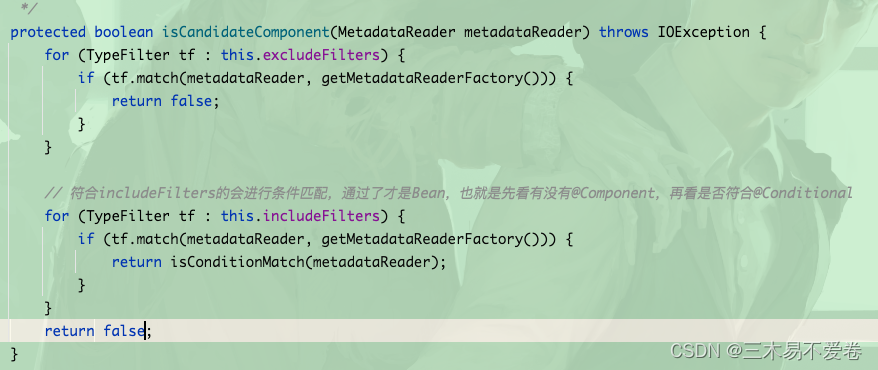
进入excludeFilters与includeFilters的判断,会调用match方法。这里includeFilters还要判断是否符合@Conditional。
接着根据metadataReader封装成为ScannedGenericBeanDefinition,
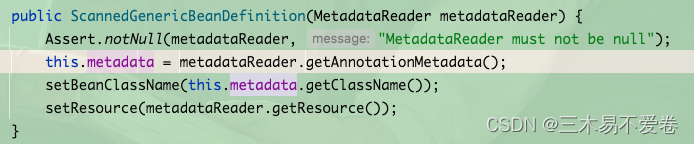
其中setBeanClassName方法设置BeanClass是一个String对象。

然后判断是否具备成为Bean的条件。

即:
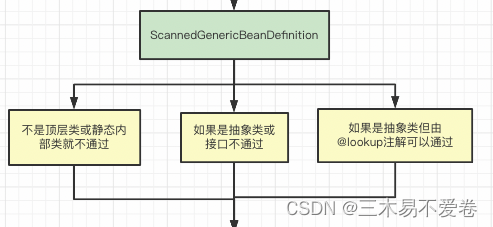
这里的@Lookup注解我们简单了解一下: 如果在抽象类的方法上面标了这个注解,那么的它返回值会从Spring中查找,而这个抽象类会被基础进行AOP,所以返回的对象是一个代理对象。具体的我们后面会讲,我们看一下简单的事例:
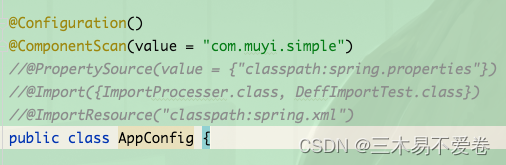
配置类并设置扫描路径如下:
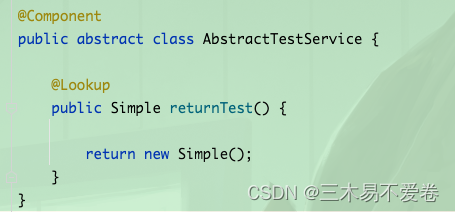
定义一个抽象类,使用@Lookup注解,并且Simple类是一个单例Bean
使用Spring,获取上面的抽象类并调用两次@Lookup注解的方法
结果如下:


- 我们可以看到如果获取这个抽象类返回的是一个代理方法,因为抽象类是没办法实例化的。
- 调用两次@Lookup的方法,返回的都是同一个对象,说明每次调用都会在Spring中获取(getBean)。
回到正题,如果通过后会把这个ScannedGenericBeanDefinition放到Set中并返回,说明这个扫描路径已经解析完成了。
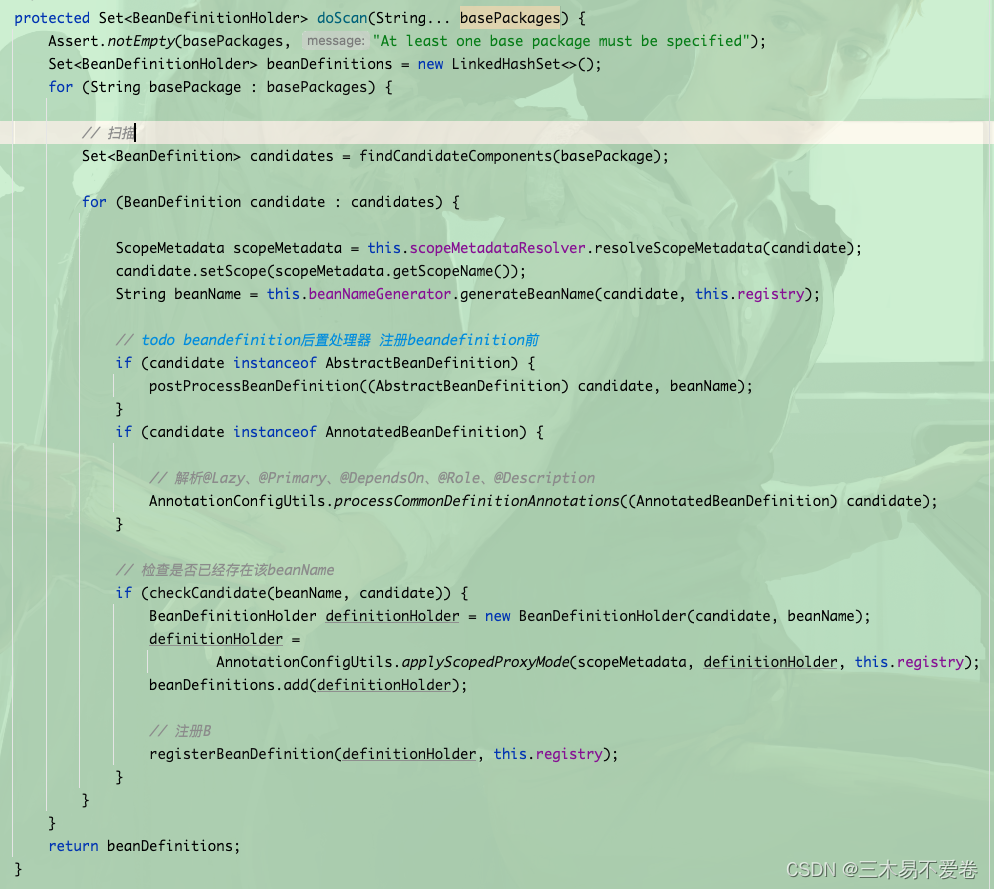
生成BeanDefinition
扫描完成后会回到doScan方法中。
这时对每一个BeanDefinition进行遍历,完善BeanDefinition与扩展后进行注册。我们详细看一下:
// 根据类元数据解析scope注解,确定范围(value)与proxyMode
ScopeMetadata scopeMetadata = this.scopeMetadataResolver.resolveScopeMetadata(candidate);
candidate.setScope(scopeMetadata.getScopeName());

// 如果有配置BeanName就返回,没有Spring就会生成
String beanName = this.beanNameGenerator.generateBeanName(candidate, this.registry);
这里如果需要Spring生成名字,那么Spring调用的是JDK的方法。Introspector.decapitalize(shortClassName)
// 给BeanDefinition没有的属性设置默认值,然后根据autowire-candidate确定当前Bean是否成为注入Bean
if (candidate instanceof AbstractBeanDefinition) {
	postProcessBeanDefinition((AbstractBeanDefinition) candidate, beanName);
}
注解中有一段"根据autowire-candidate确定当前Bean是否成为注入Bean",我来解释一下:
<bean id="A" class="com.muyi.A" autowire-candidate="false"/>
<bean id="B" class="com.muyi.B"/>
假如A与B继承了接口C,如果我要根据C类型去注入一个Bean,那么这个时候Spring会找到A和B这两个Bean,如果都没有特殊配制的情况下Spring是不知道要注入哪个Bean比较合适的,如果A如上面定义的一样,将autowire-candidate设置为false,那么Spring就会忽略掉A,直接注入B。
if (candidate instanceof AnnotatedBeanDefinition) {

	// 解析@Lazy、@Primary、@DependsOn、@Role、@Description
	AnnotationConfigUtils.processCommonDefinitionAnnotations((AnnotatedBeanDefinition) candidate);
}
就是直接根据源数据解析这些注解,并把结果设置到BeanDefinition。
if (checkCandidate(beanName, candidate)) {
	BeanDefinitionHolder definitionHolder = new BeanDefinitionHolder(candidate, beanName);
	definitionHolder =
			AnnotationConfigUtils.applyScopedProxyMode(scopeMetadata, definitionHolder, this.registry);
	beanDefinitions.add(definitionHolder);
	// 注册B
	registerBeanDefinition(definitionHolder, this.registry);
}
先看到checkCandidate方法,这里面会检测当前BeanDefinition是否已经存在Spring中,如果存在就比较两个BeanDefinition是不是相同的或者文件资源(Resource)是不是一样,是就能兼容,不在需要去注册BeanDefinition,直接用已存在的。如果有两个扫描路径相同就可能存在这种情况。
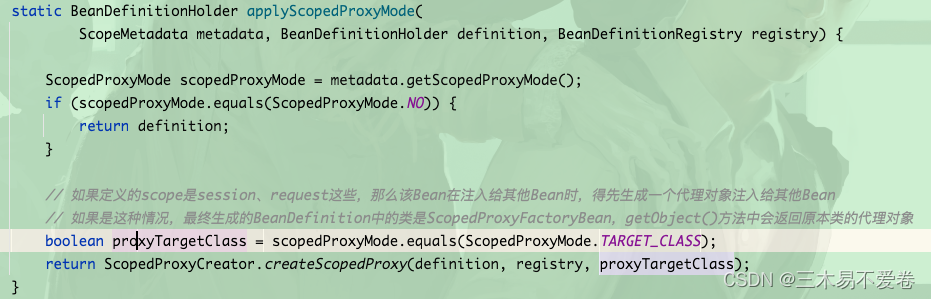
BeanDefinitionHolder definitionHolder = new BeanDefinitionHolder(candidate, beanName);
definitionHolder =
AnnotationConfigUtils.applyScopedProxyMode(scopeMetadata, definitionHolder, this.registry);
beanDefinitions.add(definitionHolder);
封装成为BeanDefinitionHolder后,根据scope的值决定返回的是原本的BeanDefinition或者代理的BeanDefinition,看一下实现:
registerBeanDefinition(definitionHolder, this.registry);
最后一句,注册BeanDefinition到Spring中。
@Override
public void registerBeanDefinition(String beanName, BeanDefinition beanDefinition)
		throws BeanDefinitionStoreException {

	Assert.hasText(beanName, "Bean name must not be empty");
	Assert.notNull(beanDefinition, "BeanDefinition must not be null");

	if (beanDefinition instanceof AbstractBeanDefinition) {
		try {

			 // 校检methodOverrides是否与工厂方法并存或者methodOverrides对应的方法根本不存在
			((AbstractBeanDefinition) beanDefinition).validate();
		} catch (BeanDefinitionValidationException ex) {
			throw new BeanDefinitionStoreException(beanDefinition.getResourceDescription(), beanName,
					"Validation of bean definition failed", ex);
		}
	}

	// 全局变量有并发问题,使用ConcurrentHashMap
	// 查看当前是否已经存在beanName相同的BeanDefinition
	BeanDefinition existingDefinition = this.beanDefinitionMap.get(beanName);
	if (existingDefinition != null) {

		// 如果不允许覆盖(严格模式)就会报错,默认允许
		if (!isAllowBeanDefinitionOverriding()) {
			throw new BeanDefinitionOverrideException(beanName, beanDefinition, existingDefinition);
		} else if (existingDefinition.getRole() < beanDefinition.getRole()) {
			// e.g. was ROLE_APPLICATION, now overriding with ROLE_SUPPORT or ROLE_INFRASTRUCTURE
			if (logger.isInfoEnabled()) {
				logger.info("Overriding user-defined bean definition for bean '" + beanName +
						"' with a framework-generated bean definition: replacing [" +
						existingDefinition + "] with [" + beanDefinition + "]");
			}
		} else if (!beanDefinition.equals(existingDefinition)) {
			if (logger.isDebugEnabled()) {
				logger.debug("Overriding bean definition for bean '" + beanName +
						"' with a different definition: replacing [" + existingDefinition +
						"] with [" + beanDefinition + "]");
			}
		} else {
			if (logger.isTraceEnabled()) {
				logger.trace("Overriding bean definition for bean '" + beanName +
						"' with an equivalent definition: replacing [" + existingDefinition +
						"] with [" + beanDefinition + "]");
			}
		}

		// 覆盖存在的BeanDefinition,之前通过checkCandidate(beanName, candidate)判断过是否兼容。
		this.beanDefinitionMap.put(beanName, beanDefinition);
	} else {

		// 是否有任何bean在此期间被标记为已创建
		if (hasBeanCreationStarted()) {
			synchronized (this.beanDefinitionMap) {
				this.beanDefinitionMap.put(beanName, beanDefinition);
				List<String> updatedDefinitions = new ArrayList<>(this.beanDefinitionNames.size() + 1);
				updatedDefinitions.addAll(this.beanDefinitionNames);
				updatedDefinitions.add(beanName);
				this.beanDefinitionNames = updatedDefinitions;
				removeManualSingletonName(beanName);
			}
		} else {

			// 若仍在启动注册阶段
			this.beanDefinitionMap.put(beanName, beanDefinition);
			this.beanDefinitionNames.add(beanName);
			removeManualSingletonName(beanName);
		}
		this.frozenBeanDefinitionNames = null;
	}

	// 重新生成beanDefinition
	if (existingDefinition != null || containsSingleton(beanName)) {
		resetBeanDefinition(beanName);
	}
}
这里大家根据注释简单过一下就可以,我们后续会详细讲的。
合并BeanDefinition
根据前言提供的流程图我们可以看到在单例bean创建前会先合并BeanDefinition。
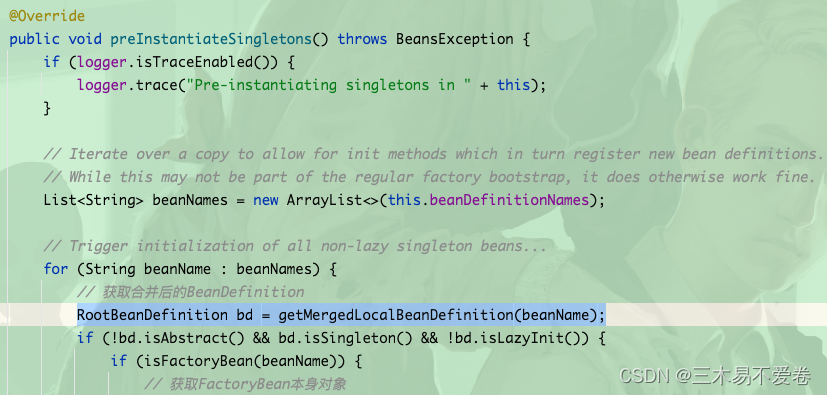
遍历所有注册的BeanName,接下来就是RootBeanDefinition bd = getMergedLocalBeanDefinition(beanName);获取合并的BeanDefinition。进入看一下:
protected RootBeanDefinition getMergedBeanDefinition(
		String beanName, BeanDefinition bd, @Nullable BeanDefinition containingBd)
		throws BeanDefinitionStoreException {

	synchronized (this.mergedBeanDefinitions) {
		RootBeanDefinition mbd = null;
		RootBeanDefinition previous = null;

		// Check with full lock now in order to enforce the same merged instance.
		if (containingBd == null) {
			mbd = this.mergedBeanDefinitions.get(beanName);
		}

		// stale为true表示需要重新生成合并BeanDefinition
		if (mbd == null || mbd.stale) {
			previous = mbd;
			if (bd.getParentName() == null) {

				// Use copy of given root bean definition.
				if (bd instanceof RootBeanDefinition) {
					mbd = ((RootBeanDefinition) bd).cloneBeanDefinition();
				}
				else {
					mbd = new RootBeanDefinition(bd);
				}
			}
			else {
				// Child bean definition: needs to be merged with parent.
				BeanDefinition pbd;
				try {

					// 可能有别名,拿到原始名称
					String parentBeanName = transformedBeanName(bd.getParentName());

					// 判断当前名称与父名称是否相同(指的是BeanDefinition)
					// 先从子容器(当前容器拿),如果没有就看有没有父容器,如果有就尝试从父容器拿。
					if (!beanName.equals(parentBeanName)) {

						pbd = getMergedBeanDefinition(parentBeanName);
					}
					else {
						BeanFactory parent = getParentBeanFactory();
						if (parent instanceof ConfigurableBeanFactory) {
							pbd = ((ConfigurableBeanFactory) parent).getMergedBeanDefinition(parentBeanName);
						}
						else {
							throw new NoSuchBeanDefinitionException(parentBeanName,
									"Parent name '" + parentBeanName + "' is equal to bean name '" + beanName +
											"': cannot be resolved without a ConfigurableBeanFactory parent");
						}
					}
				}
				catch (NoSuchBeanDefinitionException ex) {
					throw new BeanDefinitionStoreException(bd.getResourceDescription(), beanName,
							"Could not resolve parent bean definition '" + bd.getParentName() + "'", ex);
				}
				// Deep copy with overridden values.
				mbd = new RootBeanDefinition(pbd);

				// 在父的基础上,将子的属性覆盖掉父的属性
				// 意思就是综合父子的属性,但以子优先,类似与继承的关系。
				mbd.overrideFrom(bd);
			}

			// Set default singleton scope, if not configured before.
			if (!StringUtils.hasLength(mbd.getScope())) {
				mbd.setScope(SCOPE_SINGLETON);
			}

			// A bean contained in a non-singleton bean cannot be a singleton itself.
			// Let's correct this on the fly here, since this might be the result of
			// parent-child merging for the outer bean, in which case the original inner bean
			// definition will not have inherited the merged outer bean's singleton status.
			if (containingBd != null && !containingBd.isSingleton() && mbd.isSingleton()) {
				mbd.setScope(containingBd.getScope());
			}

			// Cache the merged bean definition for the time being
			// (it might still get re-merged later on in order to pick up metadata changes)
			if (containingBd == null && isCacheBeanMetadata()) {
				this.mergedBeanDefinitions.put(beanName, mbd);
			}
		}

		// 说明在合并这个BeanDefinition之前Spring已经存在了。
		if (previous != null) {

			// 拷贝之前的一些属性到现在的BeanDefinition
			copyRelevantMergedBeanDefinitionCaches(previous, mbd);
		}
		return mbd;
	}
}
根据注释去查看这个源码会十分清晰它做了哪些事情,这里存在两种情况:
- 在合并这个BeanDefinition的时候,Spring里面已经合并过了(存在缓存)
- 在合并这个BeanDefinition的时候,Spring里面没有缓存
之后就围绕着这两种情况来展开,可能大家看完这个合并可能会有点疑惑,什么情况下需要去合并呢?父BeanDefinition是什么?因为这种方式在我们开发的时候不常用所以不明白很正常。需要回到spring.xml文件中配置,注册以下两个Bean。

这时候生成bService的时候,假如没有配置lazy的属性,但是cService有配置为true,那么合并后bService会继承cService的lazy属性,导致bService的lazy属性变成了true。
确保类加载
在创建Bean的时候会先确保BeanClass被加载,也就是BeanClass不是String类型。
Class<?> resolvedClass = resolveBeanClass(mbd, beanName);进入这个方法:

被加载就直接返回,否则解析加载:
private Class<?> doResolveBeanClass(RootBeanDefinition mbd, Class<?>... typesToMatch)
			throws ClassNotFoundException {

	// 获取类加载器 ClassUtils.getDefaultClassLoader()
	ClassLoader beanClassLoader = getBeanClassLoader();
	ClassLoader dynamicLoader = beanClassLoader;
	boolean freshResolve = false;


	// 如果传入了typesToMatch,且该工厂有临时类加载器【变量 tempClassLoader】:
	// 改变dynamicLoader引用为tempClassLoader
	// 标记mdb的配置的bean类名需要重新被dynameicLoader加载
	// 如果tempClassLoader属于DecoratingClassLoader实例,会对tempClassLoader进行强转为DecoratingClassLoader 【变量 dcl】,然后对typeToMatch在dcl中的排除,使其交由其父classLoader【默认情况下父classLoader是线程上下文类加载器】 进行常规方式处理

	if (!ObjectUtils.isEmpty(typesToMatch)) {
		// When just doing type checks (i.e. not creating an actual instance yet),
		// use the specified temporary class loader (e.g. in a weaving scenario).
		ClassLoader tempClassLoader = getTempClassLoader();
		if (tempClassLoader != null) {
			dynamicLoader = tempClassLoader;
			freshResolve = true;
			if (tempClassLoader instanceof DecoratingClassLoader) {
				DecoratingClassLoader dcl = (DecoratingClassLoader) tempClassLoader;
				for (Class<?> typeToMatch : typesToMatch) {
					dcl.excludeClass(typeToMatch.getName());
				}
			}
		}
	}


	String className = mbd.getBeanClassName();
	if (className != null) {

		// 解析Spring表达式,有可能直接返回了一个Class对象
		Object evaluated = evaluateBeanDefinitionString(className, mbd);
		if (!className.equals(evaluated)) {

			// 是表达式解析,已经解析了。


			// 解析出了class
			// A dynamically resolved expression, supported as of 4.2...
			if (evaluated instanceof Class) {
				return (Class<?>) evaluated;
			}

			// 解析出了String
			else if (evaluated instanceof String) {
				className = (String) evaluated;
				freshResolve = true;
			}
			else {
				throw new IllegalStateException("Invalid class name expression result: " + evaluated);
			}
		}
		if (freshResolve) {
			// When resolving against a temporary class loader, exit early in order
			// to avoid storing the resolved Class in the bean definition.
			if (dynamicLoader != null) {
				try {
					return dynamicLoader.loadClass(className);
				}
				catch (ClassNotFoundException ex) {
					if (logger.isTraceEnabled()) {
						logger.trace("Could not load class [" + className + "] from " + dynamicLoader + ": " + ex);
					}
				}
			}
			return ClassUtils.forName(className, dynamicLoader);
		}
	}

	// Resolve regularly, caching the result in the BeanDefinition...
	return mbd.resolveBeanClass(beanClassLoader);
}
这里大家简单理解就是解析BeanClass,如果是Object就返回,如果是String按表达式(xml中bean定义设置class为表达式)处理,解析的结果是object返回,是String通过类加载器加载就可以了。
唯一需要注意的是ClassUtils.getDefaultClassLoader()这个方法返回的类加载器: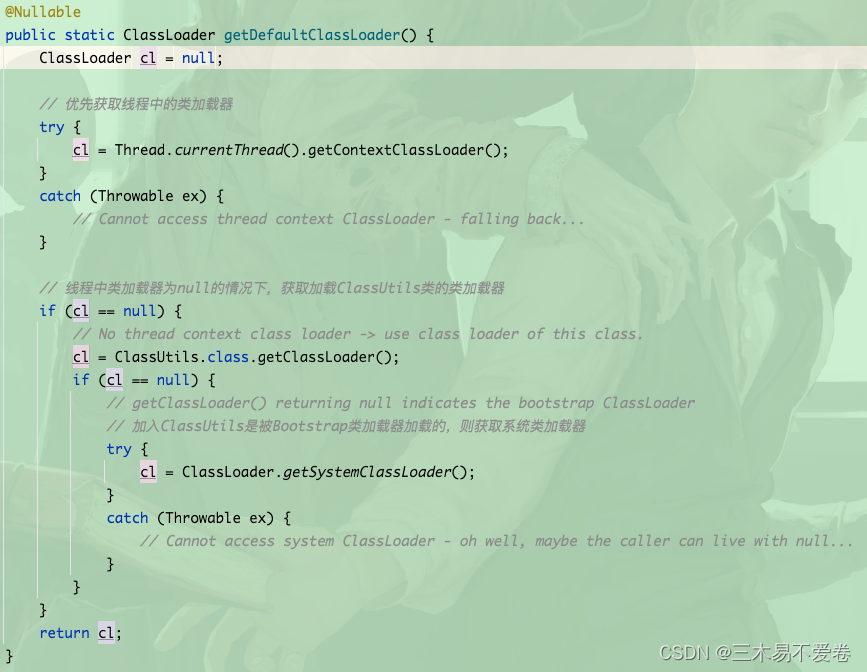
实例化前
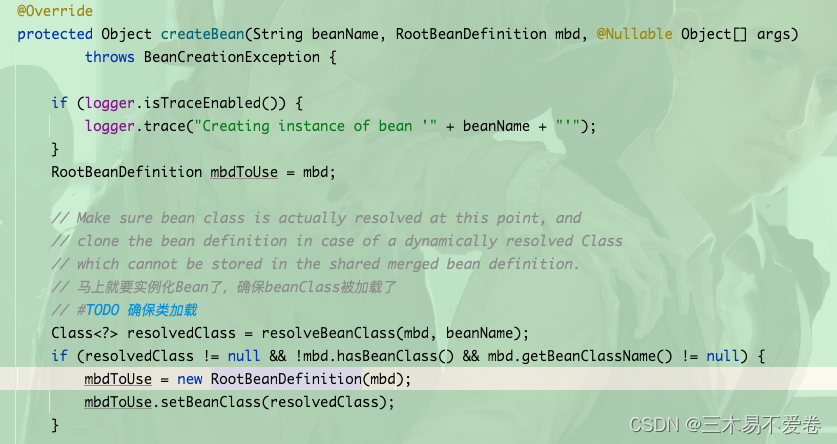
确保类加载后再次回到createBean方法。
		// 确保类加载
		Class<?> resolvedClass = resolveBeanClass(mbd, beanName);
		if (resolvedClass != null && !mbd.hasBeanClass() && mbd.getBeanClassName() != null) {

			// 后续用该副本操作,不希望将解析的class绑定到缓存里的BeanDefinition
			// 因为class有可能是每次都需要动态解析出来的(表达式)
			mbdToUse = new RootBeanDefinition(mbd);

			// 重要是这里设置了class
			mbdToUse.setBeanClass(resolvedClass);
		}

		// Prepare method overrides.
		try {
			mbdToUse.prepareMethodOverrides();  //lookup-method
		}
		catch (BeanDefinitionValidationException ex) {
			throw new BeanDefinitionStoreException(mbdToUse.getResourceDescription(),
					beanName, "Validation of method overrides failed", ex);
		}

		try {
			// Give BeanPostProcessors a chance to return a proxy instead of the target bean instance.
			// 实例化前
			// #TODO 实例化前回调
			Object bean = resolveBeforeInstantiation(beanName, mbdToUse);
			if (bean != null) {
				return bean;
			}
		}
		catch (Throwable ex) {
			throw new BeanCreationException(mbdToUse.getResourceDescription(), beanName,
					"BeanPostProcessor before instantiation of bean failed", ex);
		}

		..........................
mbdToUse.prepareMethodOverrides(); 获取@Lookup注解标注的方法个数,没有会报错。然后就来到了实例化前的回调:
protected Object resolveBeforeInstantiation(String beanName, RootBeanDefinition mbd) {
	Object bean = null;

	if (!Boolean.FALSE.equals(mbd.beforeInstantiationResolved)) {

		// Make sure bean class is actually resolved at this point.
		// isSynthetic()不是合成类为false
		// 是否存在InstantiationAwareBeanPostProcessor
		if (!mbd.isSynthetic() && hasInstantiationAwareBeanPostProcessors()) {

			// 获取这个BeanDefinition需要生成的类型
			Class<?> targetType = determineTargetType(beanName, mbd);
			if (targetType != null) {

				// 后置处理
				bean = applyBeanPostProcessorsBeforeInstantiation(targetType, beanName);

				// 通过后置处理器有生成类就直接执行实例化后
				if (bean != null) {
					bean = applyBeanPostProcessorsAfterInitialization(bean, beanName);
				}
			}
		}

		// todo 经过实例化前回调判断是否有提前生成类 - beforeInstantiationResolved
		mbd.beforeInstantiationResolved = (bean != null);
	}
	return bean;
}
有注释的情况下直接看这段代码应该不是很难,无非就是看是否存在特定的后置处理器,如果有就遍历执行,如果生成了对象就执行实例化后的后置处理器直接返回。但是这里有一些细节我们需要进入方法中说明:
// 拿到缓存查看是否为空
protected boolean hasInstantiationAwareBeanPostProcessors() {
return !getBeanPostProcessorCache().instantiationAware.isEmpty();
}
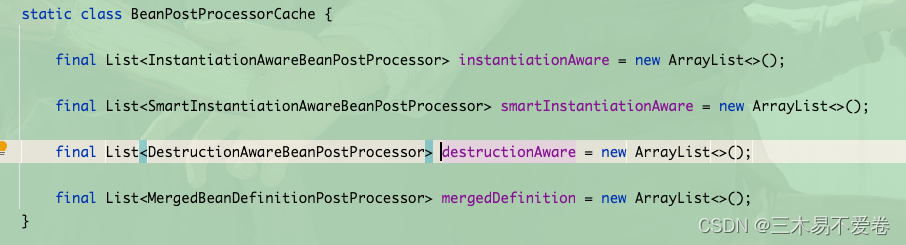
BeanPostProcessorCache getBeanPostProcessorCache() {
// 拿到所有的BeanDefinition的缓存
BeanPostProcessorCache bpCache = this.beanPostProcessorCache;
if (bpCache == null) {
bpCache = new BeanPostProcessorCache();
// 根据不同类型进行分类缓存
for (BeanPostProcessor bp : this.beanPostProcessors) {
if (bp instanceof InstantiationAwareBeanPostProcessor) {
bpCache.instantiationAware.add((InstantiationAwareBeanPostProcessor) bp);
if (bp instanceof SmartInstantiationAwareBeanPostProcessor) {
bpCache.smartInstantiationAware.add((SmartInstantiationAwareBeanPostProcessor) bp);
}
}
if (bp instanceof DestructionAwareBeanPostProcessor) {
bpCache.destructionAware.add((DestructionAwareBeanPostProcessor) bp);
}
if (bp instanceof MergedBeanDefinitionPostProcessor) {
bpCache.mergedDefinition.add((MergedBeanDefinitionPostProcessor) bp);
}
}
this.beanPostProcessorCache = bpCache;
}
return bpCache;
}
在我们判断是否存在InstantiationAwareBeanPostProcessor的时候会对所有后置处理器分类并存储到各自的缓存中。
确定目标类型:
protected Class<?> determineTargetType(String beanName, RootBeanDefinition mbd, Class<?>... typesToMatch) {
	// 判断BeanDefinition所代表的类型
	// 如果BeanDefinition设置了factoryMethod,那么就是该方法的返回类型,否则就是beanClass属性所表示的类型

	Class<?> targetType = mbd.getTargetType();
	if (targetType == null) {
		targetType = (mbd.getFactoryMethodName() != null ?
				getTypeForFactoryMethod(beanName, mbd, typesToMatch) :
				resolveBeanClass(mbd, beanName, typesToMatch));
		if (ObjectUtils.isEmpty(typesToMatch) || getTempClassLoader() == null) {
			mbd.resolvedTargetType = targetType;
		}
	}
	return targetType;
}
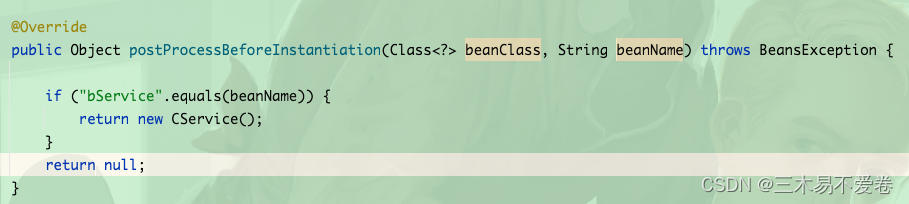
后置处理:
protected Object applyBeanPostProcessorsBeforeInstantiation(Class<?> beanClass, String beanName) {

	// 遍历执行后置处理器
	for (InstantiationAwareBeanPostProcessor bp : getBeanPostProcessorCache().instantiationAware) {

		// 如果有一个后置处理器返回了一个对象,就会直接返回这个对象,不在执行后续处理器。
		Object result = bp.postProcessBeforeInstantiation(beanClass, beanName);
		if (result != null) {
			return result;
		}
	}
	return null;
}
除了判断如果返回一个对象就不再执行后续处理器这个细节外,我们还可以发现,之前确定目标类型但是这里返回的是一个Object的对象,说明我们经过初始化前这个后置处理器是可以返回任何对象的,我们实现这个处理器可以返回与目标类型不同。
实例化
开始根据BeanDefinition去创建Bean。
。。。。。。。。。。。

try {

	// 创建Bean
	Object beanInstance = doCreateBean(beanName, mbdToUse, args);
	if (logger.isTraceEnabled()) {
		logger.trace("Finished creating instance of bean '" + beanName + "'");
	}
	return beanInstance;
}
catch (BeanCreationException | ImplicitlyAppearedSingletonException ex) {
	// A previously detected exception with proper bean creation context already,
	// or illegal singleton state to be communicated up to DefaultSingletonBeanRegistry.
	throw ex;
}
catch (Throwable ex) {
	throw new BeanCreationException(
			mbdToUse.getResourceDescription(), beanName, "Unexpected exception during bean creation", ex);
}
我们直接进入doCreateBean方法:
protected Object doCreateBean(String beanName,
RootBeanDefinition mbd, @Nullable Object[] args)
			throws BeanCreationException {

		// Instantiate the bean.
		BeanWrapper instanceWrapper = null;

		// 单例Bean
		if (mbd.isSingleton()) {

			// 有可能在本Bean创建之前,就有其他Bean把当前Bean给创建出来了(比如依赖注入过程中)
			instanceWrapper = this.factoryBeanInstanceCache.remove(beanName);
		}

		// 如果还没有创建过就去实例化
		if (instanceWrapper == null) {
			// 实例化 创建Bean实例
			instanceWrapper = createBeanInstance(beanName, mbd, args);
		}

		。。。。。。。。。
在进入createBeanInstance(beanName, mbd, args)方法前我们先来说一下实例化的几种其他方法:
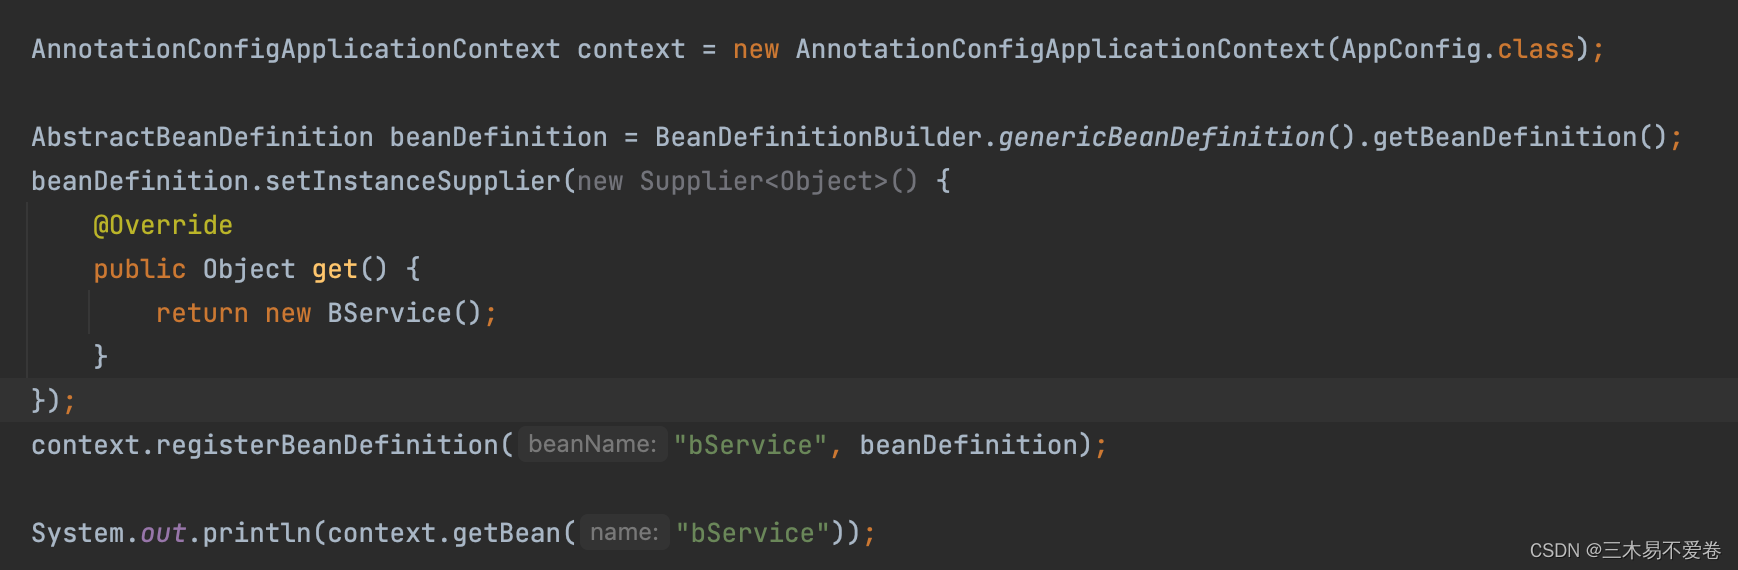
- Supplier
在使用编程式定义BeanDefinition的时候可以自己定义,例如:
2. factoryMethod:在xml文件配置bean定义的时候配置构建Bean的方法,其中可以分两种。
2.1 静态方法:
public class DService {

	public static DService factoryMethod() {

		return new DService();
	}
}
然后在xml中配置:
<bean class="com.muyi.service.DService" name="dService" factory-method="factoryMethod"/>
2.2 普通方法
public class EService {

	public DService createDService() {

		return new DService();
	}
}
在xml中配置:
<bean name="eService" class="com.muyi.service.EService"/>
<bean  name="dService" factory-bean="eService" factory-method="createDService"/>
大家理解以上几种其他创建的方式后我们进入源码:
protected BeanWrapper createBeanInstance(String beanName, RootBeanDefinition mbd, @Nullable Object[] args) {

		// 最后一次确保类加载。
		// Make sure bean class is actually resolved at this point.
		Class<?> beanClass = resolveBeanClass(mbd, beanName);

		// 类必须不为空,且为public
		if (beanClass != null && !Modifier.isPublic(beanClass.getModifiers()) && !mbd.isNonPublicAccessAllowed()) {
			throw new BeanCreationException(mbd.getResourceDescription(), beanName,
					"Bean class isn't public, and non-public access not allowed: " + beanClass.getName());
		}

		// BeanDefinition中添加了Supplier,则调用Supplier来得到对象
		Supplier<?> instanceSupplier = mbd.getInstanceSupplier();
		if (instanceSupplier != null) {
			return obtainFromSupplier(instanceSupplier, beanName);
		}

		// @Bean对应的BeanDefinition
		if (mbd.getFactoryMethodName() != null) {
			return instantiateUsingFactoryMethod(beanName, mbd, args);
		}

		// Shortcut when re-creating the same bean...
		// 一个原型BeanDefinition,会多次来创建Bean,
		// 那么就可以把该BeanDefinition所要使用的构造方法缓存起来,避免每次都进行构造方法推断
		boolean resolved = false;
		boolean autowireNecessary = false;
		if (args == null) {
			synchronized (mbd.constructorArgumentLock) {
				if (mbd.resolvedConstructorOrFactoryMethod != null) {
					resolved = true;
					autowireNecessary = mbd.constructorArgumentsResolved;
				}
			}
		}
		if (resolved) {
			// 如果确定了当前BeanDefinition的构造方法,那么看是否需要进行对构造方法进行参数的依赖注入(构造方法注入)
			if (autowireNecessary) {
				return autowireConstructor(beanName, mbd, null, null);
			}
			else {
				// 如果不需要注入,则表示用的是默认无参构造方法,直接进行实例化
				return instantiateBean(beanName, mbd);
			}
		}

		// todo SmartInstantiationAwareBeanPostProcessor Candidate constructors for autowiring?
		// 提供一个扩展点,可以利用SmartInstantiationAwareBeanPostProcessor来控制用beanClass中的哪个构造方法
		Constructor<?>[] ctors = determineConstructorsFromBeanPostProcessors(beanClass, beanName);

		// 如果ctors有值则需要进行构造方法注入,或者autowiredMode是AUTOWIRE_CONSTRUCTOR
		// 或者BeanDefinition中添加了构造方法的参数和值,或者调用getBean()方法时传入了args
		if (ctors != null || mbd.getResolvedAutowireMode() == AUTOWIRE_CONSTRUCTOR ||
				mbd.hasConstructorArgumentValues() || !ObjectUtils.isEmpty(args)) {
			return autowireConstructor(beanName, mbd, ctors, args);
		}

		// Preferred constructors for default construction?
		ctors = mbd.getPreferredConstructors();
		if (ctors != null) {
			return autowireConstructor(beanName, mbd, ctors, null);
		}

		// No special handling: simply use no-arg constructor.
		// 如果没有@Autowired注解的构造方法,当前BeanDefinition的autowiremode也不是AUTOWIRE_CONSTRUCTOR,也没有指明所要用的构造方法参数值
		// 则直接使用无参构造方法
		return instantiateBean(beanName, mbd);
	}
注意:
- 我们说的
factory-bean方式就是在注释@Bean对应的BeanDefinition这一段,这里注释写着是@Bean的,可以理解为是一个特殊的factory-bean方式,它的factory-bean就是配置类,而factory-method就是标着@Bean的方法。 determineConstructorsFromBeanPostProcessors(beanClass, beanName);是一个扩展点,可以通过后置处理器的方式人工干涉选择构造方法,需要实现SmartInstantiationAwareBeanPostProcessor
这里一段代码包含了推断构造方法这个重要的步骤,后续会详细开一章进行讲解。
BeanDefinition的后置处理器
实力化后回到方法doCreateBean
。。。。。

// #todo 后置处理合并后的BeanDefinition
// Allow post-processors to modify the merged bean definition.
synchronized (mbd.postProcessingLock) {
	if (!mbd.postProcessed) {
		try {
			applyMergedBeanDefinitionPostProcessors(mbd, beanType, beanName);
		}
		catch (Throwable ex) {
			throw new BeanCreationException(mbd.getResourceDescription(), beanName,
					"Post-processing of merged bean definition failed", ex);
		}
		mbd.postProcessed = true;
	}
}

。。。。。
applyMergedBeanDefinitionPostProcessors会调用实现了MergedBeanDefinitionPostProcessor的postProcessMergedBeanDefinition方法,我们这里就不写例子了,直接来看Spring的实现AutowiredAnnotationBeanPostProcessor。
public void postProcessMergedBeanDefinition(RootBeanDefinition beanDefinition, Class<?> beanType, String beanName) {
	InjectionMetadata metadata = findAutowiringMetadata(beanName, beanType, null);
	metadata.checkConfigMembers(beanDefinition);
}
通过findAutowiringMetadata名字就能猜到这里寻找了需要注入的元数据,注入我们常用的定义是@Value和@Autowired,一般就标注在字段或方法上面,所以这里可能就是寻找这些描述信息,但是没有进行注入。
private InjectionMetadata findAutowiringMetadata(String beanName, Class<?> clazz, @Nullable PropertyValues pvs) {
	// Fall back to class name as cache key, for backwards compatibility with custom callers.
	String cacheKey = (StringUtils.hasLength(beanName) ? beanName : clazz.getName());

	// Quick check on the concurrent map first, with minimal locking.
	// 看缓存里面有没有
	InjectionMetadata metadata = this.injectionMetadataCache.get(cacheKey);
	if (InjectionMetadata.needsRefresh(metadata, clazz)) {
		synchronized (this.injectionMetadataCache) {
			metadata = this.injectionMetadataCache.get(cacheKey);
			if (InjectionMetadata.needsRefresh(metadata, clazz)) {
				if (metadata != null) {
					metadata.clear(pvs);
				}

				// 解析注入点并缓存
				metadata = buildAutowiringMetadata(clazz);
				// 放入缓存中
				this.injectionMetadataCache.put(cacheKey, metadata);
			}
		}
	}
	return metadata;
}
我们这里简单看一下就可以了,后续会有文章进行详细讲解,这里就是看是否有注入的缓存,没有找注入点再放进去,我们原型Bean后续每次都会创建Bean。我们最后看一下它的构造方法。
public AutowiredAnnotationBeanPostProcessor() {
	this.autowiredAnnotationTypes.add(Autowired.class);
	this.autowiredAnnotationTypes.add(Value.class);
	try {
		this.autowiredAnnotationTypes.add((Class<? extends Annotation>)
				ClassUtils.forName("javax.inject.Inject", AutowiredAnnotationBeanPostProcessor.class.getClassLoader()));
		logger.trace("JSR-330 'javax.inject.Inject' annotation found and supported for autowiring");
	}
	catch (ClassNotFoundException ex) {
		// JSR-330 API not available - simply skip.
	}
}
可以看到注入类型有@Autowired,@Value,@Inject这些。
实例化后
完成后置处理回到doCreateBean,然后进行循环依赖步骤后进入属性注入populateBean(beanName, mbd, instanceWrapper);方法中。
。。。。。

if (!mbd.isSynthetic() && hasInstantiationAwareBeanPostProcessors()) {
	for (InstantiationAwareBeanPostProcessor bp : getBeanPostProcessorCache().instantiationAware) {
		if (!bp.postProcessAfterInstantiation(bw.getWrappedInstance(), beanName)) {
			return;
		}
	}
}

。。。。
此处已经进入了属性注入命名的方法中了,但是还没有进行属性注入的操作,所以这里是实例化后属性注入之前。
属性注入
。。。。。

// todo 属性注入
PropertyValues pvs = (mbd.hasPropertyValues() ? mbd.getPropertyValues() : null);

int resolvedAutowireMode = mbd.getResolvedAutowireMode();
if (resolvedAutowireMode == AUTOWIRE_BY_NAME || resolvedAutowireMode == AUTOWIRE_BY_TYPE) {
	// MutablePropertyValues是PropertyValues具体的实现类
	MutablePropertyValues newPvs = new MutablePropertyValues(pvs);
	// Add property values based on autowire by name if applicable.
	if (resolvedAutowireMode == AUTOWIRE_BY_NAME) {
		autowireByName(beanName, mbd, bw, newPvs);
	}
	// Add property values based on autowire by type if applicable.
	if (resolvedAutowireMode == AUTOWIRE_BY_TYPE) {
		autowireByType(beanName, mbd, bw, newPvs);
	}
	pvs = newPvs;
}

boolean hasInstAwareBpps = hasInstantiationAwareBeanPostProcessors();
boolean needsDepCheck = (mbd.getDependencyCheck() != AbstractBeanDefinition.DEPENDENCY_CHECK_NONE);

PropertyDescriptor[] filteredPds = null;
if (hasInstAwareBpps) {
	if (pvs == null) {
		pvs = mbd.getPropertyValues();
	}
	for (InstantiationAwareBeanPostProcessor bp : getBeanPostProcessorCache().instantiationAware) {
		// 这里会调用AutowiredAnnotationBeanPostProcessor的postProcessProperties()方法,会直接给对象中的属性赋值
		// AutowiredAnnotationBeanPostProcessor内部并不会处理pvs,直接返回了
		PropertyValues pvsToUse = bp.postProcessProperties(pvs, bw.getWrappedInstance(), beanName);
		if (pvsToUse == null) {
			if (filteredPds == null) {
				filteredPds = filterPropertyDescriptorsForDependencyCheck(bw, mbd.allowCaching);
			}
			pvsToUse = bp.postProcessPropertyValues(pvs, filteredPds, bw.getWrappedInstance(), beanName);
			if (pvsToUse == null) {
				return;
			}
		}
		pvs = pvsToUse;
	}
}
if (needsDepCheck) {
	if (filteredPds == null) {
		filteredPds = filterPropertyDescriptorsForDependencyCheck(bw, mbd.allowCaching);
	}
	checkDependencies(beanName, mbd, filteredPds, pvs);
}

// 如果当前Bean中的BeanDefinition中设置了PropertyValues,那么最终将是PropertyValues中的值,覆盖@Autowired
if (pvs != null) {
	applyPropertyValues(beanName, mbd, bw, pvs);
}

。。。。。
紧接着我们会进行属性注入,我们把它分为注入和后置,注入指的是Spring自动注入set这些方法,后置就是调用后置处理器对前面查找到的注解(@Autowired等)字段或方法进行注入。后续会有文章详细讲解,我们这里简单看一下AutowiredAnnotationBeanPostProcessor的postProcessProperties。
public PropertyValues postProcessProperties(PropertyValues pvs, Object bean, String beanName) {

	// 找注入点(所有被@Autowired注解了的Field或Method)
	InjectionMetadata metadata = findAutowiringMetadata(beanName, bean.getClass(), pvs);
	try {
		metadata.inject(bean, beanName, pvs);
	}
	catch (BeanCreationException ex) {
		throw ex;
	}
	catch (Throwable ex) {
		throw new BeanCreationException(beanName, "Injection of autowired dependencies failed", ex);
	}
	return pvs;
}
找到之前解析出来的元数据进行注入。
Aware回调
在initializeBean方法一开始会先进行Aware回调。
private void invokeAwareMethods(String beanName, Object bean) {
	if (bean instanceof Aware) {
		if (bean instanceof BeanNameAware) {
			((BeanNameAware) bean).setBeanName(beanName);
		}
		if (bean instanceof BeanClassLoaderAware) {
			ClassLoader bcl = getBeanClassLoader();
			if (bcl != null) {
				((BeanClassLoaderAware) bean).setBeanClassLoader(bcl);
			}
		}
		if (bean instanceof BeanFactoryAware) {
			((BeanFactoryAware) bean).setBeanFactory(AbstractAutowireCapableBeanFactory.this);
		}
	}
}
- BeanNameAware
- BeanClassLoaderAware
- BeanFactoryAware
初始化前
还是在initializeBean方法中,完成Aware回调后再次回调初始化前的方法。
。。。。。

if (mbd == null || !mbd.isSynthetic()) {
	wrappedBean = applyBeanPostProcessorsBeforeInitialization(wrappedBean, beanName);
}

。。。。。
这里Spring同样有自己的实现,我们来看一下。
ApplicationContextAwareProcessor:
public Object postProcessBeforeInitialization(Object bean, String beanName) throws BeansException {
	if (!(bean instanceof EnvironmentAware || bean instanceof EmbeddedValueResolverAware ||
			bean instanceof ResourceLoaderAware || bean instanceof ApplicationEventPublisherAware ||
			bean instanceof MessageSourceAware || bean instanceof ApplicationContextAware ||
			bean instanceof ApplicationStartupAware)) {
		return bean;
	}

	AccessControlContext acc = null;

	if (System.getSecurityManager() != null) {
		acc = this.applicationContext.getBeanFactory().getAccessControlContext();
	}

	if (acc != null) {
		AccessController.doPrivileged((PrivilegedAction<Object>) () -> {
			invokeAwareInterfaces(bean);
			return null;
		}, acc);
	}
	else {
		// 执行aware方法
		invokeAwareInterfaces(bean);
	}

	return bean;
}

private void invokeAwareInterfaces(Object bean) {
	if (bean instanceof EnvironmentAware) {
		((EnvironmentAware) bean).setEnvironment(this.applicationContext.getEnvironment());
	}
	if (bean instanceof EmbeddedValueResolverAware) {
		((EmbeddedValueResolverAware) bean).setEmbeddedValueResolver(this.embeddedValueResolver);
	}
	if (bean instanceof ResourceLoaderAware) {
		((ResourceLoaderAware) bean).setResourceLoader(this.applicationContext);
	}
	if (bean instanceof ApplicationEventPublisherAware) {
		((ApplicationEventPublisherAware) bean).setApplicationEventPublisher(this.applicationContext);
	}
	if (bean instanceof MessageSourceAware) {
		((MessageSourceAware) bean).setMessageSource(this.applicationContext);
	}
	if (bean instanceof ApplicationStartupAware) {
		((ApplicationStartupAware) bean).setApplicationStartup(this.applicationContext.getApplicationStartup());
	}
	if (bean instanceof ApplicationContextAware) {
		((ApplicationContextAware) bean).setApplicationContext(this.applicationContext);
	}
}
对EnvironmentAware、EmbeddedValueResolverAware、ResourceLoaderAware等Aware进行回调。
InitDestroyAnnotationBeanPostProcessor:
public Object postProcessBeforeInitialization(Object bean, String beanName) throws BeansException {
	LifecycleMetadata metadata = findLifecycleMetadata(bean.getClass());
	try {
		metadata.invokeInitMethods(bean, beanName);
	}
	catch (InvocationTargetException ex) {
		throw new BeanCreationException(beanName, "Invocation of init method failed", ex.getTargetException());
	}
	catch (Throwable ex) {
		throw new BeanCreationException(beanName, "Failed to invoke init method", ex);
	}
	return bean;
}
首先看到是拿到了生命周期的某些元数据,然后进行了invoke调用。可以大概猜到是依照某些规则拿到方法然后进行的调用。我们进入查找元数据方法看一下。
private LifecycleMetadata findLifecycleMetadata(Class<?> clazz) {
	if (this.lifecycleMetadataCache == null) {
		// Happens after deserialization, during destruction...
		return buildLifecycleMetadata(clazz);
	}
	// Quick check on the concurrent map first, with minimal locking.
	LifecycleMetadata metadata = this.lifecycleMetadataCache.get(clazz);
	if (metadata == null) {
		synchronized (this.lifecycleMetadataCache) {
			metadata = this.lifecycleMetadataCache.get(clazz);
			if (metadata == null) {
				metadata = buildLifecycleMetadata(clazz);
				this.lifecycleMetadataCache.put(clazz, metadata);
			}
			return metadata;
		}
	}
	return metadata;
}
发现与查找注解注入的方法差不多,然后进入buildLifecycleMetadata方法发现根据this.initAnnotationType, this.destroyAnnotationType这两个东西进行查找的,然后进行简单跟踪一下(发现两个属性有set方法,看一下有谁进行过调用)发现赋值为:
setInitAnnotationType(PostConstruct.class);
setDestroyAnnotationType(PreDestroy.class);
看到这里是不是恍然大悟呢?是这里调用了生命周期中注解初始化前的方法。
初始化
还是在initializeBean方法:
。。。。。

try {
	invokeInitMethods(beanName, wrappedBean, mbd);
}
catch (Throwable ex) {
	throw new BeanCreationException(
			(mbd != null ? mbd.getResourceDescription() : null),
			beanName, "Invocation of init method failed", ex);
}

。。。。。

protected void invokeInitMethods(String beanName, Object bean, @Nullable RootBeanDefinition mbd)
			throws Throwable {

	// 如果实现了InitializingBean,就会调用afterPropertiesSet方法
	boolean isInitializingBean = (bean instanceof InitializingBean);
	if (isInitializingBean && (mbd == null || !mbd.isExternallyManagedInitMethod("afterPropertiesSet"))) {
		if (logger.isTraceEnabled()) {
			logger.trace("Invoking afterPropertiesSet() on bean with name '" + beanName + "'");
		}
		if (System.getSecurityManager() != null) {
			try {
				AccessController.doPrivileged((PrivilegedExceptionAction<Object>) () -> {
					((InitializingBean) bean).afterPropertiesSet();
					return null;
				}, getAccessControlContext());
			}
			catch (PrivilegedActionException pae) {
				throw pae.getException();
			}
		}
		else {
			((InitializingBean) bean).afterPropertiesSet();
		}
	}

	// 如果有自定的就调用自定的初始化方法。
	if (mbd != null && bean.getClass() != NullBean.class) {
		String initMethodName = mbd.getInitMethodName();
		if (StringUtils.hasLength(initMethodName) &&
				!(isInitializingBean && "afterPropertiesSet".equals(initMethodName)) &&
				!mbd.isExternallyManagedInitMethod(initMethodName)) {
			invokeCustomInitMethod(beanName, bean, mbd);
		}
	}
}
- 如果实现了InitializingBean,就会调用afterPropertiesSet方法
- 在注册时设置了初始化方法就会调用指定的方法,例如
@Bean(initMethod = "")等。
初始化后
还是在initializeBean方法中
。。。。。

if (mbd == null || !mbd.isSynthetic()) {
	wrappedBean = applyBeanPostProcessorsAfterInitialization(wrappedBean, beanName);
}

。。。。。
可以在这个步骤中,对Bean最终进行处理,Spring中的AOP就是基于初始化后实现的,初始化后返 回的对象才是最终的Bean对象。
销毁
回到doCreateBean方法中的最后一段
。。。。。

try {
	registerDisposableBeanIfNecessary(beanName, bean, mbd);
}
catch (BeanDefinitionValidationException ex) {
	throw new BeanCreationException(
			mbd.getResourceDescription(), beanName, "Invalid destruction signature", ex);
}
这里最后注册了销毁Bean的方法,我们进去看一下:
protected void registerDisposableBeanIfNecessary(String beanName, Object bean, RootBeanDefinition mbd) {
	AccessControlContext acc = (System.getSecurityManager() != null ? getAccessControlContext() : null);

	// 是单例Bean,并且有销毁的方法就会注册到disposableBeans这个Map中。
	if (!mbd.isPrototype() && requiresDestruction(bean, mbd)) {
		if (mbd.isSingleton()) {
			// Register a DisposableBean implementation that performs all destruction
			// work for the given bean: DestructionAwareBeanPostProcessors,
			// DisposableBean interface, custom destroy method.
			registerDisposableBean(beanName, new DisposableBeanAdapter(
					bean, beanName, mbd, getBeanPostProcessorCache().destructionAware, acc));
		}
		else {
			// A bean with a custom scope...
			Scope scope = this.scopes.get(mbd.getScope());
			if (scope == null) {
				throw new IllegalStateException("No Scope registered for scope name '" + mbd.getScope() + "'");
			}
			scope.registerDestructionCallback(beanName, new DisposableBeanAdapter(
					bean, beanName, mbd, getBeanPostProcessorCache().destructionAware, acc));
		}
	}
}
就是将销毁方法与Bean联系在一起并注册到Spring中,继续往下看,进入requiresDestruction方法看一下有哪些销毁逻辑会被注册:
protected boolean requiresDestruction(Object bean, RootBeanDefinition mbd) {
	return (bean.getClass() != NullBean.class && (DisposableBeanAdapter.hasDestroyMethod(bean, mbd) ||
			(hasDestructionAwareBeanPostProcessors() && DisposableBeanAdapter.hasApplicableProcessors(
					bean, getBeanPostProcessorCache().destructionAware))));
}
这里就不一一放出源码讲解了,我给大家总结了一下:
- 继承DisposableBean 或者 AutoCloseable
- 如果设置了销毁方法名为"(inferred)"Spring会自动找名叫"shutdown"或者"close"的方法
- 后置处理器处理(DestructionAwareBeanPostProcessor),之前InitDestroyAnnotationBeanPostProcessor就有实现,会找到@PreDestroy的方法。
讲到这里我们回去看一下注册销毁方法的逻辑registerDisposableBean(beanName, new DisposableBeanAdapter( bean, beanName, mbd, getBeanPostProcessorCache().destructionAware, acc));这里new了一个DisposableBeanAdapter传入是为了后续Spring正常关闭后调用销毁逻辑能适配以上的销毁逻辑。
最后
今年最后一更,祝大家新年快乐!下一年可以两个人过。


 210
210


 被折叠的 条评论
为什么被折叠?
被折叠的 条评论
为什么被折叠?
 到【灌水乐园】发言


