目录
  • 1. 简介
  • 2. 与WPF的对比差异
  • 2.1 样式
  • 2.1.1 样式
  • 2.1.2 控件主题(ControlTheme)
  • 2.2 主题变体
  • 2.3 资产管理(图片、字体等)
  • 2.4 动画与过渡效果
  • 2.5 文件对话框
  • 2.6 MessageBox弹框
  • 2.7 编译绑定,如果换DataContext会不会报错?wpf有吗?
  • 2.7.1 在某个Control或Window中启用编译绑定
  • 2.7.2 全局启用
  • 2.7.3 CompiledBinding与ReflectionBinding
  • 2.8 绑定
  • 2.8.1 异步绑定
  • 2.8.2 直接绑定到方法
  • 2.8.3 绑定到控件
  • 2.9 资源的定义和合并
  • 2.10 访问UI线程
  • 2.10 创建自定义控件
  • 2.11 获取Window
  • 2.12 顶级控件 TopLevel
  • 3. 跨平台的实现原理
  • 3.1 架构
  • 3.2 跨平台开发
  • 3.2.1 在C#中进行跨平台开发
  • 3.2.2 在Xaml中进行跨平台开发
  • 4. 调试
  • 5. 一个冷知识

1. 简介

Avalonia 是 WPF 的强大替代方案,它从头开始设计为跨平台,同时提供与 WPF 非常相似的开发体验。如果您是 XAML 和 MVVM 方面的专家,那么使用 Avalonia 开发应用程序时,您会感到宾至如归。它的日益普及反映了开发人员的优先事项向跨操作系统运行的强大解决方案的转变。

IDE支持

支持的.NET版本

  • .NET Framework 4.6.2+
  • .NET Core 2.0+
  • .NET 5+ (包括最新的 .NET 8)

2. 与WPF的对比差异

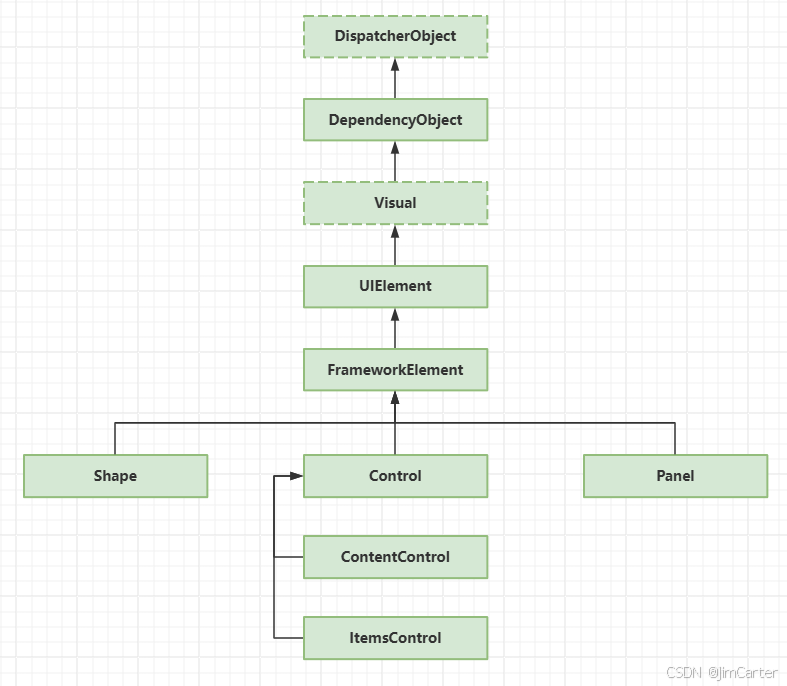
【WPF】作为一个WPF开发者你所应该知道关于Avalonia的二三事_c#

(▲WPF的类结构图)

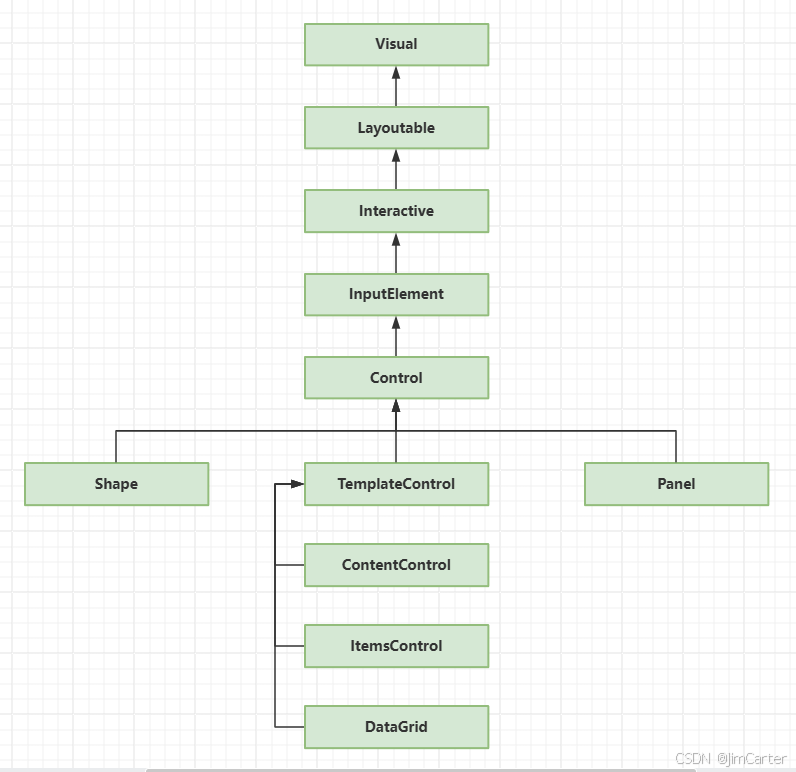
【WPF】作为一个WPF开发者你所应该知道关于Avalonia的二三事_控件_02

(▲Avalonia的类结构图)

WPF中的UIElementFrameworkElement是非模板控件的基类,大致对应于Avalonia中的Control类。而WPF中的Control类则是一个模板控件,Avalonia中相应的类是TemplatedControl

在WPF/UWP中,您将从Control类继承来创建新的模板控件,而在Avalonia中,您应该从TemplatedControl继承。
在WPF/UWP中,您将从FrameworkElement类继承来创建新的自定义绘制控件,而在Avalonia中,您应该从Control继承。

因此,简要总结如下:

  1. UIElement 🠞 Control
  2. FrameworkElement🠞 Control
  3. Control 🠞 TemplatedControl

2.1 样式

样式是Avalonia与WPF最大的差别,Avalonia为控件提供了两种主要的样式机制:样式和主题。

2.1.1 样式

样式(Styles)类似于CSS样式,通常用于根据控件的内容或在应用程序中的用途对控件进行样式化。例如,创建用于标题文本块的样式。

工作原理
样式机制有两个步骤:选择和替换。样式的 XAML 可以定义如何进行这两个步骤,但通常你会在控件元素上定义 Classes 标签来帮助选择步骤。

在选择步骤中,样式系统从控件开始沿着逻辑树向上搜索(与WPF一致)。这意味着在应用程序的最高级别(例如 App.axaml 文件)定义的样式可以在应用程序的任何地方使用,但仍然可以在控件更近的地方(例如在窗口或用户控件中)进行覆盖。

当选择步骤找到匹配项时,匹配的控件的属性将根据样式中的设置器进行更改。
示例:

<Window.Styles>
	<Style Selector="TextBlock.h1">
	    <Setter Property="FontSize" Value="24"/>
	    <Setter Property="FontWeight" Value="Bold"/>
	    
	    <Style Selector="^:pointerover">
	        <Setter Property="Foreground" Value="Red"/>
	    </Style>
	</Style>
	<Style Selector="TextBlock:pointerover">
	    <Setter Property="FontSize" Value="30"/>
	</Style>
</Window.Styles>
  • 1.
  • 2.
  • 3.
  • 4.
  • 5.
  • 6.
  • 7.
  • 8.
  • 9.
  • 10.
  • 11.
  • 12.
  • 13.

样式选择器实例:

样式选择器

描述

Button

选择所有Button类型的控件

local|MyControl

选择所有自定义的类型为local:MyControl的控件

Button.red

选择所有Classes="red"Button 控件

Button.red.large

选择所有Classes="red large"Button 控件。

Button:focus

选择所有获得焦点的Button控件。

Button.red:focus

选择所有Classes="red"且获得焦点的Button 控件。

Button#myButton

选择 Name(属性)为 “myButton” 的 Button 控件。

StackPanel Button.xl

选择所有带有xl样式类的 Button控件,同时它们是 StackPanel控件的后代,可以位于任何级别。

StackPanel > Button.xl

选择所有带有 xl 样式类的 Button控件,同时它们是 StackPanel控件的直接后代

Button /template/ ContentPresenter

选择所有在 Button控件的模板内的 ContentPresenter控件

样式选择器完整语法:https://docs.avaloniaui.net/zh-Hans/docs/reference/styles/style-selector-syntax#nesting

使用:

<TextBlock Classes="h1 blue"/>
  • 1.

样式键

样式选择器匹配的对象的类型不是由控件的具体类型决定的,而是通过检查其 StyleKey 属性来确定的。

默认情况下,StyleKey 属性返回当前实例的类型。然而,如果你希望你的控件(继承自 Button)被样式化为一个按钮,你可以在你的类中重写 StyleKeyOverride 属性,并让它返回 typeof(Button)

public class MyButton : Button
{
    // MyButton 将会被作为标准的 Button 控件样式化。
    protected override Type StyleKeyOverride => typeof(Button);
}
  • 1.
  • 2.
  • 3.
  • 4.
  • 5.

条件样式

如果你需要使用绑定条件添加或删除样式,则可以使用以下特殊语法:

<TextBlock Classes.h1="{Binding IsEnableH1}" Classes.h2="{Binding !IsEnableH1}" />
  • 1.

当绑定的IsEnableH1true时,TextBlock就会应用h1的样式。当为false时,又应用了h2样式。

也可以通过代码添加和删除样式

control.Classes.Add("blue");
control.Classes.Remove("red");
  • 1.
  • 2.
2.1.2 控件主题(ControlTheme)

控件主题是在样式的基础上构建的,用于为控件创建可切换的主题。控件主题类似于WPF的Style,但机制略有不同。通常用于对控件应用主题。

控件主题本质上是样式,但有一些重要的区别:

  • 控件主题没有选择器:它们有一个TargetType属性,用于描述它们要针对的控件。
  • 控件主题存储在ResourceDictionary中,而不是 Styles 集合中。
  • 控件主题通过设置Theme属性来分配给控件,通常使用 {StaticResource} 标记扩展。

示例主题:

<Application.Resources>
    <ControlTheme x:Key="EllipseButton" TargetType="Button">
      <Setter Property="Background" Value="Blue"/>
      <Setter Property="Foreground" Value="Yellow"/>
      <Setter Property="Padding" Value="8"/>
      <Setter Property="Template">
        <ControlTemplate>
          <Panel>
            <Ellipse Fill="{TemplateBinding Background}"
                     HorizontalAlignment="Stretch"
                     VerticalAlignment="Stretch"/>
            <ContentPresenter x:Name="PART_ContentPresenter" Content="{TemplateBinding Content}" Margin="{TemplateBinding Padding}"/>
          </Panel>
        </ControlTemplate>
      </Setter>
      
      <Style Selector="^:pointerover">
        <Setter Property="Background" Value="Red"/>
      </Style>
    </ControlTheme>
  </Application.Resources>
  • 1.
  • 2.
  • 3.
  • 4.
  • 5.
  • 6.
  • 7.
  • 8.
  • 9.
  • 10.
  • 11.
  • 12.
  • 13.
  • 14.
  • 15.
  • 16.
  • 17.
  • 18.
  • 19.
  • 20.
  • 21.

使用主题:

<Button Theme="{StaticResource EllipseButton}" HorizontalAlignment="Center" VerticalAlignment="Center">
    Hello World!
</Button>
  • 1.
  • 2.
  • 3.

如何将主题应用到控件的所有实例?将x:Key设置为x:Type而非某个字符串即可:

<ControlTheme x:Key="{x:Type Button}" TargetType="Button"></ControlTheme>
  • 1.

TargetTypeControlTheme.TargetType属性指定适用 Setter 属性的类型。如果您没有指定 TargetType,则必须使用类名限定 Setter 对象中的属性,使用 Property="ClassName.Property" 的语法。例如,不要设置 Property="FontSize",而应该设置 PropertyTextBlock.FontSizeControl.FontSize

2.2 主题变体

主题变体(theme variant)指的是基于选择的主题而具有的特定视觉外观的控件。可以理解为主题中的子主题,如某个主题中提供了DarkLight两套子主题,这两套就称之为变体。Avalonia 内置的主题 SimpleTheme FluentTheme 无需额外代码即可无缝支持 DarkLight 变体。

使用参考:https://docs.avaloniaui.net/zh-Hans/docs/guides/styles-and-resources/how-to-use-theme-variants

2.3 资产管理(图片、字体等)

基本与WPF一致。

使用代码加载图片:

var bitmap = new Bitmap(AssetLoader.Open(new Uri(uri)));
  • 1.

2.4 动画与过渡效果

Avalonia UI 中有两种类型的动画:

  • 关键帧动画:可以在时间轴上的关键帧处改变一个或多个属性的值。关键帧在时间轴上的关键点上定义。在关键帧之间使用缓动函数(默认情况下是直线插值)调整正在更改的属性。关键帧动画是一种非常灵活的动画类型。
  • 过渡动画:可以改变一个单一属性的值。可以理解为简易版的关键帧动画

参考:https://docs.avaloniaui.net/zh-Hans/docs/guides/graphics-and-animation/transitions

2.5 文件对话框

通过StorageProviderOpenFilePickerAsyncSaveFilePickerAsync使用:

打开文件对话框

// 从当前控件获取 TopLevel。或者,您也可以使用 Window 引用。
var topLevel = TopLevel.GetTopLevel(this);

// 启动异步操作以打开对话框。
var files = await topLevel.StorageProvider.OpenFilePickerAsync(new FilePickerOpenOptions
{
	Title = "Open Text File",
	AllowMultiple = false
});
if (files.Count >= 1)
{
	await using var stream = await files[0].OpenReadAsync();
	using var streamReader = new StreamReader(stream);
	var fileContent = await streamReader.ReadToEndAsync();
}
  • 1.
  • 2.
  • 3.
  • 4.
  • 5.
  • 6.
  • 7.
  • 8.
  • 9.
  • 10.
  • 11.
  • 12.
  • 13.
  • 14.
  • 15.

保存文件对话框

private async void SaveFileButton_Clicked(object sender, RoutedEventArgs args)
    {
        // 从当前控件获取 TopLevel。或者,您也可以使用 Window 引用。
        var topLevel = TopLevel.GetTopLevel(this);

        // 启动异步操作以打开对话框。
        var file = await topLevel.StorageProvider.SaveFilePickerAsync(new FilePickerSaveOptions
        {
            Title = "Save Text File"
        });

        if (file is not null)
        {
            await using var stream = await file.OpenWriteAsync();
            using var streamWriter = new StreamWriter(stream);
            await streamWriter.WriteLineAsync("Hello World!");
        }
    }
  • 1.
  • 2.
  • 3.
  • 4.
  • 5.
  • 6.
  • 7.
  • 8.
  • 9.
  • 10.
  • 11.
  • 12.
  • 13.
  • 14.
  • 15.
  • 16.
  • 17.
  • 18.

2.6 MessageBox弹框

目前还不支持,可以使用第三方:

2.7 编译绑定,如果换DataContext会不会报错?wpf有吗?

wpf的binding默认使用反射进行解析且到运行时才知道绑定的属性是否存在。为了优化这个问题,Avalonia提供了编译绑定。当启用之后,如果编译时找不到绑定的属性则报错,而且因不在使用反射系统,所以运行时更快。

2.7.1 在某个Control或Window中启用编译绑定

在节点中添加x:DataTypex:CompileBindings="True"即可启用。其中DataType可以添加到节点中也可以添加到Binding中。如:

<!-- 设置DataType并启用编译绑定 -->
<UserControl xmlns="https://github.com/avaloniaui"
             xmlns:x="http://schemas.microsoft.com/winfx/2006/xaml"
             xmlns:vm="using:MyApp.ViewModels"
             x:DataType="vm:MyViewModel" 
             x:CompileBindings="True">   <!-- 在整个Control中设置DataType且CompileBindings为true -->
    <StackPanel>
        <TextBlock Text="Last name:" />
        <TextBox Text="{Binding LastName}" />
        <!-- 在Binding标记中设置DataType -->
        <TextBox Text="{Binding MailAddress, DataType={x:Type vm:MyViewModel}}" />
    </StackPanel>
</UserControl>
  • 1.
  • 2.
  • 3.
  • 4.
  • 5.
  • 6.
  • 7.
  • 8.
  • 9.
  • 10.
  • 11.
  • 12.
  • 13.
2.7.2 全局启用

在csproj中添加以下节点:

<AvaloniaUseCompiledBindingsByDefault>true</AvaloniaUseCompiledBindingsByDefault>
  • 1.

且同样需给控件设置x:DataType

2.7.3 CompiledBinding与ReflectionBinding

二者用来更加灵活的控制编译绑定。

  • CompiledBinding:将Binding改为CompileBinding就可以在没有开启编译绑定的情况下对某个绑定开启编译绑定。
  • ReflectionBinding:在开启了编译绑定的前提下,对某个控件禁用编译绑定。
<!--使用CompileBinding, 且需设置DataType -->
<UserControl xmlns="https://github.com/avaloniaui"
             xmlns:x="http://schemas.microsoft.com/winfx/2006/xaml"
             xmlns:vm="using:MyApp.ViewModels"
             x:DataType="vm:MyViewModel">
    <StackPanel>
        <!-- 使用CompiledBinding标记进行绑定 -->
        <TextBox Text="{CompiledBinding LastName}" />
        <TextBox Text="{CompiledBinding GivenName}" />

        <!-- 这个命令将使用ReflectionBinding,因为它写的是默认的Binding -->
        <Button Content="Send an E-Mail" Command="{Binding SendEmailCommand}" />
    </StackPanel>
</UserControl>

<!-- 已经设置了编译绑定,ReflectionBinding可以表示例外 -->
<UserControl xmlns="https://github.com/avaloniaui"
             xmlns:x="http://schemas.microsoft.com/winfx/2006/xaml"
             xmlns:vm="using:MyApp.ViewModels"
             x:DataType="vm:MyViewModel"
             x:CompileBindings="True">
    <StackPanel>
    	<!--以下三个使用编译绑定-->
        <TextBox Text="{Binding LastName}" />
        <TextBox Text="{Binding GivenName}" />
        <TextBox Text="{Binding MailAddress}" />

        <!-- 使用ReflectionBinding -->
        <Button Content="Send an E-Mail" Command="{ReflectionBinding SendEmailCommand}" />
    </StackPanel>
</UserControl>
  • 1.
  • 2.
  • 3.
  • 4.
  • 5.
  • 6.
  • 7.
  • 8.
  • 9.
  • 10.
  • 11.
  • 12.
  • 13.
  • 14.
  • 15.
  • 16.
  • 17.
  • 18.
  • 19.
  • 20.
  • 21.
  • 22.
  • 23.
  • 24.
  • 25.
  • 26.
  • 27.
  • 28.
  • 29.
  • 30.
  • 31.

2.8 绑定

2.8.1 异步绑定

avalonia绑定的属性可以是异步的,即Task<T>类型,这在请求IO时很有用:

public class MainWindowViewModel : ViewModelBase
{
    public Bitmap? ImageFromBinding { get; } = ImageHelper.LoadFromResource(new Uri("avares://LoadingImages/Assets/abstract.jpg"));
    public Task<Bitmap?> ImageFromWebsite { get; } = ImageHelper.LoadFromWeb(new Uri("https://upload.wikimedia.org/wikipedia/commons/4/41/NewtonsPrincipia.jpg"));
}
  • 1.
  • 2.
  • 3.
  • 4.
  • 5.

使用:

<Grid ColumnDefinitions="*,*,*" RenderOptions.BitmapInterpolationMode="HighQuality">
    <Image Grid.Column="2" Source="{Binding ImageFromWebsite^}" MaxWidth="300" />
</Grid>
<TextBlock Text="{Binding MyAsyncText^, FallbackValue='Wait a second'}" />
  • 1.
  • 2.
  • 3.
  • 4.

注意绑定的ImageFromWebsite后面多了一个^,用来告诉Avalonia这是一个异步绑定。还支持FallbackValue

2.8.2 直接绑定到方法

Avalonia可以直接绑定到方法上而无需创建ICommand

<Window xmlns="https://github.com/avaloniaui">
   ...
   <StackPanel Margin="20">
      <Button Command="{Binding PerformAction}"
              CommandParameter="From the button, without ReactiveUI">
              Run the example</Button>
   </StackPanel>
</Window>
  • 1.
  • 2.
  • 3.
  • 4.
  • 5.
  • 6.
  • 7.
  • 8.
namespace AvaloniaGuides.ViewModels
{
    public class MainWindowViewModel 
    {
        public void PerformAction(object msg)
        {
            Debug.WriteLine($"The action was called. {msg}");
        }
		//表示是否可执行
        public bool CanPerformAction(object msg)
        {
            if (msg!=null) return !string.IsNullOrWhiteSpace( msg.ToString() );
            return false;
        }
    }
}
  • 1.
  • 2.
  • 3.
  • 4.
  • 5.
  • 6.
  • 7.
  • 8.
  • 9.
  • 10.
  • 11.
  • 12.
  • 13.
  • 14.
  • 15.
  • 16.

Avalonia默认会在绑定的方法上加上Can,用来查找是否定义了可执行方法。

2.8.3 绑定到控件

绑定到命名控件:

<TextBox Name="other">
<!-- 绑定到名为other的控件上-->
<TextBlock Text="{Binding #other.Text}"/>
  • 1.
  • 2.
  • 3.

等同于WPF中的ElementName=xxxx

<TextBox Name="other">
<TextBlock Text="{Binding Text, ElementName=other}"/>
  • 1.
  • 2.

绑定到祖先控件:

  • 使用$parent$parent[0]:绑定到父控件
  • 使用$parent[1]1是索引,从0开始。此处表示绑定到父控件的父控件。索引为23N时等同类似。
  • 使用$parent[Border]:绑定到类型是Border的父控件,往上一直找直至找到。
  • 使用$parent[local:MyControl]:绑定到类型是local:MyControl的自定义父控件上。
  • 使用$parent[Border;1]:结合使用。表示当自己有很多个父Boder时,绑定到索引为1的上。

如:

<Border>
	<Border>
		<TextBlock Text="{Binding $parent[Border].Text}"/>
	</Border>
</Border>
  • 1.
  • 2.
  • 3.
  • 4.
  • 5.

注意:
Avalonia UI 还支持 WPF/UWP 的 RelativeSource 语法,类似但并不相同。RelativeSource 在VisualTree上起作用,而此处给出的语法在LogicTree上起作用。

2.9 资源的定义和合并

参考avatoolkit

2.10 访问UI线程

与WPF类似也是使用Dispatcher

  • 异步执行不等待,使用PostDispatcher.UIThread.Post(()=>LongRunningTask(), DispatcherPriority.Background);
  • 异步执行可等待,使用InvokeAsyncawait Dispatcher.UIThread.InvokeAsync(()=>LongRunningTask(), DispatcherPriority.Background);

2.10 创建自定义控件

有三种创建方法:

  1. 创建UserControl:与创建Window一样,右键直接创建。
  2. 继承TemplateControl:模板化控件,属于项目间无外观的通用控件。在WPF中一般是继承Control实现。
  3. 继承Control:基本控件。是用户界面的基础,通过重写Render方法并使用几何图形绘制实现,TextBlockImage等都是这类型的控件。在WPF中一般是继承FrameworkElement实现。

2.11 获取Window

主窗口是在App.axaml.cs文件中传递给ApplicationLifetime.MainWindow属性的,如:

public override void OnFrameworkInitializationCompleted()
{
    if (ApplicationLifetime is IClassicDesktopStyleApplicationLifetime desktopLifetime)
    {
        desktopLifetime.MainWindow = new MainWindow();
    }
}
  • 1.
  • 2.
  • 3.
  • 4.
  • 5.
  • 6.
  • 7.

所以可以通过将Application.Current.ApplicationLifetime强制转换为IClassicDesktopStyleApplicationLifetime来随时检索它。但是在移动和浏览器平台没有窗口的概念,需要强制转换为ISingleViewApplicationLifetime并获取其MainView属性。

2.12 顶级控件 TopLevel

顶级控件充当视觉根,并且是所有顶级控件(包括Window)的基类。它处理布局、样式和渲染的调度,以及跟踪客户端大小。大多数服务都通过顶级控件访问。
获取方法:

  1. 通过var topLevel = TopLevel.GetTopLevel(control);:如果返回为null,则控件可能此时尚未被附加(初始化)。
  2. 使用Window类:因为Window也是继承自TopLevel,所以通过var topLevel = window;也能拿到。

常见成员:

成员

说明

ActualTransparencyLevel

获取平台能够提供的实际WindowTransparencyLevel

ClientSize

获取窗口的大小。

Clipboard

获取平台的Clipboard实现

FocusManager

获取根的FocusManager实例。

FrameSize

获取顶级控件的总大小,包括系统框架(如果有)。

InsetsManager

获取平台的InsetsManager实现,允许您与平台的系统栏进行交互,并处理移动窗口的安全区域变化

PlatformSettings

获取平台的PlatformSettings实例

RendererDiagnostics

获取一个值,指示渲染器是否应绘制特定的诊断信息。

RenderScaling

获取用于渲染的缩放因子。

RequestedThemeVariant

获取或设置控件(及其子元素)用于资源确定的UI主题变体。您使用ThemeVariant指定的UI主题可以覆盖应用程序级别的ThemeVariant。

StorageProvider

获取平台的StorageProvider实例 ,供了用于选择文件和文件夹、检查平台功能以及与存储书签交互的方法

TransparencyBackgroundFallback

获取或设置当不支持透明度时,透明度将与之混合的IBrush。默认情况下,这是一个纯白色的画刷。

TransparencyLevelHint

获取或设置TopLevel在可能的情况下应使用的WindowTransparencyLevel。接受多个值,按照回退顺序应用。例如,使用"Mica,Blur",Mica仅在支持它的平台上应用,其余平台上使用Blur。默认值是一个空数组或"None"。

BackRequested

在按下物理返回按钮或请求后退导航时发生。

Closed

窗口关闭时触发。

Opened

窗口打开时触发。

ScalingChanged

当TopLevel的缩放发生变化时发生。

RequestAnimationFrame(Action< TimeSpan > action)

将回调排队,以在下一个动画刻度上调用

RequestPlatformInhibition(PlatformInhibitionType type, string reason)

请求抑制PlatformInhibitionType。行为将保持抑制,直到返回值被释放。可用的PlatformInhibitionType集取决于平台。如果在不支持此类型的平台上抑制行为,则请求将不起作用。

TryGetPlatformHandle()

尝试获取派生自TopLevel的控件的平台句柄。

3. 跨平台的实现原理

3.1 架构

Avalonia能够跨平台的第一个前提是大部分代码都基于.netstandard2.0编写,其次是使用了Skia。
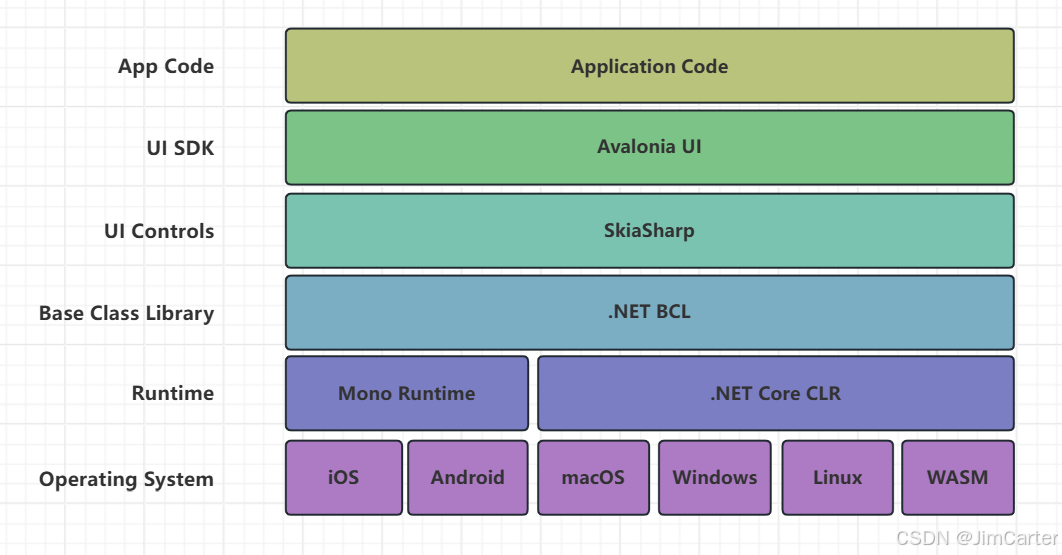
【WPF】作为一个WPF开发者你所应该知道关于Avalonia的二三事_wpf_03

Avalonia 所有的UI控件全部由SkiaSharp绘制(Skia的.NET版本)。

Skia 是一个开源的 2D 图形引擎,用于绘制文本、形状、图像等二维内容。广泛应用于多种平台的图形界面开发中,比如 Android、Chrome 浏览器、Flutter 框架等。

Skia 可以基于多种底层 API 进行绘图,如使用OpenGL、Vulkan、Metal在GPU上绘制或者直接在 CPU 上渲染。它提供跨平台的 2D 绘图能力,屏蔽了底层硬件加速 API 的差异。

Android早期通过skia库进行2d渲染,后来加入了hwui利用opengl替换skia进行大部分渲染工作,现在开始用skia opengl替换掉之前的opengl,从p的代码结构上也可以看出,p开始skia库不再作为一个单独的动态库so,而是静态库a编译到hwui的动态库里,将skia整合进hwui,hwui调用skia opengl,也为以后hwui使用skia vulkan做铺垫。

Skia虽然支持Vulkan、Metal,但是好用是完全不同的,Skia目前支持最好的应该是OpenGL,剩下两个平台支持有限而且还有bug。

出于性能(动画)和稳定性上的考虑,Avalonia自己也集成了渲染器,各个平台上的支持如下:

  1. Windows:使用Angle->Dx11渲染,当不支持Dx11时会回退到Dx9。
  2. macOS/iOS:使用OpenGL和Metal(beta)
  3. Linux:使用OpenGL和Vulkan(X11)
  4. Android:OpenGL和Vulkan
  5. Browser:WebGL(转Canvas)

3.2 跨平台开发

3.2.1 在C#中进行跨平台开发

.NET 6 及更高版本提供了一组 API,用于在运行时获取操作系统 - OperatingSystem

该类常用的静态方法有:

方法

描述

IsWindows()

当前操作系统是否是Windows

IsLinux()

同理

IsMacOS()

同理

IsAndroid()

同理

IsIOS()

同理

IsBrowser()

同理

IsOSPlatform(string platform)

判断是否运行在某个平台上,入参可以为:Browser, Linux, FreeBSD, Android, iOS, macOS, tvOS, watchOS, Windows.

条件编译:
.NET内置了一下条件编译符号,可以按需使用:

符号

说明

ANDROID

BROWSER

IOS

MACCATALYST

MACOS

TVOS

WINDOWS

[OS][version]

如:IOS15_1

[OS][version]_OR_GREATER

IOS15_1_OR_GREATER

(很遗憾没有Linux,也许以后会被加上)

更多编译符号请参考: https://learn.microsoft.com/zh-cn/dotnet/csharp/language-reference/preprocessor-directives#conditional-compilation

3.2.2 在Xaml中进行跨平台开发

使用OnPlatform指定平台:

<TextBlock Text="{OnPlatform Default='Unknown', Windows='Im Windows', macOS='Im macOS', Linux='Im Linux'}"/>
<!--等同于-->
<TextBlock Text="{OnPlatform 'Unknown', Windows='Im Windows', macOS='Im macOS', Linux='Im Linux'}"/>

<!--设置高度-->
<Border Height="{OnPlatform 10, Windows=50.5}"/>
<!--引用资源-->
<Border Background="{OnPlatform Default={StaticResource DefaultBrush}, Windows={StaticResource WindowsBrush}}"/>
  • 1.
  • 2.
  • 3.
  • 4.
  • 5.
  • 6.
  • 7.
  • 8.

▲不同平台显示不同的文字,默认文字为Unknown

OnPlatform同时也是一个标签,可以单独使用:

<StackPanel>
    <OnPlatform>
        <OnPlatform.Default>
            <ToggleButton Content="Hello World" />
        </OnPlatform.Default>
        <OnPlatform.iOS>
            <ToggleSwitch Content="Hello iOS" />
        </OnPlatform.Windows>
    </OnPlatform>
</StackPanel>
  • 1.
  • 2.
  • 3.
  • 4.
  • 5.
  • 6.
  • 7.
  • 8.
  • 9.
  • 10.

也可以添加到资源字典中:

<ResourceDictionary>
    <OnPlatform x:Key="MyBrush">
        <OnPlatform.Default>
            <SolidColorBrush Color="Blue" />
        </OnPlatform.Default>
        <OnPlatform.iOS>
            <SolidColorBrush Color="Yellow" />
        </OnPlatform.Windows>
    </OnPlatform>
</ResourceDictionary>
  • 1.
  • 2.
  • 3.
  • 4.
  • 5.
  • 6.
  • 7.
  • 8.
  • 9.
  • 10.

为了避免编写过多重复代码,可以使用Options一次性指定多个平台:

<OnPlatform>
        <!--Android、iOS都用Mobile样式,避免写两次>
        <On Options="Android, iOS">
            <StyleInclude Source="/Styles/Mobile.axaml" />
        </On>
        <!-- 默认 -->
        <On Options="Default">
            <StyleInclude Source="/Styles/Default.axaml" />
        </On>
    </OnPlatform>
  • 1.
  • 2.
  • 3.
  • 4.
  • 5.
  • 6.
  • 7.
  • 8.
  • 9.
  • 10.

OnPlatform工作原理与if-else一样是条件运行,不同于条件编译,所以编辑器会生成所有平台代码。但是Avalonia团队也对OnPlatform做了编译优化,支持编译裁剪和特定平台发布。比如OnPlatform里你配制了WindowsmacOS,但是发布时你只发布Windows平台,那么macOS配制项就会被删除,这样也能减少生成体积。

除了OnPlatform之外,还有一个有用的标签是OnFormFactor。这两个很类似,区别是后者用来判断当前运行是在手机还是桌面、也没有编译优化。使用方法如下:

<UserControl xmlns="https://github.com/avaloniaui"
             xmlns:x="http://schemas.microsoft.com/winfx/2006/xaml">
    <TextBlock Text="{OnFormFactor 'Default value', Mobile='Im Mobile', Desktop='Im Desktop'}"/>
</UserControl>
  • 1.
  • 2.
  • 3.
  • 4.

指定解析类型

<TextBlock Tag="{OnPlatform '0, 0, 0, 0', Windows='10, 10, 10, 10', x:TypeArguments=Thickness}"/>
  • 1.

如上所示,Tag默认为object类型,如果不指定x:TypeArguments=Thickness,会被识别为字符串。使用时在C#层还要再做一次处理,而指定之后C#拿到的就是Thickness类型了

4. 调试

一般新建Avalonia项目时,就已经默认安装了Nuget包:Avalonia.Diagnostics。如果没有的话就手动安一下。

安装完成之后,开始调试,然后按下F12就能看到类似于WPF Snoop的监视工具,用来调试布局、绑定、排查问题。
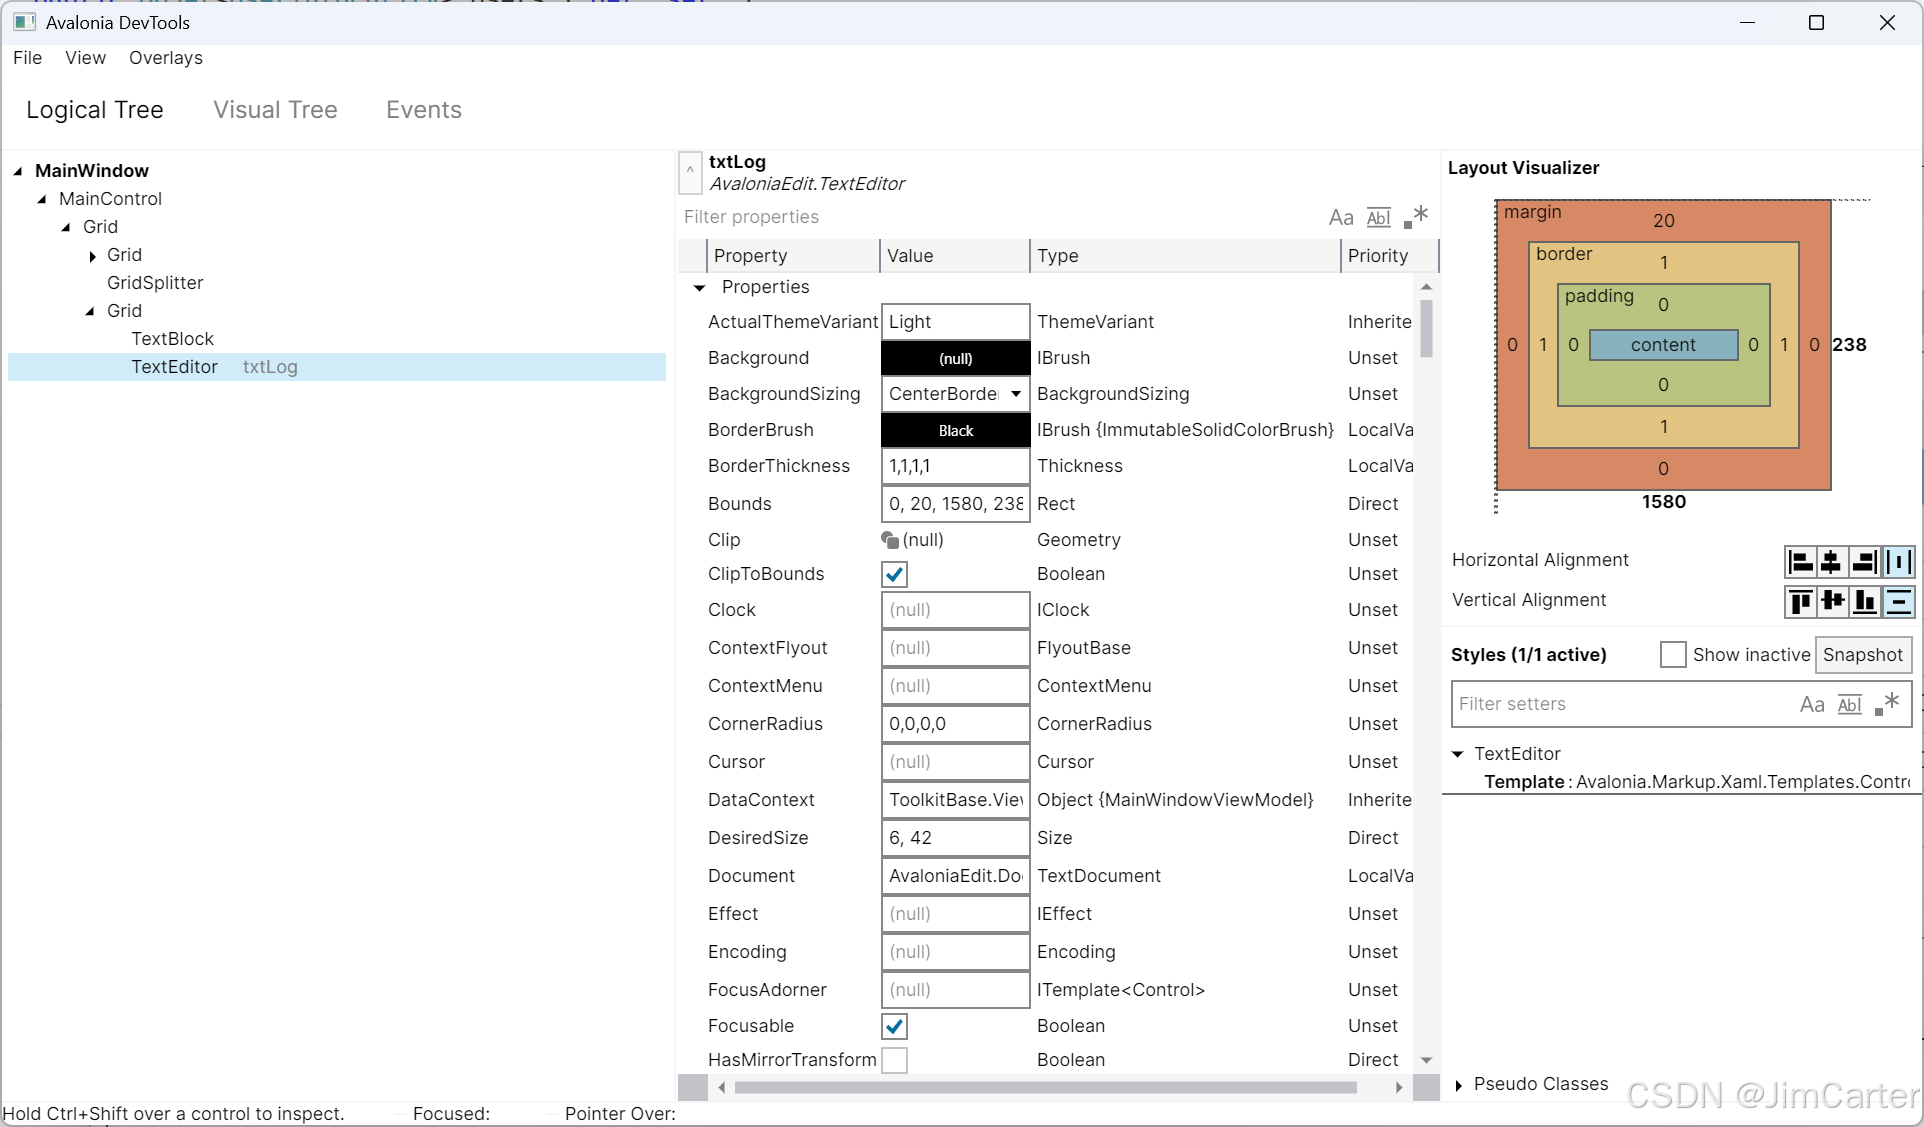
【WPF】作为一个WPF开发者你所应该知道关于Avalonia的二三事_c#_04

5. 一个冷知识

不知道大家是否知道一些与WPF相关的比较知名的库为什么都要以Avalon开头,比如:Avalonia,AvalonDock,AvalonEdit,AvalonStudio。

原因就是WPF当初内部立项的时候,项目代号就是Avalon。当初的xaml标签都是以<Avalon></Avalon>开头。

微软所有产品内部代号与发布名称映射表可参见: https://zh.wikipedia.org/zh-cn/%E5%BE%AE%E8%BD%AF%E4%BA%A7%E5%93%81%E4%BB%A3%E5%8F%B7%E5%88%97%E8%A1%A8


更多资料:
https://avaloniaui.net/blog/avalonia-platform-support-why-it-s-simple https://avaloniaui.net/blog/avalonia-ui-and-maui-something-for-everyone   https://docs.avaloniaui.net/zh-Hans/docs/guides/platforms/platform-specific-code/dotnet https://docs.avaloniaui.net/zh-Hans/docs/guides/platforms/platform-specific-code/xaml