


一、springboot简介
1.1springboot介绍
springboot的目的在于创建和启动新的基于spring框架的项目。springboot会选择最适合spring子项目和第三方开源库进行整合。大部分springboot应用只需要非常少的配置就可以快速运行起来。
springboot是伴随spring4诞生的,它提供了一种快速使用spring的方式。
1.2 spring特点
(1)为基于spring的开发提供更快的入门体验
(2)创建可以独立运行的spring应用
(3)可以嵌入tomcat或jetty服务器,不需要打包成war文件
(4)提供推荐的基础pom文件(start)来简化Apache Maven的配置
(5)竟可能的根据项目依赖来自动配置spring框架
(6)提供可以直接在生产环境中使用的功能如性能指标 应用信息 和应用健康检查
(7)开箱即用,没有代码生产也无需xml配置,同时也可以修改默认值来满足特定的需求
(8)其他大量的项目都是基于springboot之上,如springcloud
1.3springboot缺点
(1)依赖太多,随便的一个springboot应用都有好几十M
(2)缺少服务的注册和发现等解决方案
(3)缺少监控集成方案,安全管理方案
1.4 spring应用场景
(1)spring能应用场景
(2)Javaweb应用
(3)微服务
二 spring 的Java配置Demo
从Spring3.x开始提供了Java配置方式,使用Java配置方式可以更好的理解你配置的Bean,现在我们就处于这个时代,并且Spring4.x和Spring boot都推荐使用java配置的方式.
Java配置是Spring4.x推荐的配置方式,可以完全替代xml配置。
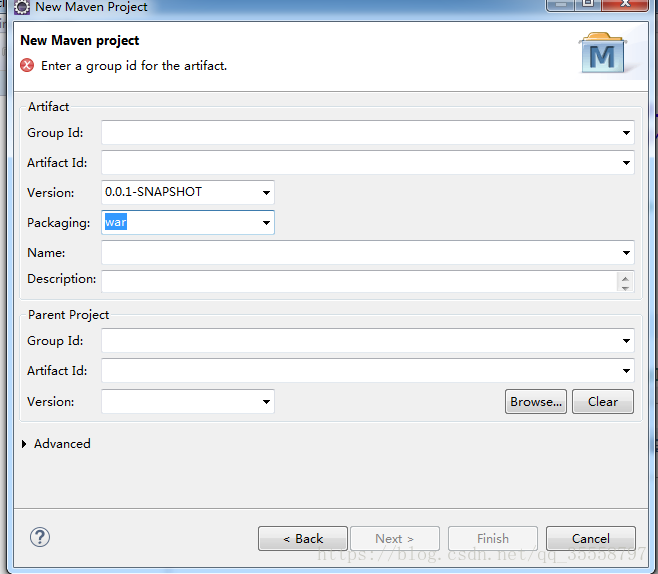
2.1 创建一个maveng工程springboot-demo-01,选择war类型(web应用)
2.2 导入依赖pom文件如下
<project xmlns="http://maven.apache.org/POM/4.0.0" xmlns:xsi="http://www.w3.org/2001/XMLSchema-instance"
	xsi:schemaLocation="http://maven.apache.org/POM/4.0.0 http://maven.apache.org/xsd/maven-4.0.0.xsd">
	<modelVersion>4.0.0</modelVersion>
	<groupId>com.itcast.springboot</groupId>
	<artifactId>springboot-demo-01</artifactId>
	<version>0.0.1-SNAPSHOT</version>
	<packaging>war</packaging>


	<dependencies>
		<!-- spring mvc -->
		<dependency>
			<groupId>org.springframework</groupId>
			<artifactId>spring-webmvc</artifactId>
			<version>5.0.4.RELEASE</version>
		</dependency>

		<!-- https://mvnrepository.com/artifact/org.springframework/spring-context -->
		<dependency>
			<groupId>org.springframework</groupId>
			<artifactId>spring-context</artifactId>
			<version>5.0.4.RELEASE</version>
		</dependency>
		<!-- https://mvnrepository.com/artifact/com.jolbox/bonecp-spring -->
		<!-- 连接池 -->
<!-- 		<dependency>
			<groupId>com.jolbox</groupId>
			<artifactId>bonecp-spring</artifactId>
			<version>0.8.0.RELEASE</version>
		</dependency> -->
		<!-- 阿里巴巴数据源 连接池-->
		<dependency>
			<groupId>com.alibaba</groupId>
			<artifactId>druid</artifactId>
			<version>1.1.9</version>
		</dependency>
	</dependencies>

	<build>
		<finalName>${project.artifactId}</finalName>
		<plugins>
			<!-- 资源拷贝插件 -->
			<plugin>
				<groupId>org.apache.maven.plugins</groupId>
				<artifactId>maven-resources-plugin</artifactId>
				<configuration>
					<source>${jdk.version}</source>
					<target>${jdk.version}</target>
					<encode>${project.build.sourceEncoding}</encode>
				</configuration>
			</plugin>

			<!-- java编译插件 -->
			<plugin>
				<groupId>org.apache.maven.plugins</groupId>
				<artifactId>maven-compiler-plugin</artifactId>
				<version>3.7.0</version>
				<configuration>
					<source>${jdk.version}</source>
					<target>${jdk.version}</target>
					<encode>${project.build.sourceEncoding}</encode>
				</configuration>
			</plugin>
		</plugins>
	</build>

	<properties>
		<project.build.sourceEncoding>UTF-8</project.build.sourceEncoding>
		<project.reporting.outputEncoding>UTF-8</project.reporting.outputEncoding>
		<java.version>1.8</java.version>
	</properties>
</project>
2.3创建一个User对象
package com.itcast.springboot.javaconfig;

public class User {

	private String username;
	private String password;

	private Integer age;

	public String getUsername() {
		return username;
	}

	public void setUsername(String username) {
		this.username = username;
	}

	public String getPassword() {
		return password;
	}

	public void setPassword(String password) {
		this.password = password;
	}

	public Integer getAge() {
		return age;
	}

	public void setAge(Integer age) {
		this.age = age;
	}

	@Override
	public String toString() {
		return "User [username=" + username + ", password=" + password + ", age=" + age + "]";
	}


}
2.4 编写UserDAO用于模拟与数据库的交互
package com.itcast.springboot.javaconfig;

import java.util.ArrayList;
import java.util.List;

public class UserDAO {

	public List<User> queryUserList(){

		List<User> list=new ArrayList<User>();

		for(int i=0;i<10;i++){
			User user=new User();
			user.setUsername("username_"+(i+1));
			user.setPassword("password_"+(i+1));
			user.setAge(i+1);

			list.add(user);
		}

		return list;
	}

}
2.5 编写UserService
package com.itcast.springboot.javaconfig;

import java.util.List;

import org.springframework.beans.factory.annotation.Autowired;
import org.springframework.stereotype.Service;
//import org.springframework.beans.factory.annotation.Autowired;
@Service
public class UserService {

	//注入spring容器的bean对象
	@Autowired
	private UserDAO dao;

	public List<User> queryUserList(){

		return dao.queryUserList();
	}
}
2.6编写springConfig用于实例化spring容器
package com.itcast.springboot.javaconfig;

import org.springframework.context.annotation.Bean;
import org.springframework.context.annotation.ComponentScan;
import org.springframework.context.annotation.Configuration;

/**
 *
 * @author jack
 *
 */
@Configuration//通过该注解来表明该类是一个spring的配置,相当于一个xml
@ComponentScan(basePackages="com.itcast.springboot.javaconfig")
public class SpringConfig {

	//通过该注解来表明是一个bean对象 相当于xml中的bean
	@Bean
	public UserDAO getUserDAO(){

		return new UserDAO();
	}
}
2.7编写测试类
package com.itcast.springboot.javaconfig;

import java.util.List;

import org.springframework.context.annotation.AnnotationConfigApplicationContext;

/**
 * spring的Java配置方式
 * @author jack
 *
 */
public class Test {

	public static void main(String[] args) {

		//通过Java配置来实例化spring容器
		AnnotationConfigApplicationContext  context=new AnnotationConfigApplicationContext(SpringConfig.class);

		//获取spring容器中的bean对象

		UserService  userService=context.getBean(UserService.class);

		//调用对象中的方法
		List<User> list=userService.queryUserList();

		for(User user:list){
			System.out.println(user);
		}

		//销毁容器
		context.destroy();
	}

}
测试结果:
User [username=username_1, password=password_1, age=1]
User [username=username_2, password=password_2, age=2]
User [username=username_3, password=password_3, age=3]
User [username=username_4, password=password_4, age=4]
User [username=username_5, password=password_5, age=5]
User [username=username_6, password=password_6, age=6]
User [username=username_7, password=password_7, age=7]
User [username=username_8, password=password_8, age=8]
User [username=username_9, password=password_9, age=9]
User [username=username_10, password=password_10, age=10]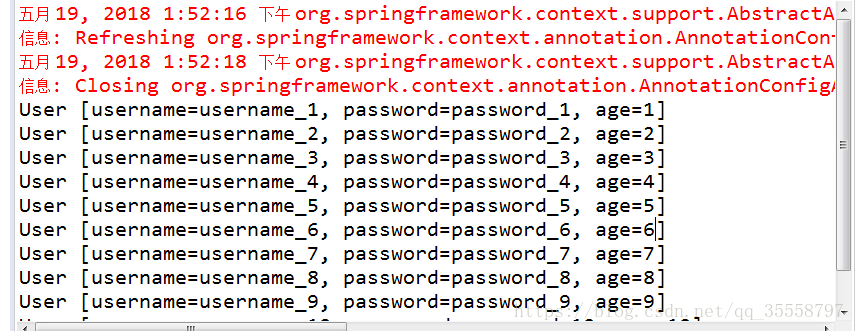
三 springBoot快速入门
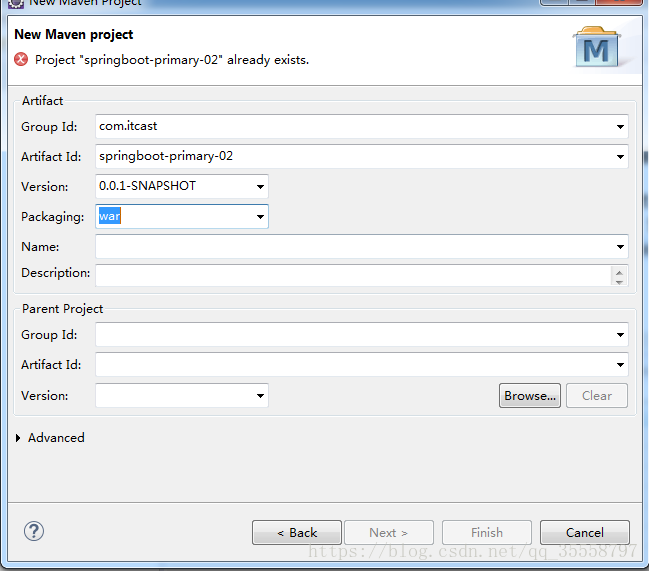
3.1 新建一个springboot-primary-02的maven项目
类型选择war,后面以这个为模板做web.
遇到问题:
使用maven创建web项目时,可能会出现如下错误:
web.xml is missing and <failOnMissingWebXml> is set to true
此问题的解决办法:
a. 右键点击Project Explorer中的Deployment Descriptor
b. 选择Generate Deployment Descriptor Stub,这样就能生成src/main/webapp/WEB_INF/web.xml文件了。
3.2 导入依赖pom文件
<project xmlns="http://maven.apache.org/POM/4.0.0" xmlns:xsi="http://www.w3.org/2001/XMLSchema-instance" xsi:schemaLocation="http://maven.apache.org/POM/4.0.0 http://maven.apache.org/xsd/maven-4.0.0.xsd">
  <modelVersion>4.0.0</modelVersion>
  <groupId>com.itcast</groupId>
  <artifactId>springboot-primary-02</artifactId>
  <version>0.0.1-SNAPSHOT</version>
  <packaging>war</packaging>

<!-- 引入springboot父类依赖 -->
<!-- Spring boot的项目必须要将parent设置为spring boot的parent,该parent包含了大量默认的配置,大大简化了我们的开发。 -->
	<parent>
		<groupId>org.springframework.boot</groupId>
		<artifactId>spring-boot-starter-parent</artifactId>
		<version>2.0.1.RELEASE</version>
		<relativePath />
		<!-- lookup parent from repository -->
	</parent>

  	<dependencies>
  		<!-- springboot依赖 -->
  		<!-- springboot集成web -->
		<dependency>
			<groupId>org.springframework.boot</groupId>
			<artifactId>spring-boot-starter-web</artifactId>
		</dependency>
  		<!-- spring依赖 -->
  		<!-- spring mvc -->
		<dependency>
			<groupId>org.springframework</groupId>
			<artifactId>spring-webmvc</artifactId>
			<version>5.0.4.RELEASE</version>
		</dependency>
		<!-- spring mvc -->
		<dependency>
			<groupId>org.springframework</groupId>
			<artifactId>spring-webmvc</artifactId>
			<version>5.0.4.RELEASE</version>
		</dependency>

		<!-- 阿里巴巴数据源 连接池-->
		<dependency>
			<groupId>com.alibaba</groupId>
			<artifactId>druid</artifactId>
			<version>1.1.9</version>
		</dependency>
		<!-- 集成mysql -->
		<dependency>
			<groupId>mysql</groupId>
			<artifactId>mysql-connector-java</artifactId>
		</dependency>
  	</dependencies>
  	<properties>
		<project.build.sourceEncoding>UTF-8</project.build.sourceEncoding>
		<project.reporting.outputEncoding>UTF-8</project.reporting.outputEncoding>
		<java.version>1.8</java.version>
	</properties>
	<build>
		<plugins>
			<!-- 添加springboot的插件 -->
			<plugin>
				<groupId>org.springframework.boot</groupId>
				<artifactId>spring-boot-maven-plugin</artifactId>
				<configuration>
					<source>${jdk.version}</source><!-- 源代码使用的开发版本 -->
					<target>${jdk.version}</target><!-- 需要生成的目标class文件的编译版本 -->
					<encode>${project.build.sourceEncoding}</encode>
				</configuration>
			</plugin>
		</plugins>
	</build>
</project>
3.3建立app入口类
package com.itcast;

import org.springframework.boot.SpringApplication;
import org.springframework.boot.autoconfigure.SpringBootApplication;
import org.springframework.context.annotation.Configuration;
import org.springframework.stereotype.Controller;
import org.springframework.web.bind.annotation.RequestMapping;
import org.springframework.web.bind.annotation.ResponseBody;

@Controller
@SpringBootApplication
@Configuration
public class HelloApplication {

	@RequestMapping("/hello")
	@ResponseBody
	public String hello(){
		return "hello springBoot!";
	}
	public static void main(String[] args) {
		SpringApplication.run(HelloApplication.class, args);

	}

}
代码说明:
1、@SpringBootApplication:Spring Boot项目的核心注解,主要目的是开启自动配置。;
2、@Configuration:这是一个配置Spring的配置类;
3、@Controller:标明这是一个SpringMVC的Controller控制器;
4、main方法:在main方法中启动一个应用,即:这个应用的入口;
测试类运行结果:
  .   ____          _            __ _ _
 /\\ / ___'_ __ _ _(_)_ __  __ _ \ \ \ \
( ( )\___ | '_ | '_| | '_ \/ _` | \ \ \ \
 \\/  ___)| |_)| | | | | || (_| |  ) ) ) )
  '  |____| .__|_| |_|_| |_\__, | / / / /
 =========|_|==============|___/=/_/_/_/
 :: Spring Boot ::        (v2.0.1.RELEASE)

2018-05-19 15:58:09.431  INFO 12208 --- [           main] com.itcast.HelloApplication              : Starting HelloApplication on jack-PC with PID 12208 (D:\workSpaces\EclipseWorkspace\SpringBoot\springboot-primary-02\target\classes started by jack in D:\workSpaces\EclipseWorkspace\SpringBoot\springboot-primary-02)
2018-05-19 15:58:09.456  INFO 12208 --- [           main] com.itcast.HelloApplication              : No active profile set, falling back to default profiles: default
2018-05-19 15:58:09.878  INFO 12208 --- [           main] ConfigServletWebServerApplicationContext : Refreshing org.springframework.boot.web.servlet.context.AnnotationConfigServletWebServerApplicationContext@55040f2f: startup date [Sat May 19 15:58:09 CST 2018]; root of context hierarchy
2018-05-19 15:58:18.016  INFO 12208 --- [           main] o.s.b.w.embedded.tomcat.TomcatWebServer  : Tomcat initialized with port(s): 8080 (http)
2018-05-19 15:58:18.221  INFO 12208 --- [           main] o.apache.catalina.core.StandardService   : Starting service [Tomcat]
2018-05-19 15:58:18.221  INFO 12208 --- [           main] org.apache.catalina.core.StandardEngine  : Starting Servlet Engine: Apache Tomcat/8.5.29
2018-05-19 15:58:18.253  INFO 12208 --- [ost-startStop-1] o.a.catalina.core.AprLifecycleListener   : The APR based Apache Tomcat Native library which allows optimal performance in production environments was not found on the java.library.path: [E:\Program Files\Java\jre1.8.0_112\bin;C:\Windows\Sun\Java\bin;C:\Windows\system32;C:\Windows;E:/Program Files/Java/jre1.8.0_112/bin/server;E:/Program Files/Java/jre1.8.0_112/bin;E:/Program Files/Java/jre1.8.0_112/lib/amd64;D:\orcle\orcle12c\12.1.0\dbhome_1\bin;C:\ProgramData\Oracle\Java\javapath;C:\Windows\system32;C:\Windows;C:\Windows\System32\Wbem;C:\Windows\System32\WindowsPowerShell\v1.0\;E:\Program Files\Java\jdk1.8.0_112\bin;E:\Program Files\Java\jdk1.8.0_112\jre\bin;E:\Program Files\MySQL\mysql-5.7.16-winx64\bin;E:\Program Files\apache-maven\apache-maven-3.5.3\bin;E:\Program Files\Git\cmd;E:\Program Files\Gradle\gradle-4.7\bin;E:\Program Files\TortoiseGit\bin;E:\Program Files\eclipse;;.]
2018-05-19 15:58:19.048  INFO 12208 --- [ost-startStop-1] o.a.c.c.C.[Tomcat].[localhost].[/]       : Initializing Spring embedded WebApplicationContext
2018-05-19 15:58:19.048  INFO 12208 --- [ost-startStop-1] o.s.web.context.ContextLoader            : Root WebApplicationContext: initialization completed in 9225 ms
2018-05-19 15:58:19.623  INFO 12208 --- [ost-startStop-1] o.s.b.w.servlet.ServletRegistrationBean  : Servlet dispatcherServlet mapped to [/]
2018-05-19 15:58:19.656  INFO 12208 --- [ost-startStop-1] o.s.b.w.servlet.FilterRegistrationBean   : Mapping filter: 'characterEncodingFilter' to: [/*]
2018-05-19 15:58:19.657  INFO 12208 --- [ost-startStop-1] o.s.b.w.servlet.FilterRegistrationBean   : Mapping filter: 'hiddenHttpMethodFilter' to: [/*]
2018-05-19 15:58:19.657  INFO 12208 --- [ost-startStop-1] o.s.b.w.servlet.FilterRegistrationBean   : Mapping filter: 'httpPutFormContentFilter' to: [/*]
2018-05-19 15:58:19.658  INFO 12208 --- [ost-startStop-1] o.s.b.w.servlet.FilterRegistrationBean   : Mapping filter: 'requestContextFilter' to: [/*]
2018-05-19 15:58:20.190  INFO 12208 --- [           main] o.s.w.s.handler.SimpleUrlHandlerMapping  : Mapped URL path [/**/favicon.ico] onto handler of type [class org.springframework.web.servlet.resource.ResourceHttpRequestHandler]
2018-05-19 15:58:21.325  INFO 12208 --- [           main] s.w.s.m.m.a.RequestMappingHandlerAdapter : Looking for @ControllerAdvice: org.springframework.boot.web.servlet.context.AnnotationConfigServletWebServerApplicationContext@55040f2f: startup date [Sat May 19 15:58:09 CST 2018]; root of context hierarchy
2018-05-19 15:58:21.558  INFO 12208 --- [           main] s.w.s.m.m.a.RequestMappingHandlerMapping : Mapped "{[/hello]}" onto public java.lang.String com.itcast.HelloApplication.hello()
2018-05-19 15:58:21.574  INFO 12208 --- [           main] s.w.s.m.m.a.RequestMappingHandlerMapping : Mapped "{[/error]}" onto public org.springframework.http.ResponseEntity<java.util.Map<java.lang.String, java.lang.Object>> org.springframework.boot.autoconfigure.web.servlet.error.BasicErrorController.error(javax.servlet.http.HttpServletRequest)
2018-05-19 15:58:21.576  INFO 12208 --- [           main] s.w.s.m.m.a.RequestMappingHandlerMapping : Mapped "{[/error],produces=[text/html]}" onto public org.springframework.web.servlet.ModelAndView org.springframework.boot.autoconfigure.web.servlet.error.BasicErrorController.errorHtml(javax.servlet.http.HttpServletRequest,javax.servlet.http.HttpServletResponse)
2018-05-19 15:58:21.637  INFO 12208 --- [           main] o.s.w.s.handler.SimpleUrlHandlerMapping  : Mapped URL path [/webjars/**] onto handler of type [class org.springframework.web.servlet.resource.ResourceHttpRequestHandler]
2018-05-19 15:58:21.637  INFO 12208 --- [           main] o.s.w.s.handler.SimpleUrlHandlerMapping  : Mapped URL path [/**] onto handler of type [class org.springframework.web.servlet.resource.ResourceHttpRequestHandler]
2018-05-19 15:58:22.069  INFO 12208 --- [           main] o.s.j.e.a.AnnotationMBeanExporter        : Registering beans for JMX exposure on startup
2018-05-19 15:58:22.310  INFO 12208 --- [           main] o.s.b.w.embedded.tomcat.TomcatWebServer  : Tomcat started on port(s): 8080 (http) with context path ''
2018-05-19 15:58:22.334  INFO 12208 --- [           main] com.itcast.HelloApplication              : Started HelloApplication in 14.969 seconds (JVM running for 18.124)
在Spring Boot项目中,启动的方式有两种,一种是直接run Java Application另外一种是通过Spring Boot的Maven插件运行。
第一种:run as Java Application
第二种:

这个是插件启动
4 springboot的核心
4.1 springboot 入口类和@springbootApplication
Spring Boot的项目一般都会有*Application的入口类,入口类中会有main方法,这是一个标准的Java应用程序的入口方法。
@SpringBootApplication注解是Spring Boot的核心注解,它其实是一个组合注解:
 * Copyright 2012-2017 the original author or authors.

package org.springframework.boot.autoconfigure;

import java.lang.annotation.Documented;
import java.lang.annotation.ElementType;
import java.lang.annotation.Inherited;
import java.lang.annotation.Retention;
import java.lang.annotation.RetentionPolicy;
import java.lang.annotation.Target;

import org.springframework.boot.SpringBootConfiguration;
import org.springframework.boot.context.TypeExcludeFilter;
import org.springframework.context.annotation.Bean;
import org.springframework.context.annotation.ComponentScan;
import org.springframework.context.annotation.ComponentScan.Filter;
import org.springframework.context.annotation.Configuration;
import org.springframework.context.annotation.FilterType;
import org.springframework.core.annotation.AliasFor;

/**
 * Indicates a {@link Configuration configuration} class that declares one or more
 * {@link Bean @Bean} methods and also triggers {@link EnableAutoConfiguration
 * auto-configuration} and {@link ComponentScan component scanning}. This is a convenience
 * annotation that is equivalent to declaring {@code @Configuration},
 * {@code @EnableAutoConfiguration} and {@code @ComponentScan}.
 *
 * @author Phillip Webb
 * @author Stephane Nicoll
 * @since 1.2.0
 */
@Target(ElementType.TYPE)
@Retention(RetentionPolicy.RUNTIME)
@Documented
@Inherited
@SpringBootConfiguration
@EnableAutoConfiguration
@ComponentScan(excludeFilters = {
		@Filter(type = FilterType.CUSTOM, classes = TypeExcludeFilter.class),
		@Filter(type = FilterType.CUSTOM, classes = AutoConfigurationExcludeFilter.class) })
public @interface SpringBootApplication {

	/**
	 * Exclude specific auto-configuration classes such that they will never be applied.
	 * @return the classes to exclude
	 */
	@AliasFor(annotation = EnableAutoConfiguration.class)
	Class<?>[] exclude() default {};

	/**
	 * Exclude specific auto-configuration class names such that they will never be
	 * applied.
	 * @return the class names to exclude
	 * @since 1.3.0
	 */
	@AliasFor(annotation = EnableAutoConfiguration.class)
	String[] excludeName() default {};

	/**
	 * Base packages to scan for annotated components. Use {@link #scanBasePackageClasses}
	 * for a type-safe alternative to String-based package names.
	 * @return base packages to scan
	 * @since 1.3.0
	 */
	@AliasFor(annotation = ComponentScan.class, attribute = "basePackages")
	String[] scanBasePackages() default {};

	/**
	 * Type-safe alternative to {@link #scanBasePackages} for specifying the packages to
	 * scan for annotated components. The package of each class specified will be scanned.
	 * <p>
	 * Consider creating a special no-op marker class or interface in each package that
	 * serves no purpose other than being referenced by this attribute.
	 * @return base packages to scan
	 * @since 1.3.0
	 */
	@AliasFor(annotation = ComponentScan.class, attribute = "basePackageClasses")
	Class<?>[] scanBasePackageClasses() default {};

}
a. @SpringBootConfiguration:这是Spring Boot项目的配置注解,这也是一个组合注解
在Spring Boot项目中推荐使用@ SpringBootConfiguration替代@Configuration
b. @EnableAutoConfiguration:启用自动配置,该注解会使SpringBoot根据项目中依赖的jar包自动配置项目的配置项:
如:我们添加了spring-boot-starter-web的依赖,项目中也就会引入SpringMVC的依赖,Spring Boot就会自动配置tomcat和SpringMVCC. @ComponentScan:默认扫描@SpringBootApplication所在类的同级目录以及它的子目录。
4.2 关闭自动配置
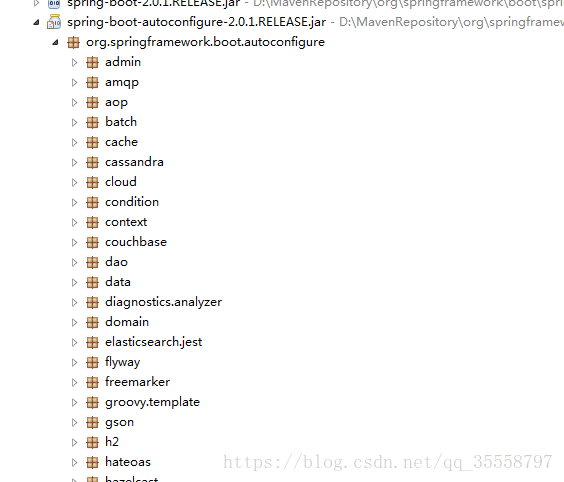
通过上述,我们得知,Spring Boot会根据项目中的jar包依赖,自动做出配置,Spring Boot支持的自动配置如下(非常多):
如果我们不需要Spring Boot自动配置,想关闭某一项的自动配置,该如何设置呢?
比如:我们不想自动配置solr,想手动配置。
@SpringBootApplication(exclude={SolrAutoConfiguration.class})
package com.itcast;

import org.springframework.boot.SpringApplication;
import org.springframework.boot.autoconfigure.SpringBootApplication;
import org.springframework.boot.autoconfigure.solr.SolrAutoConfiguration;
import org.springframework.context.annotation.Configuration;
import org.springframework.stereotype.Controller;
import org.springframework.web.bind.annotation.RequestMapping;
import org.springframework.web.bind.annotation.ResponseBody;

@Controller
@SpringBootApplication(exclude={SolrAutoConfiguration.class})
@Configuration
public class HelloApplication {

	@RequestMapping("/hello")
	@ResponseBody
	public String hello(){
		return "hello springBoot!";
	}
	public static void main(String[] args) {
		SpringApplication.run(HelloApplication.class, args);

	}

}
4.3自定义Banner
启动Spring Boot项目后会看到这样的图案:

这个图片其实是可以自定义的
b)拷贝生成的字符到一个文本文件中,并且将该文件命名为banner.txt
c)将banner.txt拷贝到项目的resources目录中
如果不想看到这个banner,也可以关闭
package com.itcast;

import org.springframework.boot.Banner;
import org.springframework.boot.SpringApplication;
import org.springframework.boot.autoconfigure.SpringBootApplication;
import org.springframework.boot.autoconfigure.solr.SolrAutoConfiguration;
import org.springframework.context.annotation.Configuration;
import org.springframework.stereotype.Controller;
import org.springframework.web.bind.annotation.RequestMapping;
import org.springframework.web.bind.annotation.ResponseBody;

@Controller
@SpringBootApplication(exclude={SolrAutoConfiguration.class})
@Configuration
public class HelloApplication {

	@RequestMapping("/hello")
	@ResponseBody
	public String hello(){
		return "hello springBoot!";
	}
	public static void main(String[] args) {
		SpringApplication app=new SpringApplication(HelloApplication.class);

		app.setBannerMode(Banner.Mode.OFF);
		app.run(args);

	}

}
4.4 全局配置文件
Spring Boot项目使用一个全局的配置文件application.properties或者是application.yml,在resources目录下或者类路径下的/config下,一般我们放到resources下。
注意:在相同目录下,application.properties的配置级别高于application.yml。即当同时存在是application.yml是个摆设
a)修改tomcat的端口
application.properties文件中
server.port=8081 server:
port: 8088运行结果:
2018-05-19 17:12:30.533 INFO 11936 --- [ main] o.s.b.w.embedded.tomcat.TomcatWebServer : Tomcat started on port(s): 8081 (http) with context path ''application.properties文件中
server.port=8081
server.servlet-path=*.htmlapplication.yml文件中
server:
  port: 8088
servlet-path: /*.jspapplication.properties文件中
logging.level.org.springframework=DEBUG日志级别从低到高分为TRACE < DEBUG < INFO < WARN < ERROR < FATAL,如果设置为WARN,则低于WARN的信息都不会输出。
Spring Boot中默认配置ERROR、WARN和INFO级别的日志输出到控制台。


 880
880


 被折叠的 条评论
为什么被折叠?
被折叠的 条评论
为什么被折叠?
 到【灌水乐园】发言


